
Okhttp学习笔记
一:设置篇
1:RealCall
client.newCall(request).enqueue(object: Callback{
newCall会构建一个RealCall对象。
class RealCall(
  val client: OkHttpClient,

  val originalRequest: Request,
  val forWebSocket: Boolean
)
- client,配置中心,设置一切
- originalRequest,原始请求,后面会升级,用来配置一个请求
- 默认为false,设置为true就可以让服务端往客户端推送数据,在实时交易网站比如股票用得多。
2:OkhttpClient
client配置一切
OkhttpClient使用创建者模式可以配置很多请求的方式、参数之类的。

2.1: eventListener
给http请求的各个行为加上监听器

val client = OkHttpClient.Builder().eventListener(object: EventListener() {
            override fun callStart(call: Call) {
                log("call start")
            }

            override fun callEnd(call: Call) {
                log("call end")
            }

            override fun connectStart(
                call: Call,
                inetSocketAddress: InetSocketAddress,
                proxy: Proxy
            ) {
                log("connectStart")
            }
        }).build()
二:请求前和后的大框架
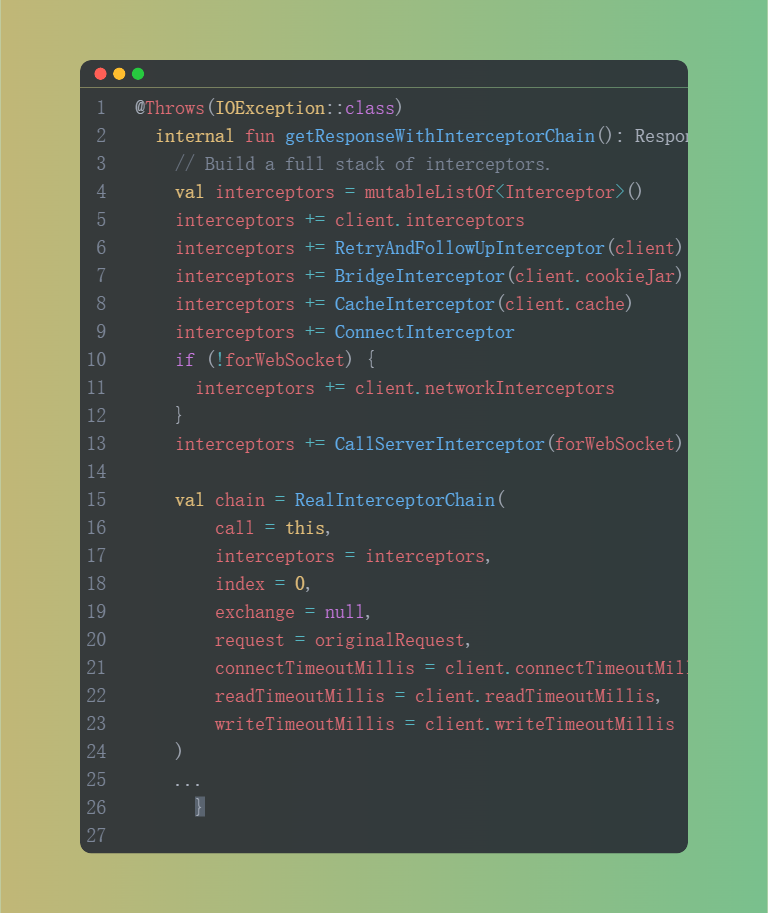
OkHttpClient.newCall.enqueue 含 dispatcher(线程调度) 含 enqueue  含  readyAsyncCalls.add(AsyncCall)
                                                               含  查找请求同一个主机的其他请求的请求数值来共享
                                                               含  promoteAndExecute    含  判断是否超过最大请求数maxRequests(可通过Dispatcher来配置)
                                                                                        含  判断是否超过请求主机的数量maxRequestPerhotst
                                                                                        含  callsPerHost++
                                                                                        含  加入可执行队列  和  正在执行队列
                                                                                        含  把可执行队列里的东西取出来执行 (asyncCall.executeOn) 含 executorService.execute(this)(开启异步执行之旅!!,执行asynvCall的run方法)  含   getResponseWithInterceptorChain()后, 取得response进行callback调用
请求前和请求后的流程都在这。重点是那个getResponseWithInterceptorChain进去之后就是重点的请求过程了!!
三:源码篇
1:connectionPool的多路复用
https://sufushi.github.io/2018/01/26/OkHttp%E6%A1%86%E6%9E%B6%E6%BA%90%E7%A0%81%E8%A7%A3%E6%9E%90%EF%BC%88%E4%BA%94%EF%BC%89/
2:dns把域名转为ip地址
private class DnsSystem : Dns {
      override fun lookup(hostname: String): List<InetAddress> {
        try {
          return InetAddress.getAllByName(hostname).toList()  通过域名返回一个ip地址的列表
        } catch (e: NullPointerException) {
          throw UnknownHostException("Broken system behaviour for dns lookup of $hostname").apply {
            initCause(e)
          }
        }
      }
    }
3:Interceptor的拦截框架

一开始,由最原始的Chain调用index为0的Interceptor的intercept(构建index为1的Chain并传入Interceptor的intercept参数),在interceptor完成前置任务之后调用Chain的proceed。开始循环。
4:RetryAndFollowUpInterceptor
- retry 错误重试
- follow up 重定向
不断地尝试网络请求,直到成功,有错误会进入报错逻辑。
while(true) {
call.enterNetworkInterceptorExchange//进行连接前的准备工作
try {
          response = realChain.proceed(request)
          newExchangeFinder = true
        } catch (e: RouteException) {
          // The attempt to connect via a route failed. The request will not have been sent.
          if (!recover(e.lastConnectException, call, request, requestSendStarted = false)) {//尝试进行修复
            throw e.firstConnectException.withSuppressed(recoveredFailures)
          } else {
            recoveredFailures += e.firstConnectException
          }
          newExchangeFinder = false
          continue
        } catch (e: IOException) {
          // An attempt to communicate with a server failed. The request may have been sent.
          if (!recover(e, call, request, requestSendStarted = e !is ConnectionShutdownException)) {
            throw e.withSuppressed(recoveredFailures)
          } else {
            recoveredFailures += e
          }
          newExchangeFinder = false
          continue
        }

}
val followUp = followUpRequest(response, exchange)//判断是否需要重定向,如果需要重定向,followUp不为null

  if (followUp == null) {
    if (exchange != null && exchange.isDuplex) {
      call.timeoutEarlyExit()
    }
    closeActiveExchange = false
    return response
  }

  val followUpBody = followUp.body
  if (followUpBody != null && followUpBody.isOneShot()) {
    closeActiveExchange = false
    return response
  }

  response.body?.closeQuietly()

  if (++followUpCount > MAX_FOLLOW_UPS) {
    throw ProtocolException("Too many follow-up requests: $followUpCount")
  }

  request = followUp  //进入while的下一轮,followup被用作下一个request
  priorResponse = response
}
}
//这一段的逻辑就是,如果出错或者重定向,就进入下一轮循环,否则直接返回response结束。
5:BridgeInterceptor
override fun intercept(chain: Interceptor.Chain): Response {


     if (body != null) {
      val contentType = body.contentType()
      if (contentType != null) {
        requestBuilder.header("Content-Type", contentType.toString())
      }

      val contentLength = body.contentLength()
      if (contentLength != -1L) {
        requestBuilder.header("Content-Length", contentLength.toString())//内容的长度帮我们算好
        requestBuilder.removeHeader("Transfer-Encoding")
      } else {
        requestBuilder.header("Transfer-Encoding", "chunked")//不定长长度
        requestBuilder.removeHeader("Content-Length")
      }
    }

    if (userRequest.header("Host") == null) {
      requestBuilder.header("Host", userRequest.url.toHostHeader())//添加host
    }

    if (userRequest.header("Connection") == null) {
      requestBuilder.header("Connection", "Keep-Alive")
    }

    // If we add an "Accept-Encoding: gzip" header field we're responsible for also decompressing
    // the transfer stream.
    var transparentGzip = false
    if (userRequest.header("Accept-Encoding") == null && userRequest.header("Range") == null) {
      transparentGzip = true
      requestBuilder.header("Accept-Encoding", "gzip")
    }

    val cookies = cookieJar.loadForRequest(userRequest.url)
    if (cookies.isNotEmpty()) {
      requestBuilder.header("Cookie", cookieHeader(cookies))
    }

    if (userRequest.header("User-Agent") == null) {
      requestBuilder.header("User-Agent", userAgent)
    }

    val networkResponse = chain.proceed(requestBuilder.build())
if (transparentGzip &&
        "gzip".equals(networkResponse.header("Content-Encoding"), ignoreCase = true) &&//自动帮我解压
        networkResponse.promisesBody()) {
      val responseBody = networkResponse.body
      if (responseBody != null) {
        val gzipSource = GzipSource(responseBody.source())
        val strippedHeaders = networkResponse.headers.newBuilder()
            .removeAll("Content-Encoding")
            .removeAll("Content-Length")
            .build()
        responseBuilder.headers(strippedHeaders)
        val contentType = networkResponse.header("Content-Type")
        responseBuilder.body(RealResponseBody(contentType, -1L, gzipSource.buffer()))
      }
    }

    return responseBuilder.build()
  }

//这一段的逻辑就是:1)帮程序员 计算和添加 请求头的参数 2)如果需要就解压response
6:ConnectInterceptor
它的Intercept方法只有很短
val realChain = chain as RealInterceptorChain
    val exchange = realChain.call.initExchange(chain)
    val connectedChain = realChain.copy(exchange = exchange)
    return connectedChain.proceed(realChain.request)
没有后置工作,创建好连接,就把任务交给下一个拦截器。重点是initExchange创建连接的代码。
直接放一个所有Interceptor的流程图,横向表示函数调用,纵向对齐的表示同一个函数里的步骤。
RetryAndFollowUpInterceptor 含 请求前的准备 含 createAddress(hostName and port)
含 给下一个interceptor执行
含 拿到response,判断是否重试和重定向
----------
BridgeInterceptor 含 添加一些header
含 给下一个interceptor执行
含 拿到response,是否解压
---------
CacheInterceptor 含 看看缓存中有没有
含 给下一个interceptor执行
含 拿到response,是否更新缓存或储存进缓存
---------
connectInterceptor 含 initExchange,初始化连接exchange 含 找到codec(编码解码方式Encodes HTTP requests and decodes HTTP responses)
含 往codex里写东西
找到codec(编码解码方式Encodes HTTP requests and decodes HTTP responses) 含 !!findHealthyConnection 含 findConnection
含 是http1还是2的codex
findConnection 1:含 call的connection还未释放,直接拿来用
2:含 尝试从连接池中拿一个可用连接 含 connection.isEligible(判断这个连接是否满足条件,端口号,代理,协议,域名等等是否都一样)
(不完全匹配,也可以查看是否满足合并条件:http2,ip相等,证书符合)
(这次没有route,拿不到可以合并的连接)
3:含 再次尝试从连接池中拿一个可用连接 含 connection.isEligible(判断这个连接是否满足条件,端口号,代理,协议,域名等等是否都一样)
(不完全匹配,也可以查看是否满足合并条件:http2,ip相等,证书符合)
(这次有route)
4:含 创建一个新的连接,放进池子里(创建是同步的) 含 判断是否需要tunnel隧道(自己是http,目标是https),或建立普通的socket。这一步建立TCP连接
含 建立协议:http2还是http1,是否加密连接、握手。验证证书
5:含 再、再次尝试从连接池中拿一个可用连接,和上面的函数都是一样的,只不过参数不同。
第一次不允许拿多路复用的,参数不给route,只允许完美匹配。
第二次给出route,但不给出requireMultiplexed,既可以复用,也可以不复用
第三次给出route和requireMultiplexed,只允许使用http2复用的连接(因为第四步又放连接进去了,再检查一下)
---------
CallServerInterceptor        含   操作exchange来向服务器发请求和返回response
20220312更新:
可以看到,我们的interceptor会在最前面和最后面执行。我们自定义的interceptor放在列表的最前面,可以有多个。
本文作者:ou尼酱~~~
本文链接:https://www.cnblogs.com/--here--gold--you--want/p/15750782.html
版权声明:本作品采用知识共享署名-非商业性使用-禁止演绎 2.5 中国大陆许可协议进行许可。


【推荐】国内首个AI IDE,深度理解中文开发场景,立即下载体验Trae
【推荐】编程新体验,更懂你的AI,立即体验豆包MarsCode编程助手
【推荐】抖音旗下AI助手豆包,你的智能百科全书,全免费不限次数
【推荐】轻量又高性能的 SSH 工具 IShell:AI 加持,快人一步