Struts2.zzh
Struts2是什么?
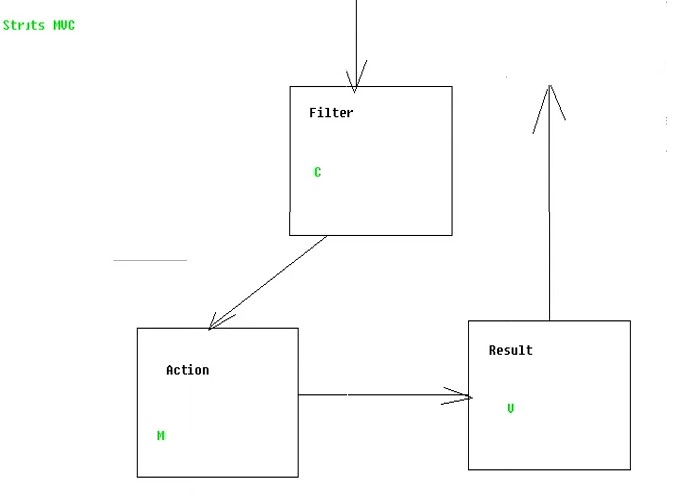
Struts2是一个基于MVC设计模式的Web应用框架,它本质上相当于一个servlet,在MVC设计模式中,Struts2作为控制器(Controller)来建立模型与视图的数据交互
Struts2的使用优势(表面):
1.自动封装参数
2.参数校验
3.结果的处理(转发|重定向)
4.国际化
5.显示等待页面
6.表单防止重复提交
struts2具有更加先进的架构以及思想
struts2的历史:
1.struts2与struts1区别就是技术上没有什么关系,Struts 2的体系结构与Struts 1的体系结构差别巨大
2.struts2的前身是webwork框架

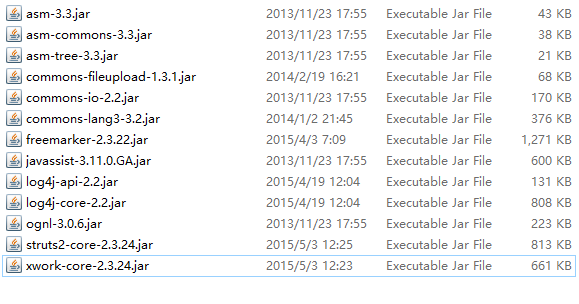
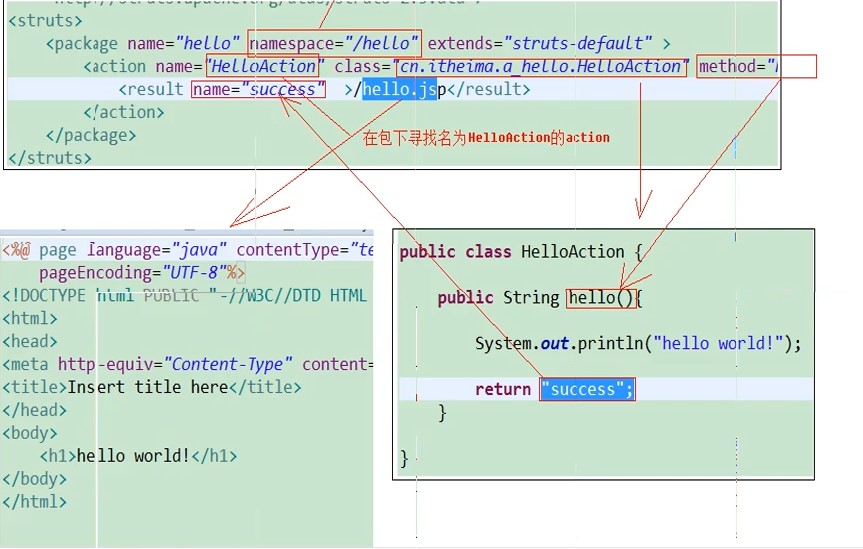
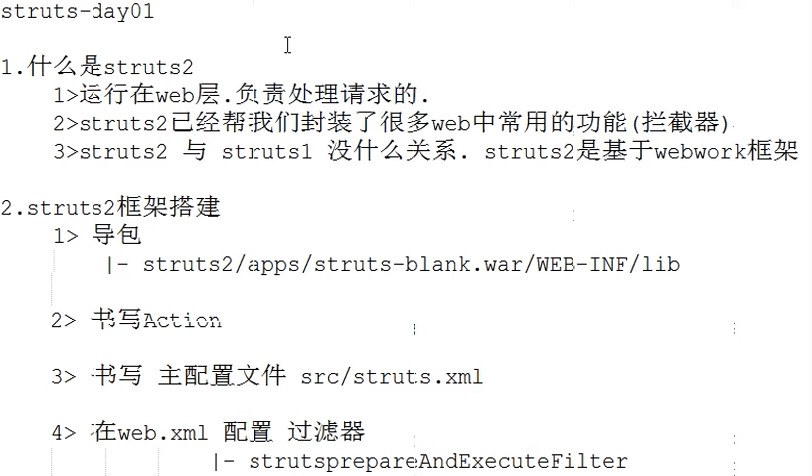
搭建struts2框架的步骤
1.导包
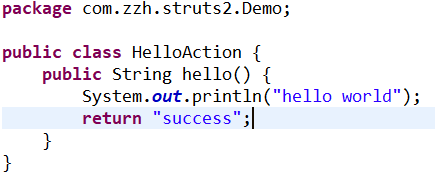
2.书写Action类
3.书写src/struts.xml
4.将struts2核心过滤器配置到web.xml
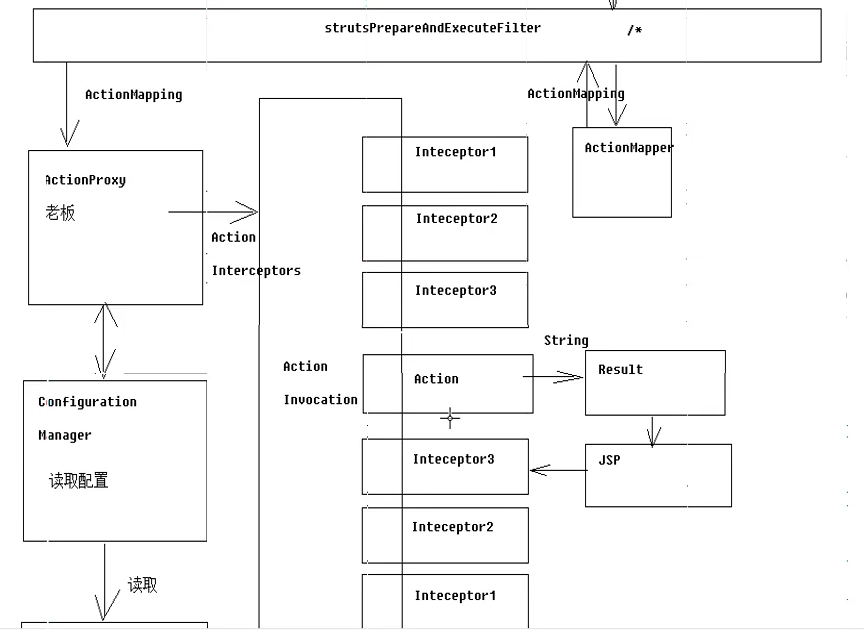
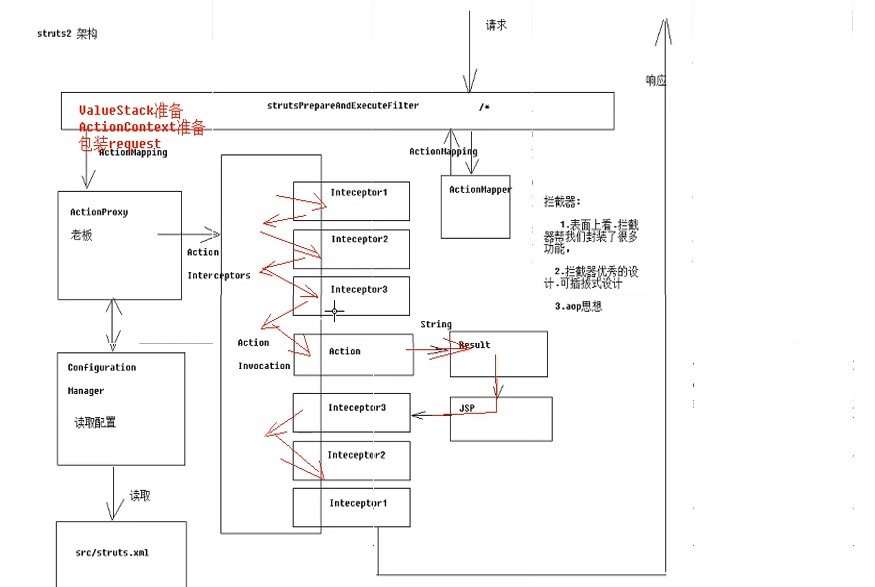
框架展示
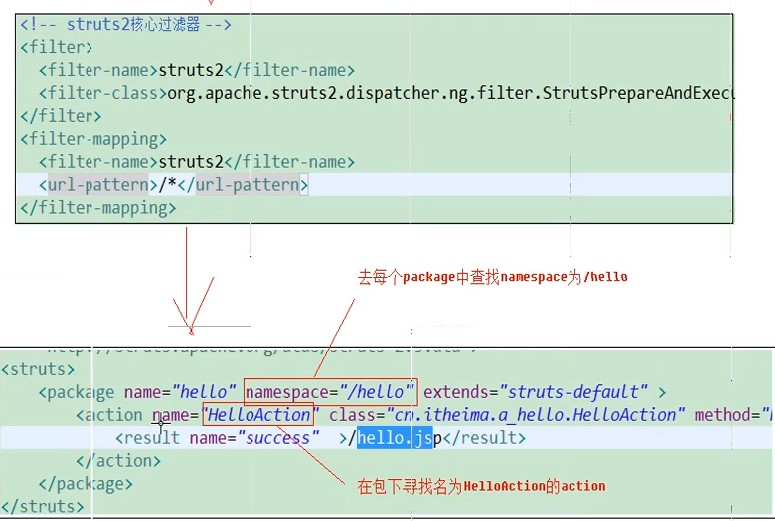
请求到使用struts2框架的流程
拦截器:
1.表面上看,拦截器帮我们封装了很多功能
2.拦截器优秀的设计,可拔插式设计
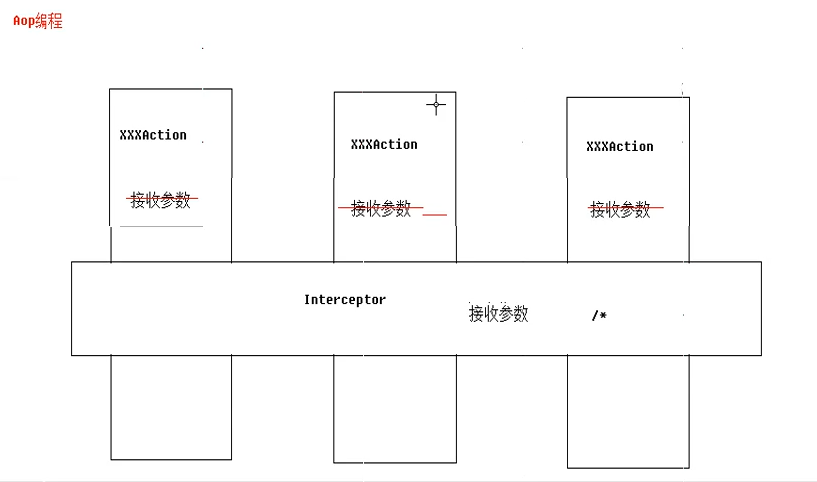
3.aop思想,面向切面编程,概念如下图所示,filter就是这样一种编程思想
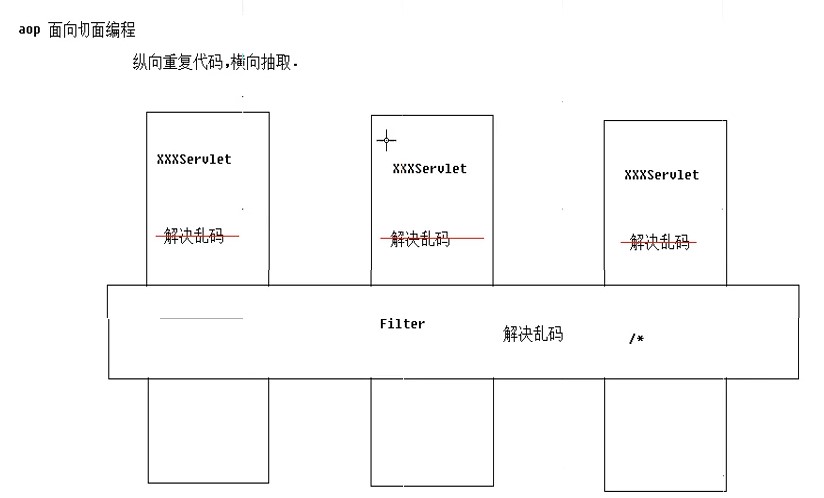
拦截器可以实现与filter类似的功能,配置了action后不需每个servlet都书写配置参数的语句
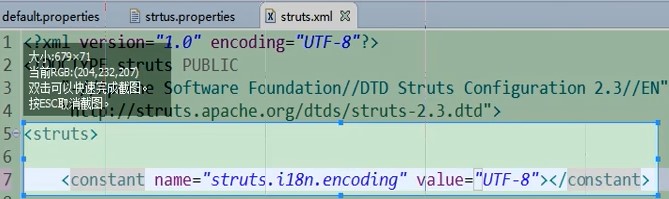
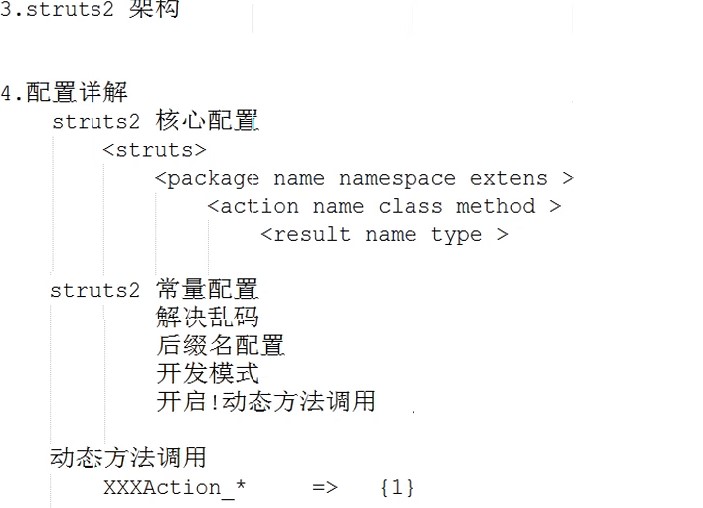
struts.xml配置详解
<?xml version="1.0" encoding="UTF-8"?>
<!DOCTYPE struts PUBLIC
	"-//Apache Software Foundation//DTD Struts Configuration 2.3//EN"
	"http://struts.apache.org/dtds/struts-2.3.dtd">
<struts>
	<!-- package:将Action配置封装,就是可以在package中配置很多action
			name属性:包的名字,起标识作用,不能与其他包名重复
			namespace属性:给action的访问路径定义一个命名空间
			extends属性:继承一个指定包
			abstract属性:包是否为抽象;标识性属性,标识该包不能独立运行,专门被继承
	 -->
	<package name="hello" namespace="/hello" extends="struts-default">
		<!-- action元素:配置action类
				name属性:决定了Action访问资源名
				method属性:指定调用Action中的哪个方法来处理请求
		 -->
		<action name="HelloAction" class="com.zzh.struts2.Demo.HelloAction" method="hello">
			<!-- result元素:结果配置
					name属性:标识结果处理的名称,与action方法的返回值对应
					type属性:指定调用哪一个result类来处理结果,默认使用转发
					标签体:填写页面的相对路径
			 -->
			<result name="success" type="dispatcher">/hello.jsp</result>
		</action>

	</package>
</struts>
27
1
2
3
4
5
<struts>6
<!-- package:将Action配置封装,就是可以在package中配置很多action7
name属性:包的名字,起标识作用,不能与其他包名重复8
namespace属性:给action的访问路径定义一个命名空间9
extends属性:继承一个指定包10
abstract属性:包是否为抽象;标识性属性,标识该包不能独立运行,专门被继承11
-->12
<package name="hello" namespace="/hello" extends="struts-default">13
<!-- action元素:配置action类14
name属性:决定了Action访问资源名15
method属性:指定调用Action中的哪个方法来处理请求 16
-->17
<action name="HelloAction" class="com.zzh.struts2.Demo.HelloAction" method="hello">18
<!-- result元素:结果配置19
name属性:标识结果处理的名称,与action方法的返回值对应20
type属性:指定调用哪一个result类来处理结果,默认使用转发21
标签体:填写页面的相对路径22
-->23
<result name="success" type="dispatcher">/hello.jsp</result>24
</action>25
26
</package>27
</struts>struts2常量配置
1.默认常量配置位置
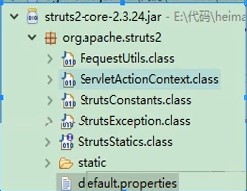
2.修改struts2常量配置(方式顺序就是加载顺序)
(1)方式一:在src/struts.xml下修改(在实际开发中比较常用)
(2)方式二:在src下创建struts.properties


(3)方式三:在项目的web.xml中
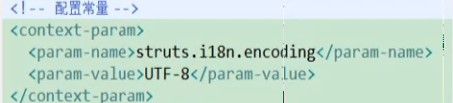
常见常量配置
	<!-- i18n:国际化,解决post提交乱码 -->
	<constant name="struts.i18n.encoding" value="UTF-8"></constant>
	<!-- 指访问action时的后缀名 -->
	<constant name="struts.action.extension" value="action,,"></constant>
	<!-- 指定struts2是否以开发模式运行
		1.热加载主配置(不需要重启即可生效)
		2.提供更多错误信息输出,方便开发时的调试
	 -->
	<constant name="struts.devMode" value="true"></constant>
9
1
<!-- i18n:国际化,解决post提交乱码 -->2
<constant name="struts.i18n.encoding" value="UTF-8"></constant>3
<!-- 指访问action时的后缀名 -->4
<constant name="struts.action.extension" value="action,,"></constant>5
<!-- 指定struts2是否以开发模式运行6
1.热加载主配置(不需要重启即可生效)7
2.提供更多错误信息输出,方便开发时的调试8
-->9
<constant name="struts.devMode" value="true"></constant>struts2配置的进阶
1.动态方法调用(重点)
(1)了解即可,这种方法在搜索引擎中由于地址过于复杂会被搜索引擎不理解


(2)星号通配符
<?xml version="1.0" encoding="UTF-8"?>
<!DOCTYPE struts PUBLIC
	"-//Apache Software Foundation//DTD Struts Configuration 2.3//EN"
	"http://struts.apache.org/dtds/struts-2.3.dtd">
<struts>
	<package name="dynamic" namespace="/dynamic" extends="struts-default">
		<!-- 动态方法调用方式2:通配符方式
			使用{1}取出第一个星号通配的内容
		 -->
		<action name="Demo1Action_*" class="com.zzh.struts2.dynamic.Demo1Action" method="{1}">
			<result name="success">/hello.jsp</result>
		</action>
	</package>
	<include file="com/zzh/struts2/Demo/struts.xml"></include>
</struts>
15
1
2
3
4
5
<struts>6
<package name="dynamic" namespace="/dynamic" extends="struts-default">7
<!-- 动态方法调用方式2:通配符方式8
使用{1}取出第一个星号通配的内容9
-->10
<action name="Demo1Action_*" class="com.zzh.struts2.dynamic.Demo1Action" method="{1}">11
<result name="success">/hello.jsp</result>12
</action>13
</package>14
<include file="com/zzh/struts2/Demo/struts.xml"></include>15
</struts>2.struts2中的默认配置(了解)
method属性:execute
result的name属性:success
result的type属性:dispatcher
result的class属性:com.opensymphony.xwork2.ActionSupport

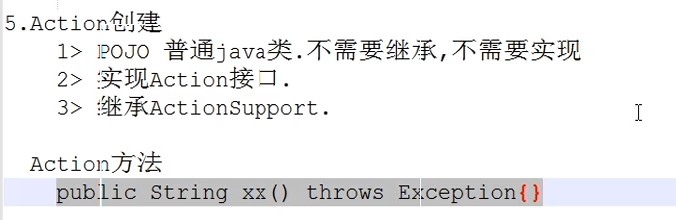
action类详解
方式一:
package com.zzh.struts2.api;

//方式1:创建一个普通类POJO
//POJO:不用继承任何父类,也不需要实现任何接口
//使struts2框架的代码侵入性更低
public class Demo1Action {

}
9
1
package com.zzh.struts2.api;2
3
//方式1:创建一个普通类POJO4
//POJO:不用继承任何父类,也不需要实现任何接口5
//使struts2框架的代码侵入性更低6
public class Demo1Action {7
8
}9
方式二:
package com.zzh.struts2.api;

import com.opensymphony.xwork2.Action;

//方式2:实现一个接口Action
//里面有execute方法,提供action方法的规范
//Action接口预置了一些字符串,可以在返回结果时使用,为了方便
public class Demo2Action implements Action{

	@Override
	public String execute() throws Exception {

		return null;
	}
}
16
1
package com.zzh.struts2.api;2
3
import com.opensymphony.xwork2.Action;4
5
//方式2:实现一个接口Action6
//里面有execute方法,提供action方法的规范7
//Action接口预置了一些字符串,可以在返回结果时使用,为了方便8
public class Demo2Action implements Action{9
10
11
public String execute() throws Exception {12
13
return null;14
}15
}16
方式三:
package com.zzh.struts2.api;

import com.opensymphony.xwork2.ActionSupport;

//方式3:继承ActionSupport类
//帮我们实现了Validateable ValidationAware TextProvider LocaleProvider
//如果需要用到这些接口的实现时,不需要自己来实现
public class Demo3Action extends ActionSupport{


}
12
1
package com.zzh.struts2.api;2
3
import com.opensymphony.xwork2.ActionSupport;4
5
//方式3:继承ActionSupport类6
//帮我们实现了Validateable ValidationAware TextProvider LocaleProvider7
//如果需要用到这些接口的实现时,不需要自己来实现8
public class Demo3Action extends ActionSupport{9
10
11
}12
day01复习总结:
结果跳转方式
1.转发
		<!-- 转发 -->
		<action name="Demo1Action" class="com.zzh.struts.result.Demo1Action" method="execute">
			<result name="success">/hello.jsp</result>
		</action>
4
1
<!-- 转发 -->2
<action name="Demo1Action" class="com.zzh.struts.result.Demo1Action" method="execute">3
<result name="success">/hello.jsp</result>4
</action>2.重定向
		<!-- 重定向 -->
		<action name="Demo2Action" class="com.zzh.struts.result.Demo2Action" method="execute">
			<result name="success" type="redirect">/hello.jsp</result>
		</action>
4
1
<!-- 重定向 -->2
<action name="Demo2Action" class="com.zzh.struts.result.Demo2Action" method="execute">3
<result name="success" type="redirect">/hello.jsp</result>4
</action>3.转发到Action
		<!-- 转发到Action -->
		<action name="Demo3Action" class="com.zzh.struts.result.Demo3Action" method="execute">
			<result name="success" type="chain">
				<!-- 转发到的action名 -->
				<param name="actionName">Demo1Action</param>
				<!-- action所在的命名空间 -->
             	<param name="namespace">/</param>
			</result>
		</action>
9
1
<!-- 转发到Action -->2
<action name="Demo3Action" class="com.zzh.struts.result.Demo3Action" method="execute">3
<result name="success" type="chain">4
<!-- 转发到的action名 -->5
<param name="actionName">Demo1Action</param>6
<!-- action所在的命名空间 -->7
<param name="namespace">/</param>8
</result>9
</action>4.重定向到Action
		<!-- 重定向到Action -->
		<action name="Demo4Action" class="com.zzh.struts.result.Demo4Action" method="execute">
			<result name="success" type="redirectAction">
				<!-- 重定向到的action名 -->
             	<param name="actionName">Demo2Action</param>
             	<!-- action所在的命名空间 -->
             	<param name="namespace">/</param>
			</result>
		</action>
9
1
<!-- 重定向到Action -->2
<action name="Demo4Action" class="com.zzh.struts.result.Demo4Action" method="execute">3
<result name="success" type="redirectAction">4
<!-- 重定向到的action名 -->5
<param name="actionName">Demo2Action</param>6
<!-- action所在的命名空间 -->7
<param name="namespace">/</param> 8
</result>9
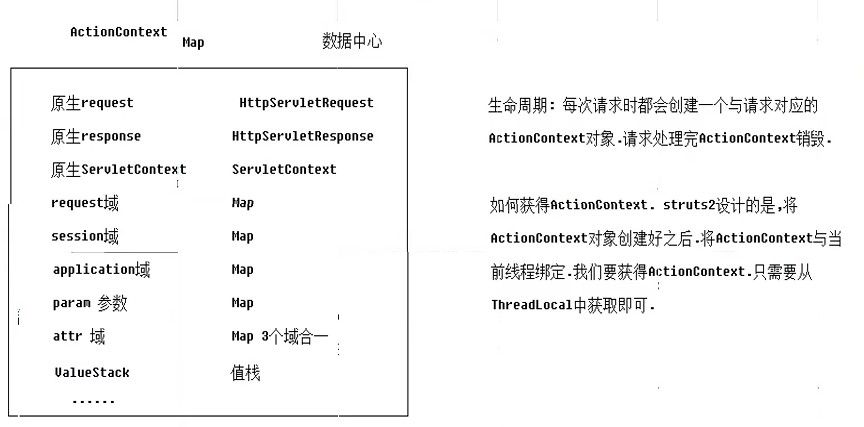
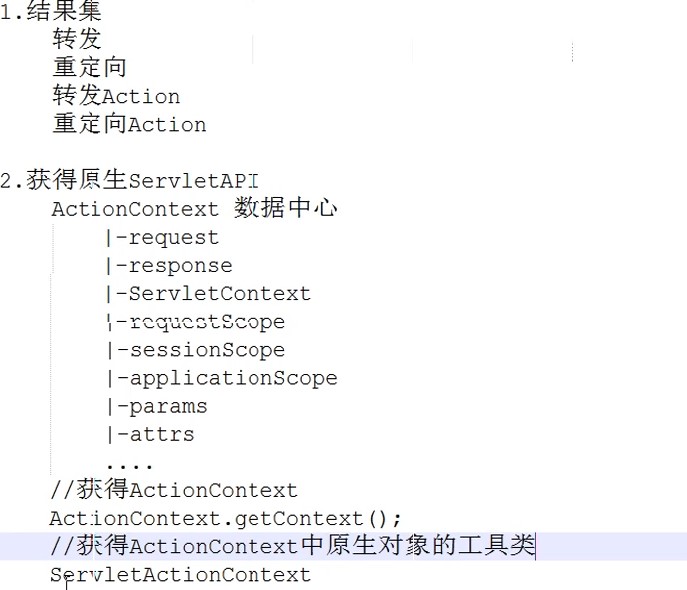
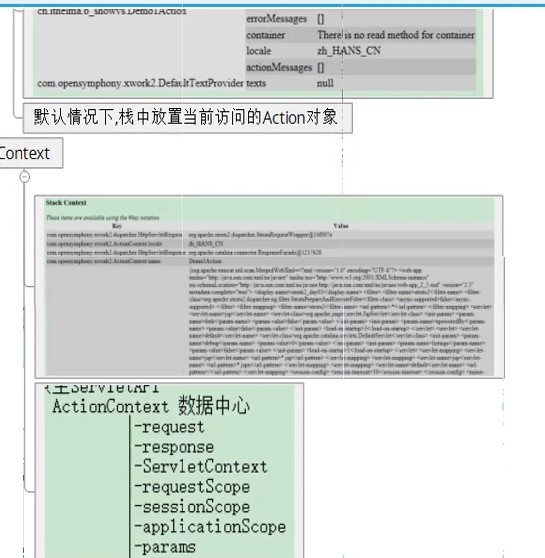
</action>struts2获得servletAPI
ActionContext:
ActionContext是Action的上下文,Struts2自动在其中保存了一些在Action执行过程中所需的对象,比如session, parameters, locale等。Struts2会根据每个执行HTTP请求的线程来创建对应的ActionContext,即一个线程有一个唯一的ActionContext。因此,使用者可以使用静态方法ActionContext.getContext()来获取当前线程ActionContext,也正是由于这个原因,使用者不用去操心让Action是线程安全的。
1.通过ActionContext
package com.zzh.struts.api;

import java.util.Map;

import com.opensymphony.xwork2.ActionContext;
import com.opensymphony.xwork2.ActionSupport;

public class Demo5Action extends ActionSupport{

	public String execute() throws Exception {
		//request域 =>Map (struts2并不推荐使用原声request域)
		//不推荐
		Map<String,Object> requestScope = (Map<String, Object>) ActionContext.getContext().get("request");
		//推荐
		ActionContext.getContext().put("name", "requestTom");
		//session域 =>Map
		Map<String, Object> sessionScope = ActionContext.getContext().getSession();
		sessionScope.put("name", "sessionTom");
		//application域 =>Map
		Map<String, Object> applicationScope = ActionContext.getContext().getApplication();
		applicationScope.put("name","applicationTom");
		return SUCCESS;
	}
}
24
1
package com.zzh.struts.api;2
3
import java.util.Map;4
5
import com.opensymphony.xwork2.ActionContext;6
import com.opensymphony.xwork2.ActionSupport;7
8
public class Demo5Action extends ActionSupport{9
10
public String execute() throws Exception {11
//request域 =>Map (struts2并不推荐使用原声request域)12
//不推荐13
Map<String,Object> requestScope = (Map<String, Object>) ActionContext.getContext().get("request");14
//推荐15
ActionContext.getContext().put("name", "requestTom");16
//session域 =>Map17
Map<String, Object> sessionScope = ActionContext.getContext().getSession();18
sessionScope.put("name", "sessionTom");19
//application域 =>Map20
Map<String, Object> applicationScope = ActionContext.getContext().getApplication();21
applicationScope.put("name","applicationTom");22
return SUCCESS;23
}24
}2.通过ServletActionContext
public class Demo6Action extends ActionSupport{
	//不推荐使用
	public String execute() throws Exception {
		//原生request
		HttpServletRequest request = ServletActionContext.getRequest();
		//原生session
		HttpSession session = request.getSession();
		//原生response
		HttpServletResponse response = ServletActionContext.getResponse();
		//原生servletContext
		ServletContext servletContext = ServletActionContext.getServletContext();
		return SUCCESS;
	}
}
14
1
public class Demo6Action extends ActionSupport{2
//不推荐使用3
public String execute() throws Exception {4
//原生request5
HttpServletRequest request = ServletActionContext.getRequest();6
//原生session7
HttpSession session = request.getSession();8
//原生response9
HttpServletResponse response = ServletActionContext.getResponse();10
//原生servletContext11
ServletContext servletContext = ServletActionContext.getServletContext();12
return SUCCESS;13
}14
}3.使用实现ServletXXXAware接口
public class Demo7Action extends ActionSupport implements ServletRequestAware{
	private HttpServletRequest request;

	public String execute() throws Exception {
		System.out.println("原生request");
		return SUCCESS;
	}

	public void setServletRequest(HttpServletRequest request) {
		this.request=request;
	}
}
12
1
public class Demo7Action extends ActionSupport implements ServletRequestAware{2
private HttpServletRequest request;3
4
public String execute() throws Exception {5
System.out.println("原生request");6
return SUCCESS;7
}8
9
public void setServletRequest(HttpServletRequest request) {10
this.request=request;11
}12
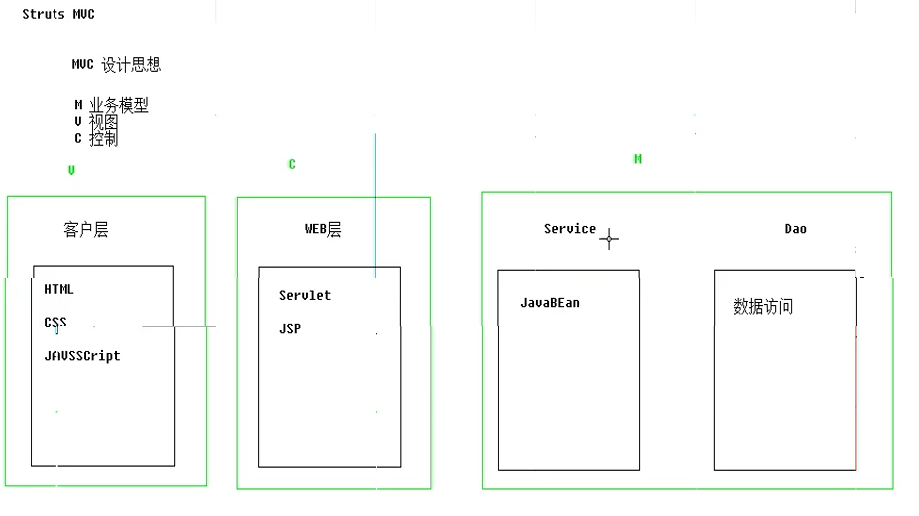
}MVC设计思想
如何获得参数
Action的生命周期:
1.每次请求到来时,都会创建一个新的Action实例
2.Action是线程安全的,可以使用成员变量接收
package com.zzh.struts.param;

import java.util.Date;
import java.util.Map;

import javax.servlet.ServletContext;
import javax.servlet.http.HttpServletRequest;
import javax.servlet.http.HttpServletResponse;
import javax.servlet.http.HttpSession;

import org.apache.struts2.ServletActionContext;
import org.apache.struts2.interceptor.ServletRequestAware;

import com.opensymphony.xwork2.ActionContext;
import com.opensymphony.xwork2.ActionSupport;

//如何获得参数
//每次请求Action时都会创建新的Action实例对象
public class Demo8Action extends ActionSupport{
	//准备与参数键名称相同的属性
	private String name;
	//自动类型转换,只能转换八大基本数据类型以及对应包装类
	private Integer age;
	//支持特定类型字符串转换为Date,例如yyyy-MM-dd
	private Date birthday;

	public String execute() throws Exception {
		System.out.println("name参数值"+name+",age参数值:"+age+",birthday参数值:"+birthday);
		return SUCCESS;
	}


	public Integer getAge() {
		return age;
	}


	public void setAge(Integer age) {
		this.age = age;
	}


	public Date getBirthday() {
		return birthday;
	}


	public void setBirthday(Date birthday) {
		this.birthday = birthday;
	}


	public String getName() {
		return name;
	}
	public void setName(String name) {
		this.name = name;
	}
}
61
1
package com.zzh.struts.param;2
3
import java.util.Date;4
import java.util.Map;5
6
import javax.servlet.ServletContext;7
import javax.servlet.http.HttpServletRequest;8
import javax.servlet.http.HttpServletResponse;9
import javax.servlet.http.HttpSession;10
11
import org.apache.struts2.ServletActionContext;12
import org.apache.struts2.interceptor.ServletRequestAware;13
14
import com.opensymphony.xwork2.ActionContext;15
import com.opensymphony.xwork2.ActionSupport;16
17
//如何获得参数18
//每次请求Action时都会创建新的Action实例对象19
public class Demo8Action extends ActionSupport{20
//准备与参数键名称相同的属性21
private String name;22
//自动类型转换,只能转换八大基本数据类型以及对应包装类23
private Integer age;24
//支持特定类型字符串转换为Date,例如yyyy-MM-dd25
private Date birthday;26
27
public String execute() throws Exception {28
System.out.println("name参数值"+name+",age参数值:"+age+",birthday参数值:"+birthday);29
return SUCCESS;30
}31
32
33
34
public Integer getAge() {35
return age;36
}37
38
39
public void setAge(Integer age) {40
this.age = age;41
}42
43
44
public Date getBirthday() {45
return birthday;46
}47
48
49
public void setBirthday(Date birthday) {50
this.birthday = birthday;51
}52
53
54
55
public String getName() {56
return name;57
}58
public void setName(String name) {59
this.name = name;60
}61
}对象驱动:
package com.zzh.struts.param;

import java.util.Date;
import java.util.Map;

import javax.servlet.ServletContext;
import javax.servlet.http.HttpServletRequest;
import javax.servlet.http.HttpServletResponse;
import javax.servlet.http.HttpSession;

import org.apache.struts2.ServletActionContext;
import org.apache.struts2.interceptor.ServletRequestAware;

import com.opensymphony.xwork2.ActionContext;
import com.opensymphony.xwork2.ActionSupport;
import com.zzh.struts.domain.User;

//如何获得参数
//每次请求Action时都会创建新的Action实例对象
public class Demo9Action extends ActionSupport{
	//准备USER对象
	private User user;

	public String execute() throws Exception {
		System.out.println(user);
		return SUCCESS;
	}

	public User getUser() {
		return user;
	}

	public void setUser(User user) {
		this.user = user;
	}

}
37
1
package com.zzh.struts.param;2
3
import java.util.Date;4
import java.util.Map;5
6
import javax.servlet.ServletContext;7
import javax.servlet.http.HttpServletRequest;8
import javax.servlet.http.HttpServletResponse;9
import javax.servlet.http.HttpSession;10
11
import org.apache.struts2.ServletActionContext;12
import org.apache.struts2.interceptor.ServletRequestAware;13
14
import com.opensymphony.xwork2.ActionContext;15
import com.opensymphony.xwork2.ActionSupport;16
import com.zzh.struts.domain.User;17
18
//如何获得参数19
//每次请求Action时都会创建新的Action实例对象20
public class Demo9Action extends ActionSupport{21
//准备USER对象22
private User user;23
24
public String execute() throws Exception {25
System.out.println(user);26
return SUCCESS;27
}28
29
public User getUser() {30
return user;31
}32
33
public void setUser(User user) {34
this.user = user;35
}36
37
} <form action="${pageContext.request.contextPath }/Demo9Action">
用户名:<input type="text" name="user.name"><br>
年龄:<input type="text" name="user.age"><br>
生日:<input type="text" name="user.birthday"><br>
<input type="submit" value="提交">
</form>6
1
<form action="${pageContext.request.contextPath }/Demo9Action">2
用户名:<input type="text" name="user.name"><br>3
年龄:<input type="text" name="user.age"><br>4
生日:<input type="text" name="user.birthday"><br>5
<input type="submit" value="提交">6
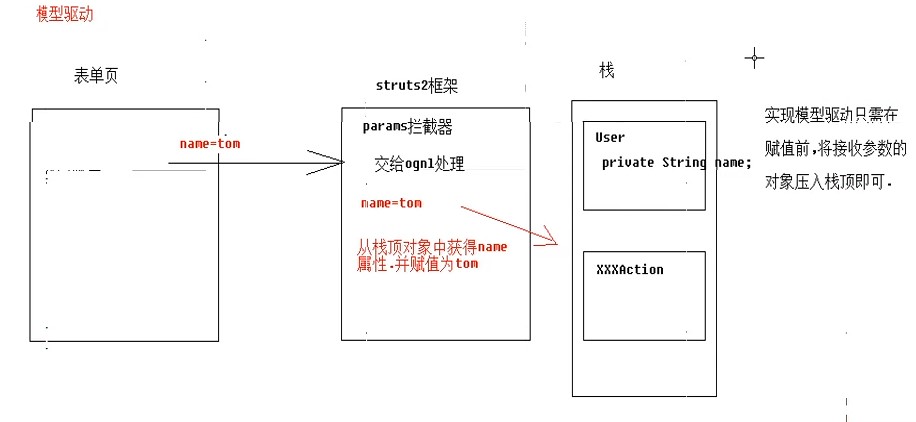
</form>模型驱动:
public class Demo10Action extends ActionSupport implements ModelDriven<User>{
	//准备USER 成员变量
	private User user = new User();

	public String execute() throws Exception {
		System.out.println(user);
		return SUCCESS;
	}

	@Override
	public User getModel() {

		return user;
	}

}
16
1
public class Demo10Action extends ActionSupport implements ModelDriven<User>{2
//准备USER 成员变量3
private User user = new User();4
5
public String execute() throws Exception {6
System.out.println(user);7
return SUCCESS;8
}9
10
11
public User getModel() {12
13
return user;14
}15
16
} <form action="${pageContext.request.contextPath }/Demo10Action">
用户名:<input type="text" name="name"><br>
年龄:<input type="text" name="age"><br>
生日:<input type="text" name="birthday"><br>
<input type="submit" value="提交">
</form>6
1
<form action="${pageContext.request.contextPath }/Demo10Action">2
用户名:<input type="text" name="name"><br>3
年龄:<input type="text" name="age"><br>4
生日:<input type="text" name="birthday"><br>5
<input type="submit" value="提交">6
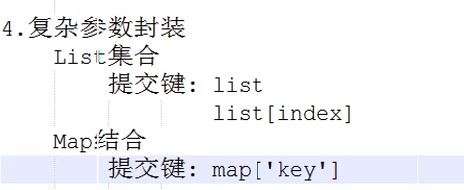
</form>集合类型封装
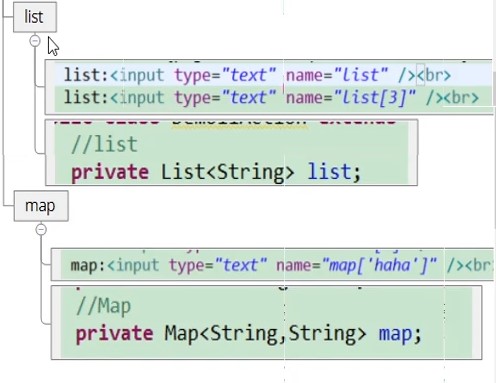
struts_day02总结复习

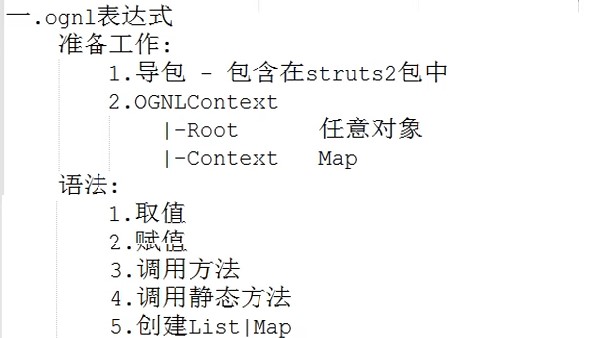
OGNL表达式
OGNL:对象视图导航语言.${user.addr.name}这种写法就叫对象视图导航
OGNL不仅仅可以视图导航,支持比EL表达式更加丰富的功能
一.使用OGNL准备工作
1.导包:struts2的包中已经包含了ognl.jar包,不需要导入额外的jar包
2.代码准备:
OGNL表达式和EL表达式的取值范围:
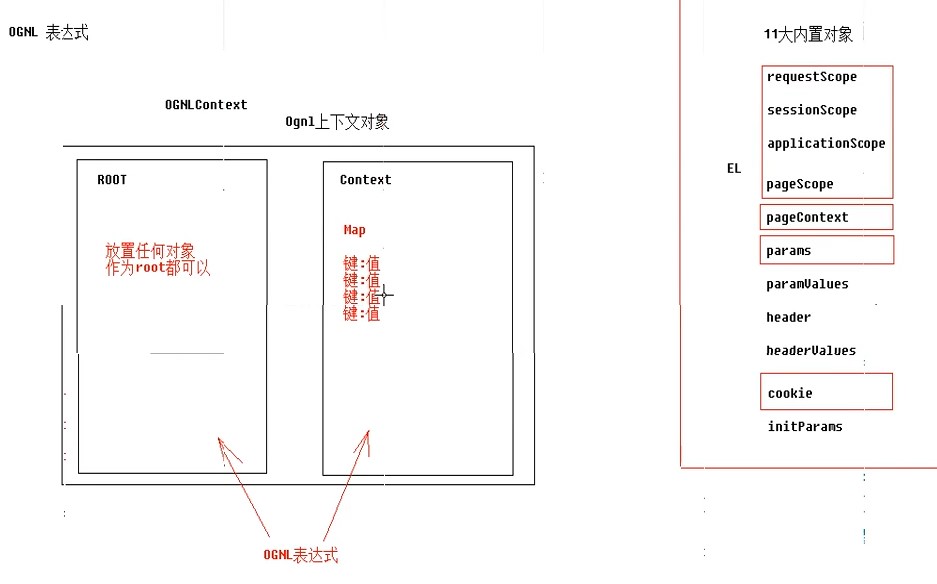
1.基本取值
	//Ognl基本语法演示
	//取出root中的属性值
	@Test
	public void fun2() throws OgnlException {
		//准备OGNLContext
		//准备Root
		User rootUser = new User("zzh",21);
		//准备Context
		Map<String,User> context = new HashMap<String,User>();
		context.put("user1", new User("jack",18));
		context.put("user2", new User("rose",22));
		OgnlContext oc = new OgnlContext();
		oc.setRoot(rootUser);
		oc.setValues(context);
		//书写OGNL

		//取出root中user对象的name属性
		String name = (String) Ognl.getValue("name", oc, oc.getRoot());
		//取出root中user对象的age属性
		Integer age = (Integer) Ognl.getValue("age", oc, oc.getRoot());
		System.out.println(name);
		System.out.println(age);
	}
23
1
//Ognl基本语法演示2
//取出root中的属性值3
4
public void fun2() throws OgnlException {5
//准备OGNLContext6
//准备Root7
User rootUser = new User("zzh",21);8
//准备Context9
Map<String,User> context = new HashMap<String,User>();10
context.put("user1", new User("jack",18));11
context.put("user2", new User("rose",22));12
OgnlContext oc = new OgnlContext();13
oc.setRoot(rootUser);14
oc.setValues(context);15
//书写OGNL16
17
//取出root中user对象的name属性18
String name = (String) Ognl.getValue("name", oc, oc.getRoot());19
//取出root中user对象的age属性20
Integer age = (Integer) Ognl.getValue("age", oc, oc.getRoot());21
System.out.println(name);22
System.out.println(age);23
} //Ognl基本语法演示
//取出context中的属性值
@Test
public void fun3() throws OgnlException {
//准备OGNLContext
//准备Root
User rootUser = new User("zzh",21);
//准备Context
Map<String,User> context = new HashMap<String,User>();
context.put("user1", new User("jack",18));
context.put("user2", new User("rose",22));
OgnlContext oc = new OgnlContext();
oc.setRoot(rootUser);
oc.setValues(context);
//书写OGNL
//取出context中user对象的name属性 #代表从域中取值
String name = (String) Ognl.getValue("#user1.name", oc, oc.getRoot());
//取出context中user对象的age属性
Integer age = (Integer) Ognl.getValue("#user2.age", oc, oc.getRoot());
System.out.println(name);
System.out.println(age);
}23
1
//Ognl基本语法演示2
//取出context中的属性值3
4
public void fun3() throws OgnlException {5
//准备OGNLContext6
//准备Root7
User rootUser = new User("zzh",21);8
//准备Context9
Map<String,User> context = new HashMap<String,User>();10
context.put("user1", new User("jack",18));11
context.put("user2", new User("rose",22));12
OgnlContext oc = new OgnlContext();13
oc.setRoot(rootUser);14
oc.setValues(context);15
//书写OGNL16
17
//取出context中user对象的name属性 #代表从域中取值18
String name = (String) Ognl.getValue("#user1.name", oc, oc.getRoot());19
//取出context中user对象的age属性20
Integer age = (Integer) Ognl.getValue("#user2.age", oc, oc.getRoot());21
System.out.println(name);22
System.out.println(age);23
}2.赋值
	//Ognl基本语法演示
	//为属性赋值
	@Test
	public void fun4() throws OgnlException {
		//准备OGNLContext
		//准备Root
		User rootUser = new User("zzh",21);
		//准备Context
		Map<String,User> context = new HashMap<String,User>();
		context.put("user1", new User("jack",18));
		context.put("user2", new User("rose",22));
		OgnlContext oc = new OgnlContext();
		//将rootUser作为root部分
		oc.setRoot(rootUser);
		//将context这个Map作为Context对象
		oc.setValues(context);
		//书写OGNL

		//将root中的user对象的name属性赋值
		Ognl.getValue("name='朱展鸿'", oc, oc.getRoot());
		//取出context中user对象的age属性
		String name = (String) Ognl.getValue("name", oc, oc.getRoot());

		Integer age = (Integer) Ognl.getValue("#user1.age='11',#user1.age", context, oc.getRoot());
		System.out.println(name);
		System.out.println(age);
	}
27
1
//Ognl基本语法演示2
//为属性赋值3
4
public void fun4() throws OgnlException {5
//准备OGNLContext6
//准备Root7
User rootUser = new User("zzh",21);8
//准备Context9
Map<String,User> context = new HashMap<String,User>();10
context.put("user1", new User("jack",18));11
context.put("user2", new User("rose",22));12
OgnlContext oc = new OgnlContext();13
//将rootUser作为root部分14
oc.setRoot(rootUser);15
//将context这个Map作为Context对象16
oc.setValues(context);17
//书写OGNL18
19
//将root中的user对象的name属性赋值20
Ognl.getValue("name='朱展鸿'", oc, oc.getRoot());21
//取出context中user对象的age属性22
String name = (String) Ognl.getValue("name", oc, oc.getRoot());23
24
Integer age = (Integer) Ognl.getValue("#user1.age='11',#user1.age", context, oc.getRoot());25
System.out.println(name);26
System.out.println(age);27
}3.调用方法
	//Ognl基本语法演示
	//调用方法
	@Test
	public void fun5() throws OgnlException {
		//准备OGNLContext
		//准备Root
		User rootUser = new User("zzh",21);
		//准备Context
		Map<String,User> context = new HashMap<String,User>();
		context.put("user1", new User("jack",18));
		context.put("user2", new User("rose",22));
		OgnlContext oc = new OgnlContext();
		oc.setRoot(rootUser);
		oc.setValues(context);
		//书写OGNL

		//调用root中的set方法
		Ognl.getValue("setName('??')", oc, oc.getRoot());
		//取出context中user对象的age属性
		String name = (String) Ognl.getValue("getName()", oc, oc.getRoot());

		System.out.println(name);
	}
23
1
//Ognl基本语法演示2
//调用方法3
4
public void fun5() throws OgnlException {5
//准备OGNLContext6
//准备Root7
User rootUser = new User("zzh",21);8
//准备Context9
Map<String,User> context = new HashMap<String,User>();10
context.put("user1", new User("jack",18));11
context.put("user2", new User("rose",22));12
OgnlContext oc = new OgnlContext();13
oc.setRoot(rootUser);14
oc.setValues(context);15
//书写OGNL16
17
//调用root中的set方法18
Ognl.getValue("setName('??')", oc, oc.getRoot());19
//取出context中user对象的age属性20
String name = (String) Ognl.getValue("getName()", oc, oc.getRoot());21
22
System.out.println(name);23
}4.调用静态方法
	//Ognl基本语法演示
	//调用静态方法
	@Test
	public void fun6() throws OgnlException {
		//准备OGNLContext
		//准备Root
		User rootUser = new User("zzh",21);
		//准备Context
		Map<String,User> context = new HashMap<String,User>();
		context.put("user1", new User("jack",18));
		context.put("user2", new User("rose",22));
		OgnlContext oc = new OgnlContext();
		oc.setRoot(rootUser);
		oc.setValues(context);
		//书写OGNL
		//调用静态方法
		String test = (String) Ognl.getValue("@com.zzh.struts.utils.HahaUtils@echo('lalala')", oc, oc.getRoot());
		//Double pi = (Double) Ognl.getValue("@java.lang.Math@PI", oc, oc.getRoot());
		Double pi = (Double) Ognl.getValue("@@PI", oc, oc.getRoot());
		System.out.println(test);
		System.out.println(pi);
	}
22
1
//Ognl基本语法演示2
//调用静态方法3
4
public void fun6() throws OgnlException {5
//准备OGNLContext6
//准备Root7
User rootUser = new User("zzh",21);8
//准备Context9
Map<String,User> context = new HashMap<String,User>();10
context.put("user1", new User("jack",18));11
context.put("user2", new User("rose",22));12
OgnlContext oc = new OgnlContext();13
oc.setRoot(rootUser);14
oc.setValues(context);15
//书写OGNL16
//调用静态方法17
String test = (String) Ognl.getValue("@com.zzh.struts.utils.HahaUtils@echo('lalala')", oc, oc.getRoot());18
//Double pi = (Double) Ognl.getValue("@java.lang.Math@PI", oc, oc.getRoot());19
Double pi = (Double) Ognl.getValue("@@PI", oc, oc.getRoot());20
System.out.println(test);21
System.out.println(pi);22
}5.创建List|Map对象
	//Ognl基本语法演示
	//ognl创建对象 List|Map对象
	@Test
	public void fun7() throws OgnlException {
		//准备OGNLContext
		//准备Root
		User rootUser = new User("zzh",21);
		//准备Context
		Map<String,User> context = new HashMap<String,User>();
		context.put("user1", new User("jack",18));
		context.put("user2", new User("rose",22));
		OgnlContext oc = new OgnlContext();
		oc.setRoot(rootUser);
		oc.setValues(context);
		//书写OGNL
		//创建List对象
		Integer size = (Integer) Ognl.getValue("{'zzh','jerry','tom'}.size()", oc, oc.getRoot());
		String test1 = (String) Ognl.getValue("{'zzh','jerry','tom'}[0]", oc, oc.getRoot());
		String test2 = (String) Ognl.getValue("{'zzh','jerry','tom'}.get(1)", oc, oc.getRoot());
		System.out.println(size);
		System.out.println(test1);
		System.out.println(test2);

		//#表示的是创建一个Map对象
		Integer size2 = (Integer) Ognl.getValue("#{'name':'zzh','age':18}.size()", oc, oc.getRoot());
		String test3 = (String) Ognl.getValue("#{'name':'zzh','age':18}['name']", oc, oc.getRoot());
		System.out.println(size2);
		System.out.println(test3);
	}
29
1
//Ognl基本语法演示2
//ognl创建对象 List|Map对象3
4
public void fun7() throws OgnlException {5
//准备OGNLContext6
//准备Root7
User rootUser = new User("zzh",21);8
//准备Context9
Map<String,User> context = new HashMap<String,User>();10
context.put("user1", new User("jack",18));11
context.put("user2", new User("rose",22));12
OgnlContext oc = new OgnlContext();13
oc.setRoot(rootUser);14
oc.setValues(context);15
//书写OGNL16
//创建List对象17
Integer size = (Integer) Ognl.getValue("{'zzh','jerry','tom'}.size()", oc, oc.getRoot());18
String test1 = (String) Ognl.getValue("{'zzh','jerry','tom'}[0]", oc, oc.getRoot());19
String test2 = (String) Ognl.getValue("{'zzh','jerry','tom'}.get(1)", oc, oc.getRoot());20
System.out.println(size);21
System.out.println(test1);22
System.out.println(test2);23
24
//#表示的是创建一个Map对象25
Integer size2 = (Integer) Ognl.getValue("#{'name':'zzh','age':18}.size()", oc, oc.getRoot());26
String test3 = (String) Ognl.getValue("#{'name':'zzh','age':18}['name']", oc, oc.getRoot());27
System.out.println(size2);28
System.out.println(test3);29
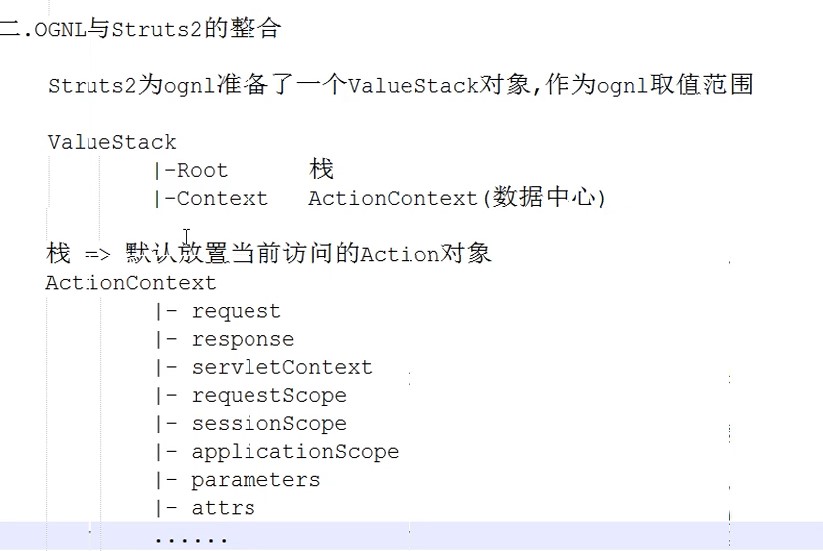
}Struts2与OGNL表达式的结合
结合原理:
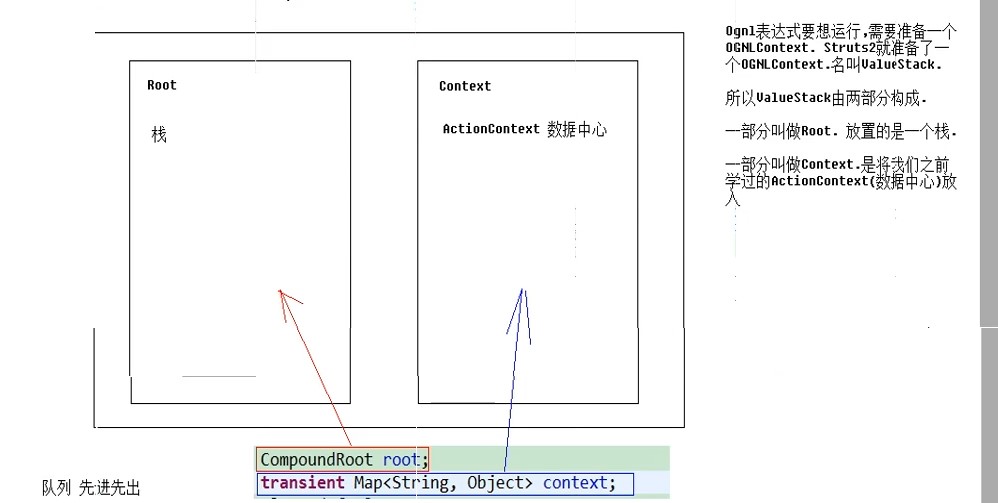
栈原理:
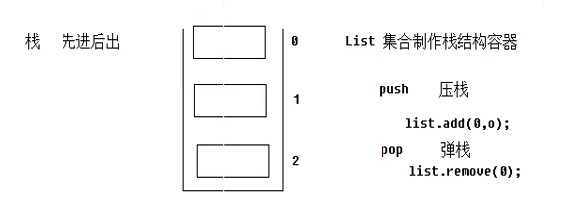
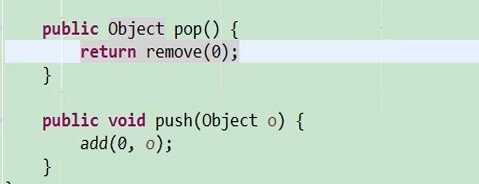
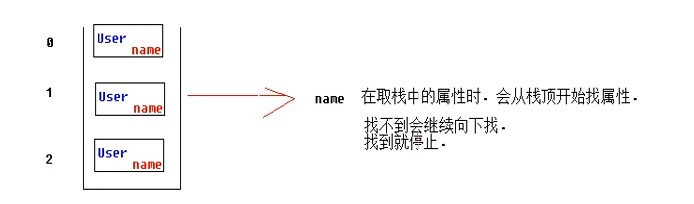
查看值栈中的两个部分
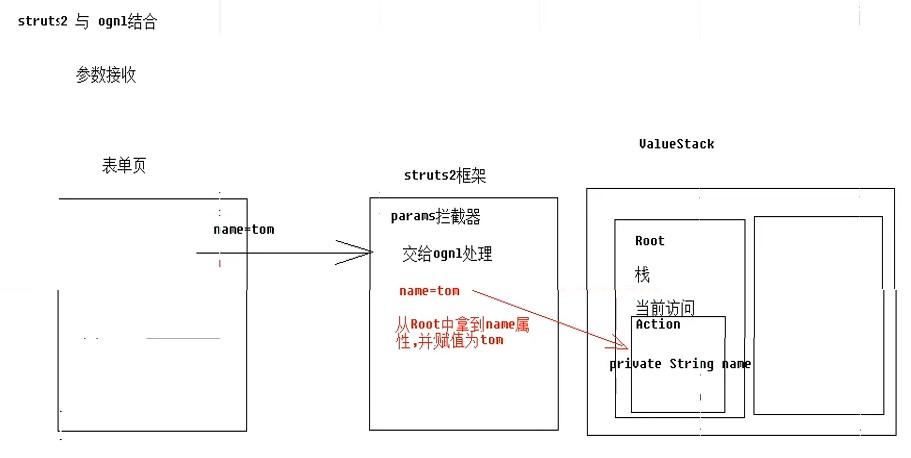
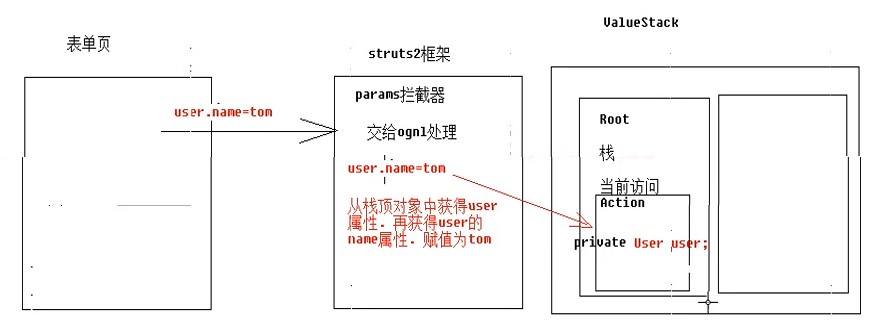
struts2和ognl结合体现:
1.参数接收
属性驱动:
对象驱动:
模型驱动:
package com.zzh.struts.param;

import com.opensymphony.xwork2.ActionContext;
import com.opensymphony.xwork2.ActionSupport;
import com.opensymphony.xwork2.Preparable;
import com.opensymphony.xwork2.util.ValueStack;
import com.zzh.struts.domain.User;

//模型驱动的本质就是preparable接口
public class Demo2Action extends ActionSupport implements Preparable{
	User user = new User();
	public String execute() throws Exception {
		System.out.println(user);
		return SUCCESS;
	}

	@Override
	public void prepare() throws Exception {
		//压入栈顶
		//1.获得栈
		ValueStack vs = ActionContext.getContext().getValueStack();
		//2.压入栈顶
		vs.push(user);
	}

}
x
1
package com.zzh.struts.param;2
3
import com.opensymphony.xwork2.ActionContext;4
import com.opensymphony.xwork2.ActionSupport;5
import com.opensymphony.xwork2.Preparable;6
import com.opensymphony.xwork2.util.ValueStack;7
import com.zzh.struts.domain.User;8
9
//模型驱动的本质就是preparable接口10
public class Demo2Action extends ActionSupport implements Preparable{11
User user = new User();12
public String execute() throws Exception {13
System.out.println(user);14
return SUCCESS;15
}16
17
18
public void prepare() throws Exception {19
//压入栈顶20
//1.获得栈21
ValueStack vs = ActionContext.getContext().getValueStack();22
//2.压入栈顶23
vs.push(user);24
}25
26
}2.配置文件中

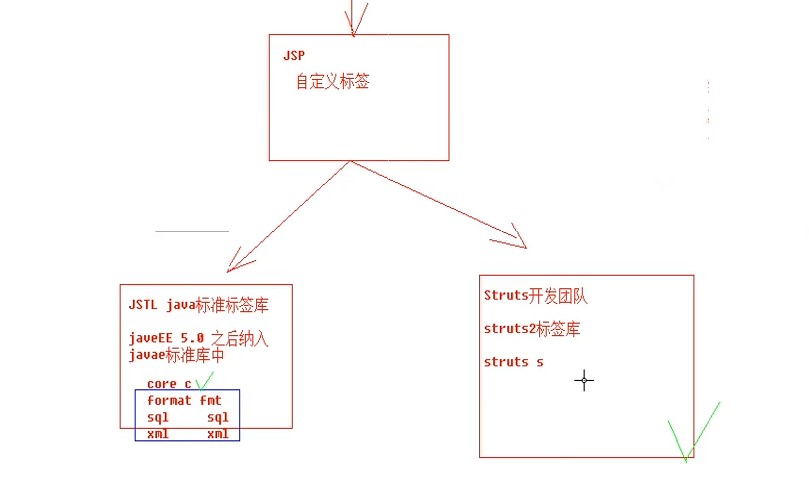
3.struts2标签(了解)
JSTL:java标准标签库
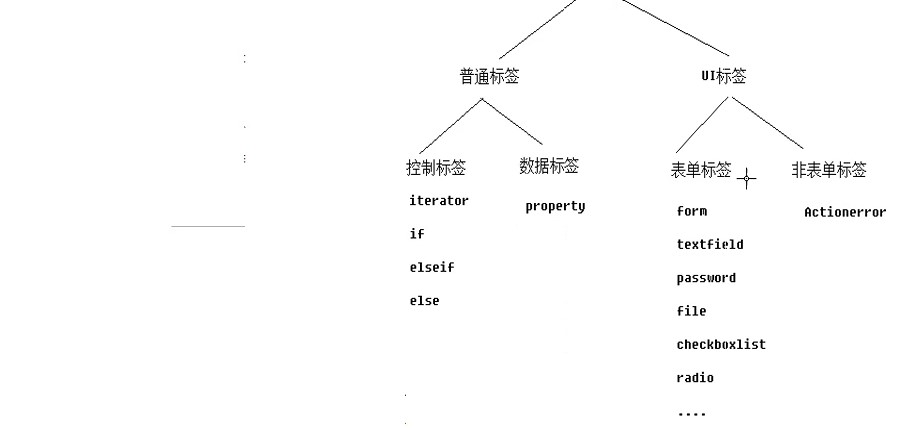
1.控制标签和数据标签
<%@ page language="java" contentType="text/html; charset=UTF-8"
    pageEncoding="UTF-8"%>
<%@ taglib uri="/struts-tags" prefix="s" %>
<!DOCTYPE html PUBLIC "-//W3C//DTD HTML 4.01 Transitional//EN" "http://www.w3.org/TR/html4/loose.dtd">
<html>
<head>
<meta http-equiv="Content-Type" content="text/html; charset=UTF-8">
<title>Insert title here</title>
</head>
<body>
	<!-- 遍历标签iterator -->
	<s:iterator value="#list">
		<s:property /><br>
	</s:iterator>
	<hr>
	<s:iterator value="#list" var="name">
		<s:property value="#name"/><br>
	</s:iterator>
	<hr>
	<s:iterator begin="1" end="100" step="1">
		<s:property />
	</s:iterator>
	<hr>
	<s:if test="#list.size()==4">
		list长度为4
	</s:if>
	<s:elseif test="#list.size()==5">
		list长度为5
	</s:elseif>
	<s:else>
		list长度是个谜
	</s:else>
	<hr>
	<s:property value="#list.size"/>

</body>
</html>
1
37
1
<%@ page language="java" contentType="text/html; charset=UTF-8"2
pageEncoding="UTF-8"%>3
<%@ taglib uri="/struts-tags" prefix="s" %>4
5
<html>6
<head>7
<meta http-equiv="Content-Type" content="text/html; charset=UTF-8">8
<title>Insert title here</title>9
</head>10
<body>11
<!-- 遍历标签iterator -->12
<s:iterator value="#list">13
<s:property /><br>14
</s:iterator>15
<hr>16
<s:iterator value="#list" var="name">17
<s:property value="#name"/><br>18
</s:iterator>19
<hr>20
<s:iterator begin="1" end="100" step="1">21
<s:property />22
</s:iterator>23
<hr>24
<s:if test="#list.size()==4">25
list长度为426
</s:if>27
<s:elseif test="#list.size()==5">28
list长度为529
</s:elseif>30
<s:else>31
list长度是个谜32
</s:else>33
<hr>34
<s:property value="#list.size"/>35
36
</body>37
</html>2.表单标签和非表单标签
<%@ page language="java" contentType="text/html; charset=UTF-8"
    pageEncoding="UTF-8"%>
<%@ taglib uri="/struts-tags" prefix="s" %>
<!DOCTYPE html PUBLIC "-//W3C//DTD HTML 4.01 Transitional//EN" "http://www.w3.org/TR/html4/loose.dtd">
<html>
<head>
<meta http-equiv="Content-Type" content="text/html; charset=UTF-8">
<title>Insert title here</title>
</head>
<body>
	<!--struts2表单标签  -->
	<!-- 好处:
			1.内置了一套样式
			2.自动回显,根据栈中属性
	 -->
	<s:form action="Demo2Action" namespace="/" theme="xhtml">
		<s:textfield name="name" lable="用户名"></s:textfield>
		<s:password name="password" lable="密码"></s:password>
		<s:radio list="#{1:'男' 0:'女' }" name="gender" lable="性别"></s:radio>
		<s:checkboxlist list="#{2:'diannao' 1:'dianshi' }" name="habits" lable="兴趣"></s:checkboxlist>
		<s:select list="#{2:'大专' 3:'本科' }" headerKey="" headerValue="---请选择---" name="edu" lable="学历"></s:select>
		<s:file name="img" lable="个人照片"></s:file>
		<s:textarea name="desc" label="简介"></s:textarea>
		<s:submit value="提交"></s:submit>
	</s:form>
	<s:actionerror/>
</body>
</html>
1
28
1
<%@ page language="java" contentType="text/html; charset=UTF-8"2
pageEncoding="UTF-8"%>3
<%@ taglib uri="/struts-tags" prefix="s" %>4
5
<html>6
<head>7
<meta http-equiv="Content-Type" content="text/html; charset=UTF-8">8
<title>Insert title here</title>9
</head>10
<body>11
<!--struts2表单标签 -->12
<!-- 好处:13
1.内置了一套样式14
2.自动回显,根据栈中属性15
-->16
<s:form action="Demo2Action" namespace="/" theme="xhtml">17
<s:textfield name="name" lable="用户名"></s:textfield>18
<s:password name="password" lable="密码"></s:password>19
<s:radio list="#{1:'男' 0:'女' }" name="gender" lable="性别"></s:radio>20
<s:checkboxlist list="#{2:'diannao' 1:'dianshi' }" name="habits" lable="兴趣"></s:checkboxlist>21
<s:select list="#{2:'大专' 3:'本科' }" headerKey="" headerValue="---请选择---" name="edu" lable="学历"></s:select>22
<s:file name="img" lable="个人照片"></s:file>23
<s:textarea name="desc" label="简介"></s:textarea>24
<s:submit value="提交"></s:submit>25
</s:form>26
<s:actionerror/>27
</body>28
</html>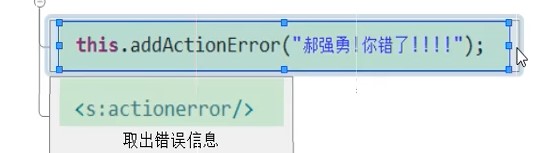
扩展内容-struts2流程源码
1.request对象的getAttribute方法
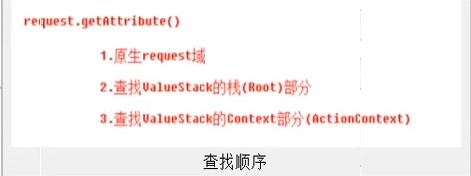
Ognl表达式复习:

自定义拦截器
interceptor的生命周期:项目启动的时候创建拦截器,项目结束时销毁拦截器
1.第一种方式:实现interceptor接口
package com.zzh.struts.interceptor;

import com.opensymphony.xwork2.ActionInvocation;
import com.opensymphony.xwork2.interceptor.Interceptor;

public class MyInterceptor1 implements Interceptor{
	public void destroy() {
	}

	public void init() {
	}

	public String intercept(ActionInvocation arg0) throws Exception {

		return null;
	}

}
x
1
package com.zzh.struts.interceptor;2
3
import com.opensymphony.xwork2.ActionInvocation;4
import com.opensymphony.xwork2.interceptor.Interceptor;5
6
public class MyInterceptor1 implements Interceptor{7
public void destroy() {8
}9
10
public void init() {11
}12
13
public String intercept(ActionInvocation arg0) throws Exception {14
15
return null;16
}17
18
}19
2.第二种方式:继承AbstractInterceptor类
package com.zzh.struts.interceptor;

import com.opensymphony.xwork2.ActionInvocation;
import com.opensymphony.xwork2.interceptor.AbstractInterceptor;

public class MyInterceptor2 extends AbstractInterceptor{

	public String intercept(ActionInvocation arg0) throws Exception {

		return null;
	}

}
x
1
package com.zzh.struts.interceptor;2
3
import com.opensymphony.xwork2.ActionInvocation;4
import com.opensymphony.xwork2.interceptor.AbstractInterceptor;5
6
public class MyInterceptor2 extends AbstractInterceptor{7
8
public String intercept(ActionInvocation arg0) throws Exception {9
10
return null;11
}12
13
}3.第三种方式:继承MethodFilterInterceptor类,功能--定制拦截器拦截的方法,定制哪些方法需要拦截,定制哪些方法不需要拦截
package com.zzh.struts.interceptor;

import com.opensymphony.xwork2.ActionInvocation;
import com.opensymphony.xwork2.interceptor.MethodFilterInterceptor;

public class MyInterceptor3 extends MethodFilterInterceptor{

	protected String doIntercept(ActionInvocation arg0) throws Exception {

		return null;
	}

}
x
1
package com.zzh.struts.interceptor;2
3
import com.opensymphony.xwork2.ActionInvocation;4
import com.opensymphony.xwork2.interceptor.MethodFilterInterceptor;5
6
public class MyInterceptor3 extends MethodFilterInterceptor{7
8
protected String doIntercept(ActionInvocation arg0) throws Exception {9
10
return null;11
}12
13
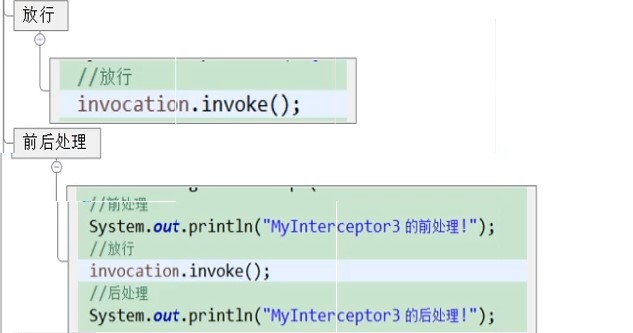
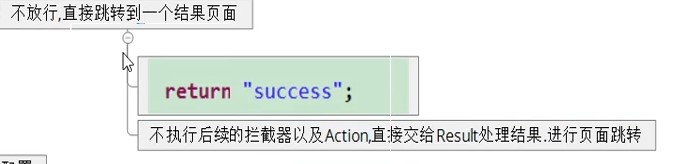
}4.拦截器api
5.拦截器配置
<?xml version="1.0" encoding="UTF-8"?>
<!DOCTYPE struts PUBLIC
	"-//Apache Software Foundation//DTD Struts Configuration 2.3//EN"
	"http://struts.apache.org/dtds/struts-2.3.dtd">
<struts>
	<constant name="struts.devMode" value="true"></constant>
	<package name="inter" namespace="/" extends="struts-default">
		<interceptors>
			<!-- 1.注册拦截器 -->
			<interceptor name="myInter3" class="com.zzh.struts.interceptor.MyInterceptor3"></interceptor>
			<!-- 2.注册拦截器栈 -->
			<interceptor-stack name="myStack">
				<!-- 自定义拦截器引入(建议放在20个拦截器之前) -->
				<interceptor-ref name="myInter3">
					<!-- 指定哪些方法不拦截 -->
					<param name="excludeMethods">add,find</param>
					<!-- 指定哪些方法拦截
					<param name="includeMethods">add,delete</param>
					-->
				</interceptor-ref>

				<!-- 引用默认的拦截器栈(20个) -->
				<interceptor-ref name="defaultStack"></interceptor-ref>
			</interceptor-stack>
		</interceptors>
			<!-- 3.指定包中默认拦截器栈 -->
			<default-interceptor-ref name="myStack"></default-interceptor-ref>

		<action name="Demo1Action_*" class="com.zzh.struts.interceptor.Demo1Action" method="{1}">
			<result name="success">/hello.jsp</result>
		</action>
	</package>
</struts>
1
33
1
2
3
4
5
<struts>6
<constant name="struts.devMode" value="true"></constant>7
<package name="inter" namespace="/" extends="struts-default">8
<interceptors>9
<!-- 1.注册拦截器 -->10
<interceptor name="myInter3" class="com.zzh.struts.interceptor.MyInterceptor3"></interceptor>11
<!-- 2.注册拦截器栈 -->12
<interceptor-stack name="myStack">13
<!-- 自定义拦截器引入(建议放在20个拦截器之前) -->14
<interceptor-ref name="myInter3">15
<!-- 指定哪些方法不拦截 -->16
<param name="excludeMethods">add,find</param>17
<!-- 指定哪些方法拦截 18
<param name="includeMethods">add,delete</param>19
-->20
</interceptor-ref>21
22
<!-- 引用默认的拦截器栈(20个) -->23
<interceptor-ref name="defaultStack"></interceptor-ref>24
</interceptor-stack>25
</interceptors>26
<!-- 3.指定包中默认拦截器栈 -->27
<default-interceptor-ref name="myStack"></default-interceptor-ref>28
29
<action name="Demo1Action_*" class="com.zzh.struts.interceptor.Demo1Action" method="{1}">30
<result name="success">/hello.jsp</result>31
</action>32
</package>33
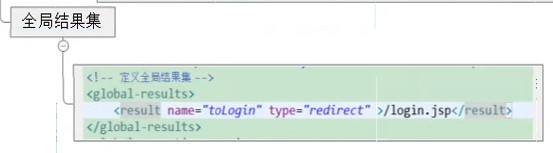
</struts>全局结果集
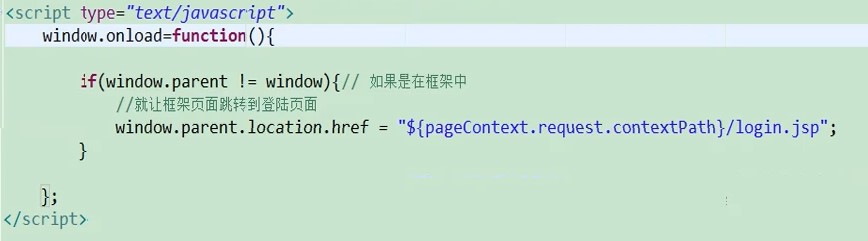
让子页面成为父页面的方法