Linux 系统安装配置PHP服务(源码安装)
简介:
PHP(外文名:PHP: Hypertext Preprocessor,中文名:“超文本预处理器”)是一种通用开源脚本语言。语法吸收了C语言、Java和Perl的特点,利于学习,使用广泛,主要适用于Web开发领域。
标注:
配置nginx请参考此教程:
http://www.cnblogs.com/zoulongbin/p/6253568.html
配置mysql请参考此教程:
http://www.cnblogs.com/zoulongbin/p/6287167.html
配置网络yum源参考此教程:
http://www.cnblogs.com/zoulongbin/p/5773330.html
需要安装以下安装包:(使用网络yum源在线安装以下四个依赖包,本教程大部分使用下载的源码安装进行编译安装)
[root@ssticentos65 src]# yum -y install libcurl-devel (必须安装)
[root@ssticentos65 src]# yum -y install libXpm-devel (必须安装)
[root@ssticentos65 src]# yum -y install libxml2-devel (必须安装)
[root@ssticentos65 src]# yum -y install php-mbstring (自行选择安装)
提示:Linux软件编译安装都需要依赖两个安装包 gcc gcc-c++ make 可使用 yum -y install gcc gcc-c++ make 在线安装。
标注:下载的软件安装包统一存放路径在 /usr/local/src 目录下进行解压编译安装
1、 安装yasm
下载地址:http://www.tortall.net/projects/yasm/releases/
[root@ssticentos65 src]# cd yasm-1.3.0
[root@ssticentos65 yasm-1.3.0]# ./configure
[root@ssticentos65 yasm-1.3.0]# make
[root@ssticentos65 yasm-1.3.0]# make install
2、 安装libmcrypt
下载地址:https://sourceforge.net/projects/mcrypt/files/Libmcrypt/2.5.8/
[root@ssticentos65 src]# cd libmcrypt-2.5.8
[root@ssticentos65 libmcrypt-2.5.8]# ./configure
[root@ssticentos65 libmcrypt-2.5.8]# make
[root@ssticentos65 libmcrypt-2.5.8]# make install
3、 安装libvpx
下载地址: http://www.linuxfromscratch.org/blfs/view/svn/multimedia/libvpx.html
[root@ssticentos65 src]# cd libvpx-1.6.0
[root@ssticentos65 libvpx-1.6.0]#./configure --prefix=/usr/local/libvpx --enable-shared --enable-vp9
[root@ssticentos65 libvpx-1.6.0]# make
[root@ssticentos65 libvpx-1.6.0]# make install
4、 安装tiff
下载地址: http://download.osgeo.org/libtiff/
[root@ssticentos65 src]# cd tiff-4.0.6
[root@ssticentos65 tiff-4.0.6]#./configure --prefix=/usr/local/tiff --enable-shared
[root@ssticentos65 tiff-4.0.6]# make
[root@ssticentos65 tiff-4.0.6]# make install
5、 安装libpng
下载地址:http://www.libpng.org/pub/png/libpng.html
[root@ssticentos65 src]# cd libpng-1.6.28
[root@ssticentos65 libpng-1.6.28]#./configure --prefix=/usr/local/libpng --enable-shared
[root@ssticentos65 libpng-1.6.28]# make
[root@ssticentos65 libpng-1.6.28]# make install
6、 安装freetype
下载地址:http://ring.u-toyama.ac.jp/archives/graphics/freetype/freetype2/
[root@ssticentos65 src]# cd freetype-2.7.1
[root@ssticentos65 freetype-2.7.1]#./configure --prefix=/usr/local/freetype --enable-shared
[root@ssticentos65 freetype-2.7.1]# make
[root@ssticentos65 freetype-2.7.1]# make install
7、 安装jpeg
下载地址:http://www.ijg.org/files/
[root@ssticentos65 src]# cd jpeg-9a
[root@ssticentos65 jpeg-9a]#./configure --prefix=/usr/local/jpeg --enable-shared
[root@ssticentos65 jpeg-9a]# make
[root@ssticentos65 jpeg-9a]# make install
8、 安装libgd
下载地址:https://github.com/libgd/libgd/releases
[root@ssticentos65 src]# cd libgd-2.2.0
[root@ssticentos65 libgd-2.2.0]#./configure --prefix=/usr/local/libgd --enable-shared --with-jpeg=/usr/local/jpeg --with-png=/usr/local/libpng --with-freetype=/usr/local/freetype --with-fontconfig=/usr/local/freetype --with-xpm=/usr/ --with-tiff=/usr/local/tiff --with-webp=/usr/local/libwebp/
[root@ssticentos65 libgd-2.2.0]# make
[root@ssticentos65 libgd-2.2.0]# make install
9、 安装t1lib
下载地址:http://download.csdn.net/download/sunkaivg/9696064
[root@ssticentos65 src]# cd t1lib-5.1.2
[root@ssticentos65 t1lib-5.1.2]#./configure --prefix=/usr/local/t1lib --enable-shared
[root@ssticentos65 t1lib-5.1.2]# make without_doc
[root@ssticentos65 t1lib-5.1.2]# make install
10、 安装php
下载地址 :http://www.php.net/downloads.php
[root@ssticentos65 src]# ls
php-5.6.28 php-5.6.28.tar.gz
[root@ssticentos65 src]# pwd
/usr/local/src
[root@ssticentos65 src]# cd php-5.6.28
[root@ssticentos65 php-5.6.28]#./configure --prefix=/usr/local/php --with-config-file-path=/usr/local/php/etc --with-pdo-mysql=/usr/local/mysql --with-mysqli=/usr/local/mysql/bin/mysql_config --with-mysql-sock=/tmp/mysql.sock --with-pdo-mysql=/usr/local/mysql --with-gd --with-png-dir=/usr/local/libpng --with-jpeg-dir=/usr/local/jpeg --with-freetype-dir=/usr/local/freetype --with-xpm-dir=/usr/ --with-zlib-dir=/usr/local/zlib --with-iconv --enable-libxml --enable-xml --enable-bcmath --enable-shmop --enable-sysvsem --enable-inline-optimization --enable-opcache --enable-mbregex --enable-fpm --enable-mbstring --enable-ftp --enable-gd-native-ttf --with-openssl --enable-pcntl --enable-sockets --with-xmlrpc --enable-zip --enable-soap --without-pear --with-gettext --enable-session --with-mcrypt --with-curl --enable-ctype
[root@ssticentos65 php-5.6.28]# make
[root@ssticentos65 php-5.6.28]# make install
11、配置PHP
#显示php安装包存放路径
[root@ssticentos65 src]# pwd
/usr/local/src
[root@ssticentos65 src]# ls
php-5.6.28 php-5.6.28.tar.gz
[root@ssticentos65 src]# cd php-5.6.28
#复制php配置文件到安装目录
[root@ssticentos65 php-5.6.28]# cp php.ini-production /usr/local/php/etc/php.ini
#删除系统自带配置文件
[root@ssticentos65 php-5.6.28]# rm -rf /etc/php.ini
#添加软链接到 /etc目录
[root@ssticentos65 php-5.6.28]# ln -s /usr/local/php/etc/php.ini /etc/php.ini
[root@ssticentos65 php-5.6.28]# ls -l /etc/php.ini
lrwxrwxrwx 1 root root 26 Jan 6 02:22 /etc/php.ini -> /usr/local/php/etc/php.ini
#复制模板文件为php-fpm配置
[root@ssticentos65 php-5.6.28]# cp /usr/local/php/etc/php-fpm.conf.default /usr/local/php/etc/php-fpm.conf
#添加软件链接到 /etc目录
[root@ssticentos65 php-5.6.28]#ln -s /usr/local/php/etc/php-fpm.conf /etc/php-fpm.conf
#编辑php配置文件php-fpm.conf
[root@ssticentos65 php-5.6.28]# vim /usr/local/php/etc/php-fpm.conf
pid = run/php-fpm.pid //如果这个选项在配置文件存在就取消掉注释使用,如果不存在可以忽略,请勿手动添加,否则PHP启动会报错。
user = www
group = www
:wq! #保存并退出
12、设置php-fpm开机自启动
#复制php-fpm到启动目录
[root@ssticentos65 ~]# cp /usr/local/src/php-5.6.28/sapi/fpm/init.d.php-fpm /etc/init.d/php-fpm
[root@ssticentos65 ~]# ls -l /etc/init.d/php-fpm
-rw-r--r--. 1 root root 2354 Jan 6 02:37 /etc/init.d/php-fpm
#赋予php-fpm执行权限
[root@ssticentos65 ~]# chmod 755 /etc/init.d/php-fpm
[root@ssticentos65 ~]# ls -l /etc/init.d/php-fpm
-rwxr-xr-x. 1 root root 2354 Jan 6 02:37 /etc/init.d/php-fpm
#设置php-fpm开机启动
[root@ssticentos65 ~]# chkconfig php-fpm on
[root@ssticentos65 ~]# chkconfig --list php-fpm
php-fpm 0:off 1:off 2:on 3:on 4:on 5:on 6:off
#编辑php配置文件php.ini
[root@ssticentos65 ~]# vim /usr/local/php/etc/php.ini
找到:disable_functions =
修改成disable_functions= passthru,exec,system,chroot,scandir,chgrp,chown,shell_exec,proc_open,proc_get_status,ini_alter,ini_alter,ini_restore,dl,openlog,syslog,readlink,symlink,popepassthru,stream_socket_server,escapeshellcmd,dll,popen,disk_free_space,checkdnsrr,checkdnsrr,getservbyname,getservbyport,disk_total_space,posix_ctermid,posix_get_last_error,posix_getcwd,posix_getegid,posix_geteuid,posix_getgid,posix_getgrgid,posix_getgrnam,posix_getgroups,posix_getlogin,posix_getpgid,posix_getpgrp,posix_getpid,posix_getppid,posix_getpwnam,posix_getpwuid, posix_getrlimit,posix_getsid,posix_getuid,posix_isatty, posix_kill,posix_mkfifo,posix_setegid,posix_seteuid,posix_setgid, posix_setpgid,posix_setsid,posix_setuid,posix_strerror,posix_times,posix_ttyname,posix_uname
找到:date.timezone =
修改为:date.timezone = PRC #设置时区
找到:expose_php = On
修改为:expose_php = Off #禁止显示php版本的信息
找到:short_open_tag = Off
修改为:short_open_tag = On #支持php短标签
找到opcache.enable=0
修改为opcache.enable=1 #php支持opcode缓存
找到:opcache.enable_cli=1 #php支持opcode缓存
修改为:opcache.enable_cli=0
在最后一行添加:zend_extension=opcache.so #开启opcode缓存功能 (在文本按Shift+G就能跳到最后一行)
:wq! #保存并退出
13、配置nginx支持php
检查www用户和www用户组是否存在,不存在请手动创建
[root@ssticentos65 ~]# cat /etc/passwd | grep www
apache:x:48:48:Apache:/var/www:/sbin/nologin
www:x:501:3005::/home/www:/bin/bash
[root@ssticentos65 ~]# cat /etc/group | grep www
www:x:3005:
[root@ssticentos65 ~]# vim /usr/local/nginx/conf/nginx.conf
user www www;
#首行user去掉注释,修改Nginx运行组为www www;必须与/usr/local/php/etc/php-fpm.d/www.conf中的user,group配置相同,否则php运行出错
location / {
root html;
index index.html index.htm index.php; #添加index.php
}
location ~ \.php$ {
root html;
fastcgi_pass 127.0.0.1:9000;
fastcgi_index index.php;
fastcgi_param SCRIPT_FILENAME $document_root$fastcgi_script_name;
include fastcgi_params;
}
#取消FastCGI server部分location的注释,注意fastcgi_param行的参数,改为$document_root$fastcgi_script_name,或者使用绝对路径
:wq! #保存并退出
#启动nginx服务
[root@ssticentos65 ~]# /etc/init.d/nginx restart
#启动php服务
[root@ssticentos65 ~]# /etc/init.d/php-fpm start
14、测试php配置
#进入nginx默认网站根目录
[root@ssticentos65 ~]# cd /usr/local/nginx/html/
[root@ssticentos65 html]# ls
50x.html index.html
#删除默认测试页
[root@ssticentos65 html]# rm -rf /usr/local/nginx/html/*
[root@ssticentos65 html]# pwd
/usr/local/nginx/html
#新建index.php文件进行测试
[root@ssticentos65 html]# vim index.php
<?php
phpinfo();
?>
:wq! #保存并退出
#设置目录所有者为 www
[root@ssticentos65 html]# chown www.www /usr/local/nginx/html/ -R
#设置目录权限
[root@ssticentos65 html]# chmod 755 /usr/local/nginx/html/ -R
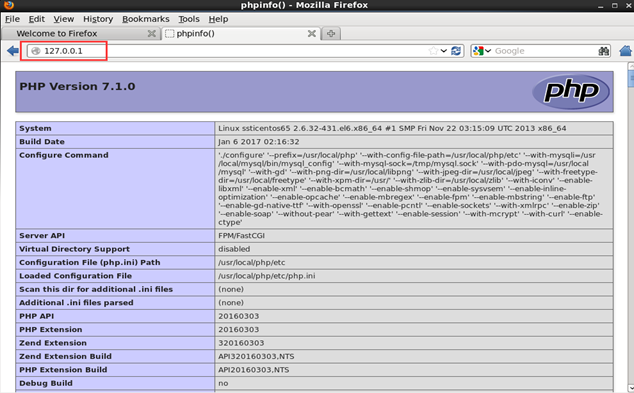
打开浏览器输入服务器IP地址,会看到下面的界面就是php安装成功

感谢此博客提供参考 http://www.osyunwei.com/archives/7891.html


【推荐】国内首个AI IDE,深度理解中文开发场景,立即下载体验Trae
【推荐】编程新体验,更懂你的AI,立即体验豆包MarsCode编程助手
【推荐】抖音旗下AI助手豆包,你的智能百科全书,全免费不限次数
【推荐】轻量又高性能的 SSH 工具 IShell:AI 加持,快人一步