

使用AIDL实现进程间的通信
在Android中,如果我们需要在不同进程间实现通信,就需要用到AIDL技术去完成。
AIDL(Android Interface Definition Language)是一种接口定义语言,编译器通过*.aidl文件的描述信息生成符合通信协议的Java代码,我们无需自己去写这段繁杂的代码,只需要在需要的时候调用即可,通过这种方式我们就可以完成进程间的通信工作。关于AIDL的编写规则我在这里就不多介绍了,读者可以到网上查找一下相关资料。
接下来,我就演示一个操作AIDL的最基本的流程。
首先,我们需要建立一个服务端的工程,如图所以:
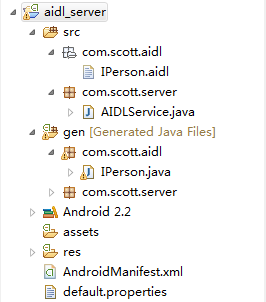
在IPerson.aidl中我们定义了一个“问候”的方法,代码如下:
package com.scott.aidl;
interface IPerson {
	String greet(String someone);
}
在Eclipse插件的帮助下,编译器会自动在gen目录中生成对应的IPerson.java文件,格式化后的代码如下:
package com.scott.aidl;

public interface IPerson extends android.os.IInterface {
	/** Local-side IPC implementation stub class. */
	public static abstract class Stub extends android.os.Binder implements com.scott.aidl.IPerson {

		private static final java.lang.String DESCRIPTOR = "com.scott.aidl.IPerson";

		/** Construct the stub at attach it to the interface. */
		public Stub() {
			this.attachInterface(this, DESCRIPTOR);
		}

		/**
		 * Cast an IBinder object into an com.scott.aidl.IPerson interface,
		 * generating a proxy if needed.
		 */
		public static com.scott.aidl.IPerson asInterface(android.os.IBinder obj) {
			if ((obj == null)) {
				return null;
			}
			android.os.IInterface iin = (android.os.IInterface) obj.queryLocalInterface(DESCRIPTOR);
			if (((iin != null) && (iin instanceof com.scott.aidl.IPerson))) {
				return ((com.scott.aidl.IPerson) iin);
			}
			return new com.scott.aidl.IPerson.Stub.Proxy(obj);
		}

		public android.os.IBinder asBinder() {
			return this;
		}

		@Override
		public boolean onTransact(int code, android.os.Parcel data, android.os.Parcel reply, int flags)
				throws android.os.RemoteException {
			switch (code) {
			case INTERFACE_TRANSACTION: {
				reply.writeString(DESCRIPTOR);
				return true;
			}
			case TRANSACTION_greet: {
				data.enforceInterface(DESCRIPTOR);
				java.lang.String _arg0;
				_arg0 = data.readString();
				java.lang.String _result = this.greet(_arg0);
				reply.writeNoException();
				reply.writeString(_result);
				return true;
			}
			}
			return super.onTransact(code, data, reply, flags);
		}

		private static class Proxy implements com.scott.aidl.IPerson {
			private android.os.IBinder mRemote;

			Proxy(android.os.IBinder remote) {
				mRemote = remote;
			}

			public android.os.IBinder asBinder() {
				return mRemote;
			}

			public java.lang.String getInterfaceDescriptor() {
				return DESCRIPTOR;
			}

			public java.lang.String greet(java.lang.String someone) throws android.os.RemoteException {
				android.os.Parcel _data = android.os.Parcel.obtain();
				android.os.Parcel _reply = android.os.Parcel.obtain();
				java.lang.String _result;
				try {
					_data.writeInterfaceToken(DESCRIPTOR);
					_data.writeString(someone);
					mRemote.transact(Stub.TRANSACTION_greet, _data, _reply, 0);
					_reply.readException();
					_result = _reply.readString();
				} finally {
					_reply.recycle();
					_data.recycle();
				}
				return _result;
			}
		}

		static final int TRANSACTION_greet = (android.os.IBinder.FIRST_CALL_TRANSACTION + 0);
	}

	public java.lang.String greet(java.lang.String someone) throws android.os.RemoteException;
}
该文件的大纲视图如下:
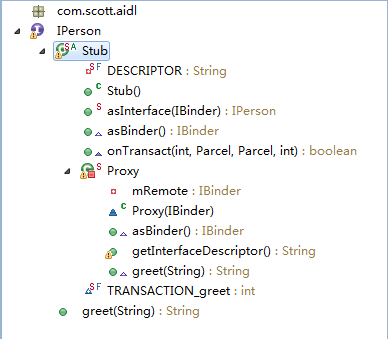
IPerson接口中的抽象内部类Stub继承android.os.Binder类并实现IPerson接口,比较重要的方法是asInterface(IBinder)方法,该方法会将IBinder类型的对象转换成IPerson类型,必要的时候生成一个代理对象返回结果。
接下来就是我们的Service了:
package com.scott.server;

import android.app.Service;
import android.content.Intent;
import android.os.IBinder;
import android.os.RemoteException;
import android.util.Log;

import com.scott.aidl.IPerson;

public class AIDLService extends Service {

	private static final String TAG = "AIDLService";

	IPerson.Stub stub = new IPerson.Stub() {
		@Override
		public String greet(String someone) throws RemoteException {
			Log.i(TAG, "greet() called");
			return "hello, " + someone;
		}
	};

	@Override
	public IBinder onBind(Intent intent) {
		Log.i(TAG, "onBind() called");
		return stub;
	}

	@Override
	public boolean onUnbind(Intent intent) {
		Log.i(TAG, "onUnbind() called");
		return true;
	}

	@Override
	public void onDestroy() {
		super.onDestroy();
		Log.i(TAG, "onDestroy() called");
	}
}
我们实现了IPerson.Stub这个抽象类的greet方法,然后再onBind(Intent)方法中返回我们的stub实例,这样一来调用方获取的IPerson.Stub就是我们的这个实例,greet方法也会按照我们的期望那样执行。
当然,要想让Service生效,我们还需要在AndroidManifest.xml中做一些配置工作:
<service android:name=".AIDLService">
    <intent-filter>
        <action android:name="android.intent.action.AIDLService" />
             <category android:name="android.intent.category.DEFAULT" />
    </intent-filter>
</service>
服务端已经完成了,接下来我们就该完成客户端的工作了。我已经建好了一个客户端工程,如图:
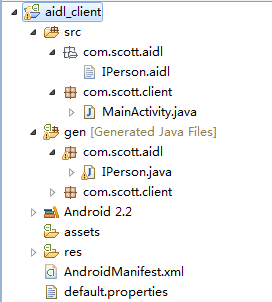
我们只需要把IPerson.aidl文件拷到相应的目录中即可,编译器同样会生成相对应的IPerson.java文件,这一部分和服务端没什么区别。这样一来,服务端和客户端就在通信协议上达到了统一。我们主要工作在MainActivity中完成。
MainActivity代码如下:
package com.scott.client;

import android.app.Activity;
import android.content.ComponentName;
import android.content.Context;
import android.content.Intent;
import android.content.ServiceConnection;
import android.os.Bundle;
import android.os.IBinder;
import android.os.RemoteException;
import android.util.Log;
import android.view.View;
import android.widget.Button;
import android.widget.Toast;

import com.scott.aidl.IPerson;

public class MainActivity extends Activity {

	private Button bindBtn;
	private Button greetBtn;
	private Button unbindBtn;

	private IPerson person;
	private ServiceConnection conn = new ServiceConnection() {

		@Override
		public void onServiceConnected(ComponentName name, IBinder service) {
			Log.i("ServiceConnection", "onServiceConnected() called");
			person = IPerson.Stub.asInterface(service);
		}

		@Override
		public void onServiceDisconnected(ComponentName name) {
			//This is called when the connection with the service has been unexpectedly disconnected,
			//that is, its process crashed. Because it is running in our same process, we should never see this happen.
			Log.i("ServiceConnection", "onServiceDisconnected() called");
		}
	};

	@Override
	public void onCreate(Bundle savedInstanceState) {
		super.onCreate(savedInstanceState);
		setContentView(R.layout.main);

		bindBtn = (Button) findViewById(R.id.bindBtn);
		bindBtn.setOnClickListener(new View.OnClickListener() {
			@Override
			public void onClick(View v) {
				Intent intent = new Intent("android.intent.action.AIDLService");
				bindService(intent, conn, Context.BIND_AUTO_CREATE);

				bindBtn.setEnabled(false);
				greetBtn.setEnabled(true);
				unbindBtn.setEnabled(true);
			}
		});

		greetBtn = (Button) findViewById(R.id.greetBtn);
		greetBtn.setOnClickListener(new View.OnClickListener() {
			@Override
			public void onClick(View v) {
				try {
					String retVal = person.greet("scott");
					Toast.makeText(MainActivity.this, retVal, Toast.LENGTH_SHORT).show();
				} catch (RemoteException e) {
					Toast.makeText(MainActivity.this, "error", Toast.LENGTH_SHORT).show();
				}
			}
		});

		unbindBtn = (Button) findViewById(R.id.unbindBtn);
		unbindBtn.setOnClickListener(new View.OnClickListener() {
			@Override
			public void onClick(View v) {
				unbindService(conn);

				bindBtn.setEnabled(true);
				greetBtn.setEnabled(false);
				unbindBtn.setEnabled(false);
			}
		});
	}
}
从代码中可以看到,我们要重写ServiceConnection中的onServiceConnected方法将IBinder类型的对像转换成我们的IPerson类型。到现在我们就剩下最后一个步骤了,这个环节也是最为关键的,就是绑定我们需要的服务。我们通过服务端Service定义的“android.intent.action.AIDLService”这个标识符来绑定其服务,这样客户端和服务端就实现了通信的连接,我们就可以调用IPerson中的“问候”方法了。
最后,贴几张客户端演示过程图。
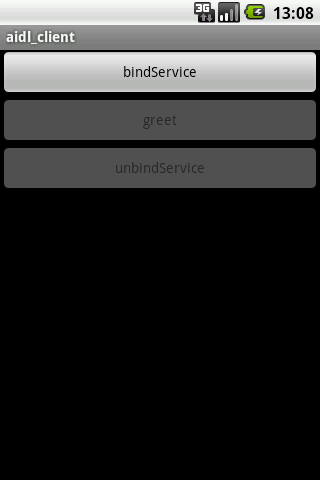
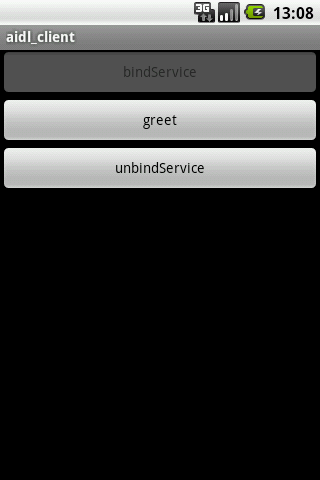

按照顺序分别是:初始界面;点击bindService后界面;点击greet后界面;点击unbindService后界面。
操作过程中的日志如下:

