

支持滚动条的图片查看控件
图片显示滚动条的常规做法
在用C#做WinForm开发时,如果要支持查看图片时显示滚动条通常按照如下方式去做:
第一步,拖一个Panel控件到窗口上并设置Dock = DockStyle.Fill,AutoScroll=true.
第二步,拖一个PictureBox控件到Panel控件中,设置其Position为(0, 0),SizeMode为AutoSize
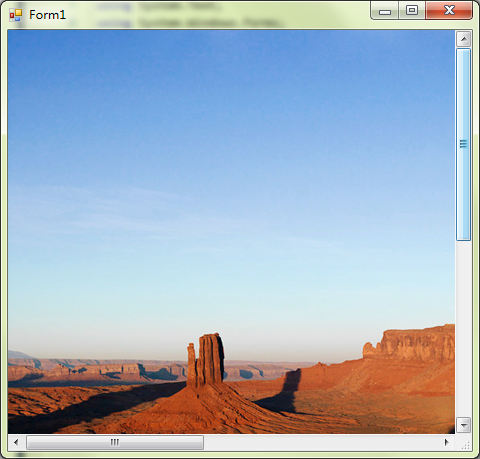
这样在查看的图片的宽高大于窗口的宽高时就会出现滚动条。
如果按照上述步骤封装成一个UserControl,并定义一些列的属性和事件下次使用直接从Toolbox拖到窗口上就可以了。
最终效果如下图所示:
如果要在查看时支持缩放图片该怎么办呢?你可以通过改变PictureBox的SizeMode属性为Zoom并动态计算PictureBox的Position和Size来实现。
但本文将采取另外一种方式实现支持滚动条的图片查看控件。
UserControl和Control
UserControl和Control是开发WinForm控件时常用的两个基类。继承自UserControl的控件通常叫做用户自定义控件,常用于组合一系列的控件成一个新的控件。而继承自Control的控件通常叫做完全自定义控件,通常用于从头开发一个新的控件。所有的WinForm的控件都是继承自Control的,包括UserControl。UserControl和Control的关系如下图所示(忽略了其他接口):
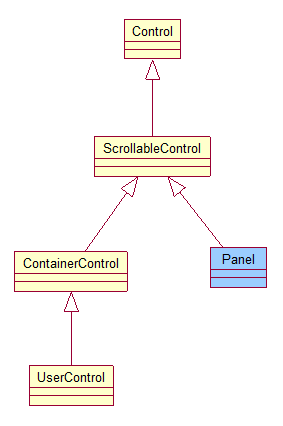
从图上可以看出,UserControl继承自容器控件类ContainerControl,ContainerControl类继承自支持滚动的ScrollableControl类,ScrollableControl类继承自Control类。支持滚动的Panel控件同样继承自ScrollableControl,是ScrollableControl的一个泛化。
本文的目的不是讲解UserControl和Control的区别、属性、事件、方法之类的,想要详细了解请参阅MSDN。
在控件上显示图像
要在控件上显示图像,需要用到Graphics画布对象。你可以在控件的任意方法或属性中创建Graphics的一个实例:
也可以在OnPaint事件的参数中获取:
 View Code

2 {
3 base.OnPaint(pe);
4 var g = pe.Graphics;
5 DrawImage(pe);
6 }
获取到Graphics对象后,你就可以通过调用Graphics.DrawImage方法在控件上绘制图像了。Graphics.DrawImage方法有很多重载,支持部分绘制图像、对图像进行处理等。本文只使用DrawImage(Image image, Rectangle rect)把图像绘制到rect参数定义的矩形区域,关于Graphics和DrawImage的更详细的说明请参见MSDN。
简单的设计一下
看完上面的内容,你应该对如何开发支持滚动和缩放的PictureViewer有了一定的了解了吧?是否摩拳擦掌准备动手写代码了?不着急,我们先想一想需要支持哪些功能。我们简单的列一个功能清单,如下:
1. 支持图片超出显示区域时,通过滚动条查看图像;
2. 支持自动适应窗口大小或窗口的宽度;
3. 支持Ctrl+鼠标滚轮进行任意比例的缩放;
4. 支持通过设置图像文件或Image对象显示图像;
5. 支持对图像的缩放范围进行限制;
在明确需要支持的功能清单后,我们可以开始编写代码了。
开始编码
选择基类
为了使控件支持滚动条,我们选择ScrollableControl作为控件的基类,并把控件的AutoScroll设置为true。启用了双缓冲可以解决闪动的问题。
{
/// <summary>
/// 创建PictureViewer的一个实例
/// </summary>
public PictureViewer()
{
this.AutoScroll = true;
this.DoubleBuffered = true;
InitializeComponent();
}
}
定义属性
接下来定义一些公共属性,用来配置控件显示的图像,缩放步进、缩放比率等。
View Code
2 /// 获取或设置图片文件
3 /// </summary>
4 [Description("如果同时设置了Image属性和ImageFile属性,使用Image属性设置的图像。")]
5 public string ImageFile
6 {
7 get;
8 set;
9 }
10
11 /// <summary>
12 /// 图像
13 /// </summary>
14 private Image _image = null;
15 /// <summary>
16 /// 获取或设置图像。
17 /// </summary>
18 [Description("如果同时设置了Image属性和ImageFile属性,使用Image属性设置的图像。")]
19 public Image Image
20 {
21 get
22 {
23 if (_image != null)
24 {
25 return _image;
26 }
27 else
28 {
29 if (!string.IsNullOrEmpty(ImageFile))
30 {
31 _image = Image.FromFile(ImageFile);
32 }
33 }
34 return _image;
35 }
36 set
37 {
38 _image = value;
39 }
40 }
41
42 /// <summary>
43 /// 缩放步进
44 /// </summary>
45 private int _zoomStep = 10;
46 /// <summary>
47 /// 获取或设置缩放步进,1至100之间
48 /// </summary>
49 public int ZoomStep
50 {
51 get { return _zoomStep; }
52 set
53 {
54 if (value < 1)
55 {
56 _zoomStep = 1;
57 }
58 else if (value > 100)
59 {
60 _zoomStep = 100;
61 }
62 else
63 {
64 _zoomStep = value;
65 }
66 }
67 }
68
69 /// <summary>
70 /// 最大缩放比率,表示为百分之几。
71 /// </summary>
72 private int _maxZoomPercent = 1000;
73 /// <summary>
74 /// 获取或设置最大缩放比率,表示为百分之几。
75 /// </summary>
76 public int MaxZoomPercent
77 {
78 get { return _maxZoomPercent; }
79 set { _maxZoomPercent = value; }
80 }
81
82 /// <summary>
83 /// 当前缩放比例
84 /// </summary>
85 private int _zoomPercent = 100;
86 /// <summary>
87 /// 获取或设置当前缩放比例
88 /// </summary>
89 public int ZoomPercent
90 {
91 get { return _zoomPercent; }
92 set
93 {
94 if (_zoomPercent < 1)
95 {
96 _zoomPercent = 1;
97 }
98 else if (_zoomPercent > MaxZoomPercent)
99 {
100 _zoomPercent = MaxZoomPercent;
101 }
102 else
103 {
104 _zoomPercent = value;
105 }
106 this.Invalidate();
107 }
108 }
109
110 /// <summary>
111 /// 适应模式
112 /// </summary>
113 private FitMode _fitMode = FitMode.FitAll;
114 /// <summary>
115 /// 获取或设置初始适应模式
116 /// </summary>
117 public FitMode FitMode
118 {
119 get { return _fitMode; }
120 set
121 {
122 _fitMode = value;
123 if (_fitMode == ControlsLibrary.FitMode.FitPercent)
124 {
125 ZoomPercent = 100;
126 }
127 else
128 {
129 this.Invalidate();
130 }
131 }
132 }
上面的FitMode是一个枚举类型,其定义如下。
View Code
2 /// 图像适应模式
3 /// </summary>
4 public enum FitMode
5 {
6 /// <summary>
7 /// 全部适应
8 /// </summary>
9 FitAll,
10 /// <summary>
11 /// 适应宽度
12 /// </summary>
13 FitWidth,
14 /// <summary>
15 /// 适应到百分比
16 /// </summary>
17 FitPercent
18 }
注意,在为FitMode和ZoomPercent属性赋值时,调用了Invalidate()方法。这个方法会通知Windows重新绘制这个控件。通常情况下只在OnPaint事件中绘制,其他地方通过调用Invalidate方法通知Windows重绘重绘。Invalidate方法有很多重载,这里不一一表述,如想进一步了解请参考MSDN相关文档。
计算图像大小和位置
下面我们要计算绘制图像的大小。根据设计,控件要支持图像自适应控件大小,图像自适应控件宽度以及指定百分比。我们分别编写三个方法,用来计算三种模式下的图像大小:
View Code 2 /// 适应工作区
3 /// </summary>
4 /// <returns>图像大小</returns>
5 private Size FitAll()
6 {
7int width = 0;
8int height = 0;
9
10var imageRatio = (float)Image.Width / (float)Image.Height;
11// 较宽
12 if (imageRatio > 1)
13 {
14 width = Math.Min(Image.Width, this.ClientSize.Width);
15 height = (int)(width / imageRatio);
16if (height > this.ClientSize.Height)
17 {
18 height = this.ClientSize.Height;
19 width = (int)(height * imageRatio);
20 }
21 }
22else
23 {
24 height = Math.Min(Image.Height, this.ClientSize.Height);
25 width = (int)(height * imageRatio);
26if (width > this.ClientSize.Width)
27 {
28 width = this.ClientSize.Width;
29 height = (int)(height / imageRatio);
30 }
31 }
32return new Size(width, height);
33 }
34
35/// <summary>
36 /// 自适应宽度
37 /// </summary>
38 /// <returns>图像大小</returns>
39 private Size FitWidth()
40 {
41int width = this.ClientSize.Width;
42int height = (int)(Image.Height * (float)width / (float)Image.Width);
43return new Size(width, height);
44 }
45
46/// <summary>
47 /// 适应到指定百分比
48 /// </summary>
49 /// <param name="percent">百分比,默认100</param>
50 /// <returns>图像大小</returns>
51 private Size FitPercent(int percent = 100)
52 {
53if (percent == 100)
54 {
55return Image.Size;
56 }
57
58if (percent < 1)
59 {
60 percent = 1;
61 }
62else if (percent > MaxZoomPercent)
63 {
64 percent = MaxZoomPercent;
65 }
66
67int width = (int)(Image.Width * ((float)percent / 100f));
68int height = (int)(Image.Height * ((float)percent / 100f));
69return new Size(width, height);
70 }
确定了各种模式下图像的大小后,我们需要确定把图像绘制到什么位置,这样就得到了图像绘制区域的矩形:
View Code 2 /// 创建图像区域矩形
3 /// </summary>
4 private Rectangle CreateRectangle()
5 {
6 var size = Size.Empty;
7 if (FitMode == ControlsLibrary.FitMode.FitAll)
8 {
9 size = FitAll();
10 }
11 else if (FitMode == ControlsLibrary.FitMode.FitWidth)
12 {
13 size = FitWidth();
14 }
15 else
16 {
17 size = FitPercent(this.ZoomPercent);
18 }
19 var x = Math.Max((this.Size.Width - size.Width) / 2, 0);
20 var y = Math.Max((this.Size.Height - size.Height) / 2, 0);
21 return new Rectangle(new Point(x, y), size);
22 }
绘制图像
下面就到了最关键的地方,绘制图像:
View Code 2 /// 绘制图像
3 /// </summary>
4 private void DrawImage(PaintEventArgs e)
5 {
6 if (Image == null)
7 {
8 return;
9 }
10
11 var rect = CreateRectangle();
12
13 // 根据滚动条修改画布坐标原点的位置。
14 e.Graphics.TranslateTransform(-this.HorizontalScroll.Value, -this.VerticalScroll.Value);
15
16 // 设置滚动条出现的最小Size
17 if (this.AutoScrollMinSize != rect.Size)
18 {
19 this.AutoScrollMinSize = rect.Size;
20 }
21 e.Graphics.DrawImage(Image, rect);
22 }
这段代码中有两个地方需要注意:
通过调用Graphics的TranslateTransform函数可以修改画布的坐标原点的位置,如果注销这个局域,则图像不会随着滚动条的滚动而滚动。
通过设置AutoScrollSize可以控件定义当工作区小于指定大小时出现滚动条。这里把AutoScrollMinSize设置为图像矩形的大小,就可以让控件在图片大小大于控件大小是自动出现滚动条。
接下来覆盖基类的OnPaint方法,绘制图像:
View Code 2 /// 绘制控件
3 /// </summary>
4 protected override void OnPaint(PaintEventArgs pe)
5 {
6 base.OnPaint(pe);
7 var g = pe.Graphics;
8 DrawImage(pe);
9 }
这时候,在窗口中调用拖入一个PictureViewer控件并设置其Image或ImageFile属性已经可以显示图像和滚动条了,通过设置FitMode和ZoomPercent属性也可以修改显示模式和图像的显示比例,滚动滚动条也能正确显示图像了。
实现缩放
最后,只需要覆盖基类的OnMouseWhell事件,实现Ctrl+鼠标滚轮实现缩放图片即可完成控件。
View Code 2 /// 鼠标滚轮事件
3 /// </summary>
4 /// <remarks>
5 /// 按下Ctrl并滚动滚轮,缩放图片。
6 /// </remarks>
7 protected override void OnMouseWheel(MouseEventArgs e)
8 {
9 if ((Control.ModifierKeys & Keys.Control) == Keys.Control)
10 {
11 if (e.Delta > 0)
12 {
13 this.ZoomPercent += ZoomStep;
14 }
15 else
16 {
17 this.ZoomPercent -= ZoomStep;
18 }
19 return;
20 }
21
22 base.OnMouseWheel(e);
23 }
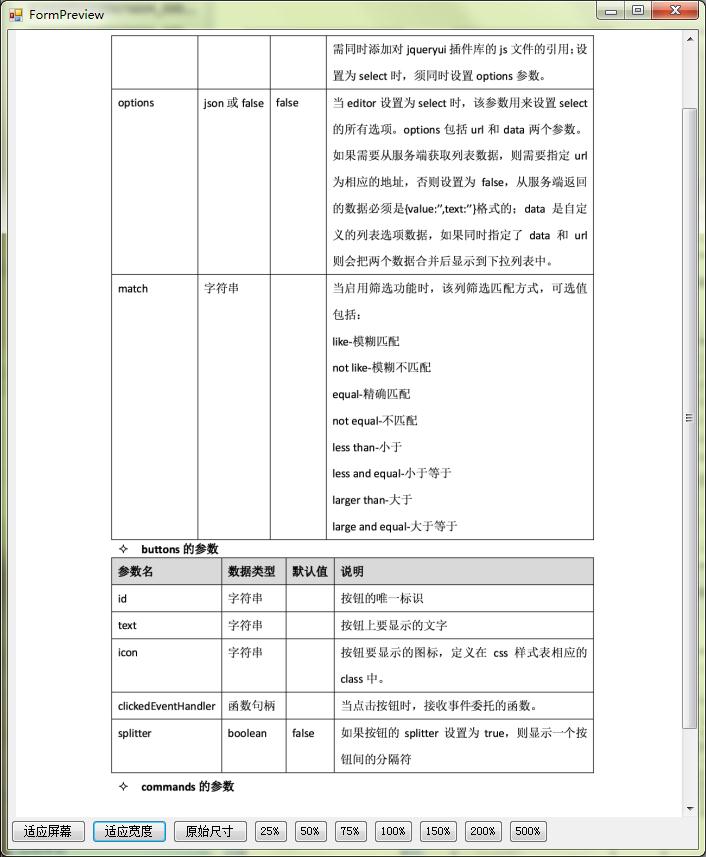
最终的运行效果如下图。
总结
一般自定义控件控件开发就有几个步骤:
1. 选择合适的基类;
2. 定义公共属性;
3. 绘制要显示的内容,在适当的时候进行坐标变换。本文中计算图像大小和位置都属于这一操作;
4. 定义事件的默认操作。如本例的Ctrl+滚轮可以缩放图像;
5. 如有必要,定义一些事件和方法供使用控件时调用(本例没有提供自定义事件和方法)。
去试试吧,一旦你开始了就没有什么困难的。
