Integrating TinyMCE Editor with ASP.NET
Introduction
In one of my projects, there was a requirement to embed a WYSIWYG editor. Some of the features that were looked into were:
- Easy to configure
- Open source
- In some cases, user can edit only portion of the pre-rendered text in the editor.
After searching a lot, I came across TinyMCE editor (http://tinymce.moxiecode.com/). But, I had some issues in integrating the same with ASP.NET applications. The following write up provides one of the ways to integrate with TinyMCE.
How To
The following section provides the steps to implement it in ASP.NET.
Step 1: Download the latest version (tinymce_3_3_7.zip) from the following location,http://tinymce.moxiecode.com/download.php. Unzip the downloaded .zip file in one of your local folders.
Step 2: Create an ASP.NET web application and copy the tinymce folder to the web application. The solution explorer would look something like this.

Note: You can remove the examples folder under tinymce folder.
Step 3: Add a reference of tiny_mce.js file to the page in which you would like to integrate the TinyMCE editor.
Include tiny_mce.js file at the top of your file.
<script type="text/javascript" src="tinymce/jscripts/tiny_mce/tiny_mce.js"></script>
Add the following lines of code which initialize all the textarea controls on the WYSIWYG editor type. They are quite customizable, please check the examples section in their web site.
<script type="text/javascript">
tinyMCE.init({
// General options
mode: "textareas",
theme: "advanced",
plugins: "pagebreak,style,layer,table,save,advhr,advimage,advlink,emotions,iespell,
inlinepopups,insertdatetime,preview,media,searchreplace,print,contextmenu,paste,
directionality,fullscreen,noneditable,visualchars,nonbreaking,xhtmlxtras,template,
wordcount,advlist,autosave",
setup: function(ed) {
ed.onKeyPress.add(
function(ed, evt) {
}
);
},
// Theme options
theme_advanced_buttons1: "save,newdocument,|,bold,italic,underline,strikethrough,|,
justifyleft,justifycenter,justifyright,justifyfull,styleselect,formatselect,
fontselect,fontsizeselect",
theme_advanced_buttons2: "cut,copy,paste,pastetext,pasteword,|,search,replace,|,
bullist,numlist,|,outdent,indent,blockquote,|,undo,redo,|,link,unlink,anchor,
image,cleanup,help,code,|,insertdate,inserttime,preview,|,forecolor,backcolor",
theme_advanced_buttons3: "tablecontrols,|,hr,removeformat,visualaid,|,sub,sup,|,
charmap,emotions,iespell,media,advhr,|,print,|,ltr,rtl,|,fullscreen",
theme_advanced_buttons4: "insertlayer,moveforward,movebackward,absolute,|,
styleprops,|,cite,abbr,acronym,del,ins,attribs,|,visualchars,nonbreaking,
template,pagebreak,restoredraft",
theme_advanced_toolbar_location: "top",
theme_advanced_toolbar_align: "left",
theme_advanced_statusbar_location: "bottom",
theme_advanced_resizing: true,
// Example content CSS (should be your site CSS)
content_css: "css/content.css",
// Drop lists for link/image/media/template dialogs
template_external_list_url: "lists/template_list.js",
external_link_list_url: "lists/link_list.js",
external_image_list_url: "lists/image_list.js",
media_external_list_url: "lists/media_list.js",
// Style formats
style_formats: [
{ title: 'Bold text', inline: 'b' },
{ title: 'Red text', inline: 'span', styles: { color: '#ff0000'} },
{ title: 'Red header', block: 'h1', styles: { color: '#ff0000'} },
{ title: 'Example 1', inline: 'span', classes: 'example1' },
{ title: 'Example 2', inline: 'span', classes: 'example2' },
{ title: 'Table styles' },
{ title: 'Table row 1', selector: 'tr', classes: 'tablerow1' }
],
// Replace values for the template plugin
template_replace_values: {
username: "Some User",
staffid: "991234"
}
});
</script>
Step 4: Add a text area control on to the page.
<textarea id="elm1" name="elm1" rows="15" cols="80" style="width: 80%"
runat="server"></textarea>
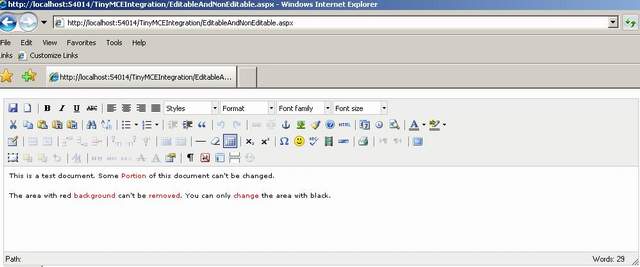
Step 5: Execute the Page J and you should able to see the editor embedded in your ASP.NET page.
Additional Features
In case you would want to have pre rendered text with some non editable text, use the CSS class mceNonEditablefor the text you would want to make it non editable.
this.elm1.Value = "<p>This is a test document. Some <span class='mceNonEditable' style=\"color: #ff0000;\">Portion</span> of this document can't be changed.</p>\r\n<p>The area with red <span class='mceNonEditable' style=\"color: #ff0000;\">background </span> can't be <span class='mceNonEditable' style=\"color: #ff0000;\">removed</span>. You can only <span class='mceNonEditable' style=\"color: #ff0000;\">change </span> the area with black.</p>\r\n<p> </p>";
Where this.elm1 is a textarea control.
Summary
I had difficulties in getting it to work, hence thought this should be useful for people wanting to integrate the TinyMCE editor with their ASP.NET applications.
转自 http://www.codeproject.com/Articles/88142/Integrating-TinyMCE-Editor-with-ASP-NET


【推荐】国内首个AI IDE,深度理解中文开发场景,立即下载体验Trae
【推荐】编程新体验,更懂你的AI,立即体验豆包MarsCode编程助手
【推荐】抖音旗下AI助手豆包,你的智能百科全书,全免费不限次数
【推荐】轻量又高性能的 SSH 工具 IShell:AI 加持,快人一步
· AI与.NET技术实操系列(二):开始使用ML.NET
· 记一次.NET内存居高不下排查解决与启示
· 探究高空视频全景AR技术的实现原理
· 理解Rust引用及其生命周期标识(上)
· 浏览器原生「磁吸」效果!Anchor Positioning 锚点定位神器解析
· DeepSeek 开源周回顾「GitHub 热点速览」
· 记一次.NET内存居高不下排查解决与启示
· 物流快递公司核心技术能力-地址解析分单基础技术分享
· .NET 10首个预览版发布:重大改进与新特性概览!
· .NET10 - 预览版1新功能体验(一)