一 整体功能图和实现思路
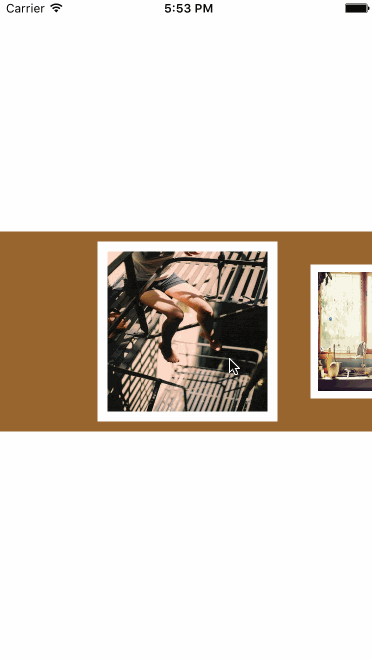
1 完整的功能图:
2 实现功思路:
1> 流水布局(实现UICollectionView必需要的条件)
2> 自己定义cell(实现UICollectionView必需要的条件)
3> 自己定义流水布局
4> 假设想冲缓存池中取,那么必须採用注冊的方法
5> 照片缩放
6> 照片移动后自己主动定位功能
7> 一种新的封装思路
二 流水布局
1 包含下面部分:
—> 1> cell的大小
—> 2> 滚动方向
—> 3> 实现照片墙的额外滚动区域
—> 4> 每一个cell之间的距离
2 下面是未封装的代码:
UICollectionViewFlowLayout *layout = [[UICollectionViewFlowLayout alloc] init];
layout.minimumInteritemSpacing = XFJ_space;
layout.itemSize = CGSizeMake(XFJ_sizeXY, XFJ_sizeXY);
CGFloat margin = (XFJ_screenW - XFJ_sizeXY) * 0.5;
layout.sectionInset = UIEdgeInsetsMake(XFJ_zero, margin, XFJ_zero, margin);
layout.scrollDirection = UICollectionViewScrollDirectionHorizontal;
三 UICollectionView对象创建与相关设置
1 包含下面部分:
—> 1> UICollectionView对象的尺寸,位置
—> 2> 背景颜色
—> 3> 设置代理
2 下面是未封装的代码:
UICollectionView *collectionView = [[UICollectionView alloc] initWithFrame:CGRectZero collectionViewLayout:layout];
collectionView.bounds = CGRectMake(XFJ_zero, XFJ_zero, self.view.bounds.size.width, 200);
collectionView.center = self.view.center;
collectionView.showsHorizontalScrollIndicator = NO;
collectionView.backgroundColor = [UIColor brownColor];
[self.view addSubview:collectionView];
collectionView.dataSource = self;
四 数据源方法
1 包含下面部分:
—> 1> 总共几组
—> 2> cell的个数
—> 3> cell中的内容
2 代码部分:
#pragma mark - 数据源方法(组数,不写默认为一组)
- (NSInteger)numberOfSectionsInCollectionView:(UICollectionView *)collectionView
{
return 1;
}
#pragma mark - cell的个数
- (NSInteger)collectionView:(UICollectionView *)collectionView numberOfItemsInSection:(NSInteger)section
{
return 20;
}
#pragma mark - 每一个cell的内容
- (UICollectionViewCell *)collectionView:(UICollectionView *)collectionView cellForItemAtIndexPath:(NSIndexPath *)indexPath
{
XFJFlowCell *cell = [collectionView dequeueReusableCellWithReuseIdentifier:ID forIndexPath:indexPath];
NSString *imageName = [NSString stringWithFormat:@"%zd",indexPath.row + 1];
cell.image = [UIImage imageNamed:imageName];
return cell;
}
五 自己定义cell
1 自己定义的时候同一时候创建一个xib
2 定义一个图片属性
@property (nonatomic, strong) UIImage *image;
3 通过从xib中拖线的方式,拿到UIImageView对象,用来设置图片
@property (weak, nonatomic) IBOutlet UIImageView *imageView;
4 重写定义好的属性的set方法
- (void)setImage:(UIImage *)image
{
    _image = image;

    self.imageView.image = image;
}
5 将设置cell内容中的cell类型改为自己定义的类型,让程序载入的时候,直接载入自己定义的类型
六 注冊
1 注意: 运用UICollectionView的时候,假设想从缓存池中取,那么必需要採用注冊的方法,採用一般的方法是不能够的.
2 代码部分:
[collectionView registerNib:[UINib nibWithNibName:@"XFJFlowCell" bundle:nil] forCellWithReuseIdentifier:ID];
七 自己定义流水布局
1 自己定义原因: 假设想要达到整个app执行的效果图,那么传统的流水布局是无法实现的,那么我们就需要自己定义.以后再开发中也是这样,在开发中大多数的功能,系统是无法实现的,那么我们就需要自己定义.
2 创建自己定义流水布局(继承系统的类)
3 照片的缩放
3.1 必需要知道的事: 我们通过观察效果图知道,并非全部的cell都需要缩放,仅仅是在我们视线范围内的图片需要缩放.
3.2 怎样计算缩放比例?
3.3 依据什么来进行缩放的?
代码部分:
- (nullable NSArray<__kindof UICollectionViewLayoutAttributes *> *)layoutAttributesForElementsInRect:(CGRect)rect
{
NSArray *atts = [super layoutAttributesForElementsInRect:self.collectionView.bounds];
CGFloat width = self.collectionView.bounds.size.width;
CGFloat offsetX = self.collectionView.contentOffset.x;
for (UICollectionViewLayoutAttributes *att in atts) {
CGFloat delta = fabs(att.center.x - (width * 0.5 + offsetX));
CGFloat scal = 1 - delta / (width * 0.5) * 0.25;
att.transform = CGAffineTransformMakeScale(scal, scal);
}
return atts;
}
4 照片定位功能
4.1 当我们用手指拖动照片,然后停止的时候,照片会定位到中心点的位置
4.2 实现思路: 计算出中心点,然后通过与中心点的距离做比較,离中心点近的图片,就自己主动定位到中心位置
4.3 明白: 假设用户高速拖动,而且停止的时候,照片会有缓冲,要知道怎样计算偏移量.
详细的代码:
- (CGPoint)targetContentOffsetForProposedContentOffset:(CGPoint)proposedContentOffset withScrollingVelocity:(CGPoint)velocity
{
CGFloat width = self.collectionView.bounds.size.width;
CGRect targetR = CGRectMake(proposedContentOffset.x, 0, width, MAXFLOAT);
NSArray *atts = [super layoutAttributesForElementsInRect:targetR];
CGFloat minDelta = MAXFLOAT;
for (UICollectionViewLayoutAttributes *att in atts) {
CGFloat delta = att.center.x - (width * 0.5 + proposedContentOffset.x);
if (fabs(delta) < fabs(minDelta)) {
minDelta = delta;
}
}
proposedContentOffset.x += minDelta;
if (proposedContentOffset.x < 0) {
proposedContentOffset.x = 0;
}
return proposedContentOffset;
}
5 将系统的流水布局,改为自己定义的流水布局.
八 前提
注意: 在实现上面对比片的缩放,和自己主动定位功能的方法的前提下,我们必需要实现下面的代码,假设不实现,是无法达到效果的.会出现故障.
1 仅仅要滚动就会刷新
- (BOOL)shouldInvalidateLayoutForBoundsChange:(CGRect)newBounds
{
return YES;
}
九 新的封装方法
1 思路:运用到了C语言中的思路,下面的代码中值等于最后一个.
int a = ({
    int b = 2;
    int c = 3;
    int d = 4;
    a = b + c + d;
    5;
});
2 详细对流水布局和创建UICollectionView对象的封装代码:
2.1 封装代码块一:
XFJFlowLayout *layout = ({
XFJFlowLayout *layout = [[XFJFlowLayout alloc] init];
layout.minimumInteritemSpacing = XFJ_space;
layout.itemSize = CGSizeMake(XFJ_sizeXY, XFJ_sizeXY);
CGFloat margin = (XFJ_screenW - XFJ_sizeXY) * 0.5;
layout.sectionInset = UIEdgeInsetsMake(XFJ_zero, margin, XFJ_zero, margin);
layout.scrollDirection = UICollectionViewScrollDirectionHorizontal;
layout;
});
2.2 封装代码块二:
UICollectionView *collectionView = ({
UICollectionView *collectionView = [[UICollectionView alloc] initWithFrame:CGRectZero collectionViewLayout:layout];
collectionView.bounds = CGRectMake(XFJ_zero, XFJ_zero, self.view.bounds.size.width, 200);
collectionView.center = self.view.center;
collectionView.showsHorizontalScrollIndicator = NO;
collectionView.backgroundColor = [UIColor brownColor];
[self.view addSubview:collectionView];
collectionView.dataSource = self;
collectionView;
});
3 封装的优点
1> 能非常快的找到相应的位置.比方:假设是流水布局需要改动,就能直接找到流水布局的代码块;同理也非常快的找到UICollectionView中的代码块进行改动
2> 给阅读代码的人眼前一种新奇的感觉,感觉非常高大上.同一时候也可能会影响一部分人对代码不easy读懂(C语言知识比較薄弱).
十 总结
1 该文简单的对UICollectionView的使用方法进行了补充,里面涉及到了比較多的数学运算,调理还算是比較清晰
2 该文给大家提供了一种新的封装思想
3 希望能帮到大家,提高大家,大家有什么意见,麻烦请留言,假设你认为还惬意的话,请关注我的官方博客,谢谢!!!!


