AMQ学习笔记 - 02. JMS客户端编程模型
概述
客户端编程模型,是讲如何使用JMS API实现Java应用程序和JMS Provider的通信。
消息传送模式
消息传送模式又称为消息传送域,JMS API定义了两种模式:PTP和Pub/Sub。
PTP
全称:Point-to-Point 中文:点对点

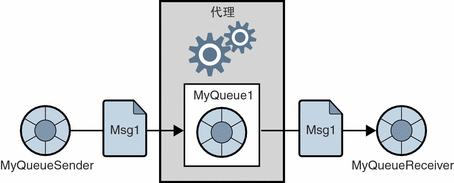
上图描述了这样的内容:Sender发送Message到代理维护的Queue,然后Receiver可以从这个Queue中获取这个Message。
这个模式的特点是:
- 一个Message只能交给一个Receiver;这里的Message像是一个消耗品。
- 只要Queue中有Message,Receiver就能获取到。
Pub/Sub
全称:Publish/Subscribe 中文:发布/订阅

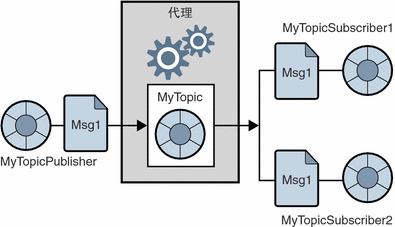
上图描述了这样的内容:Publisher发布Message到代理维护的Topic,Subscriber从代理那里订阅的Topic,从而可以获取对应的Message。
这个模式的特点是:
- 一个Message可以复制多份,交给多个Subscriber。
- 先订阅,再获取 - Subscriber只能获取订阅之后发送到Topic的Message。
角色定位
MOM包含四个基本元素:消息传递提供者、目的地、客户端(发送方或接收方)、消息。上述两种模式在MOM中的角色定位,可以表现为:

JMS API
JavaEE提供的javax.jms包中,涵盖了JMS的API。
统一域和特定于域的API
早期的规范中,PTP和Pub/Sub各有不同的接口体系,后来的JMS1.1在两个接口体系的上层,又定义了一层统一的接口体系,称为统一域的API;而之前的两套接口体系,称为特定于域的API。对比情况如下:

注意:JMS当然不是只提供了上述的接口。上述接口,只是在统一之后,有对比意义的接口。
编程模型

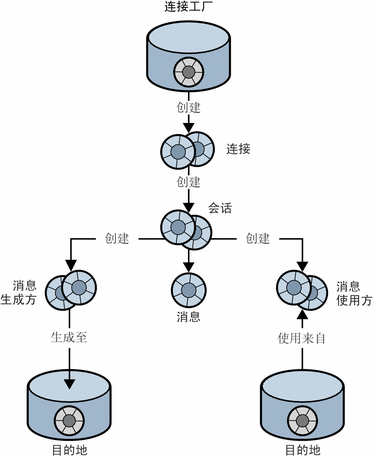
说明:连接工厂、目的地通常作为受管理对象来创建、配置、管理,驻留在对象存储库中;客户端程序通过JNDI查找获取对象,而不建议显示的创建。所以连接工厂、目的地在上图的表示有所不同。
对象简介
- 连接工厂(ConnectionFactory)
客户端使用连接工厂对象(ConnectionFactory)创建连接。 - 连接(Connection)
连接对象 (Connection) 表示客户端与代理之间的活动连接。创建连接时会分配通信资源并对客户端进行验证。这是一个相当重要的对象,大多数客户端均使用一个连接来完成所有的消息传送。连接支持并发使用:一个连接可由任意数量的生成方和使用方共享。 - 会话(Session)
如果连接代表客户端与代理之间的通信渠道,则会话标记客户端与代理之间的单次对话。会话对象主要用于创建消息、消息生成方和消息使用方。 - 消息(Message)
消息封装一次通信的内容。消息由三部分组成:消息头、属性和主体。 - 消息生成方(MessageProducer)
由Session创建,负责发送Message到目的地。 - 消息使用方(MessageConsumer)
由Session创建,负责从目的地中消费Message。 - 目的地(Destination)
JMS Provider负责维护,用于对Message进行管理的对象。MessageProducer需要指定Destination才能发送消息,MessageReceiver需要指定Destination才能接收消息。
demo
将上文的客户端编程模型应用起来。两个客户端:producer-client负责发送消息到ActiveMQ;consumer-client负责从ActiveMQ中获取消息。
在此之前,你需要下载ActiveMQ,并确保成功启动。
下载:不同的版本对JDK版本的要求不同,当前最新稳定版本是5.13.2,要求JDK1.7以上。
安装:直接解压缩
启动:(1) 在cmd窗口,切换到解压缩的路径;(2) bin\activemq start[1]
确认:ActiveMQ提供了监控器,访问http://localhost:8161/admin,默认账号:admin/admin。可以访问,表示启动成功。
补充:
[1] 在启动的时候可能会遇到下面的错误
Error occurred during initialization of VM
Could not reserve enough space for object heap
Error: Could not create the Java Virtual Machine.
Error: A fatal exception has occurred. Program will exit.
修改bin\activemq.bat文件:
if "%ACTIVEMQ_OPTS%" == "" set ACTIVEMQ_OPTS=-Xms1G -Xmx1G
将Xms和Xmx适当调小,如256M。
1.producer-client
基于Maven的simple project。你可以在jms-producer拿到源代码。
文件目录结构
pom.xml
src/main/resources/
    |---- jndi.properties
src/main/java/
    |---- cn.sinobest.asj.producer.jms.clientmode
              |---- SimpleProducer.java # 基于客户端编程模型,发送消息给ActiveMQ
文件内容
1.pom.xml
 1 <project xmlns="http://maven.apache.org/POM/4.0.0"
 2     xmlns:xsi="http://www.w3.org/2001/XMLSchema-instance"
 3     xsi:schemaLocation="http://maven.apache.org/POM/4.0.0 http://maven.apache.org/xsd/maven-4.0.0.xsd">
 4     <modelVersion>4.0.0</modelVersion>
 5     <groupId>cn.sinobest.asj</groupId>
 6     <artifactId>jms-producer</artifactId>
 7     <version>0.0.1-SNAPSHOT</version>
 8     <name>jms-producer</name>
 9     <description>基于ActiveMQ的Producer Client。</description>
10     <dependencies>
11         <!-- import activemq-client to send message to ActiveMQ -->
12         <dependency>
13             <groupId>org.apache.activemq</groupId>
14             <artifactId>activemq-client</artifactId>
15             <version>5.13.2</version>
16         </dependency>
17         <!-- not necessary, import to remove the warn message from activemq-client -->
18         <dependency>
19             <groupId>org.slf4j</groupId>
20             <artifactId>slf4j-simple</artifactId>
21             <version>1.7.19</version>
22         </dependency>
23     </dependencies>
24 </project>
2.jndi.properties
 1 java.naming.factory.initial=org.apache.activemq.jndi.ActiveMQInitialContextFactory
 2
 3 # use the following property to configure the default connector
 4 java.naming.provider.url=tcp://localhost:61616
 5
 6 # register some queues in JNDI using the form
 7 # queue.[jndiName] = [physicalName]
 8 queue.exampleQueue=example.queue
 9
10 # register some topics in JNDI using the form
11 # topic.[jndiName] = [physicalName]
12 topic.exampleTopic = example.topic
说明:
- java.naming.factory.initial
定义ConnectionFactory的实例化类。 - java.naming.provider.url
定义broker的url,这个是ActiveMQ默认的url。 - queue.exampleQueue
定义了一个Queue Destination。name为example.queue,JNDI的name为exampleQueue。 - topic.exampleTopic
定义了一个Topic Destination。name为example.topic,JNDI的name为exampleTopic。
3.SimpleProcedure.java

 1 package cn.sinobest.asj.producer.jms.clientmode;
 2 import javax.jms.Connection;
 3 import javax.jms.ConnectionFactory;
 4 import javax.jms.Destination;
 5 import javax.jms.JMSException;
 6 import javax.jms.MessageProducer;
 7 import javax.jms.Session;
 8 import javax.jms.TextMessage;
 9 import javax.naming.Context;
10 import javax.naming.InitialContext;
11 import javax.naming.NamingException;
12 /**
13  * A simple demo for producer client to send message to ActiveMQ.<br>
14  * refer to <a href="http://activemq.apache.org/jndi-support.html">JNDI
15  * Support</a>
16  *
17  * @author lijinlong
18  */
19 public class SimpleProducer {
20     /** JNDI name for ConnectionFactory */
21     static final String CONNECTION_FACTORY_JNDI_NAME = "ConnectionFactory";
22     /** JNDI name for Queue Destination (use for PTP Mode) */
23     static final String QUEUE_JNDI_NAME = "exampleQueue";
24     /** JNDI name for Topic Destination (use for Pub/Sub Mode) */
25     static final String TOPIC_JNDI_NAME = "exampleTopic";
26     /**
27      * @param args
28      */
29     public static void main(String[] args) {
30         Context jndiContext = null;
31         ConnectionFactory connectionFactory = null;
32         Connection connection = null;
33         Session session = null;
34         Destination destination = null;
35         MessageProducer producer = null;
36         // create a JNDI API IntialContext object
37         try {
38             jndiContext = new InitialContext();
39         } catch (NamingException e) {
40             System.out.println("Could not create JNDI Context:"
41                     + e.getMessage());
42             System.exit(1);
43         }
44
45         // look up ConnectionFactory and Destination
46         try {
47             connectionFactory = (ConnectionFactory) jndiContext
48                     .lookup(CONNECTION_FACTORY_JNDI_NAME);
49             // look up QUEUE_JNDI_NAME for PTP Mode
50             // look up TOPIC_JNDI_NAME for Pub/Sub Mode
51             destination = (Destination) jndiContext.lookup(QUEUE_JNDI_NAME);
52         } catch (NamingException e) {
53             System.out.println("JNDI look up failed:" + e.getMessage());
54             System.exit(1);
55         }
56
57         // send Messages and finally release the resources.
58         try {
59             connection = connectionFactory.createConnection();
60             session = connection.createSession(Boolean.FALSE,
61                     Session.AUTO_ACKNOWLEDGE);
62             producer = session.createProducer(destination);
63             TextMessage message = session.createTextMessage();
64             for (int i = 0; i < 3; i++) {
65                 message.setText(String.format("This is the %dth message.",
66                         i + 1));
67                 producer.send(message);
68             }
69         } catch (JMSException e) {
70             e.printStackTrace();
71         } finally {
72             try {
73                 if (session != null)
74                     session.close();
75                 if (connection != null)
76                     connection.close();
77             } catch (JMSException e) {
78                 e.printStackTrace();
79             }
80         }
81     }
82 }
说明:
- 第23行声明的JNDI name for ConnectionFactory的值是固定的。
- 第25行声明的JNDI name for Queue的值,对应于jndi.properties的queue的jndi name。
- 第27行声明的JNDI name for Topic的值,对应于jndi.properties的topic的jndi name。
- 第55行look up Destination的实例,参数取QUEUE_JNDI_NAME或TOPIC_JNDI_NAME,分别对应PTP模式和Pub/Sub模式。
2.consumer-client
基于Maven的simple project。你可以在jms-consumer拿到源代码。
文件目录结构
pom.xml
src/main/resources/
    |---- jndi.properties
src/main/java/
    |---- cn.sinobest.asj.consumer.jms.clientmode
              |---- SimpleConsumer.java # 基于客户端编程模型,从ActiveMQ接收消息
文件内容
1.pom.xml
 1 <project xmlns="http://maven.apache.org/POM/4.0.0"
 2     xmlns:xsi="http://www.w3.org/2001/XMLSchema-instance"
 3     xsi:schemaLocation="http://maven.apache.org/POM/4.0.0 http://maven.apache.org/xsd/maven-4.0.0.xsd">
 4     <modelVersion>4.0.0</modelVersion>
 5     <groupId>cn.sinoebst.asj</groupId>
 6     <artifactId>jms-consumer</artifactId>
 7     <version>0.0.1-SNAPSHOT</version>
 8     <name>jms-consumer</name>
 9     <description>基于ActiveMQ的Consumer Client。</description>
10     <dependencies>
11         <!-- import activemq-client to receive message from ActiveMQ -->
12         <dependency>
13             <groupId>org.apache.activemq</groupId>
14             <artifactId>activemq-client</artifactId>
15             <version>5.13.2</version>
16         </dependency>
17         <!-- not necessary, import to remove the warn message from activemq-client -->
18         <dependency>
19             <groupId>org.slf4j</groupId>
20             <artifactId>slf4j-simple</artifactId>
21             <version>1.7.19</version>
22         </dependency>
23     </dependencies>
24 </project>
2.jndi.properties
 1 java.naming.factory.initial=org.apache.activemq.jndi.ActiveMQInitialContextFactory
 2
 3 # use the following property to configure the default connector
 4 java.naming.provider.url=tcp://localhost:61616
 5
 6 # register some queues in JNDI using the form
 7 # queue.[jndiName] = [physicalName]
 8 queue.exampleQueue=example.queue
 9
10 # register some topics in JNDI using the form
11 # topic.[jndiName] = [physicalName]
12 topic.exampleTopic = example.topic
3.SimpleConsumer.java

 1 package cn.sinobest.asj.consumer.jms.clientmode;
 2 import javax.jms.Connection;
 3 import javax.jms.ConnectionFactory;
 4 import javax.jms.Destination;
 5 import javax.jms.JMSException;
 6 import javax.jms.Message;
 7 import javax.jms.MessageConsumer;
 8 import javax.jms.Session;
 9 import javax.jms.TextMessage;
10 import javax.naming.Context;
11 import javax.naming.InitialContext;
12 import javax.naming.NamingException;
13 /**
14  * A simple demo for consumer to receive message from ActiveMQ.<br>
15  *
16  * @author lijinlong
17  *
18  */
19 public class SimpleConsumer {
20     /** JNDI name for ConnectionFactory */
21     static final String CONNECTION_FACTORY_JNDI_NAME = "ConnectionFactory";
22     /** JNDI name for Queue Destination (use for PTP Mode) */
23     static final String QUEUE_JNDI_NAME = "exampleQueue";
24     /** JNDI name for Topic Destination (use for Pub/Sub Mode) */
25     static final String TOPIC_JNDI_NAME = "exampleTopic";
26     /**
27      * @param args
28      */
29     public static void main(String[] args) {
30         Context jndiContext = null;
31         ConnectionFactory connectionFactory = null;
32         Connection connection = null;
33         Session session = null;
34         Destination destination = null;
35         MessageConsumer consumer = null;
36         // create a JNDI API IntialContext object
37         try {
38             jndiContext = new InitialContext();
39         } catch (NamingException e) {
40             System.out.println("Could not create JNDI Context:"
41                     + e.getMessage());
42             System.exit(1);
43         }
44         // look up ConnectionFactory and Destination
45         try {
46             connectionFactory = (ConnectionFactory) jndiContext
47                     .lookup(CONNECTION_FACTORY_JNDI_NAME);
48             // look up QUEUE_JNDI_NAME for PTP Mode
49             // look up TOPIC_JNDI_NAME for Pub/Sub Mode
50             destination = (Destination) jndiContext.lookup(QUEUE_JNDI_NAME);
51         } catch (NamingException e) {
52             System.out.println("JNDI look up failed:" + e.getMessage());
53             System.exit(1);
54         }
55         // receive Messages and finally release the resources.
56         try {
57             connection = connectionFactory.createConnection();
58             connection.start(); // connection should be called in
59                                 // receiver-client
60             session = connection.createSession(Boolean.FALSE,
61                     Session.AUTO_ACKNOWLEDGE);
62             consumer = session.createConsumer(destination);
63             long timeout = 10 * 1000;
64             for (Message message = consumer.receive(timeout); message != null; message = consumer
65                     .receive(timeout)) {
66                 String text = ((TextMessage) message).getText();
67                 System.out.println(String.format("receive a message:%s", text));
68             }
69         } catch (JMSException e) {
70             e.printStackTrace();
71         } finally {
72             try {
73                 if (session != null)
74                     session.close();
75                 if (connection != null)
76                     connection.close();
77             } catch (JMSException e) {
78                 e.printStackTrace();
79             }
80         }
81     }
82 }
说明:在第65行调用了Connection#start方法,否则无法收到消息(目前不明白原因)。
3.测试
3.1.基于PTP Mode测试
- 确保SimpleProducer和SimpleConsumer中,都是根据QUEUE_JNDI_NAME来look up Destination实例的。
- 确保ActiveMQ启动正常。
- 运行SimpleProducer。
- 运行SimpleConsumer - 看到信息输出。

3.2.基于Pub/Sub测试
- 确保SimpleProducer和SimpleConsumer中,都是根据TOPIC_JNDI_NAME来look up Destination实例的。
- 确保ActiveMQ启动正常。
- 运行SimpleConsumer。
Pub/Sub的其中一个特点是:先订阅,再接收。所以要先运行Consumer。 - 尽快运行SimpleProducer。
Consumer设置的timeout是10s,如果10s内没有收到消息就会退出。 - SimpleConsumer的控制台有输出信息。
输出内容和PTP的测试结果一致。
4.编程获取ConnectionnFactory和Destination
虽然不建议使用编程的方式获取ConnectionFactory和Destination,但是还是记录一下:
 1 // 创建工厂实例
 2 // javax.jms.ConnectionFactory
 3 // org.apache.activemq.ActiveMQConnectionFactory
 4 ConnectionFactory connectionFactory = new ActiveMQConnectionFactory(
 5     ActiveMQConnectionFactory.DEFAULT_USER,
 6     ActiveMQConnectionFactory.DEFAULT_PASSWORD,
 7     ActiveMQConnectionFactory.DEFAULT_BROKER_URL);
 8
 9 // javax.jms.Connection
10 Connection connection = connectionFactory.createConnection();
11 // javax.jms.Session
12 Session session = connection.createSession(Boolean.FALSE, Session.AUTO_ACKNOWLEDGE);
13
14 // 创建目的地
15 // javax.jms.Destination
16 Destination destination = session.createQueue("example.queue");
17 Destination destination = session.createTopic("example.topic");
附录
参考
- Sun Java System Message Queue 3.7 UR1 技术概述 — 第 2 章 客户端编程模型
大部分理论知识都参考了这里 - JNDI Support
如何配置、使用JNDI获取连接工厂实例和目的地实例
本文来自博客园,作者:一尾金鱼,转载请注明原文链接:https://www.cnblogs.com/ywjy/articles/5433747.html


【推荐】国内首个AI IDE,深度理解中文开发场景,立即下载体验Trae
【推荐】编程新体验,更懂你的AI,立即体验豆包MarsCode编程助手
【推荐】抖音旗下AI助手豆包,你的智能百科全书,全免费不限次数
【推荐】轻量又高性能的 SSH 工具 IShell:AI 加持,快人一步