
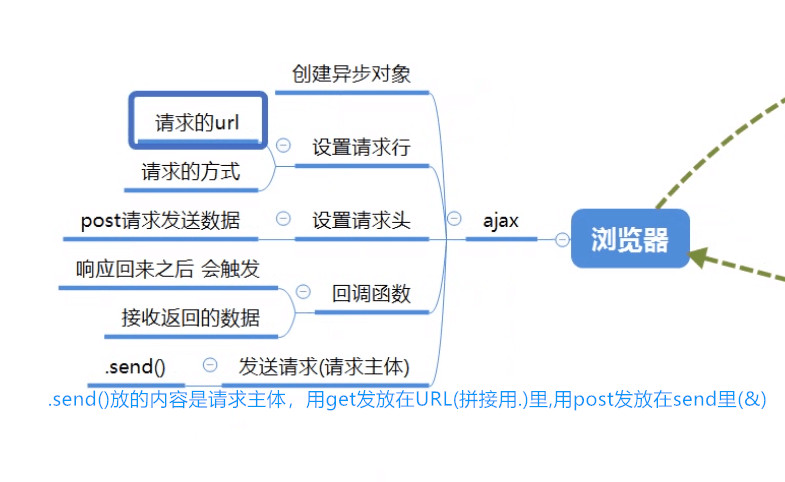
ajax
如何使自己的电脑也成为一台服务器 安装PHPstudy 2016版本 保证php和阿帕奇Apache是绿灯
https://blog.csdn.net/al_assad/article/details/70510889
修改了Apache的默认端口号
如果你修改了默认端口号(假如将Listen 80改为Listen 8080),那么你将无法通过http://localhost或者是http://127.0.0.1来打开位于Apache服务器上的网页,
必须在地址后面加上冒号+端口号,如http://localhost:8080或者是http://127.0.0.1:8080,只有这样才能访问位于Apache服务器中的网页
怎样快速查找自己电脑IP地址:
cmd----ipconfig-- IPv4 地址
-
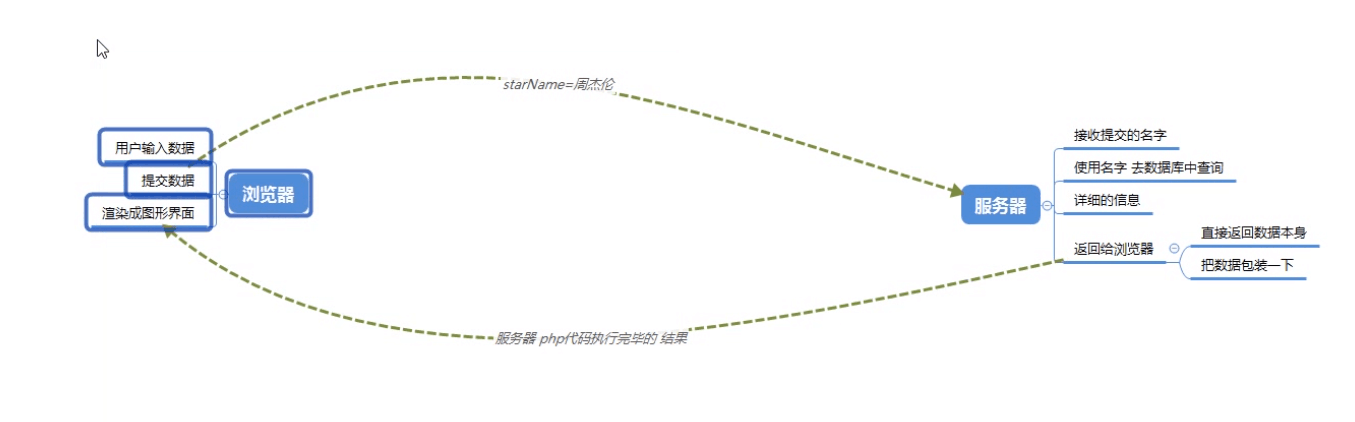
浏览器发出请求
-
服务器监听到80端口(或443)有请求过来,并解析url路径
-
根据服务器的路由配置,返回相应信息(可以是 html 字串,也可以是 json 数据,图片等)
-
浏览器根据数据包的 Content-Type 来决定如何解析数据
文件上传到服务器/自己电脑成为了一个小服务器
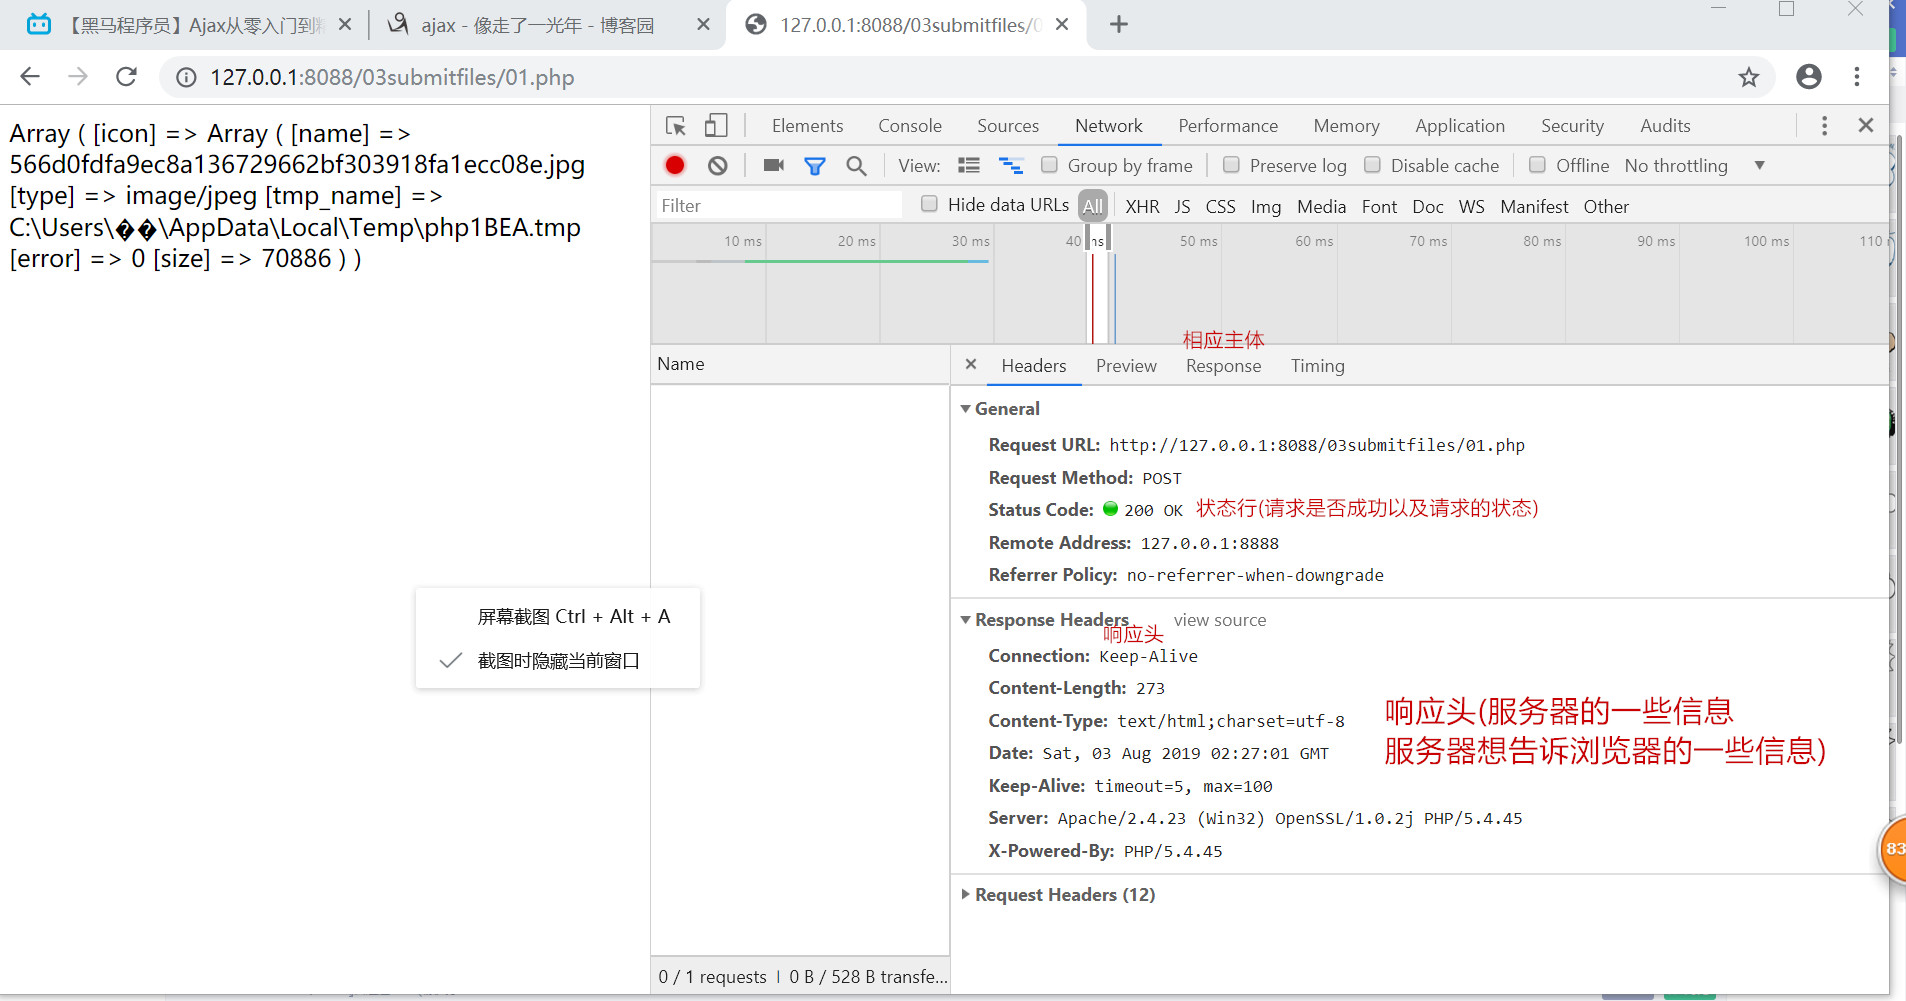
<!DOCTYPE html>
<html lang="en">
<head>
    <meta charset="UTF-8">
    <meta name="viewport" content="width=device-width, initial-scale=1.0">
    <meta http-equiv="X-UA-Compatible" content="ie=edge">
    <title>Document</title>
</head>
<!--
    form提交内容到服务器 action是提交到的路径 现阶段只能是php啊如果是HTML网页根本不可能的
    表单form上传文件到服务器只能用method=post /method默认是get 还要加上这个属性enctype="multipart/form-data"
    选择文件按钮<input type='file'>自动会出来大一大叠选择内容的
-->
<body>
    <h2>上传文件</h2>
    <form action='01.php' method='post' enctype="multipart/form-data">
        <input type='file' name='icon'>
        <br>
        <input type='submit'>
    </form>
</body>
</html>
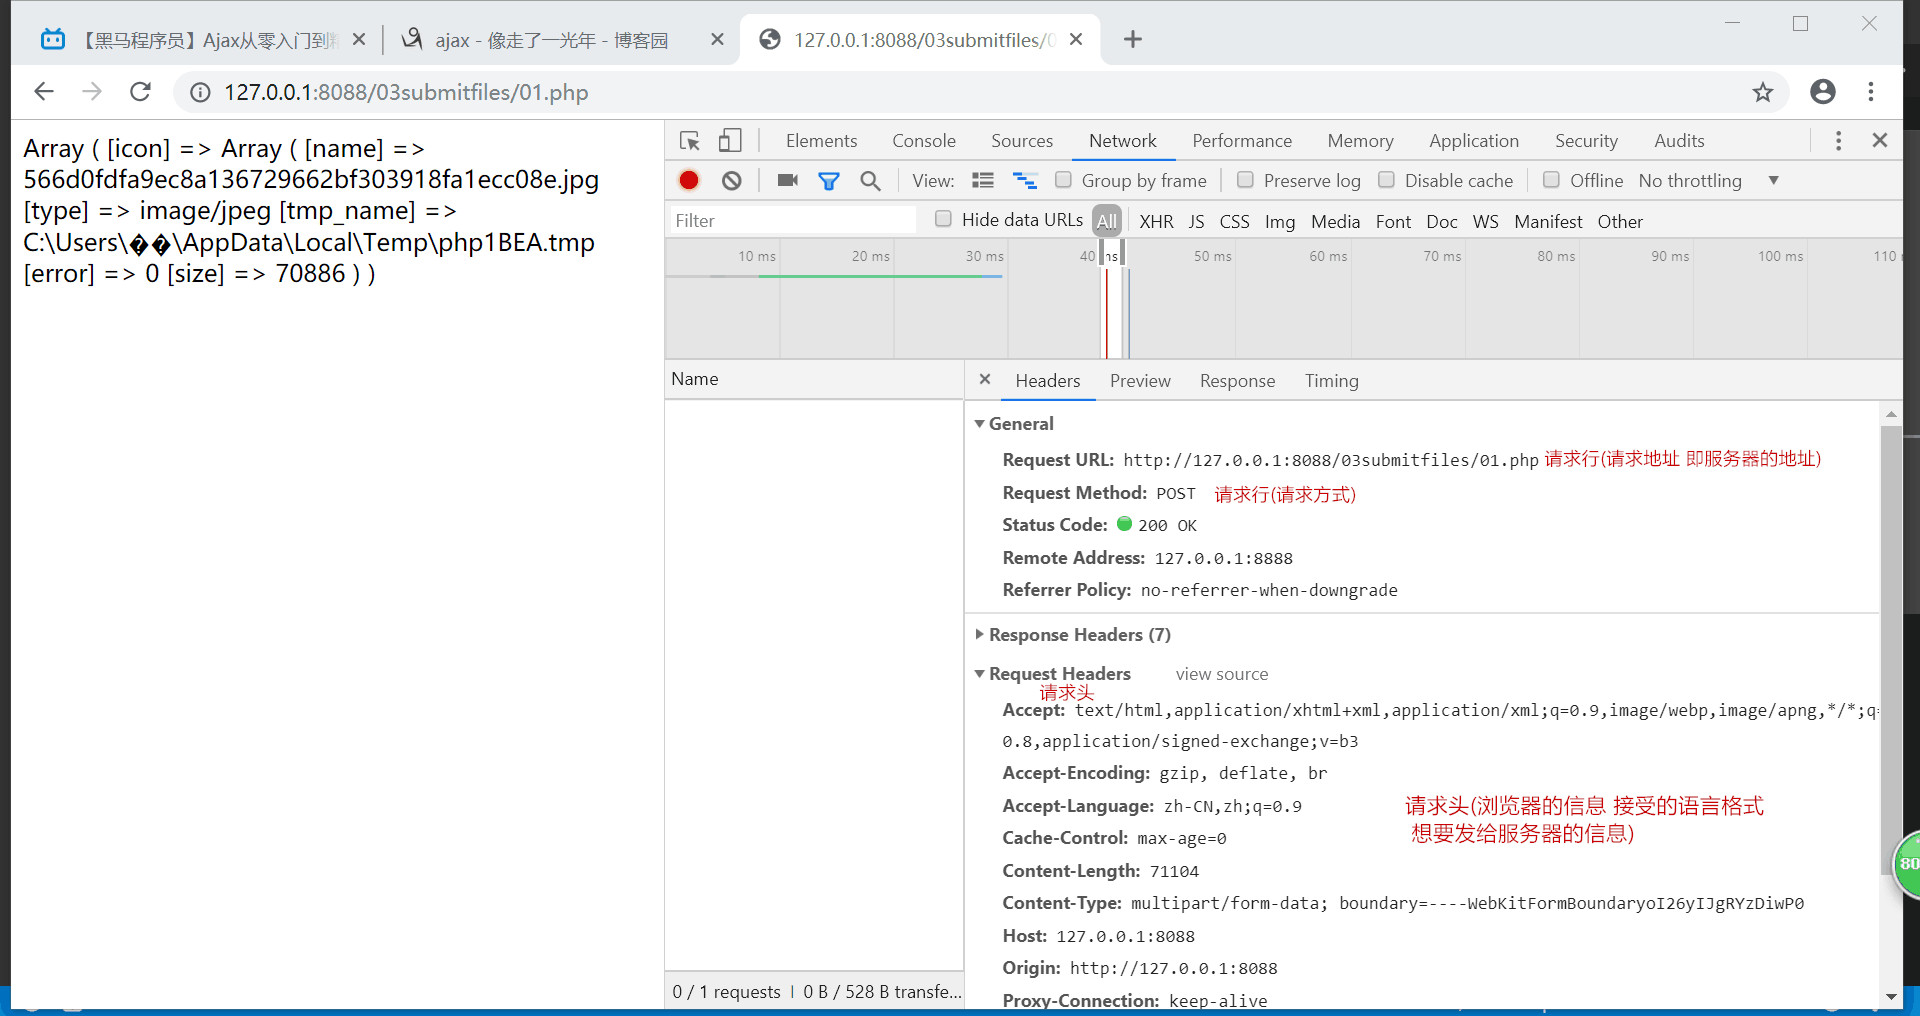
<?php
//设置页面编码模式 使用PHP函数
header('content-type:text/html;charset=utf-8');

//提交过来的是文件 所以$_FILES
/*print_r($_FILES);
出现的是:
Array ( [icon] => Array (
    [name] => 566d0fdfa9ec8a136729662bf303918fa1ecc08e.jpg 文件名字
    [type] => image/jpeg 类型 我提交的是个图片
    [tmp_name] => C:\Users\��\AppData\Local\Temp\php15EF.tmp 文件位置 tmp是临时的意思 即php执行完文件也销毁了所以其实打开这个文件在的位置 是看不到这个文件存在的
    [error] => 0 [size] => 70886 大小 )
    ) 数组--关系型数组--关系型数组


所以可以增设 sleep(5) //出现5秒 单位是秒
也可以将文件从这个会被销毁的位置转移到其他位置 move_uploaded_file(file,newloc)
*/
print_r($_FILES);
sleep(5) //可以在临时存储的位置看到图片五秒钟
move_uploaded_file($_FILES['icon']['tmp_name'],'newloc/'.$_FILES['icon']['name']);//注意引号的位置 以及字符串拼接是.


?>
用form表单的方式 提交后会实现页面跳转
浏览器刷新页面和服务器交互:1.form表单 2.<a>链接 3.window。location
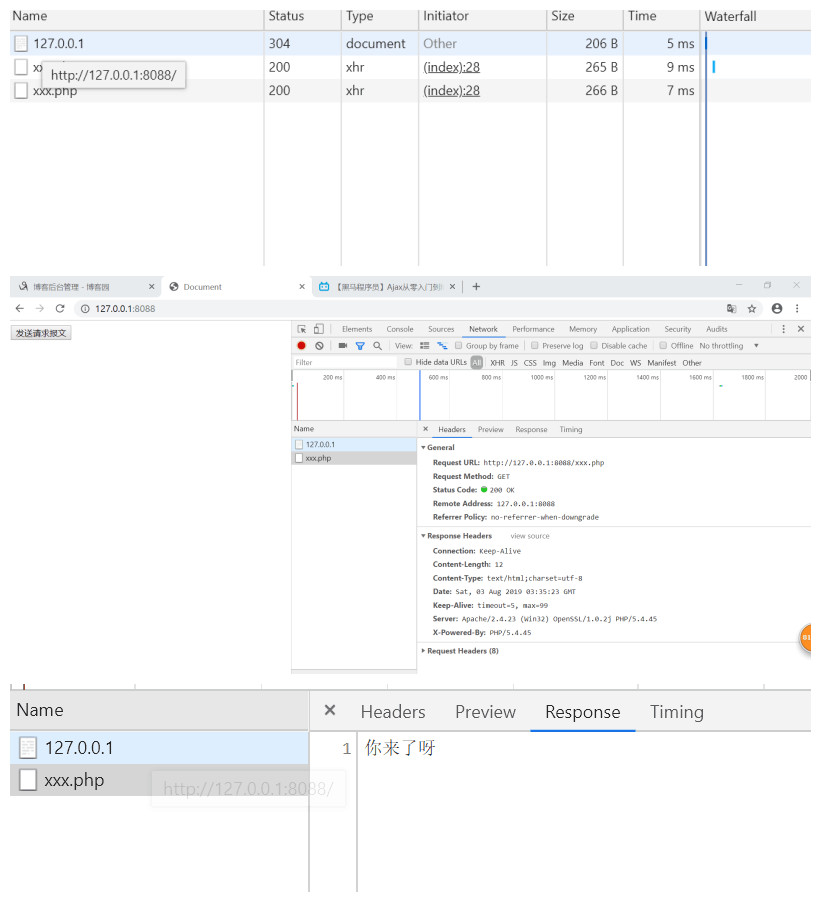
浏览器不刷新页面和服务器交互 ajax XMLHttpRequest
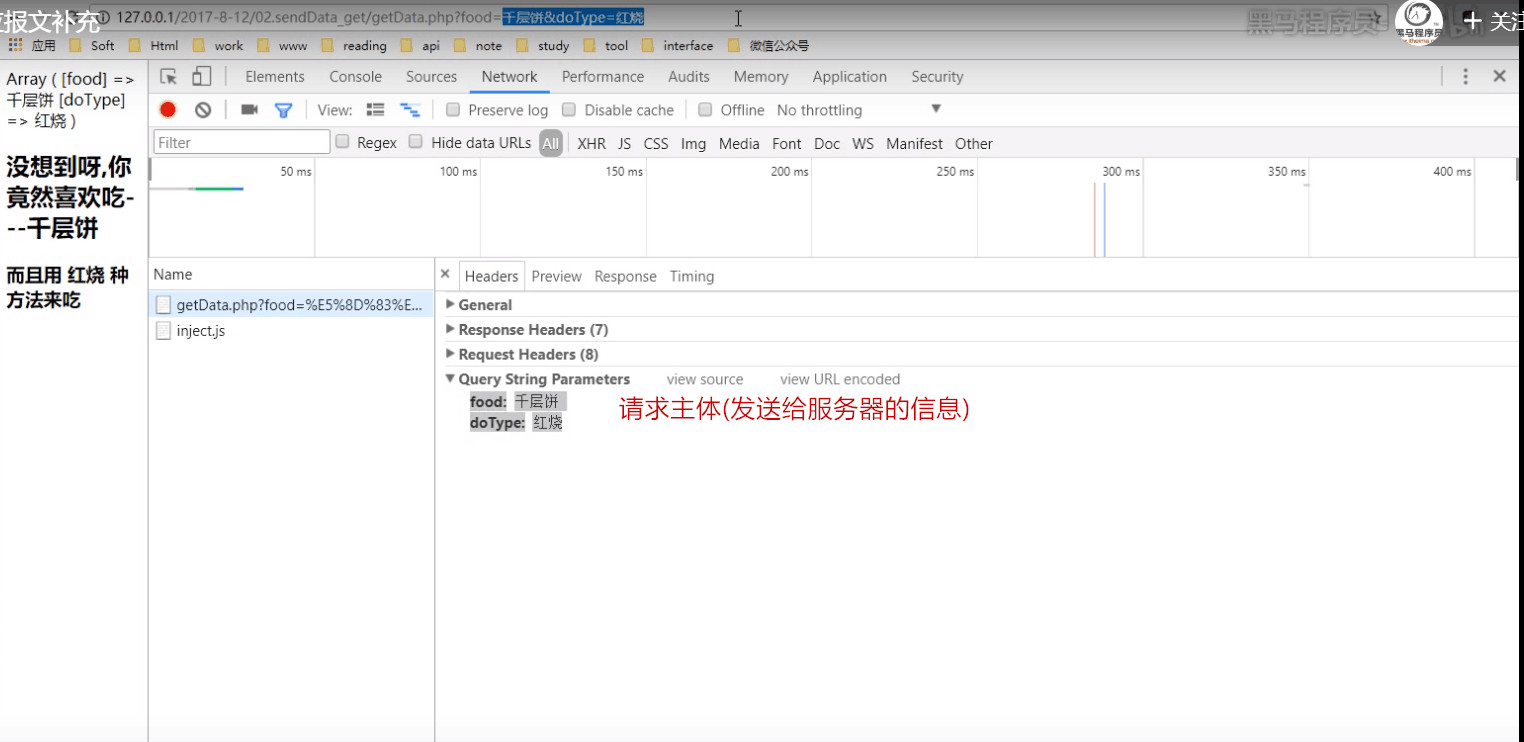
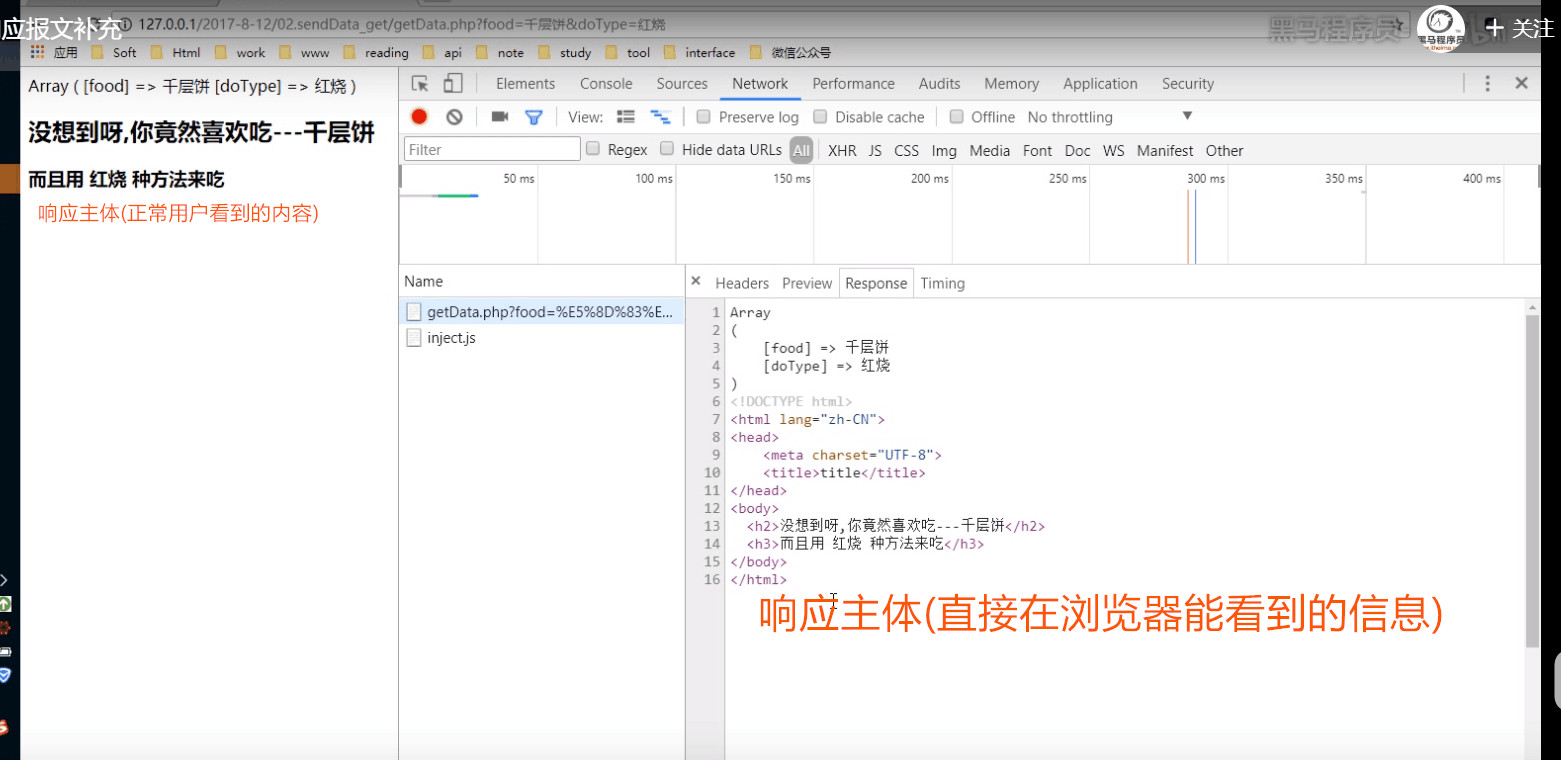
ajax发送get请求
<!DOCTYPE html>
<html lang="en">
<head>
    <!--不实现页面跳转 直接发送请求   ajax-->
    <meta charset="UTF-8">
    <meta name="viewport" content="width=device-width, initial-scale=1.0">
    <meta http-equiv="X-UA-Compatible" content="ie=edge">
    <title>Document</title>
</head>
<body>
    <h2>点击的时候发送报文 --不刷新页面</h2>
    <input type="button" value='get请求'>
    <h3></h3>
</body>
</html>
<script>
        //绑定点击事件
        document.querySelector('input').onclick = function (){
            //创建一个对象 异步对象
            var xhr = new XMLHttpRequest();

            //请求行(包括请求方式和请求地址)  xhr.open(method,url)
            //get请求的数据(要传给服务器的数据) 拼接在URL中 形式:xxx.php?key=value&key2=value2(因为get方式是无法隐藏掉你传给服务器的内容的 所以隐私性低)
                          //你既可以在HTML网页上弄个提交数据的方式 提交到php 也可以直接更改上面URL的内容?后加东西即传给服务器了
           // xhr.open('get','xxx.php')
           xhr.open('get','xxx.php?name=jack&skill=painting')//服务器那边print_r($_GET): ([name] => jack  [skill] => painting)


            //请求头 set request head     参数一:键名 参数二:值 xhr.setRequestHeader(name,value)
            //get请求 可以省略 设置请求头的操作
            xhr.setRequestHeader('heima','good august')


            //注册回调函数 请求响应回来之后触发
            xhr.onload=function (){

              console.log('你回来啦')
              console.log(xhr.responseText) //服务器返还的内容 主语当然还是xhr

                  //通过更改页面的DOM元素来体现返回的数据
                  document.querySelector('h3').innerHTML=xhr.responseText
          }

            //请求主体 和发送一起执行
            xhr.send(null) //不发送任何东西

            //发送到浏览器


        }
 </script>
<?php
//设置页面编码模式 使用PHP函数
header('content-type:text/html;charset=utf-8');
echo '你来了呀';

print_r ($_GET);

sleep(3);//服务器响应内容延迟3秒返回给浏览器
?>
案列: 验证用户名是否存在
<!DOCTYPE html>
<html lang="en">
<head>
    <meta charset="UTF-8">
    <meta name="viewport" content="width=device-width, initial-scale=1.0">
    <meta http-equiv="X-UA-Compatible" content="ie=edge">
    <title>Document</title>
</head>
<body>
    <h2>用户注册</h2>
     <!--此时name属性不是必须的  用form表单向服务器提交时是必须的-->
     <!--<input type='text' name='username' placeholder="请输入姓名">-->
    <input type='text' placeholder="请输入姓名">
</body>
</html>
<script>
    document.querySelector('input').onblur = function (){//onblur 失去焦点
        //1.创建对象
        var xhr = new XMLHttpRequest()

        //2 设置请求行(get请求数据写在URL后面)
        xhr.open('get','checkname.php?name='+this.value)
        /*这里着重讲一下 input表单没有加name属性所以php里print_r的话出来的name
          print_r($_GET);
          Array
        (
         [name] => ass
        )
        xxx.php?key=value 这个value我们要获取的是上面input的输入值 而这个函数现在就是'input'的函数 所以直接this.value 即可
        */

        //3.设置请求头 (get请求数据可以省略 post不发送数据也可以省略)
        //xhr.setRequestHeader()

        //5. 回调函数
        xhr.onload =function(){
            console.log(xhr.responseText)
            document.querySelector('h2').innerHTML = xhr.responseText
        }

        //4.请求主体 发送
        //get请求为空 或者写null post请求数据写在这里 如果没有数据 直接为空或者写null
        xhr.send(null)
    }

</script>
<?php
    //设置页面编码模式 使用PHP函数
    header('content-type:text/html;charset=utf-8');

    //数据库 这里没有 直接拿假数据模拟数据库
    $nameArr = array('rose','jack','icemounntain','robet');

    $name = $_GET['name']; //这个name就是前面那个呀

    //判断浏览器提交过来的数据是否在数据中存在 即是否在上面这个数组中:in_array(查询的内容,去那个数组查询)
    $result = in_array($name,$nameArr); //ture or false


    //根据查询到的结果返回不同的内容给用户
    if($result == true){
        echo '很遗憾该用户名已被占用(╯﹏╰)';
    }else{
        echo '恭喜您成功注册O(∩_∩)O~~';
    }

?>
ajax使用post提交数据
<script>
    document.querySelector('input').onclick = function (){
        //1.创建对象
        var xhr = new XMLHttpRequest()

        //2 设置请求行
        xhr.open('post','checkname.php') //!!!!!这里不一样了 后面URL不用加什么东西


        //3.设置请求头 (get请求数据可以省略 post不发送数据也可以省略)(但是如果post发送数据-->xhl.send()有内容 必须是)
        xhr.setRequestHeader("Content-type","application/x-www-form-urlencoded")

        //5. 回调函数
        xhr.onload =function(){
            console.log(xhr.responseText)
          /*   你 post 过来了Array
            (
               [name] => 西蓝花
               [frind] => 鸡蛋
            )

          */
        }

        //4.请求主体 发送
        //get请求为空 或者写null post请求数据写在这里 如果没有数据 直接为空或者写null
        xhr.send('name=西蓝花&frind=鸡蛋')
    }

</script>

、、、、、、、、、、、、、、、、、、、、、、、、、、、、、、、、、
 echo('你 post 过来了');
    print_r($_POST);
实例:机器人聊天界面
<!DOCTYPE html>
<html lang="en">

<head>
    <meta charset="UTF-8">
    <title>Document</title>
    <style>
        body{
            margin: 0;
            padding: 20px;
        }

        .clearfix::before,
        .clearfix::before{
            content: '';
            visibility:hidden;
            clear:both;
            line-height:0;
            height:0;
            display: block;

        }
        .clearfix{
            zoom: 1;
        }
        .f_1{
            float: left;
        }


        .f_r{
            float: right;
        }

        .container{
            margin: 50px auto 0;
            width: 800px;
            height: 500px;
            border: 1px solid skyblue;
            border-radius: 10px;
        }
        .message{
            border-bottom: 1px solid skyblue;
            height: 400px;
            overflow-y:scroll;
            padding: 20px;
            box-sizing: border-box;
            transform: all 2s;
        }


        .control{
            height: 100px;
            padding-left:50px;
            padding-right: 50px;
        }

        .inputBox{
            height: 60px;
            margin-top: 20px;
            border-radius: 20px;
            outline: none;
            padding:0;
            box-sizing: border-box;
            width: 500px;
            font-size: 30px;
            box-shadow: 0 0 3px gray;
            border: 1px solid #ccc;
            transform: all 2s;
            padding-left: 10px;
        }

        .inputBox:focus{
            border-color:skyblue;
            box-shadow: 0 0 3px skyblue;
        }

        .sendButton{
         height: 70px;;
         margin-top: 15px;
         background-color: yellowgreen;
         width: 150px;
         border: none;
         outline: none;
         border-radius: 10px;
         color:white;
         font-size: 40px;
         font-family: '微软雅黑';
         cursor: pointer;
      }

     .message>div>a{
         text-decoration:none;
         width: 50px;
         height: 50px;
         border-radius: 50%;
         background-color: skyblue;
         text-align: center;
         line-height: 50px;
         color: white;
         font-size: 25px;
         font-weight: 700;
         font-family: '微软雅黑';
     }

     .message>.robot>a{
         background-color: hotpink;
     }

     .message>.self>a{
         background-color: yellowgreen;
     }

    .message>div{
     padding: 10px 0;
    }

    .message>div>p{
        max-width: 300px;
        min-height:28px;
        margin: 0 10px;
        padding: 10px 10px;
        background-color: #ccc;
        border-radius: 10px;
        word-break: break-all;
        position: relative;
        line-height: 28px;
        font-weight: 400;
        font-family: '微软雅黑';
        color: white;
        font-size:20px;
    }

    .message>.robot>p{
        background-color: skyblue;
    }

    .message>.robot>p::before{
        content: '';
        position:absolute;
        border-top:6px solid #ccc ;
    }

        .message>.self>p{
            color: black;
        }
        .message>.self>p::before{
            content: '';
            position:absolute;
            border-top: 6px solid transparent;
            border-bottom: 6px solid transparent;
            border-right: 6px solid #ccc;
            right: -6px;
            top: 15px;
        }

    </style>
</head>
<body>
  <h1>在线机器人</h1>
  <div class="container">
<div class="message">
<div class="robot clearfix">
<a href="#" class="f_1">机</a>
    <p class="f_1">我要吃西兰花</p>
</a>
</div>
<div class="hidden_self self clearfix"style="display: none;">
    <a href="#" class="f_r">人</a>
<p class="f_r">123213</p>

  </div>
</div>
<div class="control">
<input type="text" class="inputBox f_1">
<input type="button" class="sendButton f_r "value="发送">

</div>
  </div>

</body>

</html>
<script src='js/jquery-3.4.1.js'></script>
<script>
   //jQuery
   $(function (){
       $('.sendButton').click(function(){
           //创建自己的聊天框
           var $cloneSelf = $('.self').first().clone();
                  /*这里要加.first()的哦防止自己这边输入的时候1变二二变四四变八 因为是类选择器作为名字 一旦克隆一个 就不止那一个叫这个类名了*/

           //添加到容器中
           $('.message').append($cloneSelf);
           $cloneSelf.show();
           //获取输入框的内容  设置给克隆的 元素内部的p标签
           $cloneSelf.find('p').html($('.inputBox').val())

           //ajax
           var xhr = new XMLHttpRequest()

           xhr.open('post','chat.php')   //图灵机器人 xhr.open('post','http://www.tuling123.com/openapi/api')
           xhr.setRequestHeader("Content-type","application/x-www-form-urlencoded")
           xhr.onload=function (){
               console.log(xhr.responseText)

               //克隆机器人的聊天框
               var $cloneRobot=$('.robot').first().clone()
               $cloneRobot.appendTo('.message')
               $cloneRobot.find('p').html(xhr.responseText)
           }
           xhr.send(null)    //图灵机器人xhr.send('key=d5e1bd150c13480fb37de3933e9e2d3b&info='+$(".inputBox").val())//php里字符串拼接是需要.的 这里是js部分啊
      })
   })
</script>
<?php
sleep(1);
$mess=array(
    '你好啊',
    '我没有吃饭哦',
    '老地方见',
    '讨厌'
);
$randomkey=array_rand($mess,1);
echo $mess[$randomkey];
?>
状态改变
 1 <!DOCTYPE html>
 2 <html lang="en">
 3 <head>
 4     <meta charset="UTF-8">
 5     <meta name="viewport" content="width=device-width, initial-scale=1.0">
 6     <meta http-equiv="X-UA-Compatible" content="ie=edge">
 7     <title>Document</title>
 8     <style>
 9     div{
10         width:100px;
11         height:100px;
12         background-color:skyblue;
13     }
14     div:hover{
15         background-color: yellowgreen;
16     }
17     </style>
18 </head>
19 <body>
20     <h2>异步对象</h2>
21     <input type='button' class='lastBtn' value='ajax请求'>
22     <div></div>
23 </body>
24 </html>
25 <script>
26      /*异步对象 同时能干很多事情
27         同步    一件一件的干 不能同时进行两件事情
28         比如在xhr.open('get','xx.php',true)的情况下 对div滑入滑出颜色是变化的
29         参数改为FALSE 同步 滑入滑出颜色不会改变/无法进行别的事情
30      */
31      document.querySelector('input').onclick =function(){
32
33          var xhr=new XMLHttpRequest()
34
35           //这里确定是否使用异步 第三个参数 默认是TRUE false的话就是同步的意思 在请求回来之前什么也干不了
36          xhr.open('get','statechange.php',false)
37
38         xhr.onreadystatechange = function(){
39         //xhr on ready state change状态改变时触发  xhr.readyState=0/1/2/3/4 4:请求完成整个过程完毕
40                 //.....两个&&
41            if(xhr.readyState==4&&xhr.status==200){ //200表示请求的页面存在就是open函数里的xxx.php存在
42                  console.log('我回来了')
43                  console.log(xhr.readyState)
44                  console.log(xhr.responseText)
45            }
46
47
48         }
49
50
51          xhr.send(null)
52      }
53 </script>
54 ............................
55 <?php
56 sleep(10)
57
58 ?>
实例:图片切换
 1 <!DOCTYPE html>
 2 <html lang="en">
 3 <head>
 4     <meta charset="UTF-8">
 5     <meta name="viewport" content="width=device-width, initial-scale=1.0">
 6     <meta http-equiv="X-UA-Compatible" content="ie=edge">
 7     <title>Document</title>
 8 </head>
 9 <body>
10     <h3>图片展示</h3>
11     <div>
12         <h1>鲜花</h1>
13         <img style="width:300px;height:300px;" src='image/flower.jpg' alt="">
14         <p>娇艳欲滴</p>
15     </div>
16     <div style='float:left'>
17         <input type='button' value='鲜花'>
18         <input type='button' value='动漫'>
19         <input type='button' value='背景'>
20         <input type='button' value='小镇'>
21     </div>
22 </body>
23 </html>
24 <script src='jquery-1.11.1.min.js'></script>
25 <script>
26     $(function (){
27         //绑定点击事件
28         $('input').click(function(){
29             //更换信息中的名字
30             $('h1').html($(this).val())
31             var xhr=new XMLHttpRequest()
32
33             //get发送数据给服务器的话是在URL上动手脚
34             // xhr.open('get','star.php?name='+($(this).val()))
35             xhr.open('get','star.php?name='+this.value)
36
37             xhr.onreadystatechange = function(){
38                 if(xhr.readyState==4&&xhr.status==200){
39                       console.log(xhr.responseText) //image/flower.jpg 返回的就是路径哦
40                       //在只返回图片路径的情况下$('img').attr('src',xhr.responseText)
41                     //切割数据 在后台返回了一堆信息的情况下 加了|||| image/town.jpg||||镇子~
42                     var result = xhr.responseText.split('||||')
43                     console.log(result) // ["image/bg.jpg", "背影"] 切割完成 结果是数组
44
45                 $('img').attr('src',result[0]).css('width','300px').css('height','300px')
46                 $('p').html(result[1])
47
48                 }
49             }
50
51             xhr.send(null)
52         })
53     })
54 </script>
 1 <?php
 2
 3    //设置页面编码模式 使用PHP函数
 4    header('content-type:text/html;charset=utf-8');
 5
 6    //接受浏览器数据
 7    $starname = $_GET['name'];
 8
 9    //假数据
10    $picarray = array(
11        '鲜花'=>array('icon'=>'image/flower.jpg','info'=>'我想要花哦'),
12        '背景'=>array('icon'=>'image/bg.jpg','info'=>'背影'),
13        '小镇'=>array('icon'=>'image/town.jpg','info'=>'镇子~'),
14        '动漫'=>array('icon'=>'image/chartoon.jpg','info'=>'kawa')
15    );
16
17    //查询数据
18    $someone=$picarray[$starname];
19
20    //返回结果
21     echo $someone['icon'];//这是结果 image/flower.jpg
22        //服务器的两次输出给浏览器 不便于浏览器那边应用 所以输出一些特殊字符便于切割
23         echo '||||';
24     echo $someone['info'];
25     //服务器这边echo两次 给浏览器就直接一条信息了
26     //服务器这边可以echo无数次 响应给浏览器就会是直接拼起来的一段信息
27 ?>
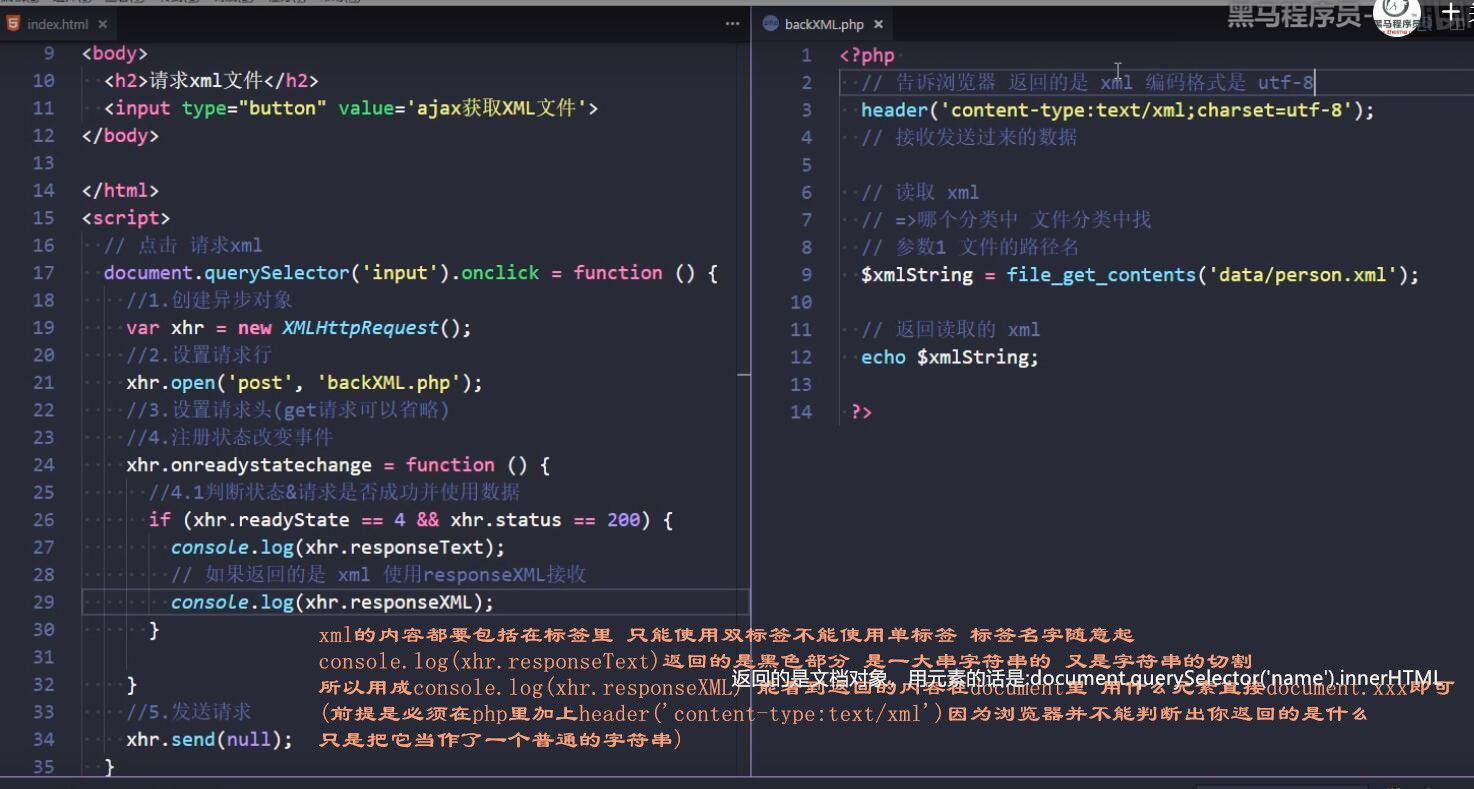
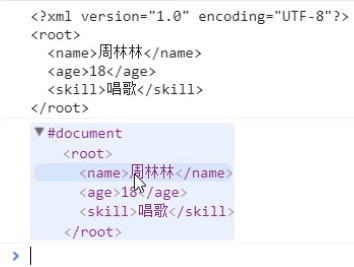
服务器返回xml
解析lol-json数据!!!还蛮重要 (xhr.responseText ---JSON.parse() 转成对象之后就用.表示元素 转成数组就用下标[i])
<!DOCTYPE html>
<html lang="en">
<head>
    <meta charset="UTF-8">
    <meta name="viewport" content="width=device-width, initial-scale=1.0">
    <meta http-equiv="X-UA-Compatible" content="ie=edge">
    <title>Document</title>
    <style>
    body{
        background-color: yellowgreen;
    }
    div{
        margin:30px auto;
        width:600px;
        min-height:300px;
        border-radius: 20px;
        border:1px solid #000;
        box-shadow: 0 0 30px rebeccapurple;
    }
    td{
        border:1px solid #000;
        border-radius: 10px;
    }
    </style>
</head>
<body>
   <!--box-shadow    min-height高度最起码-->
     <h2>lol数据解析</h2>
     <input type="button" value="获取lol数据">

     <!--展示数据的容器-->
     <div class="show-box"></div>
</body>
</html>
<script>
  document.querySelector('input').onclick=function (){
       //ajax
       var xhr = new XMLHttpRequest()
       xhr.open('post','json_lol.php')
       xhr.onreadystatechange =function (){
           if(xhr.readyState==4&&xhr.status==200){ //这段信息还蛮重点的
               var heroArr=JSON.parse(xhr.responseText)
              //解析数据 将它放在table里 以字符串拼接的方式

            //准备字符串
            var html =''
            //table开头
            html+='<table>'
                //生成tr 需要很多个 所以用上for循环
                for(i=0;i<heroArr.length;i++){
                //当前循环的对象
                    var currentHero = heroArr[i]
                    //tr开头
                    html+='<tr>'
                        //td
                        html+='<td>'+currentHero.name+'</td>'
                        html+='<td>'+currentHero.style+'</td>'
                        html+='<td><img src=" ' +currentHero.icon+ ' "></td>'
                    //tr结尾
                    html+='</tr>'
                }
            //table结尾
            html+='</table>'

            //拼接好了 table
            console.log(html)
            //设置到页面上
            document.querySelector('.show-box').innerHTML=html


           }
       }
       xhr.send(null)
   }

</script>
<?php
    //设置返回的是json(可写可不写 如果是XML则必须写XML对应的形式)
    header('content-type:application/json;charset=utf-8');

    //返回读取的数据
    echo file_get_contents('./data/info.json');
?>


、、、、、、、、、、、、、、、、、、、、、json文件 在外部写json是要带上‘’引号的 但是如果是在json文件内部写的话就不必了 默认就在字符串里
[
    {
        "icon":"images/ak.jpg",
        "name":"阿珂",
        "style":"打野"
    },
    {
        "icon":"images/aql.jpg",
        "name":"安其拉",
        "style":"法师"
    },
    {
        "icon":"images/blsy.jpg",
        "name":"百里守约",
        "style":"射手"
    },
    {
        "icon":"images/blxc.jpg",
        "name":"百里玄策",
        "style":"打野"
    }
]
一个小小的点
<!DOCTYPE html>
<html lang="en">
<head>
    <meta charset="UTF-8">
    <meta name="viewport" content="width=device-width, initial-scale=1.0">
    <meta http-equiv="X-UA-Compatible" content="ie=edge">
    <title>Document</title>
</head>
<body>
    <input type="button" value="点我" onclick='alert(123)'>
</body>
</html>
<Script>
   var cloneBtn= document.querySelector('input').cloneNode();//克隆
   document.body.appendChild(cloneBtn);
  // window.location.href='http://www.baidu.com'
  //window.location.href='https://www.baidu.com/s?ie=UTF-8&wd=西蓝花炒蛋'  想查找什么 看URL 明显直接改后面的西蓝花炒蛋就ok
</Script>
ajax----包装成工具函数
//ajax工具函数 只有一个参数(对象)
function ajax_tool_test(option){
     var xhr=new XMLHttpRequest()

     if(option.type=='get'&&option.data){
         option.url+='?'
         option.url+=option.data
         option.data=null
     }
    xhr.open(option.type,option.url)

     if(option.type='post'&&option.data){
         xhr.setRequestHeader('Content-type',' application/x-www-form-urlencoded')
     }
     xhr.onreadystatechange=function (){
         if(xhr.readyState==4&xhr.status==200){
             option.success(xhr.responseText) //将从php返回的东西作为函数的参数 调用success函数 这里是实参 回到index函数体内部

             //判断返回的数据类型 是XML json 还是普通的字符串
             var backtype=xhr.getResponseHeader('Content-type')  //得到响应头
             //是XML
             if(backtype.indexOf('xml')!=-1){
                option.success(xhr.responseXML)
             }
             //是json
            else if(backtype.indexOf('json')!=-1){
                option.success(JSON.parse(xhr.responseText))
             }
             //普通字符串
              else{
                option.success(xhr.responseText)
             }
         }
     }
     xhr.send(null)
}
jQuery的ajax
<!DOCTYPE html>
<html lang="zh-CN">

<head>
  <meta charset="UTF-8">
  <title>title</title>
</head>

<body>
  <h2>jQuery的ajax</h2>
  <input class='get' type="button" value='get请求'>
  <input class='post' type="button" value='post请求'>
  <input class='ajax' type="button" value='ajax请求'>
  <input class='ajax_extend' type="button" value='$.ajax使用补充'>
</body>

</html>
<!-- 导入jQuery   -->
<script src="./js/jquery-1.12.4.min.js"></script>
<script>

/*
  get请求 直接$('.get) 三个参数

  $('.get').click(function () {
    $.get('../00.backData/01.backSendData.php','name=rose&husband=robot',function(data){
      alert(data);
    })
// data参数 支持传入js对象
    $.get('../00.backData/01.backSendData.php',{name:'黑猫警长',skill:'抓老鼠'}, function (data) {
      alert(data);
    })
  })
*/

/* post请求 同样如此 $('post')

  $('.post').click(function () {
    // 支持传入js对象
    $.post('../00.backData/01.backSendData.php',{name:'飞天小女警',skill:'自由飞翔'}, function (data) {
      alert(data);
    })
  })
*/

//可以自己选择 get 还是post
//即ajax $('ajax') 四个参数
  $('.ajax').click(function(){
    $.ajax({
      url:'../00.backData/backXML.php',
      // type:'post',这两个参数可省
      // date:'memeda', 支持写字符串你
      success:function(data){
        console.log(data);
      }
    })
  })

  // $.ajax使用补充
  $('.ajax_extend').click(function(){
    /*
      type 如果不设置 默认的请求方法是? get (如果用get请求 那么 可以不写 type属性)
      success
        在请求成功才会触发
        如果出现 服务器告诉浏览器返回的类型 跟 jQuery内部实际转换的类型不匹配 会无法触发
      error
        当请求出现问题 会触发这个回调函数
      complete
        请求完成会触发 不管成功过还是失败
    */
    $.ajax({
        // url:'../00.backData/01.backSendData.php',
        // data:{s
        //   name:'喜洋洋',
        //   skill:'卖萌'
        // },
        // url:'../00.backData/backXML.php',
        url:'../00.backData/backJSON.php',
        success:function(data){
          console.log(data);
        },
        // 形参可以改名字 这里直接使用默认的即可
        // 参数1 异步对象
        // 参数2 错误信息
        // 参数3 错误信息在哪里
        error:function(XMLHttpRequest, textStatus, errorThrown){
          console.log('失败了哦');
          console.log(XMLHttpRequest);
          console.log(textStatus);
          console.log(errorThrown);
        },
        complete:function(){
          console.log('请求完成了');
        }
    })
  })
</script>
补充jQuery的ajax
<!DOCTYPE html>
<html lang="zh-CN">

<head>
  <meta charset="UTF-8">
  <title>title</title>
  <style>
    .cover { /*遮罩层是自己写的!!!!!!!!!!!!!!!*/
      height: 100%;
      width: 100%; /*这个遮罩层这了整个页面*/
      position: absolute;
      left: 0;
      top: 0;
      background-color: skyblue;
      opacity: .5;/*透明度*/
      display: none;
    }
  </style>
</head>

<body>
  <h2>jQuery_ajax使用补充</h2>
  <input class='json' type="button" value='获取JSON'>
  <input class='XML' type="button" value='获取XML'>
  <div class="cover"></div>
</body>

</html>
<script src="./jquery-1.12.4.min.js"></script>
<!--
    遮罩层
       开启 发送请求时
       关闭 请求回来时
  -->
<script>
  $(function () {
    $('.json').click(function () {
      // 开启
      $.ajax({
        url: '../00.backData/backJSON.php',
        success: function (data) {
          console.log(data);
          // 关闭
        },
        // 人为的指定 返回的数据格式
        dataType: 'json'
      })
    })
    $('.XML').click(function () {
      // 开启遮罩层
      $.ajax({
        url: '../00.backData/backXML.php',
        success: function (data) {
          console.log(data);
          // 关闭遮罩层
        },
        // 人为的指定 返回的数据格式 当如果后台程序猿忘记设定head无法把字符串转化成json/xml格式
        dataType: 'xml'
      })
    })
  })

  //想给所有按钮都加上遮罩层 但是一个一个按钮加又太麻烦 所以 ajax函数
  $(document).ajaxStart(function () { //在页面上任何一个地方ajax发送时执行
    $('.cover').show();
  });
  $(document).ajaxComplete(function () {//在页面上任何一个地方ajax返回时执行
    $('.cover').hide();
  });
</script>
实例:注册信息填写--jQuery的ajax
<!DOCTYPE html>
<html lang="en">

<head>
  <meta charset="UTF-8">
  <title>表单注册</title>
  <style>
    html,
    body {
      height: 100%;
      overflow: hidden;
      font-family: '微软雅黑';
    }

    body {
      margin: 0;
      padding: 0;
      /* background-color: #F7F7F7; */
      background: url('06.jQuery_register//resource/images/wallpaper.jpg') no-repeat center /100% 100%;
      display: flex;
      justify-content: center;
      align-items: center;
    }

    ul {
      margin: 0;
      padding: 50px;
      padding-top: 0px;
      list-style: none;
    }

    .register {
      width: 800px;
      background-color: #F9F9F9;
      border: 1px solid #CCC;
      border-radius: 5px;
    }

    li {
      display: flex;
      margin: 20px 0;
    }

    label,
    input {
      display: block;
      float: left;
      height: 46px;
      font-size: 24px;
      box-sizing: border-box;
      color: #333;
    }

    label {
      width: 200px;
      line-height: 46px;
      margin-right: 30px;
      text-align: right;
    }

    input {
      width: 320px;
      padding: 8px;
      line-height: 1;
      outline: none;
      position: relative;
    }

    input.code {
      width: 120px;
    }

    input.verify {
      width: 190px;
      margin-left: 10px;
    }

    input.disabled {
      background-color: #CCC !important;
      cursor: not-allowed !important;
    }

    input[type=button] {
      border: none;
      color: #FFF;
      background-color: #E64145;
      border-radius: 4px;
      cursor: pointer;
    }

    .tips {
      width: 100%;
      height: 40px;
      text-align: center;
    }

    .tips p {
      min-width: 300px;
      max-width: 400px;
      line-height: 40px;
      margin: 0 auto;
      color: #FFF;
      display: none;
      background-color: #C91623;
    }

    .submit:disabled {
      background-color: gray;
      cursor: not-allowed;
    }

    span {
      line-height: 46px;
      padding-left: 20px;
      font-size: 20px;
      color: yellowgreen;
      text-shadow: 0 0 20px yellowgreen;
    }
  </style>
</head>

<body>
  <div class="register">
    <div class="tips">
      <p>用户名不能为空</p>
    </div>
    <form id="ajaxForm">
      <ul>
        <li>
          <label for="">用户名</label>
          <input type="text" name="name" class="name">
        </li>
        <li>
          <label for="">请设置密码</label>
          <input type="password" name="pass" class="pass">
        </li>
        <li>
          <label for="">请确认密码</label>
          <input type="password" name="repass" class="repass">
        </li>
        <li>
          <label for="">验证手机</label>
          <input type="text" name="mobile" class="mobile">
        </li>
        <li>
          <label for="">短信验证码</label>
          <input type="text" name="code" class="code">
          <input type="button" value="获取验证码" class="verify">
        </li>
        <li>
          <label for=""></label>
          <input type="button" class="submit" value="立即注册">
        </li>
      </ul>
    </form>
  </div>
  <!-- 提示信息 -->

</body>

</html>

<!-- 导入jQuery  -->
<script src="06.jQuery_register/js/jquery-1.12.4.min.js"></script>
<script>
    $(function(){

        //需求1.验证用户名
           $('.name').blur(function (){
               //为了保证在代码中 使用this不出错
               var $this=$(this)
               $.ajax({
                   url:'06.jQuery_register/_api/checkName.php',
                   data:{
                       name:$this.val()
                   },
                   success:function(data){
                       console.log(data) //没有xhr.responText啦 因为没有申请变量哦 直接的data就是他啦
                       $('.tips').find('p').html(data).fadeIn(1000).delay(1000).fadeOut()
                   }
               })
           })

        //需求2.验证手机号  和验证用户名一个样
        $('.mobile').blur(function (){
               $.ajax({
                   url:'06.jQuery_register/_api/checkMobile.php',
                   type:'post',
                   data:{
                       mobile:$('.mobile').val()
                   },
                   success:function(data){
                       console.log(data) //没有xhr.responText啦 因为没有申请变量哦 直接的data就是他啦
                       $('.tips p').html(data).fadeIn(1000)
                   }
               })
           })

        //需求3.手机验证码
        $('.verify').click(function (){

          //1.总不能一直发验证码 缓冲时间
          if($(this).hasClass('disabled')){
            alert('别点了')
            return ;
          }

          //2.验证码发出去后的 倒计时
          var totaltime=60
          $('.verify').val('还有'+totaltime+'s')
          var interId=setInterval(function(){   //定时器函数啊  setInterval(function(){},时间)
                totaltime--;
                if(totaltime==0){ //到时间了60s结束了
                    clearInterval(interId)//清除定时器
                    $('.verify').removeClass('disabled')//将不能点击的类名移除
                    $('.verify').val('获取验证码')//更改按钮上的信息
                    return;//阻断后面代码 就是下一行的那个
                }
                $('.verify').val('还有'+totaltime+'s')
          },1000)

          //3.给服务器传递信息 获取验证码并补充到信息框里
               $.ajax({
                   url:'06.jQuery_register/_api/code.php',
                   data:{
                       mobile:$('.mobile').val()
                   },
                   success:function(data){
                       console.log(data)
                       $('.code').val(data)
                   }
               })
           })


       })

  </script>
模板引擎
<!DOCTYPE html>
<html lang="en">
<head>
    <meta charset="UTF-8">
    <meta name="viewport" content="width=device-width, initial-scale=1.0">
    <meta http-equiv="X-UA-Compatible" content="ie=edge">
    <title>Document</title>
</head>
<body>
    <h2>引擎模板</h2>
</body>
</html>
<script src='template-web.js'></script> !!!!!!!!!!!!!!!!!!!!!!!!!!征用模板的话一定要引入模板.js
<!--
 <script>标签里 如果不写type或者是 text/javascript 会被解析为js
     如果写其他的内容 则不会被当做js处理
     这就成了 模板  不会出现在页面上的
-->
<script type='text/html' id='template'>
  <ul>
      <!--模板 并且挖坑-->
      <li>名字{{name}}</li>
      <li>技能{{skill}}</li>
      <li>爱好{{habit}}</li>
  </ul>
</script>
<Script>
   var data={
       name:'张飞',
       skill:'帅气',
       habit:'钓鱼'
   } //新数据  // 定义对象 对象的属性名 跟 坑的 名字一样
   var result=template('template',data) //填坑  !!!!!!!!!!!!!!模板调用的方法
   console.log(result)
/* <ul>
      <li>名字张飞</li>
      <li>技能帅气</li>
      <li>爱好钓鱼</li>
  </ul>*/
</Script>
art-template
实例:什么值得买 模板+jQuery+ajax
  1 <!DOCTYPE html>
  2 <html>
  3
  4 <head>
  5     <meta charset="UTF-8">
  6     <title>SMZDM</title>
  7     <style>
  8         .items {
  9             display: flex;
 10             flex-wrap: wrap;
 11         }
 12
 13         .item {
 14             /*float: left;*/
 15             width: 320px;
 16             /*height: 320px;*/
 17             border: 1px solid #0094ff;
 18             overflow: hidden;
 19             margin: 10px 20px;
 20         }
 21
 22         .item .title {
 23             display: block;
 24             width: 100%;
 25             position: relative;
 26         }
 27
 28         .title img {
 29             display: block;
 30             width: 100%;
 31         }
 32
 33         .title span {
 34             position: absolute;
 35             right: 20px;
 36             bottom: 0px;
 37             width: 50px;
 38             text-align: center;
 39             background-color: lightgray;
 40             color: gray;
 41             font-size: 13px;
 42             border-radius: 5px 5px 0 0;
 43         }
 44
 45         .content {
 46             padding: 10px 0;
 47         }
 48
 49         .content a {
 50             text-decoration: none;
 51             color: black;
 52             font-family: "微软雅黑";
 53             font-size: 16px;
 54         }
 55
 56         .content p {
 57             color: gray;
 58             font-size: 13px;
 59             font-family: "微软雅黑";
 60             margin-bottom: 0;
 61         }
 62
 63         .f_l {
 64             float: left;
 65         }
 66
 67         .f_r {
 68             float: right;
 69         }
 70
 71         .clearfix::before,
 72         .clearfix::after {
 73             content: '';
 74             display: block;
 75             line-height: 0;
 76             height: 0;
 77             clear: both;
 78             visibility: hidden;
 79         }
 80
 81         .clearfix {
 82             zoom: 1;
 83         }
 84
 85         .info {
 86             line-height: 25px;
 87         }
 88
 89         .info img {
 90             width: 20px;
 91             height: 20px;
 92             vertical-align: middle;
 93             margin-right: 10px;
 94         }
 95
 96         .info a {
 97             color: gray;
 98             text-decoration: none;
 99             font-size: 12px;
100             height: 20px;
101             line-height: 20px;
102             margin: 0 10px;
103         }
104
105         .getMore {
106             width: 100px;
107             height: 100px;
108             border: none;
109             text-align: center;
110             background-color: hotpink;
111             line-height: 100px;
112             cursor: pointer;
113             font-size: 20px;
114             font-weight: 900;
115         }
116
117         .getSome {
118             width: 100px;
119             height: 100px;
120             border: none;
121             text-align: center;
122             line-height: 100px;
123             cursor: pointer;
124             background-color: yellowgreen;
125             font-size: 20px;
126             font-weight: 900;
127         }
128
129         .controls {
130             display: flex;
131         }
132     </style>
133 </head>
134
135 <body>
136     <div class="controls">
137         <div class="getMore">获取一条
138         </div>
139         <div class="getSome">获取多条
140         </div>
141     </div>
142     <div class="items">
143         <!--div作为容器-->
144
145     </div>
146 </body>
147 </html>
148 <!--引入 jQ -->
149 <script src="06.smzdm/js/jquery-1.12.4.min.js"></script>
150 <!-- 模板引擎 -->
151 <script src="06.smzdm/js/template-web.js"></script>
152
153 <!-- 自己定义模板 挖坑 -->
154 <script id='template' type="text/html">
155 <!-- 一个item的内容
156 article_anonymous: "0"
157 article_author_avatar: "//avatarimg.smzdm.com/default/3442202793/56cc27d8dd3c9-small.jpg"
158 article_author_id: "3267243"
159 article_author_name: "穿耐克的高达"
160 article_author_url: "https://zhiyou.smzdm.com/member/3442202793/"
161 article_content: "万众期待的SIF2017大妈分剁行终于如期举行,首站选在天府之国--成都。作为成都值友,当听到这个消息的时候正式无比兴奋,而作为第一站,我们成都剁的压力自然也不小,心想一定要为大家开个好头。好在整个活动流程下来没有大的问题,值友们也通过活动增加了友谊,与张大妈..."
162 等等省略删了-->
163     {{each items}} <!--因为后台会随机返回一个数组的数据 所以在这里设上相当于for语句的东西 就是each target-->
164     <div class="item clearfix">
165             <a href="#" class='title'>
166                     <img src="{{$value.article_pic_url}}" alt="" />
167                     <span>{{$value.article_publishtime}}</span>
168                 </a>
169             <div class="content">
170                 <a href="#">{{$value.article_title}}</a>
171                 <p>{{@$value.article_content}}</p> <!--!!!!这里保证了原文输出-->
172             </div>
173             <div class="info clearfix">
174                 <a href="#" class='f_l'><img src="imgs/icon01.jpg" alt="" />烤红薯</a>
175                 <a href="#" class='f_r'>信息:0</a>
176                 <a href="#" class='f_r'>❤:0</a>
177                 <a href="#" class='f_r'>赞:0</a>
178             </div>
179         </div>
180     {{/each}}
181 </script>
182
183 <script>
184
185   $(function(){
186       $('.getSome').click(function (){
187           $.ajax({
188               url:'06.smzdm/_api/smzdm_getSome.php',
189               data:{
190                   num:Math.floor(6*Math.random())
191               },
192               success:function(data){
193                   console.log(data) //内容:{message: "", items: Array(5)} 所以要往下用 就是
194                   console.log(data.items) //(4) [{…}, {…}, {…}, {…}] data['items']也可
195                   console.log(data.items[0]) //具体的内容了 这里不是使用Array[0]的哦 {article_id: "591182", article_channel: 11, article_pic_url: "https://a.zdmimg.com/201708/16/5994509784a917614.jpg_c350.jpg", article_url: "https://post.smzdm.com/p/591182/", article_title: "我住过的那些SPG酒店 篇十七:#首席生活家# 已经扣款的酒店订单,都会被莫名其妙的修改?", …}
196                   console.log(data.items[0].article_title) //【幕后爆料】SIF2017张大妈分剁行---成都站
197
198                   console.log(template('template',data))
199                   /*第一个template表示要用模板 第二个是模板的名字 所以别忘了给模板起ID
200                   data是要放入模板的参数  参数返回了一个数组 所以模板也设成了数组的模样*/
201                   $('.items').append(template('template',data))
202               }
203           })
204       })
205   })
206
207 </script>
208
209
210     <!-- 另一种方式
211      模板
212          没有循环 模板就是普通的模板 所以挖坑{{}} 往里面放数据 就看API文档里的东西是什么名字即可
213      <div class="item clearfix">
214             <a href="#" class='title'>
215                     <img src="{{article_pic_url}}" alt="" />
216                     <span>{{article_publishtime}}</span>
217                 </a>
218             <div class="content">
219                 <a href="#">{{article_title}}</a>
220                 <p>{{article_content}}</p>
221             </div>
222             <div class="info clearfix">
223                 <a href="#" class='f_l'><img src="06.smzdm/imgs/icon01.jpg" alt="" />烤红薯</a>
224                 <a href="#" class='f_r'>信息:0</a>
225                 <a href="#" class='f_r'>❤:0</a>
226                 <a href="#" class='f_r'>赞:0</a>
227             </div>
228         </div>
229     二者配套使用  就是不在模板里设置循环 而是在回调函数里
230      for(var i=0;i<data.items.length;i++){
231             $('.items').append(template('template',data.items[i]))
232         }
233
234     -->
瀑布流插件
<!DOCTYPE html>
<html lang="zh-CN">

<head>
  <meta charset="UTF-8">
  <title>title</title>
  <style>
    div[class^='grid-item'] {    /*如果好几个div的类名都是grid-item+其他字符*/

      width: 150px;
      border: 1px solid #000;
      margin: 10px;
    }

    .grid-item-1 {
      height: 200px;
      background-color: hotpink;
    }

    .grid-item-2 {
      height: 300px;
      background-color: yellowgreen;
    }

    .grid-item-3 {
      height: 400px;
      background-color: greenyellow;
    }
  </style>
</head>

<body>
  <div class="grid">
    <div class="grid-item-1 grid-item">...</div>
    <div class="grid-item-2 grid-item">...</div>
    <div class="grid-item-3 grid-item">...</div>
    <div class="grid-item-1 grid-item">...</div>
    <div class="grid-item-2 grid-item">...</div>
    <div class="grid-item-3 grid-item">...</div>
    <div class="grid-item-1 grid-item">...</div>
    <div class="grid-item-2 grid-item">...</div>
    <div class="grid-item-3 grid-item">...</div>
    <div class="grid-item-1 grid-item">...</div>
    <div class="grid-item-2 grid-item">...</div>
    <div class="grid-item-3 grid-item">...</div>
    <div class="grid-item-1 grid-item">...</div>
    <div class="grid-item-2 grid-item">...</div>
    <div class="grid-item-3 grid-item">...</div>
    <div class="grid-item-1 grid-item">...</div>
    <div class="grid-item-2 grid-item">...</div>
    <div class="grid-item-3 grid-item">...</div>
    <div class="grid-item-1 grid-item">...</div>
    <div class="grid-item-2 grid-item">...</div>
    <div class="grid-item-3 grid-item">...</div>
    <div class="grid-item-1 grid-item">...</div>
    <div class="grid-item-2 grid-item">...</div>
    <div class="grid-item-3 grid-item">...</div>
    <div class="grid-item-1 grid-item">...</div>
    <div class="grid-item-2 grid-item">...</div>
    <div class="grid-item-3 grid-item">...</div>
    <div class="grid-item-1 grid-item">...</div>
    <div class="grid-item-2 grid-item">...</div>
    <div class="grid-item-3 grid-item">...</div>
    <div class="grid-item-1 grid-item">...</div>
    <div class="grid-item-2 grid-item">...</div>
    <div class="grid-item-3 grid-item">...</div>
    <div class="grid-item-1 grid-item">...</div>
    <div class="grid-item-2 grid-item">...</div>
    <div class="grid-item-3 grid-item">...</div>
    <div class="grid-item-1 grid-item">...</div>
    <div class="grid-item-2 grid-item">...</div>
    <div class="grid-item-3 grid-item">...</div>
    <div class="grid-item-1 grid-item">...</div>
    <div class="grid-item-2 grid-item">...</div>
    <div class="grid-item-3 grid-item">...</div>
    <div class="grid-item-1 grid-item">...</div>
    <div class="grid-item-2 grid-item">...</div>
    <div class="grid-item-3 grid-item">...</div>
    <div class="grid-item-1 grid-item">...</div>
    <div class="grid-item-2 grid-item">...</div>
    <div class="grid-item-3 grid-item">...</div>
    <div class="grid-item-1 grid-item">...</div>
    <div class="grid-item-2 grid-item">...</div>
    <div class="grid-item-3 grid-item">...</div>
    <div class="grid-item-1 grid-item">...</div>
    <div class="grid-item-2 grid-item">...</div>
    <div class="grid-item-3 grid-item">...</div>
    <div class="grid-item-1 grid-item">...</div>
    <div class="grid-item-2 grid-item">...</div>
    <div class="grid-item-3 grid-item">...</div>
    <div class="grid-item-1 grid-item">...</div>
    <div class="grid-item-2 grid-item">...</div>
    <div class="grid-item-3 grid-item">...</div>
    <div class="grid-item-1 grid-item">...</div>
    <div class="grid-item-2 grid-item">...</div>
    <div class="grid-item-3 grid-item">...</div>
    <div class="grid-item-1 grid-item">...</div>
    <div class="grid-item-2 grid-item">...</div>
    <div class="grid-item-3 grid-item">...</div>
    <div class="grid-item-1 grid-item">...</div>
    <div class="grid-item-2 grid-item">...</div>
    <div class="grid-item-3 grid-item">...</div>
    <div class="grid-item-1 grid-item">...</div>
    <div class="grid-item-2 grid-item">...</div>
    <div class="grid-item-3 grid-item">...</div>
    <div class="grid-item-1 grid-item">...</div>
    <div class="grid-item-2 grid-item">...</div>
    <div class="grid-item-3 grid-item">...</div>
    <div class="grid-item-1 grid-item">...</div>
    <div class="grid-item-2 grid-item">...</div>
    <div class="grid-item-3 grid-item">...</div>
    <div class="grid-item-1 grid-item">...</div>
    <div class="grid-item-2 grid-item">...</div>
    <div class="grid-item-3 grid-item">...</div>
    <div class="grid-item-1 grid-item">...</div>
    <div class="grid-item-2 grid-item">...</div>
    <div class="grid-item-3 grid-item">...</div>
    <div class="grid-item-1 grid-item">...</div>
    <div class="grid-item-2 grid-item">...</div>
    <div class="grid-item-3 grid-item">...</div>
    <div class="grid-item-1 grid-item">...</div>
    <div class="grid-item-2 grid-item">...</div>
    <div class="grid-item-3 grid-item">...</div>
    <div class="grid-item-1 grid-item">...</div>
    <div class="grid-item-2 grid-item">...</div>
    <div class="grid-item-3 grid-item">...</div>
    <div class="grid-item-1 grid-item">...</div>
    <div class="grid-item-2 grid-item">...</div>
    <div class="grid-item-3 grid-item">...</div>
    <div class="grid-item-1 grid-item">...</div>
    <div class="grid-item-2 grid-item">...</div>
    <div class="grid-item-3 grid-item">...</div>
    <div class="grid-item-1 grid-item">...</div>
    <div class="grid-item-2 grid-item">...</div>
    <div class="grid-item-3 grid-item">...</div>
    <div class="grid-item-1 grid-item">...</div>
    <div class="grid-item-2 grid-item">...</div>
    <div class="grid-item-3 grid-item">...</div>
    <div class="grid-item-1 grid-item">...</div>
    <div class="grid-item-2 grid-item">...</div>
    <div class="grid-item-3 grid-item">...</div>
    <div class="grid-item-1 grid-item">...</div>
    <div class="grid-item-2 grid-item">...</div>
    <div class="grid-item-3 grid-item">...</div>
    <div class="grid-item-1 grid-item">...</div>
    <div class="grid-item-2 grid-item">...</div>
    <div class="grid-item-3 grid-item">...</div>
    <div class="grid-item-1 grid-item">...</div>
    <div class="grid-item-2 grid-item">...</div>
    <div class="grid-item-3 grid-item">...</div>
  </div>
</body>

</html>
<!--  导入jQuery  -->
<script src="07.masonry/jquery-1.12.4.min.js"></script>
<!-- 导入瀑布流插件 -->
<script src="07.masonry/masonry.pkgd.min.js"></script>
<script>

 $(function(){
  // 调用瀑布流插件实现布局
  $('.grid').masonry({
     itemSelector: '.grid-item',
     columnWidth: 200
  });
 })
</script>
<!--真滴牛逼 你页面变大变小看看-->
实例:瀑布流 ajax+模板+jQuery
<!DOCTYPE html>
<html>

<head>
    <meta charset="UTF-8">
    <title>JQuery 实现瀑布流</title>
    <style>
        body {
            text-align: center;
            margin: 0;
            padding: 0;
            background-color: #F7F7F7;
            font-family: '微软雅黑';
        }

        .wrapper {
            padding: 50px;
        }

        img {
            display: block;
            width: 100%;
            height: 300px;
        }

        .items {
            position: relative;
            /* display: flex; */
            /* 环函 */
            /* flex-wrap: wrap; */
        }

        .item {
            width: 228px;
            position: absolute;
        }

        .tips {
            width: 280px;
            height: 40px;
            margin: 30px auto 0;
            text-align: center;
            line-height: 40px;
            background-color: #CCC;
            border-radius: 6px;
            font-size: 24px;
            cursor: pointer;
        }

        .tips.loading {
            /* background-color: transparent; */
            background-color: hotpink;
        }

        .tips.disabled {
            background-color: gray;
            cursor: not-allowed;
        }

        * {
            transition: all 1s;
        }
    </style>
</head>

<body>
    <h1>瀑布流 展示页面</h1>
    <div class="wrapper">
        <!-- items 作为 瀑布流的容器  瀑布流中的 元素的 宽度 是固定的 -->
        <div class="items">

        </div>
        <p class="tips loading">正在加载...</p>
    </div>
</body>

</html>
<!-- jQ -->
<script src="09.waterFall_ajax/js/jquery-1.12.4.min.js"></script>

<!-- 模板引擎使用步骤!!!!!!!!!!!!!!!!!!!
         1.引入模板引擎  这步和下一步不一样啊啊啊 这步是引入一个js文件的
         2.根据数据定义模板
         3.挖坑  填坑使用-->
<script src="09.waterFall_ajax/js/template-web.js"></script>
<script type='text/html' id='template'>
<!--后台返回来的是一堆 pageSize: 40 所以可以在模板这用上数组-->
     {{each items}}
     <div class="item">
        <img src="{{$value.path}}" alt="">
        <p>{{$value.text}}</p>
    </div>
    {{/each}}
</script>
<!--模板引用完毕-->

<!-- 引入瀑布流插件 -->
<script src="09.waterFall_ajax/js/masonry.pkgd.min.js"></script>
<script>
   $(function (){
       var my_currentPage=1
       //1.给按钮添加事情
       $('.tips').click(function (){
           //添加不准点击的类名代码
           if($(this).hasClass('disabled')==true){
               alert('已经是最后一页了哦')
               return;
           }

        var $this=$(this)
           $this.html('.')
           //定时器
           var interid = setInterval(function(){
               var oldStr=$this.html() //这一步和96步不是同一个意思 96步是让他在按钮上显示出来
               //判断长度
               if(oldStr.length>14){
                   oldStr=''
               }
               oldStr+='.'
               $this.html(oldStr)

           },200)
           //ajax
           $.ajax({
                url: '09.waterFall_ajax/api/waterFall.php',
                type: 'post',
                data: {
                    currentPage:  my_currentPage,
                    pageSize: 40
                },
                success:function(data){
                       console.log(data)
                       clearInterval(interid)//清除定时器 不再...了
                       $('.tips').html(data.currentPage+'/'+data.totalPage) //更改按钮上文字
                       //渲染页面 模板引擎
                       var result = template('template',data)
                       console.log(result)
                       //$('.items').append(result)
                       var $dom = $(result)
              //瀑布流插件
                       $('.items').masonry({
                         //可以不传递参数的呀
                    }).append($dom).masonry('appended', $dom).masonry()//链式传递
//官网上有masonry的方法 追加元素是$grid.masonry(){}.append(elem).masonry('appended', elem).masonry() elem还需要追加的元素
//所以我们可以把这步省略掉 $('.items').append(result) result是对象 需要的是dom元素 所以var $dom = $(result); 补充进去即可
                      // 页码 累加
                    my_currentPage++;

                   // 判断是否是最后一页 如果是的话 就不能在点击了
                   if(data.currentPage==data.totalPage){
                     // 添加类名
                     $('.tips').addClass('disabled');
                   }
             }
           })

       })

       //2.
    })
</script>
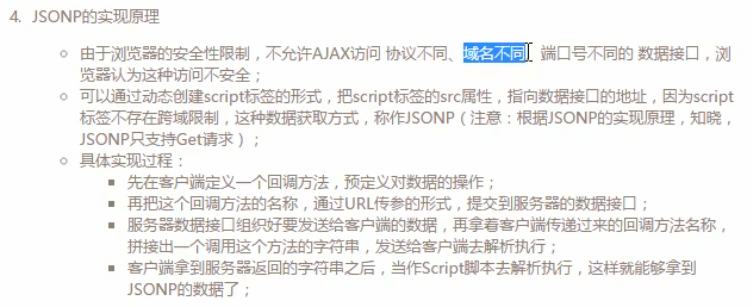
关于同源 跨域
<!DOCTYPE html>
<html lang="zh-CN">
<head>
    <meta charset="UTF-8">
    <title>title</title>
</head>
<body>
   <!-- dom元素的 src属性 是支持 跨域获取资源的 -->
   <img src="https://ss0.bdstatic.com/5aV1bjqh_Q23odCf/static/superman/img/logo/bd_logo1_31bdc765.png" alt="">

   <!--  还有 那些元素 有src属性 -->
   <!-- JSONP 就是利用了 src属性 支持跨域获取资源 -->
   <!-- <script src='http://192.168.70.78/2017-8-17/12.JSONP/backData.js'></script> -->

   <!-- JSONP的真实用法 -->
   <script>
       function doSomething(data){
         console.log(data);
       }
   </script>
   <script  src="http://192.168.70.78/2017-8-17/12.JSONP/backData.php?callback=doSomething">//?callback=doSomething相当于以get方式发送请求了

      //doSomething({"name":"jack","food":"西兰花"}) 就是后台返回的东西 实际上也相当于在这里运行
   </script>
</body>
</html>
<!--
    同源
        http://127.0.0.1/2017-8-17/09.waterFall_ajax/
        http://127.0.0.1/2017-8-17/09.waterFall_ajax/api/waterFall.php
        协议名:http
        IP地址一样: 127.0.0.1是本机
        端口号:默认是80端口
         上述三个条件一样 称之为 同源
    不同源
        协议,地址,端口号 有一个不一样 称之为不同源
    跨域:不同源的网站之前 互相发送请求

默认情况下 浏览器是阻止跨域行为的
  如何跨域:
   方法1:cros: cross origin resource sharing
         服务器端(php的):header('Access-Control-Allow-Origin: *');(html5才支持)
   方法2:JSONP    -----dataType:'jsonp'
         利用的是script标签的src属性 支持跨域访问
         script标签后面写上 需要请求的页面 发送了一个方法的名字到服务器
         服务器接收到名字之后 拼接了一个方法的调用 在参数中传入了需要给浏览器的数据
         返回到浏览器后 浏览器把他当做js解析
            没有跨域问题了 共服务器获取到了数据
 -->
D/ajax_serve中内容更丰富一点 这是搬了些有代表的
