期末作品检查
一、个人学期总结
眨眼间一个学期就要结束了,这学期在杜老师的带领下学习了python语言。Python具有丰富和强大的库。它常被昵称为胶水语言,能够把用其他语言制作的各种模块很轻松地联结在一起。常见的一种应用情形是,使用Python快速生成程序的原型(有时甚至是程序的最终界面),然后对其中有特别要求的部分,用更合适的语言改写,比如3D游戏中的图形渲染模块,性能要求特别高,就可以用C/C++重写,而后封装为Python可以调用的扩展类库。
首先本课程先开展了理论的学习,讲授了管理信息系统的大概,使我们有了初步了解。然后开始制作web网页,开始学习用html元素制作web网页,观察常用网页的HTML元素,制作自己的导航条,认识css的盒子模型,用div等元素布局形成html文件。完成了登录与注册页面的html+css+js,夜间模式的开启和关闭,制作网站网页共有元素的父模板html,包括顶部导航,中间区块划分,底部导航,底部说明等。汇总相关的样式形成独立的css文件,使用 js代码形成独立的js文件,形成完整的base.html+css+js。最后,进行flask项目,理解flask项目主程序,使用装饰器,设置路径与函数之间的关系;加载静态文件,父模板的继承和扩展;连接mysql数据库,创建用户模型,通过用户模型,对数据库进行增删改查,完成登录、注册、发布评论等功能,一步一步地完善我们的项目。在这个过程中遇到了困难也学会了去请教老师和同学,把问题解决,但是还有许多需要学习改进的地方。
二、Python+Flask+MysqL的web建设技术
经过一个学期的学习,实现了Python+Flask+MysqL的web建设,创建了一个图书分享网站,页面具有书籍分享的信息,能够通过用户登录后进行书籍分享活动,还能够发表书评、搜索文章等等。
1.使用工具
在本次实现Python+Flask+MysqL的web建设过程中,用到的主要工具有:pycharm64.exe + Python 3.6 64-bit + MySQL + Navicat for MySQL(辅助工具)


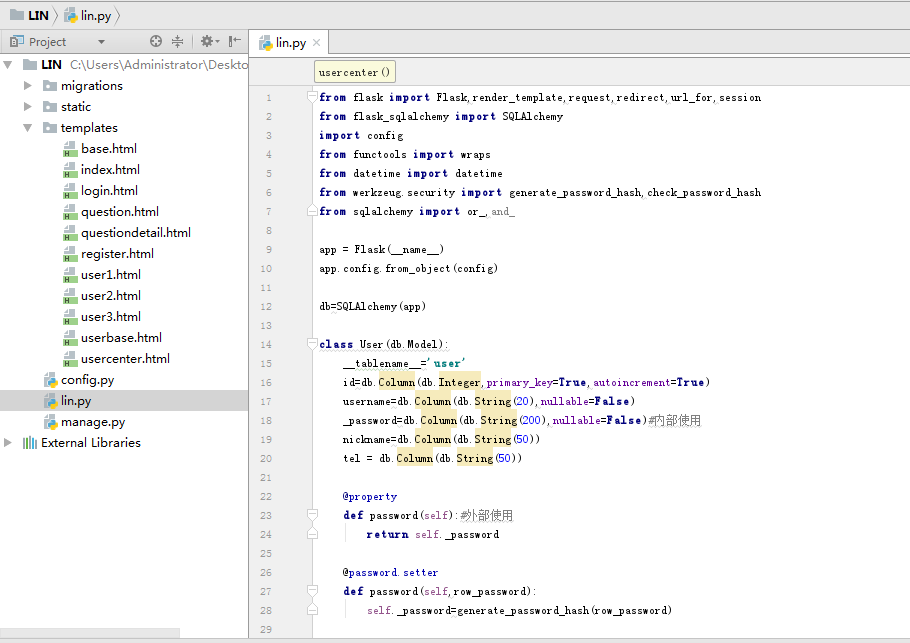
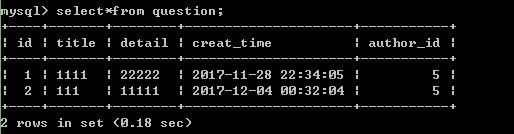
2.项目文件建设情况
pycharm 文件建设:
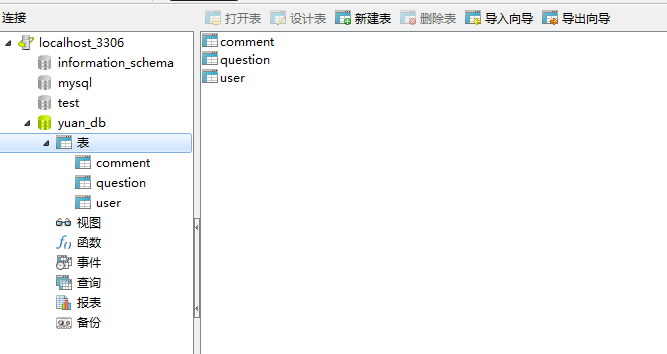
mysql数据库情况:
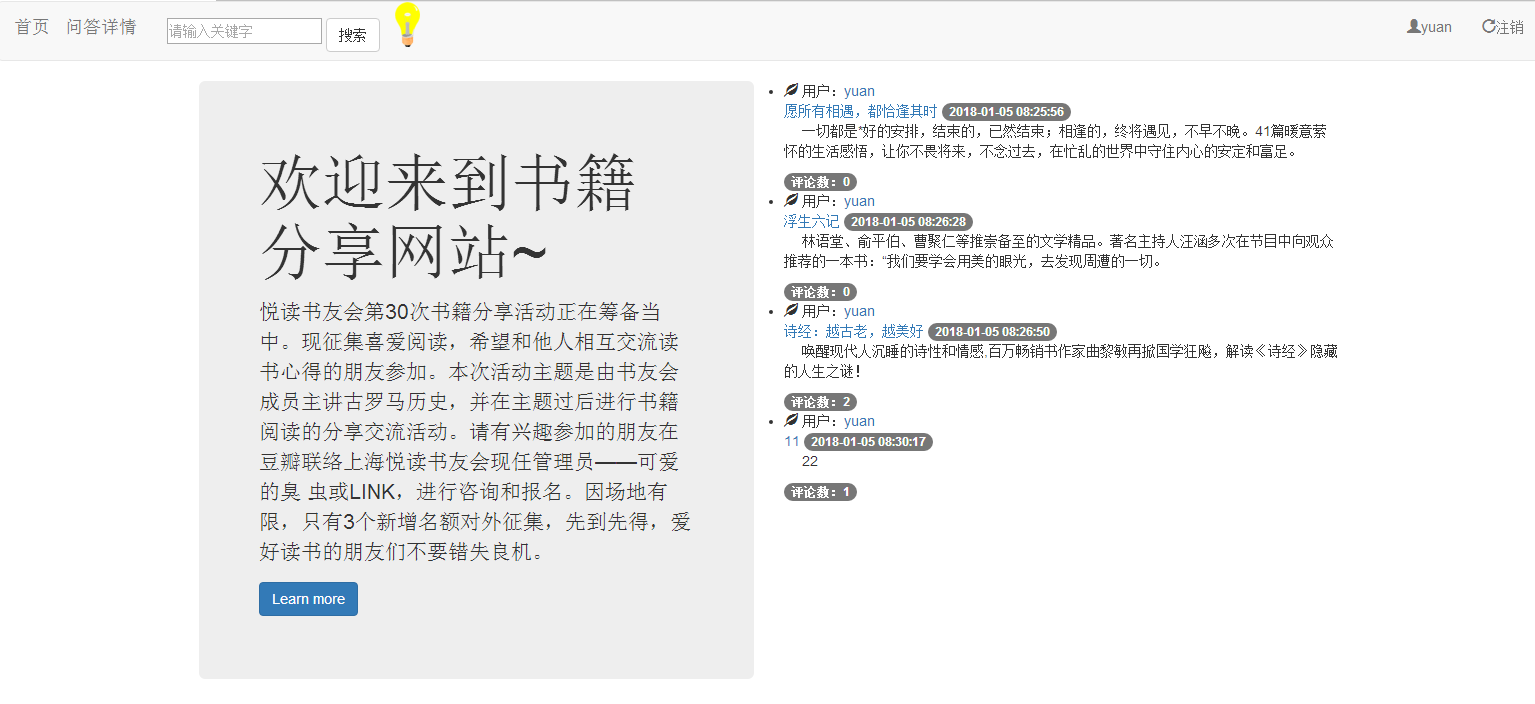
3.页面建设呈现效果
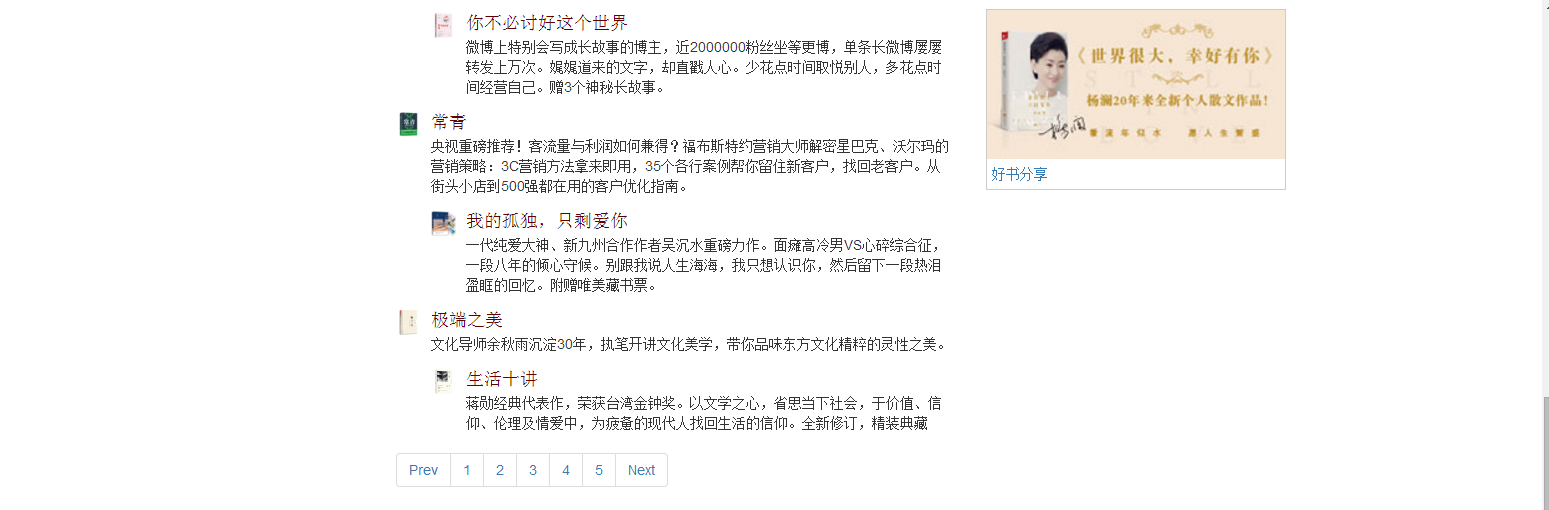
4.具体设计实现过程
(1)制作自己的导航条
效果:

代码:
HTML头部元素:
- <base> 定义了页面链接标签的默认链接地址
- <style> 定义了HTML文档的样式
- <link> 定义了一个文档和外部资源之间的关系
<body class="beijing" id="myBody" >
<nav class="navbar navbar-default " role="navigation">
    <div class="container-fluid">
        <div class="navbar-header">
            <a class="navbar-brand" href="{{ url_for('index')}}">首页</a>
            <a class="navbar-brand" href="{{ url_for('question') }}">问答详情</a>
           <form class="navbar-form navbar-left" action="{{ url_for('search') }}" method="get">
              <div class="form-group">
                  <input name="q" type="text"  placeholder="请输入关键字">
              </div>
              <button type="submit" class="btn btn-default" style="margin-top: 8px">搜索</button>
          </form>
        </div><img id="myOnOff" onclick="mySwitch()" src="http://www.runoob.com/images/pic_bulbon.gif" width="40px">
        <ul class="nav navbar-nav navbar-right">
            {% if username %}
                <li><a href="{{ url_for('usercenter',user_id=session.get('userid'),tag=1) }}"><span class="glyphicon glyphicon-user"></span>{{ session.get('user') }}</a></li>
                <!--<li><a href="#"><span class="    glyphicon glyphicon-user"></span>{{ username }}</a> </li>-->
                <li><a href="{{ url_for('logout')}}"><span class="glyphicon glyphicon-repeat"></span>注销</a></li>
            {% else %}
                <li><a href="{{ url_for('register')}}"><span class="glyphicon glyphicon-user"></span> 注册</a></li>
                <li><a href="{{ url_for('login')}}"><span class="glyphicon glyphicon-log-in"></span> 登录</a></li>
            {% endif %}
        </ul>

 </div>

</nav>
</body>
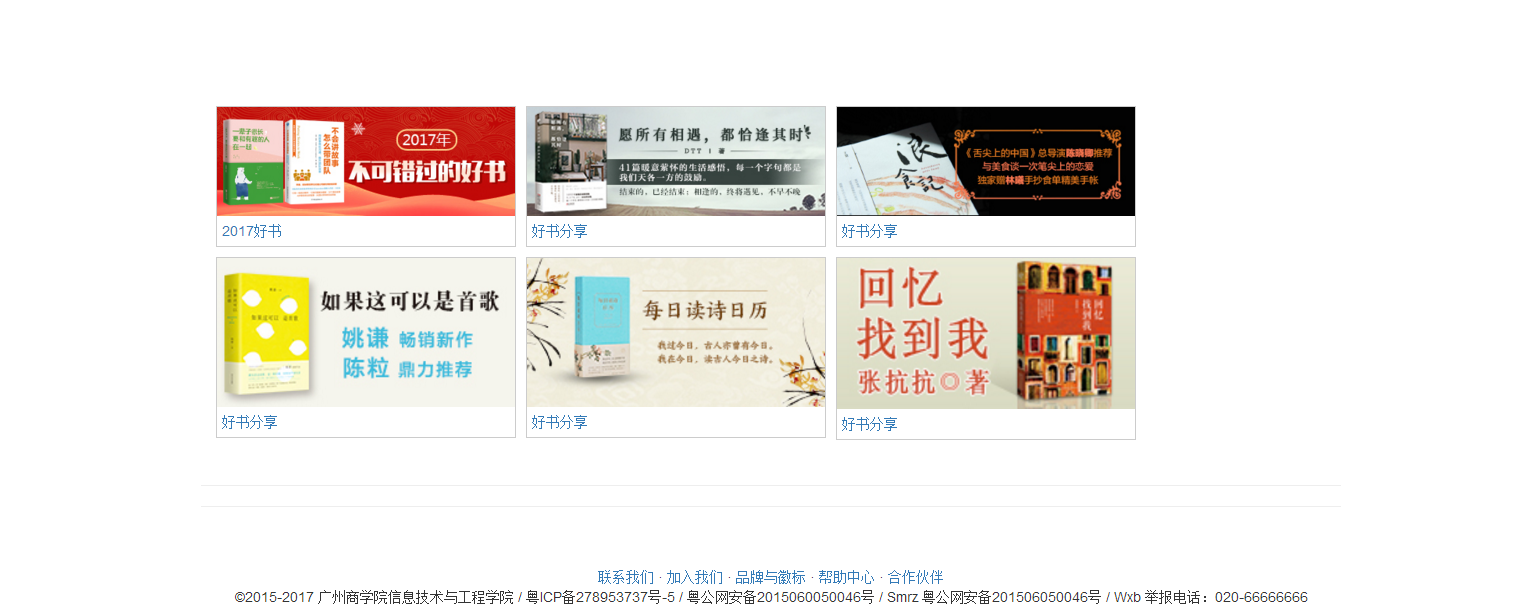
(2)图片导航块的实现
效果展示:

代码实现详情:
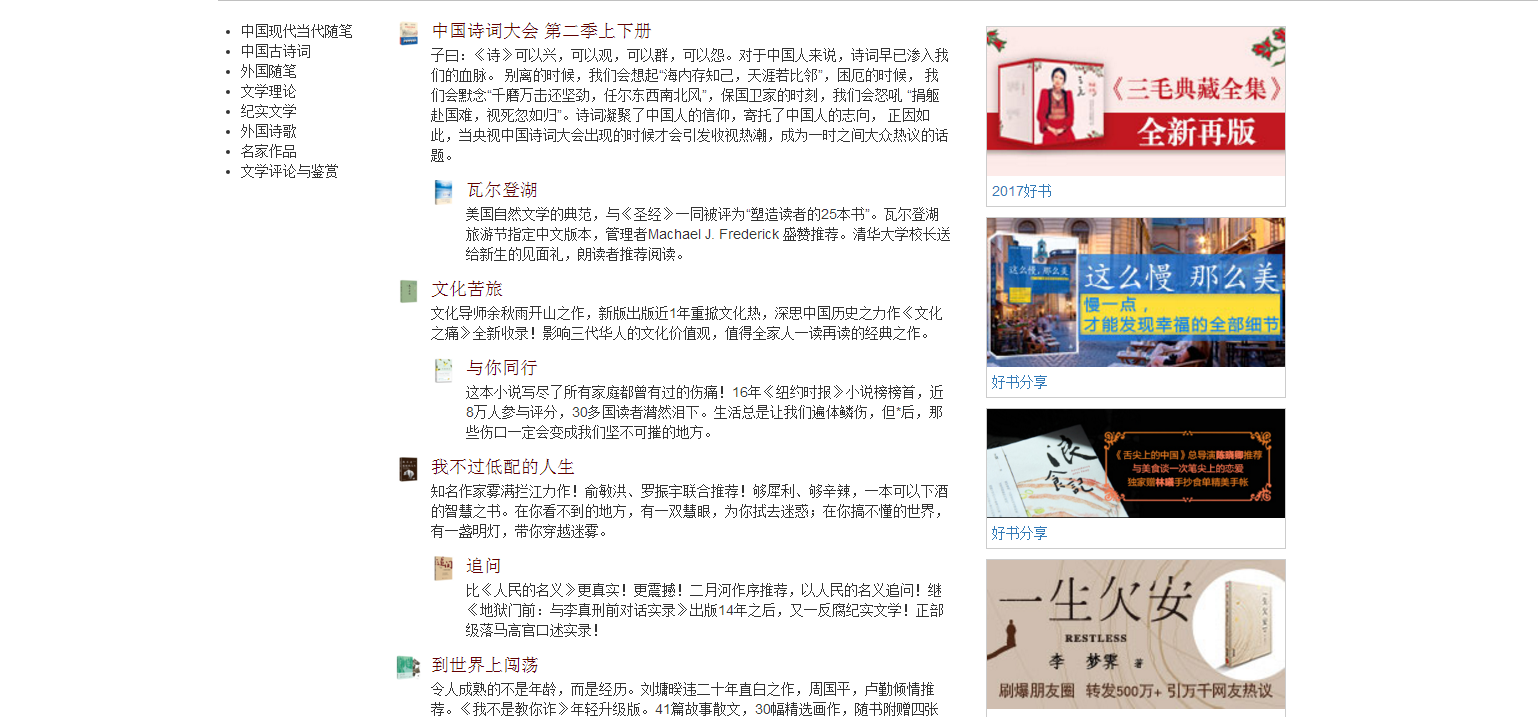
 <div class="row clearfix">
        <div class="col-md-12 column">
   <div class="recommend">
    <div class="img">
        <a href="http://store.dangdang.com/gys_0014410_rsgy"><img src="http://img51.ddimg.cn/9003260060812741.jpg" alt=""> </a>
        <div class="desc"><a href="http://store.dangdang.com/gys_0014410_rsgy">2017好书</a></div>
    </div>
    <div class="img">
        <a href="http://store.dangdang.com/gys_0016310_tk35"><img src="http://img59.ddimg.cn/9006170034706179.jpg" alt="" > </a>
        <div class="desc"><a href="http://store.dangdang.com/gys_0016310_tk35">好书分享</a></div>

    </div>
    <div class="img">
        <a href="http://store.dangdang.com/gys_04083_euce"><img src="http://img60.ddimg.cn/topic_img/gys_04083/langshiji382140.jpg" alt=""> </a>
        <div class="desc"><a href="http://store.dangdang.com/gys_04083_euce">好书分享</a></div>

    </div>
    <div class="img">
        <a href="http://store.dangdang.com/gys_0015642_5hay"><img src="http://img50.ddimg.cn/9002790031624100.jpg" alt="" > </a>
        <div class="desc"><a href="http://store.dangdang.com/gys_0015642_5hay">好书分享</a></div>

    </div>
    <div class="img">
        <a href="http://store.dangdang.com/gys_0015642_haib"><img src="http://img52.ddimg.cn/9002790034155752.jpg" alt="" > </a>
        <div class="desc"><a href="http://store.dangdang.com/gys_0015642_haib">好书分享</a></div>

    </div>
    <div class="img">
        <a href="http://book.dangdang.com/20170619_eeiv"><img src="http://img63.ddimg.cn/upload_img/00570/ta/huiyi24243620_19096.jpg" alt="" > </a>
        <div class="desc"><a href="http://book.dangdang.com/20170619_eeiv">好书分享</a></div>

    </div>

</div>


        </div>
    </div>
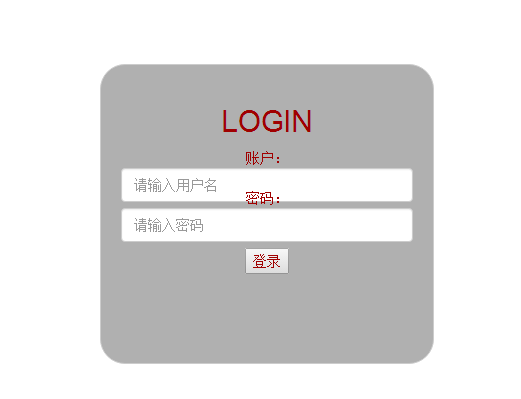
(3)JavaScrip基础,登录验证
效果:
代码:
- 登录页面准备:
- 增加错误提示框。
- 写好HTML+CSS文件。
- 设置每个输入元素的id
- 定义JavaScript 函数。
- 验证用户名6-20位
- 验证密码6-20位
- onclick调用这个函数。
{% block main %}
<div class="box" style="margin-left: 550px;margin-top: 300px;" >
    <h2 >LOGIN</h2>
     <form action="{{url_for('login') }}" method="post">
        <div class="input_box" >
            账户:<input id="uname" type="text"  class="form-control" placeholder="请输入用户名" name="username"><br>
        </div>
        <div class="input_box">
            密码:<input id="upass" type="password"  class="form-control" placeholder="请输入密码" name="password"><br>
        </div>
        <div id="error_box"><br></div>
        <div class="input_box">
            <button onclick="fnLogin()">登录</button>
        </div>
    </form>
</div>
{% endblock %}
(4)完成登录与注册页面
效果:
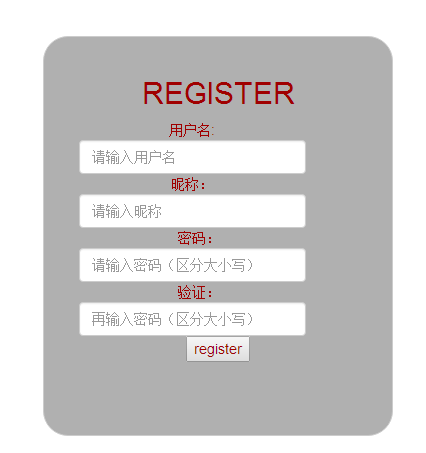
代码:
1.用户名6-12位
2.首字母不能是数字
3.只能包含字母和数字
4.密码6-12位
5.注册页两次密码是否一致
{% block main %}
<div class="box" style="margin-left: 550px;margin-top: 300px;" >
    <h2 >LOGIN</h2>
     <form action="{{url_for('login') }}" method="post">
        <div class="input_box" >
            账户:<input id="uname" type="text"  class="form-control" placeholder="请输入用户名" name="username"><br>
        </div>
        <div class="input_box">
            密码:<input id="upass" type="password"  class="form-control" placeholder="请输入密码" name="password"><br>
        </div>
        <div id="error_box"><br></div>
        <div class="input_box">
            <button onclick="fnLogin()">登录</button>
        </div>
    </form>
</div>
{% endblock %}
{% block main %}
 <div class="box" style="margin-left: 550px;margin-top: 150px;">
    <h2>REGISTER</h2>
     <form action="{{url_for('register') }}" method="post">
         <div class="input_box">

             <div class="col-sm-10">
            用户名:<input labid="uname" type="text" class="form-control"  placeholder="请输入用户名" name="username">
         </div></div>
         <div class="input_box">
              <div class="col-sm-10">
             昵称:<input id="nickname" type="text" class="form-control"  placeholder="请输入昵称" name="nickname">
         </div></div>
         <div class="input_box">
             <div class="col-sm-10">
             密码:<input id="upass" type="password" class="form-control"  placeholder="请输入密码(区分大小写)" name="password">
         </div></div>
         <div class="input_box">
             <div class="col-sm-10">
             验证:<input id="upass1" type="password" class="form-control"  placeholder="再输入密码(区分大小写)">
         </div></div>
        <div id="error_box"> </div><br>

         <div class="input_box">
            <button onclick="fnLogin()" >register</button>
         </div>
     </form>
</div>
{% endblock %}
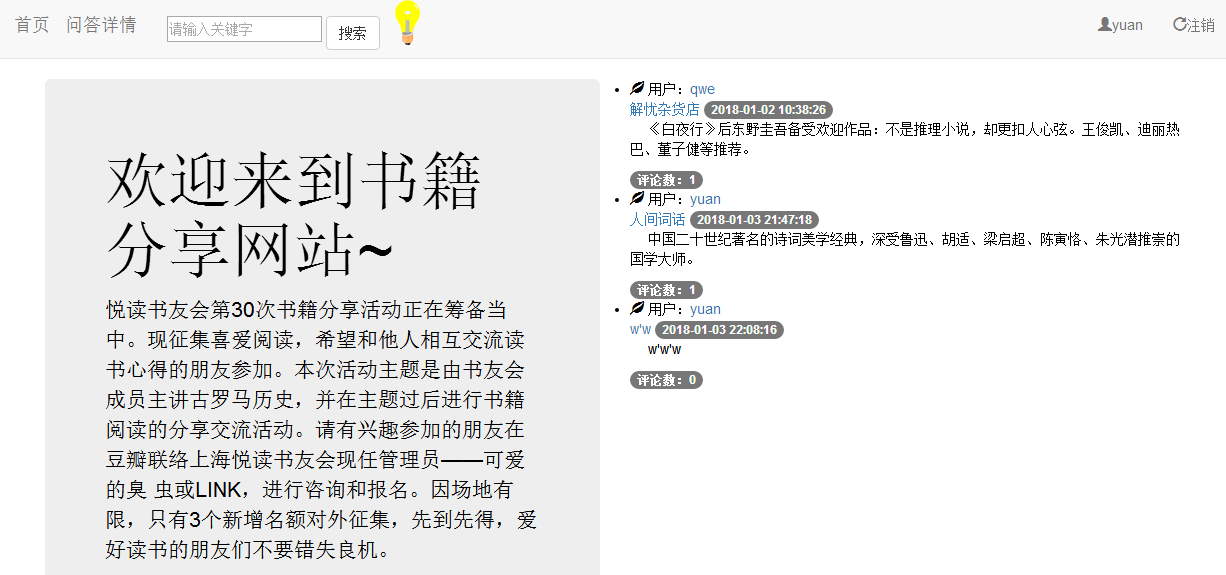
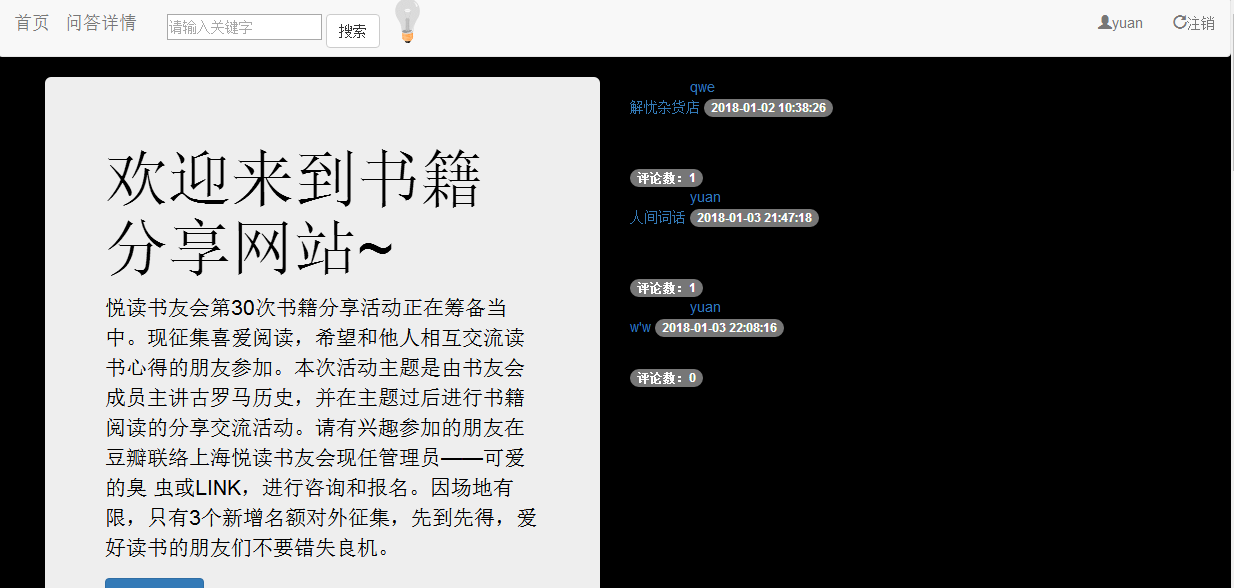
(5)夜间模式的开启与关闭,父模板的制作
效果:(日间)
(夜间)
代码:
夜间模式的开启与关闭
- 放置点击的按钮或图片。
- 定义开关切换函数。
- onclick函数调用。
父模板的制作
- 制作网站网页共有元素的父模板html,包括顶部导航,中间区块划分,底部导航,底部说明等。
- 汇总相关的样式形成独立的css文件。
- 汇总相关的js代码形成独立的js文件。
- 形成完整的base.html+css+js
<!DOCTYPE html>
<html lang="en">
<head>
    <meta charset="UTF-8">
    <title>
        {%block title %}{% endblock %}
        我的页面</title>
    <link rel="stylesheet" type="text/css" href="../static/css/1101.css">
    <script src="../static/js/1101.js"></script>
    <!-- 新 Bootstrap 核心 CSS 文件 -->
<link href="https://cdn.bootcss.com/bootstrap/3.3.7/css/bootstrap.min.css" rel="stylesheet">

<!-- 可选的Bootstrap主题文件(一般不使用) -->
<script src="https://cdn.bootcss.com/bootstrap/3.3.7/css/bootstrap-theme.min.css"></script>

<!-- jQuery文件。务必在bootstrap.min.js 之前引入 -->
<script src="https://cdn.bootcss.com/jquery/2.1.1/jquery.min.js"></script>

<!-- 最新的 Bootstrap 核心 JavaScript 文件 -->
<script src="https://cdn.bootcss.com/bootstrap/3.3.7/js/bootstrap.min.js"></script>

    {% block head %}
    {% endblock %}
</head>
<body class="beijing" id="myBody" >
<nav class="navbar navbar-default " role="navigation">
    <div class="container-fluid">
        <div class="navbar-header">
            <a class="navbar-brand" href="{{ url_for('index')}}">首页</a>
            <a class="navbar-brand" href="{{ url_for('question') }}">问答详情</a>
           <form class="navbar-form navbar-left" action="{{ url_for('search') }}" method="get">
              <div class="form-group">
                  <input name="q" type="text"  placeholder="请输入关键字">
              </div>
              <button type="submit" class="btn btn-default" style="margin-top: 8px">搜索</button>
          </form>
        </div><img id="myOnOff" onclick="mySwitch()" src="http://www.runoob.com/images/pic_bulbon.gif" width="40px">
        <ul class="nav navbar-nav navbar-right">
            {% if username %}
                <li><a href="{{ url_for('usercenter',user_id=session.get('userid'),tag=1) }}"><span class="glyphicon glyphicon-user"></span>{{ session.get('user') }}</a></li>
                <!--<li><a href="#"><span class="    glyphicon glyphicon-user"></span>{{ username }}</a> </li>-->
                <li><a href="{{ url_for('logout')}}"><span class="glyphicon glyphicon-repeat"></span>注销</a></li>
            {% else %}
                <li><a href="{{ url_for('register')}}"><span class="glyphicon glyphicon-user"></span> 注册</a></li>
                <li><a href="{{ url_for('login')}}"><span class="glyphicon glyphicon-log-in"></span> 登录</a></li>
            {% endif %}
        </ul>

 </div>

</nav>
</body>

{% block main %}
{% endblock %}
</body>

</html>
(6)开始flask项目
- 新建Flask项目。
- 设置调试模式。
- 理解Flask项目主程序。
- 使用装饰器,设置路径与函数之间的关系。
- 使用Flask中render_template,用不同的路径,返回首页、登录员、注册页。
- 用视图函数反转得到URL,url_for(‘login’),完成导航里的链接。
from flask import Flask,render_template,request,redirect,url_for,session
from flask_sqlalchemy import SQLAlchemy
import config
from functools import wraps
from datetime import datetime
from werkzeug.security import generate_password_hash,check_password_hash
from sqlalchemy import or_,and_

app = Flask(__name__)
app.config.from_object(config)

db=SQLAlchemy(app)

class User(db.Model):
    __tablename__='user'
    id=db.Column(db.Integer,primary_key=True,autoincrement=True)
    username=db.Column(db.String(20),nullable=False)
    _password=db.Column(db.String(200),nullable=False)#内部使用
    nickname=db.Column(db.String(50))
    tel = db.Column(db.String(50))

    @property
    def password(self):#外部使用
        return self._password

    @password.setter
    def password(self,row_password):
        self._password=generate_password_hash(row_password)

    def check_password(self,row_password):
        result=check_password_hash(self._password,row_password)
        return result

class Question(db.Model):
    __tablename__='question'
    id=db.Column(db.Integer,primary_key=True,autoincrement=True)
    title=db.Column(db.String(100),nullable=False)
    detail=db.Column(db.Text,nullable=False)
    creat_time=db.Column(db.DateTime,default=datetime.now)
    author_id=db.Column(db.Integer,db.ForeignKey('user.id'))
    author=db.relationship('User',backref=db.backref('question'))

class Comment(db.Model):
    __tablename__='comment'
    id=db.Column(db.Integer,primary_key=True,autoincrement=True)
    author_id=db.Column(db.Integer,db.ForeignKey('user.id'))
    question_id=db.Column(db.Integer,db.ForeignKey('question.id'))
    detail=db.Column(db.Text,nullable=False)
    creat_time=db.Column(db.DateTime,default=datetime.now)
    question=db.relationship('Question',backref=db.backref('comments',order_by=creat_time.desc))
    author=db.relationship('User',backref=db.backref('comments'))


db.create_all()


#查
#user = User.query.filter(User.username == 'sk').first()
#print(user.id,user.password)

#改
#user = User.query.filter(User.username == 'mis1234').first()
#user.password='888888'
#user.username='sk'
#db.session.commit()
#print(user.id,user.password)

#删
#user = User.query.filter(User.username=='sk').first()
#db.session.delete(user)
#db.session.commit()


#增
#user = User(username='mis1234',password='111111')
#db.session.add(user)
#db.session.commit()

@app.route('/')
def base():
    return  render_template('base.html')

@app.route('/index/')
def index():
    context={
        'questions':Question.query.all()
    }
    return render_template('index.html',**context)


@app.route('/register/',methods=['GET','POST'])
def register():
    if request.method=='GET':
        return render_template('register.html')
    else:
        usern = request.form.get('username')
        nickn = request.form.get('nickname')
        passw = request.form.get('password')
        user = User.query.filter(User.username == usern).first()
        if user:
            return 'username existed.'
        else:
            user1 = User(username = usern,password = passw,nickname = nickn)
            db.session.add(user1)
            db.session.commit()
            return redirect(url_for('login'))

@app.route('/login/',methods=['GET','POST'])
def login():
    if request.method=='GET':
        return render_template('login.html')
    else:
        usern = request.form.get('username')
        passw = request.form.get('password')
        user = User.query.filter(User.username == usern).first()
        if user:
            if user.check_password(passw):
                session['user']=usern
                session['userid']=user.id
                session.permanent = True
                return redirect(url_for('index'))
            else:
                return 'password error.'
        else:
            return 'username is not existed.'

@app.context_processor
def mycontext():
    user = session.get('user')
    if user:
        return {'username':user}
    else:
        return {}

@app.route('/logout/')
def logout():
    session.clear()
    return redirect(url_for('index'))

def loginFirst(func):
    @wraps(func)
    def wrapper(*args,**kwargs):
        if session.get('user'):
            return func(*args,**kwargs)
        else:
            return redirect(url_for('login'))
    return wrapper

@app.route('/question/',methods=['GET','POST'])
@loginFirst
def question():
    if request.method=='GET':
        return render_template('question.html')
    else:
        titleq = request.form.get('title')
        detailq = request.form.get('detail')
        user = User.query.filter(User.username==session.get('user')).first()
        author_id=user.id
        question = Question(title=titleq,detail=detailq,author_id=author_id)
        question.author=user
        db.session.add(question) #保存到数据库
        db.session.commit()
        return redirect(url_for('index'))

# @app.route('/questiondetail/<question_id>',methods=['GET','POST'])
@app.route('/questiondetail/<question_id>')
def questiondetail(question_id):
    quest=Question.query.filter(Question.id==question_id).first()
    return render_template('questiondetail.html',ques=quest)

@app.route('/comment/',methods=['POST'])
@loginFirst
def comment():
    comment=request.form.get('new_comment')
    ques_id=request.form.get('question_id')
    auth_id=User.query.filter(User.username==session.get('user')).first().id
    comm=Comment(author_id=auth_id,question_id=ques_id,detail=comment)
    db.session.add(comm)
    db.session.commit()
    return redirect(url_for('questiondetail',question_id=ques_id))

@app.route('/usercenter/<user_id>/<tag>')
@loginFirst
def usercenter(user_id,tag):
    user=User.query.filter(User.id==user_id).first()
    context={
        'user':user,
        'comments':user.comments,
        'questions':user.question
    }
    if tag=='1':
        return render_template('user1.html',**context)
    elif tag=='2':
        return render_template('user2.html',**context)
    else:
        return render_template('user3.html',**context)


@app.route('/search/')
def search():
    qu = request.args.get('q')
    ques = Question.query.filter\
        (or_(Question.title.contains(qu),
             Question.detail.contains(qu)
             )
         ).order_by('-create_time')
    return render_template('index.html',question=ques)

if __name__ == '__main__':
    app.run()
(7)加载静态文件,父模板的继承和扩展
- 用url_for加载静态文件
- <script src="{{ url_for('static',filename='js/login.js') }}"></script>
- flask 从static文件夹开始寻找
- 可用于加载css, js, image文件
- 继承和扩展
- 把一些公共的代码放在父模板中,避免每个模板写同样的内容。base.html
- 子模板继承父模板
- {% extends 'base.html’ %}
- 父模板提前定义好子模板可以实现一些自己需求的位置及名称。block
- <title>{% block title %}{% endblock %}-MIS问答平台</title>
- {% block head %}{% endblock %}
- {% block main %}{% endblock %}
- 子模板中写代码实现自己的需求。block {% block title %}登录{% endblock %}
{% extends 'base.html' %}
{% block title %}
LOGIN
{% endblock %}

{% block head %}
 <link rel="stylesheet" type="text/css" href="{{ url_for('static',filename='css/1031.css') }}">
    <script src="{{ url_for('static',filename='js/1031.js') }}"></script>
{% endblock %}

{% block main %}
略
{% endblock %}
(8)链接mysql数据库,创建用户模型
- 安装与配置python3.6+flask+mysql数据库
- 下载安装MySQL数据库
- 下载安装MySQL-python 中间件
- pip install flask-sqlalchemy (Python的ORM框架SQLAlchemy)
- mysql创建数据库
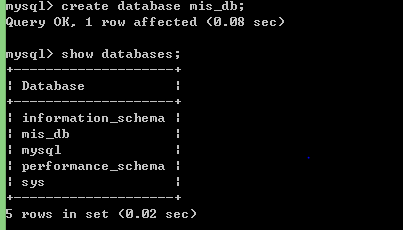
- 数据库配置信息config.py
SQLALCHEMY_DATABASE_URI = 'mysql+pymysql://root:@localhost:3306/mis_db?charset=utf8'
SQLALCHEMY_TRACK_MODIFICATIONS = False
- 建立mysql和app的连接

from flask import Flask,render_template
from flask_sqlalchemy import SQLAlchemy
import config


app = Flask(__name__)#初始化一个Flask对象,需要传递一个参数__name__
app.config.from_object(config)
db=SQLAlchemy(app)

db.create_all()
- 创建用户模型
# /创建用户模型
class User(db.Model):
    __tablename__ ='user'
    id=db.Column(db.Integer,primare_key=TabError,autoincrement=True)
    username=db.Column(db.String(20),nullable=False)
    password=db.Colum(db.String(20),nullable=False)
(9)通过用户模型,对数据库进行增删改查操作
from flask import Flask,render_template,request,redirect,url_for,session
from flask_sqlalchemy import SQLAlchemy
import config
from functools import wraps
from datetime import datetime
from werkzeug.security import generate_password_hash,check_password_hash
from sqlalchemy import or_,and_

app = Flask(__name__)
app.config.from_object(config)

db=SQLAlchemy(app)

class User(db.Model):
    __tablename__='user'
    id=db.Column(db.Integer,primary_key=True,autoincrement=True)
    username=db.Column(db.String(20),nullable=False)
    _password=db.Column(db.String(200),nullable=False)#内部使用
    nickname=db.Column(db.String(50))
    tel = db.Column(db.String(50))

    @property
    def password(self):#外部使用
        return self._password

    @password.setter
    def password(self,row_password):
        self._password=generate_password_hash(row_password)

    def check_password(self,row_password):
        result=check_password_hash(self._password,row_password)
        return result

class Question(db.Model):
    __tablename__='question'
    id=db.Column(db.Integer,primary_key=True,autoincrement=True)
    title=db.Column(db.String(100),nullable=False)
    detail=db.Column(db.Text,nullable=False)
    creat_time=db.Column(db.DateTime,default=datetime.now)
    author_id=db.Column(db.Integer,db.ForeignKey('user.id'))
    author=db.relationship('User',backref=db.backref('question'))

class Comment(db.Model):
    __tablename__='comment'
    id=db.Column(db.Integer,primary_key=True,autoincrement=True)
    author_id=db.Column(db.Integer,db.ForeignKey('user.id'))
    question_id=db.Column(db.Integer,db.ForeignKey('question.id'))
    detail=db.Column(db.Text,nullable=False)
    creat_time=db.Column(db.DateTime,default=datetime.now)
    question=db.relationship('Question',backref=db.backref('comments',order_by=creat_time.desc))
    author=db.relationship('User',backref=db.backref('comments'))


db.create_all()


#查
#user = User.query.filter(User.username == 'sk').first()
#print(user.id,user.password)

#改
#user = User.query.filter(User.username == 'mis1234').first()
#user.password='888888'
#user.username='sk'
#db.session.commit()
#print(user.id,user.password)

#删
#user = User.query.filter(User.username=='sk').first()
#db.session.delete(user)
#db.session.commit()


#增
#user = User(username='mis1234',password='111111')
#db.session.add(user)
#db.session.commit()
(10)完成注册功能
@app.route('/register/',methods=['GET','POST'])
def register():
    if request.method=='GET':
        return render_template('register.html')
    else:
        usern = request.form.get('username')
        nickn = request.form.get('nickname')
        passw = request.form.get('password')
        user = User.query.filter(User.username == usern).first()
        if user:
            return 'username existed.'
        else:
            user1 = User(username = usern,password = passw,nickname = nickn)
            db.session.add(user1)
            db.session.commit()
            return redirect(url_for('login'))
(11)完成登录功能,用session记住用户名
session:
- 从`flask`中导入`session`
from flask import Flask,render_template,request,redirect,url_for,session
- 设置`SECRET_KEY`
import os

DEBUG =True

SECRET_KEY = os.urandom(24)

DIALECT ='mysql'
DRIVER ='mysqldb'
USERNAME='root'
PASSWORD=''
HOST='localhost'
PORT='3306'
DATABASE='Y_db'

# SQLALCHEMY_DATABASE_URI = 'mysql+pymysql://root:@127.0.0.1:3306/yuan_db?charset=utf8'
SQLALCHEMY_DATABASE_URI = 'mysql+pymysql://root:@localhost:3306/Y_db?charset=utf8'
SQLALCHEMY_TRACK_MODIFICATIONS = False
- 操作字典一样操作`session`:增加用户名`session['username']=`username
@app.route('/login/',methods=['GET','POST'])
def login():
    if request.method == 'GET':
        return render_template('1031.html')
    else:
        usern = request.form.get('username')
        passw = request.form.get('password')
        user = User.query.filter(User.username == usern).first()
        # 判断用户名是否存在
        if user:
            session['user'] = usern
            session.permanent = True
            if user.password == passw:
                return redirect(url_for('shouye'))
            else:
                return 'password error'
        else:
            return 'username is not existed'
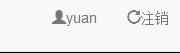
(12)登录之后更新导航
效果:
代码:
@app.context_processor
def mycontext():
    usern = session.get('user')
    if usern:
        return {'username': usern}
    else:
        return {}
<ul class="nav navbar-nav navbar-right">
            {% if username %}
                <li><a href="{{ url_for('usercenter',user_id=session.get('userid'),tag=1) }}"><span class="glyphicon glyphicon-user"></span>{{ session.get('user') }}</a></li>
                <!--<li><a href="#"><span class="    glyphicon glyphicon-user"></span>{{ username }}</a> </li>-->
                <li><a href="{{ url_for('logout')}}"><span class="glyphicon glyphicon-repeat"></span>注销</a></li>
            {% else %}
                <li><a href="{{ url_for('register')}}"><span class="glyphicon glyphicon-user"></span> 注册</a></li>
                <li><a href="{{ url_for('login')}}"><span class="glyphicon glyphicon-log-in"></span> 登录</a></li>
            {% endif %}
        </ul>
(13)发布功能的完成
效果:
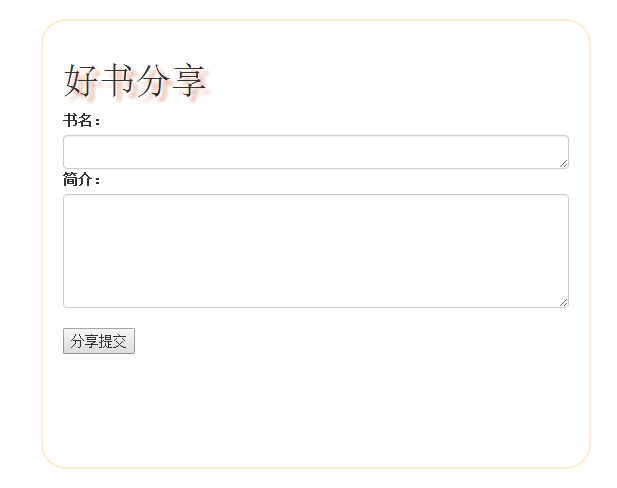
代码:
- 编写要求登录的装饰器
from functools import wraps
def loginFirst(func): #参数是函数
@wraps(func)
def wrapper(*args, ** kwargs): #定义个函数将其返回
#要求登录
return func(*args, ** kwargs)
return wrapper #返回一个函数
def loginFirst(func):
    @wraps(func)
    def wrapper(*args,**kwargs):
        if session.get('user'):
            return func(*args,**kwargs)
        else:
            return redirect(url_for('login'))
    return wrapper
- 应用装饰器,要求在发布前进行登录,登录后可发布。
@app.route('/question/',methods=['GET','POST'])
@loginFirst
def question():
- 建立发布内容的对象关系映射。
class Question(db.Model):
# /创建用户模型
class User(db.Model):
    __tablename__ ='user'
    id=db.Column(db.Integer,primary_key=True,autoincrement=True)
    username=db.Column(db.String(20),nullable=False)
    password=db.Column(db.String(20),nullable=False)
    nickname=db.Column(db.String(50))

class Question(db.Model):
    __tablename__ = 'question'
    id = db.Column(db.Integer, primary_key=True, autoincrement=True)
    title = db.Column(db.String(100), nullable=False)
    detail = db.Column(db.Text, nullable=False)
    creat_time = db.Column(db.DateTime, default=datetime.now)
    author_id = db.Column(db.Integer, db.ForeignKey('user.id'))
    author = db.relationship('User', backref=db.backref('question'))
#db.create_all()
- 完成发布函数。
保存到数据库。
重定向到首页。
@app.route('/question/',methods=['GET','POST'])
@loginFirst
def question():
    if request.method=='GET':
        return render_template('question.html')
    else:
        titleq = request.form.get('title')
        detailq = request.form.get('detail')
        user = User.query.filter(User.username==session.get('user')).first()
        author_id=user.id
        question = Question(title=titleq,detail=detailq,author_id=author_id)
        question.author=user
        db.session.add(question) #保存到数据库
        db.session.commit()
        return redirect(url_for('index'))
(14)制作首页的显示列表
效果:
代码:
 <div id="list-container">
        <ul class="list-group" style="...">
            {% for foo in questions %}
                <li>
                    <span class="glyphicon glyphicon-leaf" aria-hidden="true"></span>
                    用户:<a href="{{ url_for('usercenter',user_id=foo.author_id,tag=2) }}" target="_blank">{{ foo.author.username }}</a>
                    <br>
                    <a href="{{ url_for('questiondetail',question_id=foo.id) }}" >{{ foo.title }}</a>
                    <span class="badge">{{ foo.creat_time }}</span>
                    <p style="text-indent: 18px">{{ foo.detail }}</p>
                    <span class="badge">评论数:{{ foo.comments|length }}</span>

                </li>
            {% endfor %}
        </ul>
    </div>
(15)首页列表显示全部问答,完成问答详情页布局
- 首页列表显示全部问答:
- 将数据库查询结果传递到前端页面 Question.query.all()
@app.route('/') def index(): context = { # 'user': 'YUAN', 'questions': Question.query.order_by('-creat_time').all() } return render_template('1101.html',**context) - 前端页面循环显示整个列表。
- 问答排序
{% extends '1101.html' %}
{% block title %}问答详情{% endblock %}
{% block main %}
    <div class="page-header">
        <h3>Title{{ ques }}<br>
            <small>author {{ ques.author_id }}{{ ques.create_time }}</small>
        </h3>
    </div>
    <p class="lead">detail{{ ques.detail }}</p>
    <hr>
    <form action="{{ url_for('question') }}" method="post">
    <div class="form-group">
        <textarea name="new_comment" class="form-control" rows="3" id="new_comment" placeholder="write your comment"></textarea>
    </div>
    <button type="submit" class="btn btn-default">发送</button>
    </form>
    <ul class="list-group" style="margin: 10px"></ul>

{% endblock %}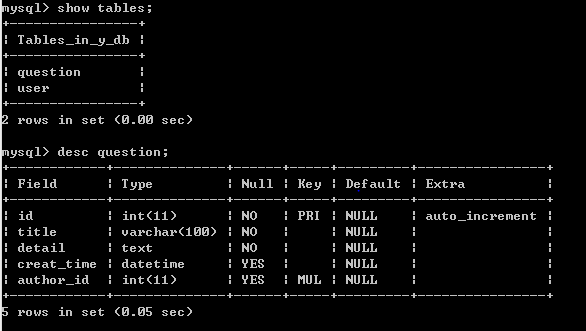
- 将数据库查询结果传递到前端页面 Question.query.all()
- 完成问答详情页布局:
- 包含问答的全部信息
- 评论区
- 以往评论列表显示区。
<p>{{ user }}context</p>

   <ul class="list-group" style="...">
       {% for foo in questions %}
           <li class="list-group-item">
           <span class="glyphicon glyphicon-leaf" aria-hidden="true"></span>
           <a href="#">{{ foo.author.username }}</a>
           <br>
           <a href="{{ url_for('detail',question_id=foo.id) }}">{{ foo.title }}</a>
           <span class="badge">{{ foo.creat_time }}</span>
           <p style="...">{{ foo.detail }}</p>

           </li>

       {% endfor %}
   </ul>
- 在首页点击问答标题,链接到相应详情页。
(16)从首页问答标题到问答详情页
效果: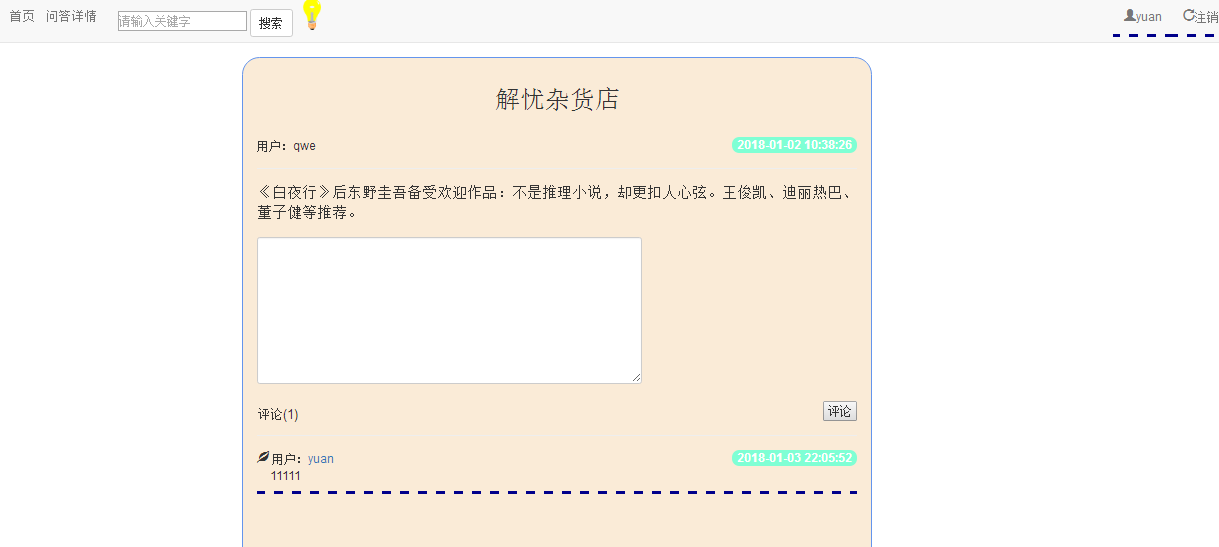
代码:
{% extends 'base.html' %}
{% block title %}
问答详情
{% endblock %}

{% block head %}
    <link rel="stylesheet" type="text/css" href="{{ url_for('static',filename='css/questiondetail.css') }}">
{% endblock %}

{% block main %}
    <div class="post">
    <div class="artical">
        <h1 style="text-align: center">{{ ques.title }}</h1>
        <br><small>用户:{{ ques.author.username }} <span class="badge">{{ ques.creat_time }}</span></small>
        <hr>
        <p class="lead">{{ ques.detail }}</p>
    </div>
        <form action="{{ url_for('comment') }}" method="post" style="align-content: inherit">
            <div class="sign-container">
                    <textarea class="form-control" rows="8" id="QuestionDetail" name="new_comment"></textarea>
                    <input name="question_id" type="hidden" value="{{ ques.id }}"/>
                <br>
                <input type="submit" value="评论" style="float: right">
                <h4>评论({{ ques.comments|length }})</h4>
                <hr>
            </div>
        </form>
        <ul class="list-group" style="background-size: contain">
            {% for foo in ques.comments %}
            <li>
                <span class="glyphicon glyphicon-leaf" aria-hidden="true"></span>
                用户:<a href="{{ url_for('usercenter',user_id=foo.author_id,tag=1) }}" >{{ foo.author.username }}</a>
                <span class="badge">{{ foo.creat_time }}</span>
                <br>
                <p style="text-indent: 18px">{{ foo.detail }}</p>
            </li>
            {% endfor %}
    </ul>
    </div>

{% endblock %}
# @app.route('/questiondetail/<question_id>',methods=['GET','POST'])
@app.route('/questiondetail/<question_id>')
def questiondetail(question_id):
    quest=Question.query.filter(Question.id==question_id).first()
    return render_template('questiondetail.html',ques=quest)

@app.route('/comment/',methods=['POST'])
@loginFirst
def comment():
    comment=request.form.get('new_comment')
    ques_id=request.form.get('question_id')
    auth_id=User.query.filter(User.username==session.get('user')).first().id
    comm=Comment(author_id=auth_id,question_id=ques_id,detail=comment)
    db.session.add(comm)
    db.session.commit()
    return redirect(url_for('questiondetail',question_id=ques_id))
(17)完成评论功能
效果:
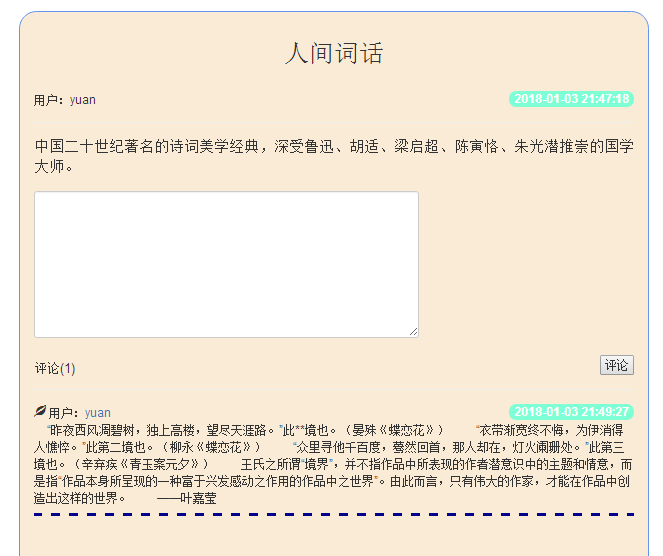
代码:
- 定义评论的视图函数
@app.route('/comment/',methods=['POST'])
def comment():
读取前端页面数据,保存到数据库中@app.route('/comments/',methods=['POST']) @loginFirst def comments(): comment=request.form.get('new_comment') questions_id =request.form.get('questions_id') author_id = User.query.filter(User.username == session.get('user')).first().id comments = Comment(detail=comment, author_id=author_id, questions_id=questions_id) db.session.add(comments) db.session.commit() - 用<input type="hidden" 方法获取前端的"question_id"
<input type="hidden" name="questions_id" value="{{ questions.id }}"> - 显示评论次数
<h4>评论({{ questions.comments|length }})</h4> - 要求评论前登录
@app.route('/comments/',methods=['POST']) @loginFirst - 尝试实现详情页面下的评论列表显示
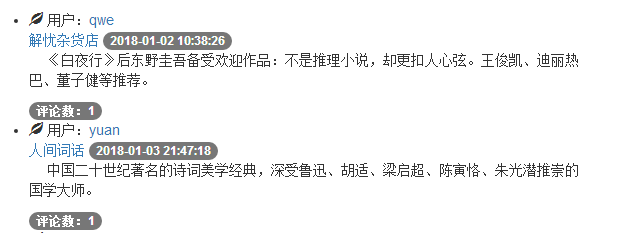
(18)评论列表显示及排序,个人中心显示
效果:

代码:
显示所有评论
{% for foo in ques.comments %}
所有评论排序
uquestion = db.relationship('Question', backref=db.backref('comments', order_by=creat_time.desc))
显示评论条数
{{ ques.comments|length }}
1.完成个人中心
2.个人中心的页面布局(html文件及相应的样式文件)
3.定义视图函数def usercenter(user_id):
4.向前端页面传递参数
5.页面显示相应数据
发布的全部问答
发布的全部评论
个人信息
6.各个页面链接到个人中心
{% extends 'base.html' %}

{% block title %}
    用户中心
{% endblock %}

{% block head %}
    <link rel="stylesheet" type="text/css" href="{{ url_for('static',filename='css/usercenter.css') }}">
{% endblock %}

{% block main %}
    <div class="list-container">
    <h1 style="align-content: center">{{ user.username }}</h1>
    <br>
    {#<div class="page-header">
        <ul class="list-group" style="background-size: contain">
        <h3>全部分享</h3>
            {% for foo in user.question %}
            <li class="list-group-item">
                <span class="glyphicon glyphicon-leaf" aria-hidden="true"></span>
                <a href="#" target="_blank">{{ foo.author.username }}</a>
                <span class="badge">发布时间:{{ foo.creat_time }}</span>
                <p style="text-indent: 18px">{{ foo.detail }}</p>
            </li>
            {% endfor %}
        </ul>
    </div>
    <hr>
    <div class="page-header">
        <h3>全部书评</h3>
        <ul class="list-group" style="background-size: contain">
            {% for foo in user.comments %}
            <li class="list-group-item">
                <span class="glyphicon-leaf" aria-hidden="true"></span>
                <a href="#" target="_blank">{{ foo.author.username }}</a>
                <span class="badge">发布时间:{{ foo.creat_time }}</span>
                <p style="text-indent: 18px">{{ foo.detail }}</p>
            </li>
            {% endfor %}
        </ul>
    </div>
    <hr>#}
    <div class="page-header">
        <h3>个人信息</h3>
        <ul class="list-group">
            <li class="list-group-item">用户:{{ user.username }}</li>
            <li class="list-group-item">编号:{{ user.id }}</li>
            <li class="list-group-item">昵称:{{ user.nickname }}</li>
            <li class="list-group-item">文章篇数:</li>
        </ul>
    </div>
    </div>

{% endblock %}
(19)个人中心标签页导航
效果:

代码:
- 新页面user.html,用<ul ><li role="presentation"> 实现标签页导航。
<ul class="nav nav-tabs">
<li role="presentation"><a href="#">Home</a></li>
<li role="presentation"><a href="#">Profile</a></li>
<li role="presentation"><a href="#">Messages</a></li>
</ul><ul class="nav nav-tabs"> <li class="nav-item"> <a class="nav-link" href="#">全部问题</a> </li> <li class="nav-item"> <a class="nav-link" href="#">全部评论</a> </li> <li class="nav-item"> <a class="nav-link disabled" href="#">个人信息</a> </li> </ul> - user.html继承base.html。
重写title,head,main块.
将上述<ul>放在main块中.
定义新的块user。{% extends '1101.html' %} {% block title %}个人中心{% endblock %} {% block head %} <link rel="stylesheet" href="http://cdn.static.runoob.com/libs/bootstrap/3.3.7/css/bootstrap.min.css"> {% endblock %} {% block main %} <div style="padding-left: 300px;padding-right: 300px"> <ul class="nav nav-pills"> <li class="active"><a href="#">问答平台</a></li> <li><a href="#">全部评论</a></li> <li><a href="#">个人资料</a></li> </ul> </div> {% block user %}{% endblock %} {% endblock %} - 让上次作业完成的个人中心页面,继承user.html,原个人中心就自动有了标签页导航。
{% extends 'user.html' %} {% block user %} <div style="padding-left: 300px;padding-right: 300px"> <div class="page-header"> <h3><span class="glyphicon glyphicon-user" aria-hidden="true"></span>{{ username }}</h3> <small>全部问答</small> <br> <ul class="note-list" style="padding-left: 0px;"> {% for foo in questions %} <li class="list-group-item"> <span class="glyphicon glyphicon-leaf" aria-hidden="true"></span> <a href="#">{{ foo.author.username }}</a> <br> <a href="{{ url_for('detail',question_id=foo.id) }}">{{ foo.title }}</a> <span class="badge">{{ foo.time }}</span> <p>{{ foo.detail }}</p> </li> {% endfor %} </ul> </div> <div class="page-header"> <h3><span class="glyphicon glyphicon-user" aria-hidden="true"></span>{{ username }}</h3> <small>全部评论</small> <br> <ul class="note-list" style="padding-left: 0px;"> {% for foo in comments %} <li class="list-group-item"> <span class="glyphicon glyphicon-leaf" aria-hidden="true"></span> <a href="#">{{ foo.author.username }}</a> <span class="badge">{{ foo.time }}</span> <br> <p>{{ foo.detail }}</p> </li> {% endfor %} </ul> </div> </div> {% endblock %} - 重写user.html中定义的user块。
{% extends'userbase.html' %}

{% block user %}
    <div class="page-header">
    <br>
    <h3>全部分享</h3>
    <br>
        <ul class="list-group" style="background-size: contain">
            {% for foo in user.question %}
            <li class="list-group-item">
                <span class="glyphicon glyphicon-leaf" aria-hidden="true"></span>
                <a href="#" target="_blank">{{ foo.author.username }}</a>
                <span class="badge">发布时间:{{ foo.creat_time }}</span>
                <p style="text-indent: 18px">{{ foo.detail }}</p>
            </li>
            {% endfor %}
        </ul>
    </div>
{% endblock %}
{% extends'userbase.html' %} {% block user %} <div class="page-header"> <br> <h3>全部书评</h3> <br> <ul class="list-group" style="background-size: contain"> {% for foo in user.comments %} <li class="list-group-item"> <span class="glyphicon-leaf" aria-hidden="true"></span> <a href="#" target="_blank">{{ foo.author.username }}</a> <span class="badge">发布时间:{{ foo.creat_time }}</span> <p style="text-indent: 18px">{{ foo.detail }}</p> </li> {% endfor %} </ul> </div> {% endblock %}{% extends'userbase.html' %} {% block user %} <div class="page-header"> <br> <h3>个人信息</h3> <br> <ul class="list-group"> <li class="list-group-item">用户:{{ user.username }}</li> <li class="list-group-item">编号:{{ user.id }}</li> <li class="list-group-item">昵称:{{ user.nickname }}</li> <li class="list-group-item">评论篇数:{{comments|length}}</li> <li class="list-group-item">文章篇数:{{questions|length}}</li> </ul> </div> {% endblock %}
(20)实现搜索功能
效果:
代码:
- 准备视图函数search()
- 修改base.html 中搜索输入框所在的
- <form action="{{ url_for('search') }}" method="get">
- <input name="q" type="text" placeholder="请输入关键字">
- 完成视图函数search()
- 获取搜索关键字
q = request.args.get('q’) - 条件查询
qu = Question.query.filter(Question.title.contains(q)).order_by('-creat_time’) - 加载查询结果:
return render_template('index.html', question=qu)
- 获取搜索关键字
- 组合条件查询
from sqlalchemy import or_, and_
示例:
Lobby.query.filter(
or_(
and_(
Lobby.id == Team.lobby_id,
LobbyPlayer.team_id == Team.id,
LobbyPlayer.player_id == player.steamid
),
and_(
Lobby.id == spectator_table.c.lobby_id,
spectator_table.c.player_id == player.steamid
)
)
)
from sqlalchemy import or_,and_

@app.route('/search/')
def search():
    qu=request.args.get('q')
    ques=Question.query.filter(
        or_(
            Question.title.contains(qu),
            Question.detail.contains(qu)
        )
    ).order_by('-creat_time')
    return render_template('index.html',questions=ques)

<form action="{{ url_for('search') }}" method="get"  class="navbar-form navbar-left">
        <input name="q" type="text" class="form-control" placeholder="请输入关键字">
        <button type="submit" class="btn btn-default"><span class="glyphicon glyphicon-search" aria-hidden="true"></span>查找</button>
    </form>
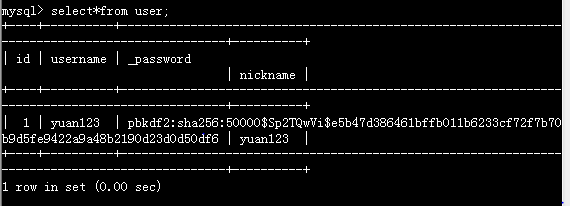
(21)密码保护
1.更新User对象,设置对内的_password
class User(db.Model):
__tablename__ = 'user'
_password = db.Column(db.String(200), nullable=False) #内部使用
class User(db.Model):
    __tablename__='user'
    id=db.Column(db.Integer,primary_key=True,autoincrement=True)
    username=db.Column(db.String(20),nullable=False)
    _password=db.Column(db.String(200),nullable=False)#内部使用
    nickname=db.Column(db.String(50))
2.编写对外的password
from werkzeug.security import generate_password_hash, check_password_hash
@property
def password(self): #外部使用,取值
return self._password
@password.setter
def password(self, row_password):#外部使用,赋值
self._password = generate_password_hash(row_password)
 @property
    def password(self):#外部使用
        return self._password

    @password.setter
    def password(self,row_password):
        self._password=generate_password_hash(row_password)

    def check_password(self,row_password):
        result=check_password_hash(self._password,row_password)
        return result
3.密码验证方法:
def check_password(self, row_password): #密码验证
result = check_password_hash(self._password,row_password)
return result
4.登录验证:
password1 = request.form.get('password')
user = User.query.filter(User.username == username).first()
if user:
if user.check_password(password1):
@app.route('/login/',methods=['GET','POST'])
def login():
    if request.method=='GET':
        return render_template('login.html')
    else:
        usern = request.form.get('username')
        passw = request.form.get('password')
        user = User.query.filter(User.username == usern).first()
        if user:
            if user.check_password(passw):
                session['user']=usern
                session['userid']=user.id
                session.permanent = True
                return redirect(url_for('index'))
            else:
                return 'password error.'
        else:
            return 'username is not existed.'
(22)数据迁移
1.更新User对象,设置对内的_password
class User(db.Model):
__tablename__ = 'user'
_password = db.Column(db.String(200), nullable=False) #内部使用
class User(db.Model):
    __tablename__='user'
    id=db.Column(db.Integer,primary_key=True,autoincrement=True)
    username=db.Column(db.String(20),nullable=False)
    _password=db.Column(db.String(200),nullable=False)#内部使用
    nickname=db.Column(db.String(50))
2.编写对外的password
from werkzeug.security import generate_password_hash, check_password_hash
@property
def password(self): #外部使用,取值
return self._password
@password.setter
def password(self, row_password):#外部使用,赋值
self._password = generate_password_hash(row_password)
 @property
    def password(self):#外部使用
        return self._password

    @password.setter
    def password(self,row_password):
        self._password=generate_password_hash(row_password)

    def check_password(self,row_password):
        result=check_password_hash(self._password,row_password)
        return result
3.密码验证方法:
def check_password(self, row_password): #密码验证
result = check_password_hash(self._password,row_password)
return result
4.登录验证:
password1 = request.form.get('password')
user = User.query.filter(User.username == username).first()
if user:
if user.check_password(password1):
@app.route('/login/',methods=['GET','POST'])
def login():
    if request.method=='GET':
        return render_template('login.html')
    else:
        usern = request.form.get('username')
        passw = request.form.get('password')
        user = User.query.filter(User.username == usern).first()
        if user:
            if user.check_password(passw):
                session['user']=usern
                session['userid']=user.id
                session.permanent = True
                return redirect(url_for('index'))
            else:
                return 'password error.'
        else:
            return 'username is not existed.'
