将本地的代码推送到公网的github账号去
将本地的代码推送到公网的github账号去
作者:尹正杰
版权声明:原创作品,谢绝转载!否则将追究法律责任。
最近工作上需要用到github账号,拜读了一位叫廖雪峰的大神的文档,把git的前世今生说的特别详细,大家有兴趣的口语去看看,及时你是小白你也能看明白,前提是你得静下心来看。如果你是个开发的话,知识想讲本地的代码推送到你的github账号上去,那么我这篇博客会手把手教你如果实现,好了,废话不多说,我们直接开始我们的表演吧。
一.在服务器上安装git
说白了,git是个linux程序,当然很早以前就有人把git移植到windows操作系统了,我这篇博客主要写的是在linux操作系统上实现的。操作系统用的是centos6.6(官网的iso镜像)。安装起来特别麻烦。其实没有必要用源码安装,反而把事情弄复杂了。安装命令如下:

 1 [root@yinzhengjie yinzhengjie]# ssh-keygen -t rsa
 2 Generating public/private rsa key pair.
 3 Enter file in which to save the key (/root/.ssh/id_rsa):
 4 Enter passphrase (empty for no passphrase):
 5 Enter same passphrase again:
 6 Your identification has been saved in /root/.ssh/id_rsa.
 7 Your public key has been saved in /root/.ssh/id_rsa.pub.
 8 The key fingerprint is:
 9 63:2e:54:58:27:d5:1f:94:8b:ab:1b:0e:89:1c:57:eb root@yinzhengjie
10 The key's randomart image is:
11 +--[ RSA 2048]----+
12 | o.o. ... |
13 | o o . o |
14 | . . . o o |
15 | . . .. o |
16 | o S . . |
17 | o * + . |
18 | + + E. |
19 | . o.. |
20 | o. |
21 +-----------------+
22 [root@yinzhengjie yinzhengjie]#
1 [root@yinzhengjie yinzhengjie]# cat /root/.ssh/id_rsa.pub
2 ssh-rsa AAAAB3NzaC1yc2EAAAABIwAAAQEApVko3f9uiyfNX6Xu02e33258dtFooKKnDMbx4FJUP1VP7DhZZfrUWjwcrsfAc9FUlmcVzoR40KzfMvaCxW5ZBPv+IRCLyB7EsdjLefbXD4f+1GwTI0LVNAAy4bezvLXZJKO8Pi0TM0r58gi0aAqFN4AZ4phYXzjrW2FRhIG3qPrRWR/2CXf448MMw0mQ+xhS8SaRR2aEaA/b8xmb75xtbK/gYehGsyCagpokGokAXUwPkcH6/300QdRpdMgSVJVpPFNM/fDRBwJnZB0Sl6pSSLroG3WiiUXL2fN/7ZnT3mNp4jYHwYMvhbsaEhG72uSFl7HlMO3nxITkHibqd1ThGw== root@yinzhengjie
3 [root@yinzhengjie yinzhengjie]#
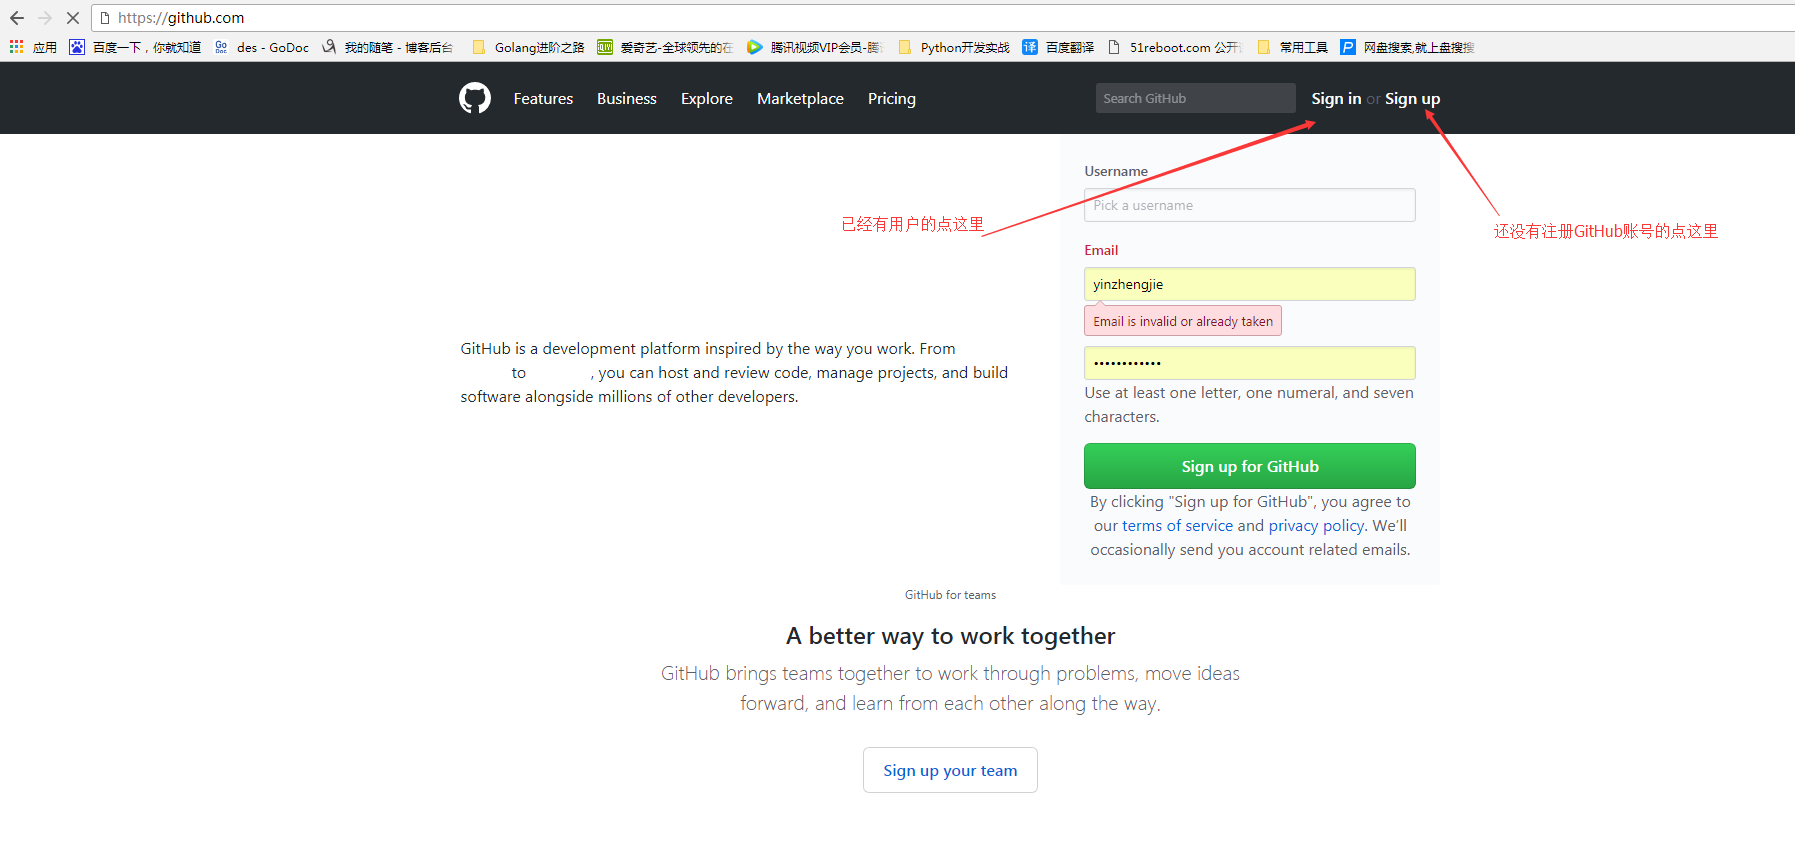
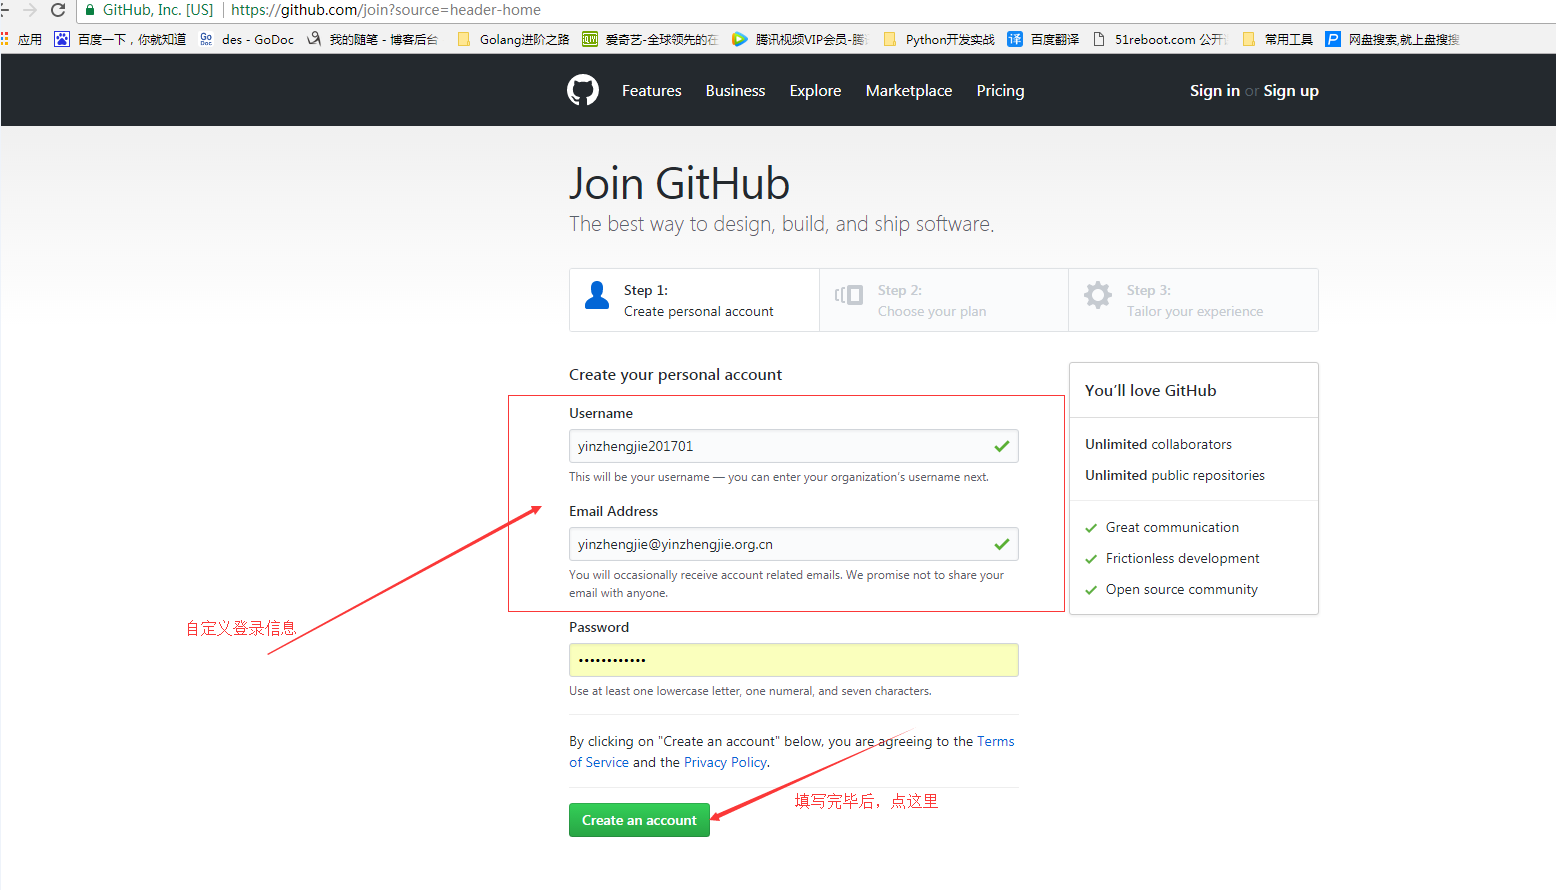
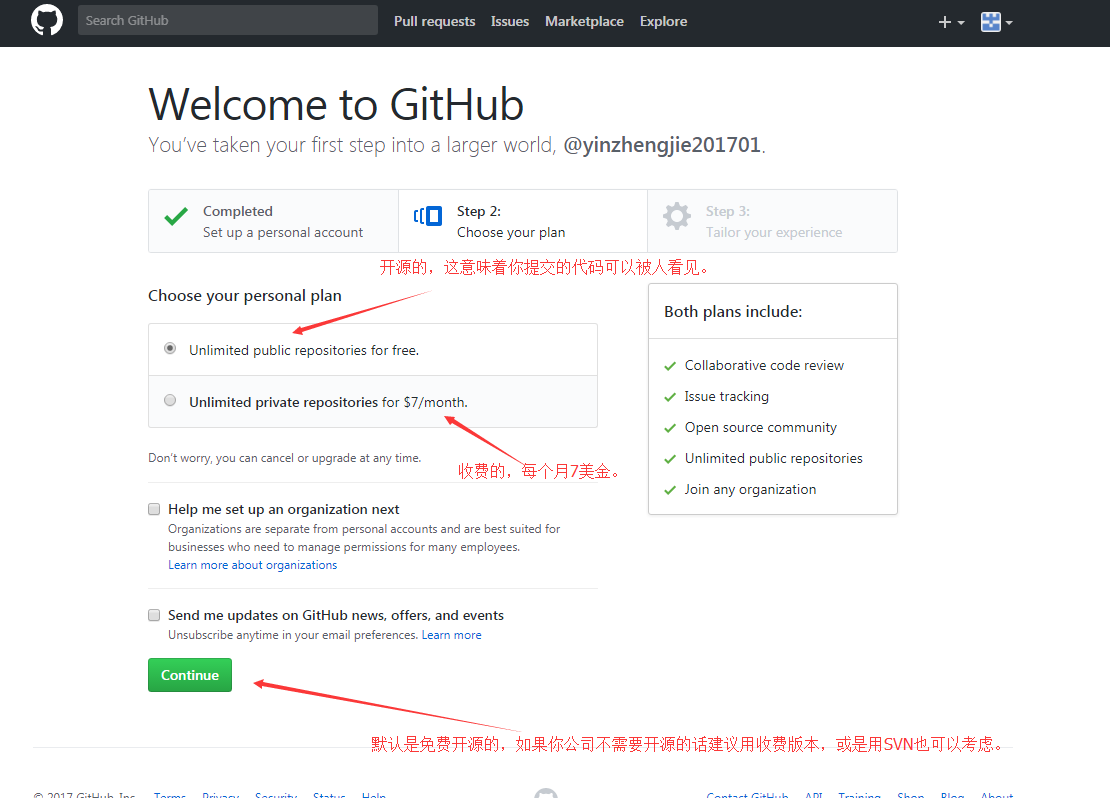
d>.填写使用GitHub的信息

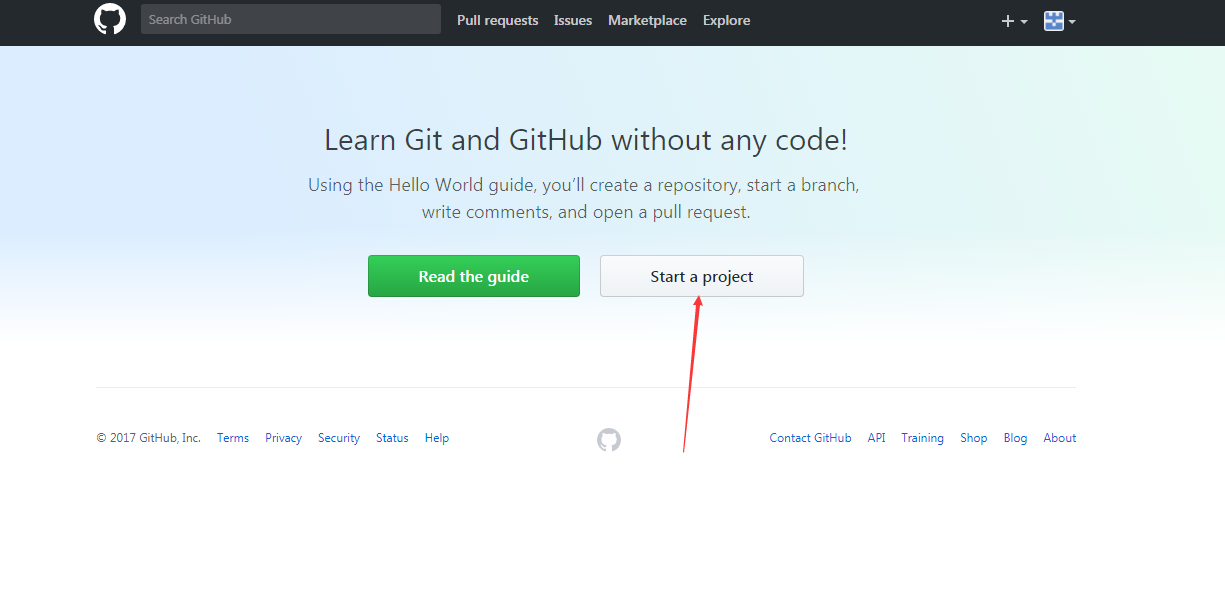
f>.去你填写的邮箱进行验证

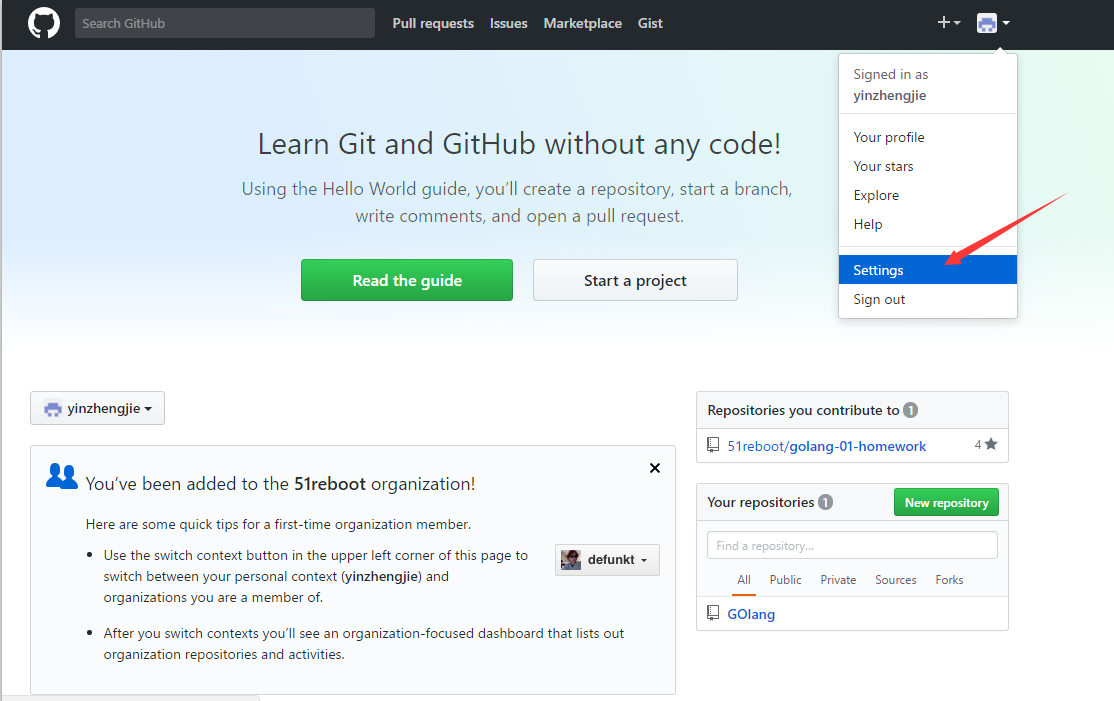
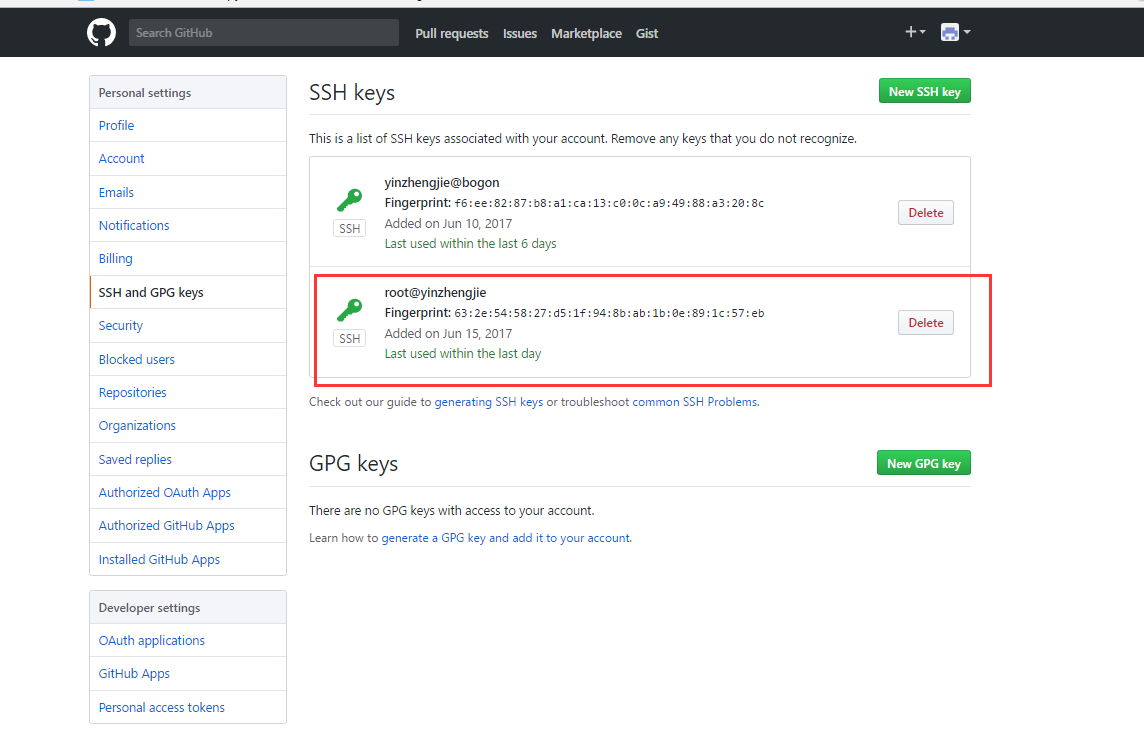
3.配置秘钥,新建一个机器的秘钥,
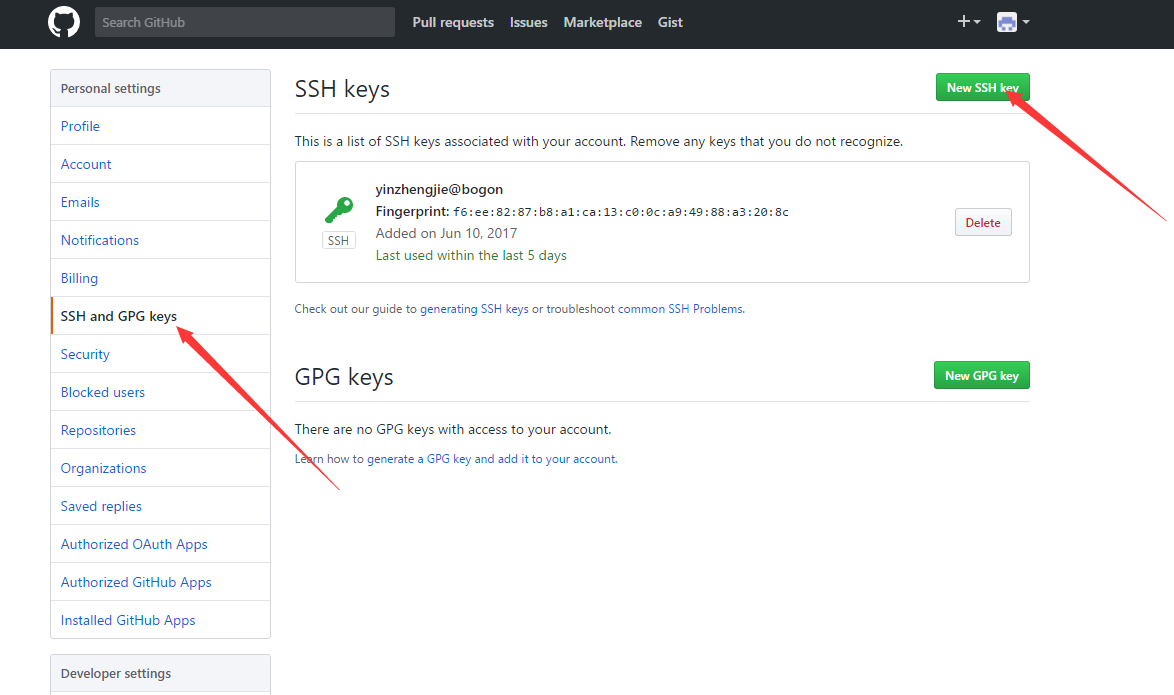
4.将刚刚在服务器上自己生成的公钥贴上去

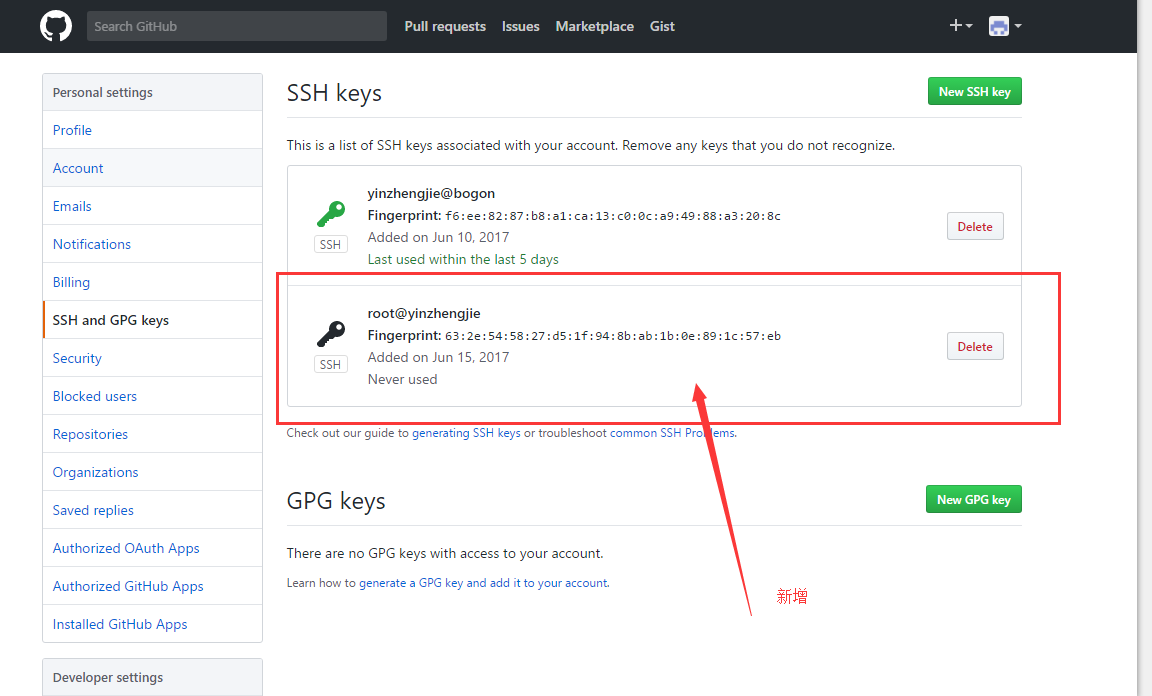
5.创建成功如果没有提交代码,钥匙为灰色,提交后会显示绿色
 1 #!/usr/bin/env python
 2 #_*_coding:utf-8_*_
 3 #@author :yinzhengjie
 4 #blog:http://www.cnblogs.com/yinzhengjie/tag/python%E8%87%AA%E5%8A%A8%E5%8C%96%E8%BF%90%E7%BB%B4%E4%B9%8B%E8%B7%AF/
 5 #EMAIL:y1053419035@qq.com
 6
 7 '''
 8 [root@yinzhengjie ~]# cd $GOPATH
 9 [root@yinzhengjie go_file]# pwd
10 /yinzhengjie/go_file
11 [root@yinzhengjie go_file]# cd src/
12 [root@yinzhengjie src]# mkdir -pv github.com/yinzhengjie
13 mkdir: created directory `github.com'
14 mkdir: created directory `github.com/yinzhengjie'
15 [root@yinzhengjie src]#
16 [root@yinzhengjie yinzhengjie]# mkdir golib && cd golib
17 [root@yinzhengjie golib]# cp /yinzhengjie/go_file/src/day1/golib/math.go ./
18 [root@yinzhengjie golib]#
19 [root@yinzhengjie golib]# ll -a
20 total 12
21 drwxr-xr-x 2 root root 4096 Jun 15 12:18 .
22 drwxr-xr-x 3 root root 4096 Jun 15 12:18 ..
23 -rw-r--r-- 1 root root   94 Jun 15 12:18 math.go
24 [root@yinzhengjie golib]#
25 [root@yinzhengjie golib]# git init
26 Initialized empty Git repository in /yinzhengjie/go_file/src/github.com/yinzhengjie/golib/.git/
27 [root@yinzhengjie golib]#
28 [root@yinzhengjie golib]# ll -a
29 total 16
30 drwxr-xr-x 3 root root 4096 Jun 15 12:19 .
31 drwxr-xr-x 3 root root 4096 Jun 15 12:18 ..
32 drwxr-xr-x 7 root root 4096 Jun 15 12:19 .git   #初始化成功会生成这个隐藏目录,里面记录着每次修改或删除的文件信息,最好不要去动这个文件。
33 -rw-r--r-- 1 root root   94 Jun 15 12:18 math.go
34 [root@yinzhengjie golib]#
35 '''
2.添加文件到Git仓库
 1 #!/usr/bin/env python
 2 #_*_coding:utf-8_*_
 3 #@author :yinzhengjie
 4 #blog:http://www.cnblogs.com/yinzhengjie/tag/python%E8%87%AA%E5%8A%A8%E5%8C%96%E8%BF%90%E7%BB%B4%E4%B9%8B%E8%B7%AF/
 5 #EMAIL:y1053419035@qq.com
 6
 7 '''
 8 为什么Git添加文件需要add,commit一共两步呢?
 9     答:因为commit可以一次提交很多⽂文件,所以你可以多次add不同的文件。
10 '''
11
12 '''
13 [root@yinzhengjie golib]# git add math.go     #使用命令 git add ,注意,可反复多次使用,添加多个文件;
14 [root@yinzhengjie golib]#
15 [root@yinzhengjie golib]# git commit -m "first"    #使用命令 git commit ,完成。其中"-m"参数表示每次提交的代码是的备注信息。
16 [master (root-commit) 6862a88] first
17  1 files changed, 7 insertions(+), 0 deletions(-)
18  create mode 100644 math.go
19 [root@yinzhengjie golib]#
20 '''
3.在github创建与本地相对应的项目
由于咱们在本地上创建了golib这个项目,那么我们就得在github服务器上创建相应的项目,不然你在往你的github推送你的代码的时候就会报错,所以我们需要手动在github上创建一个项目,其实配置很简单。跟着我一起操作吧。
a>.点击新的仓库
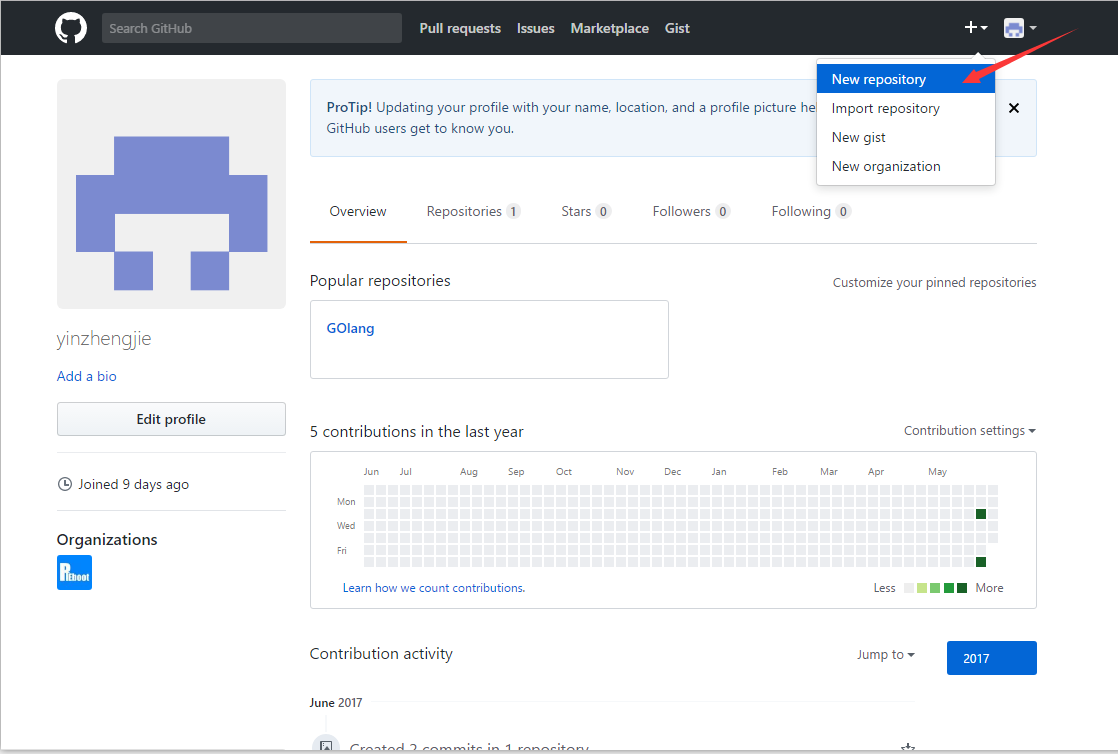
b>.创建golib仓库
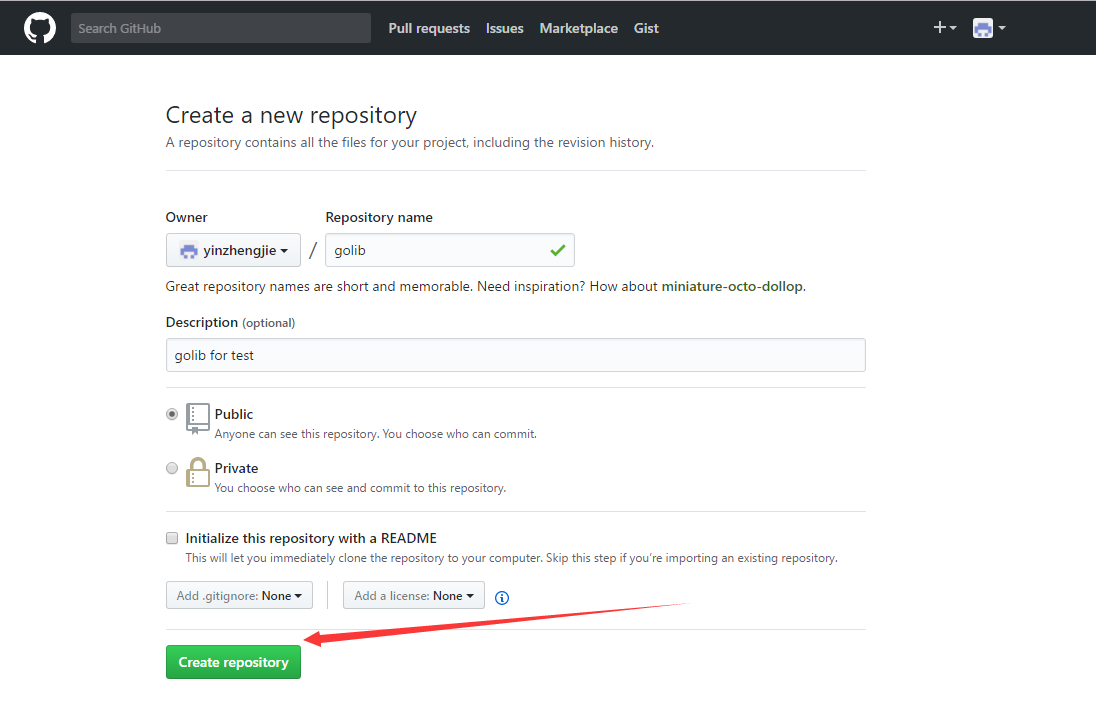
c>.创建成功后就敲击提示界面的命令将代码上传到该项目中来。
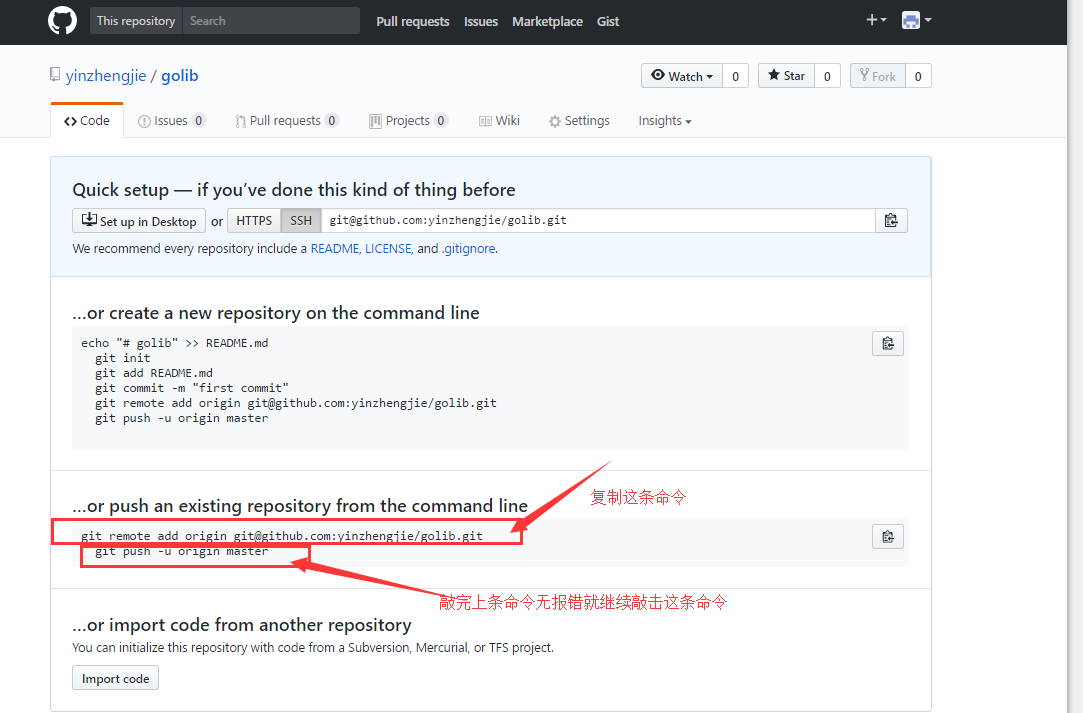
4>.在服务端将代码推送到github上去
 1 #!/usr/bin/env python
 2 #_*_coding:utf-8_*_
 3 #@author :yinzhengjie
 4 #blog:http://www.cnblogs.com/yinzhengjie/tag/python%E8%87%AA%E5%8A%A8%E5%8C%96%E8%BF%90%E7%BB%B4%E4%B9%8B%E8%B7%AF/
 5 #EMAIL:y1053419035@qq.com
 6
 7 '''
 8 [root@yinzhengjie golib]# git remote add origin git@github.com:yinzhengjie/golib.git
 9 [root@yinzhengjie golib]# git push -u origin master
10 Warning: Permanently added the RSA host key for IP address '192.30.255.112' to the list of known hosts.
11 Counting objects: 3, done.
12 Compressing objects: 100% (2/2), done.
13 Writing objects: 100% (3/3), 286 bytes, done.
14 Total 3 (delta 0), reused 0 (delta 0)
15 To git@github.com:yinzhengjie/golib.git
16  * [new branch]      master -> master
17 Branch master set up to track remote branch master from origin.
18 [root@yinzhengjie golib]# echo $?
19 0
20 [root@yinzhengjie golib]#
21 '''
通过以上命令就将代码传送成功了,这个时候你在看看咱们之前配置的秘钥,就会发现它变绿了。
5.在github上查看是否“push”成功。
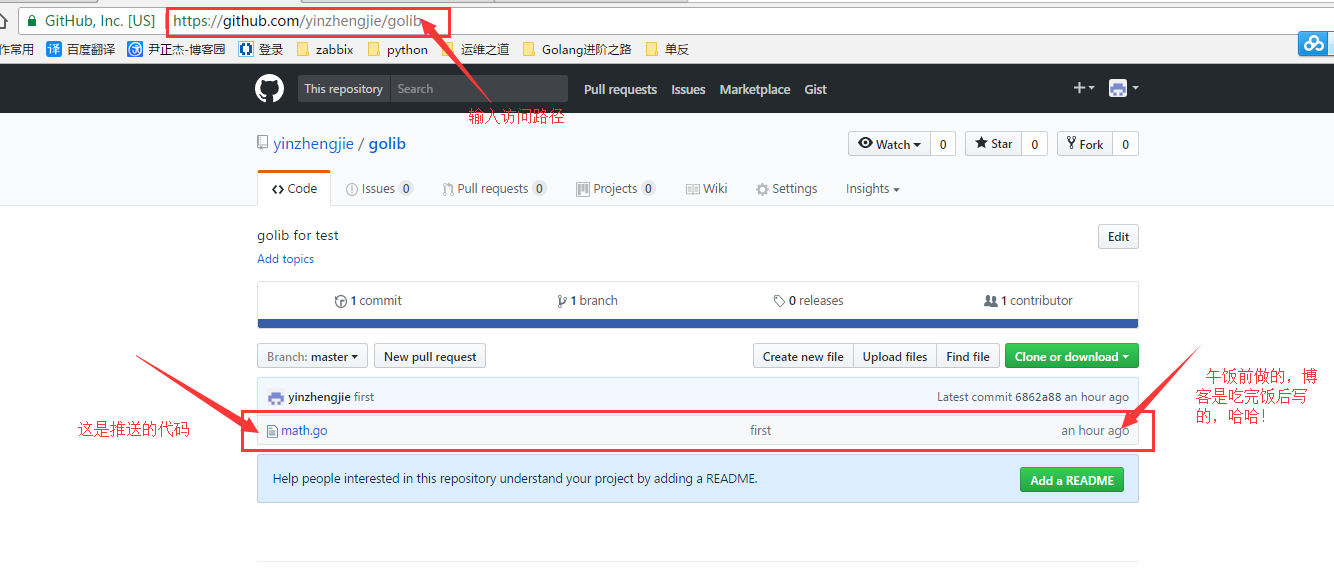
点击进去,看看上传代码的内容
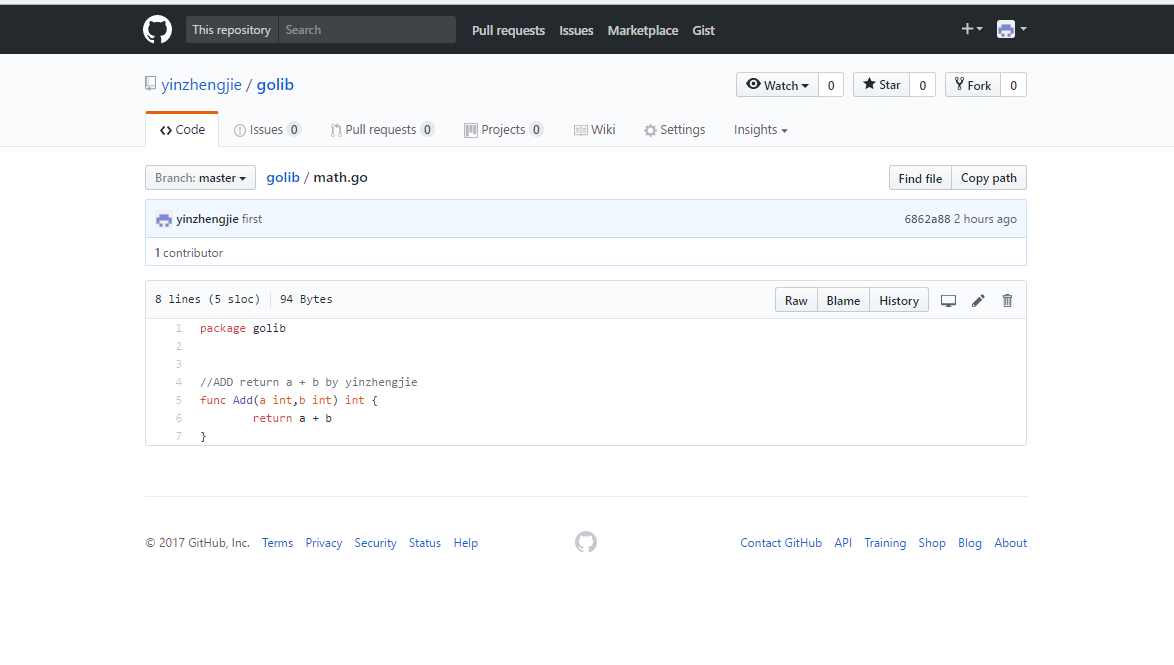
五.查看GitHub的项目详解
1.查询你感兴趣的开源项目
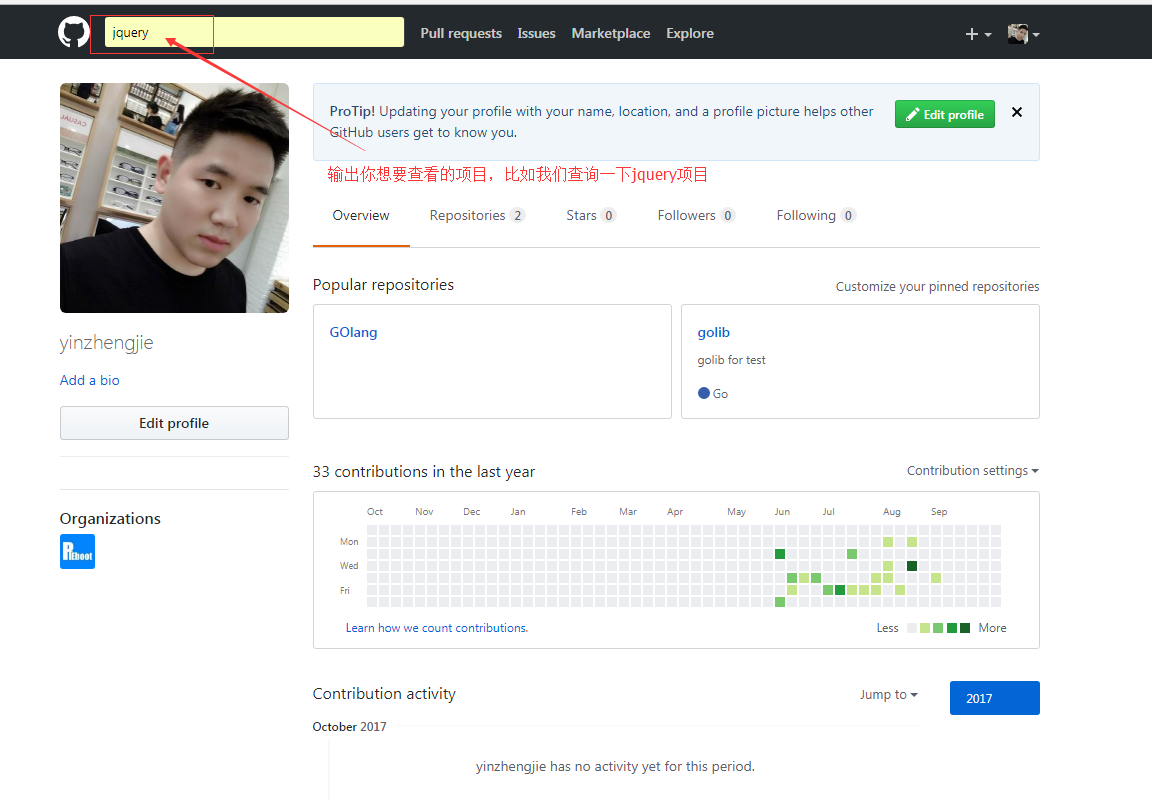
2.查看搜索到的相关开源项目

3.项目界面介绍
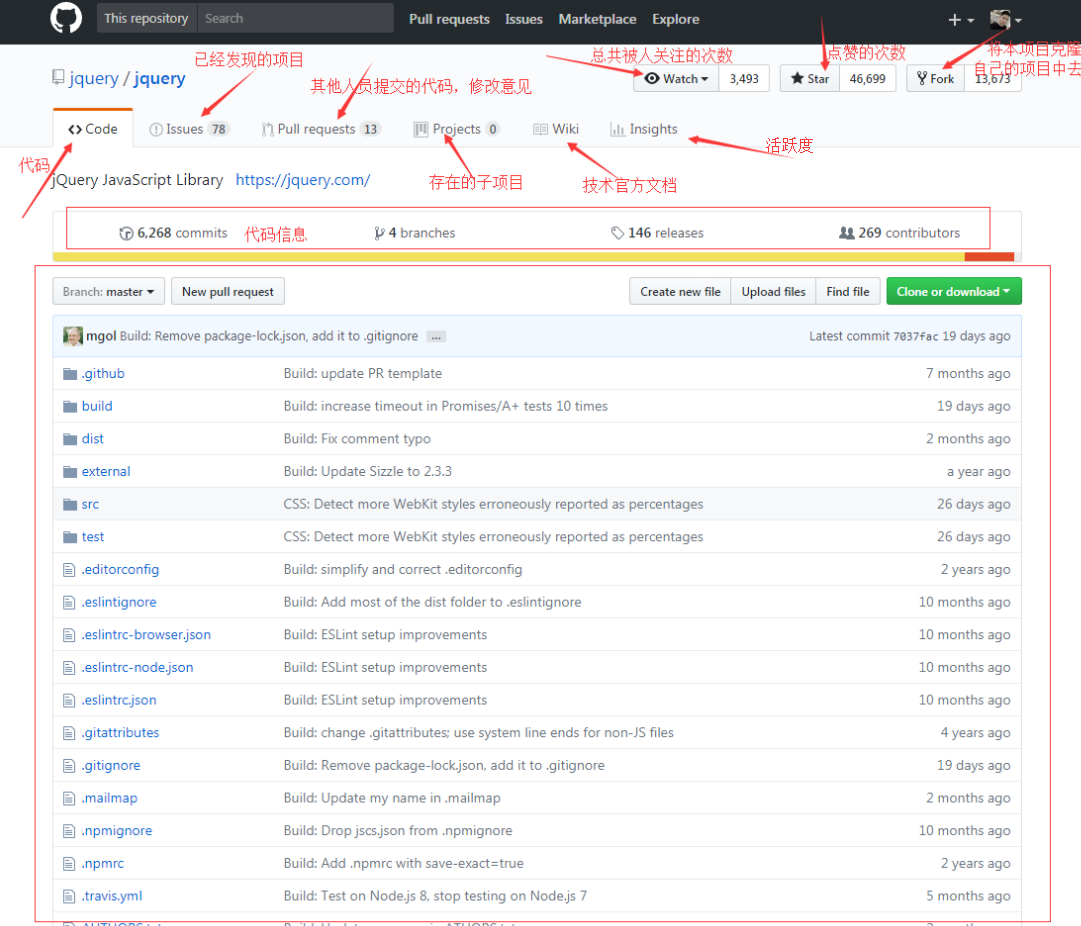
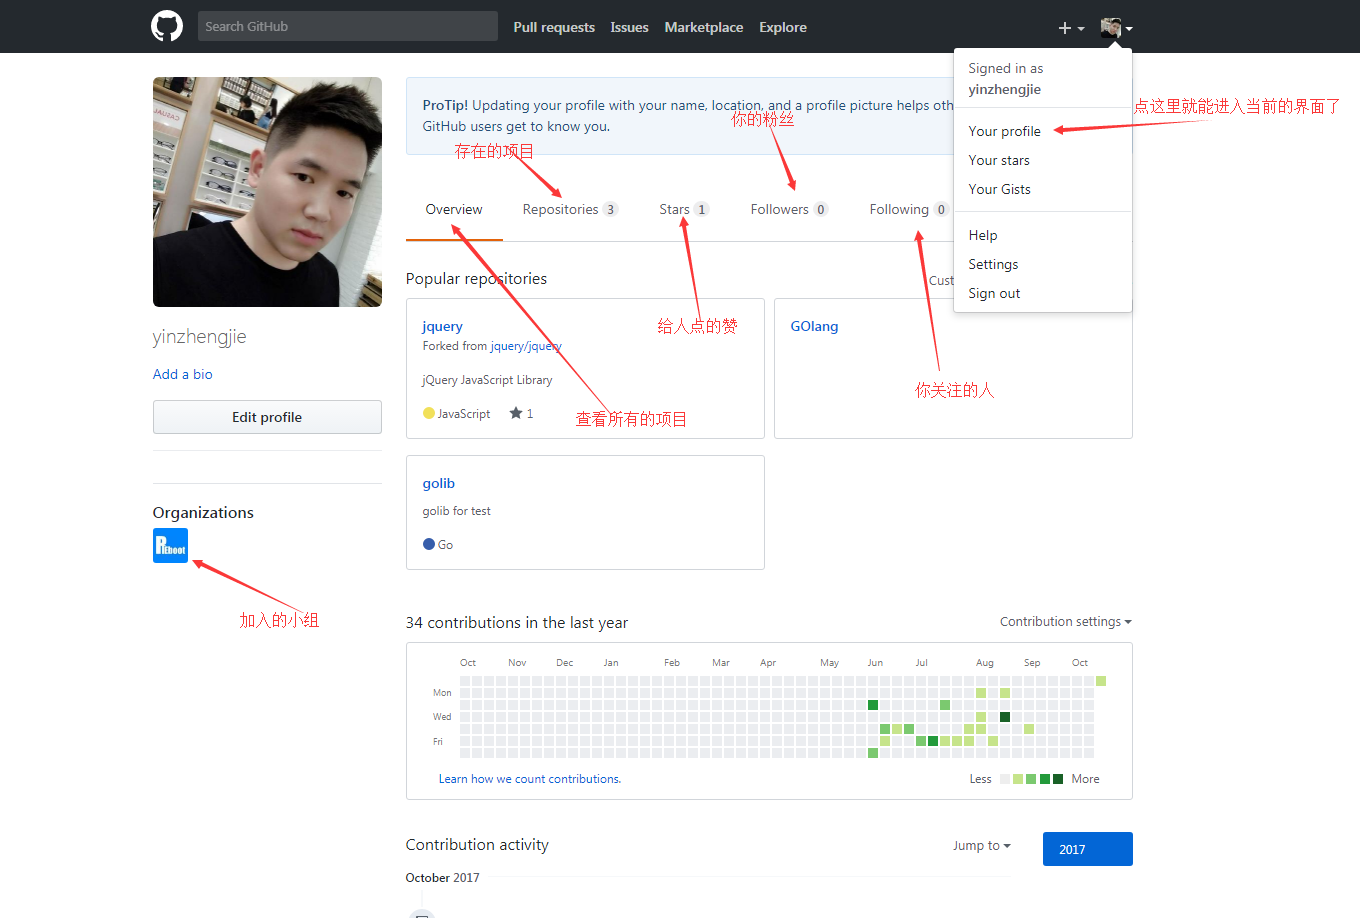
4.查看个人首页
你也许还注意到,GitHub给出的地址不止一个,还可以用类似"https://github.com/yinzhengjie/gitskills.git"这样的地址。实际上,Git支持多种协议,默认的git://使用ssh,但也可以使用https等其他协议。使用https除了速度慢以外,还有个最大的麻烦是每次推送都必须输入口令,但是在某些只开放http端口的公司内部就无法使用ssh协议而只能用https。
本文来自博客园,作者:尹正杰,转载请注明原文链接:https://www.cnblogs.com/yinzhengjie/p/7017036.html,个人微信: "JasonYin2020"(添加时请备注来源及意图备注,有偿付费)
当你的才华还撑不起你的野心的时候,你就应该静下心来学习。当你的能力还驾驭不了你的目标的时候,你就应该沉下心来历练。问问自己,想要怎样的人生。


