Python入门篇-基础数据类型之整型(int),字符串(str),字节(bytes),列表(list)和切片(slice)
Python入门篇-基础数据类型之整型(int),字符串(str),字节(bytes),列表(list)和切片(slice)
作者:尹正杰
版权声明:原创作品,谢绝转载!否则将追究法律责任。
一.Python内置数据结构分类
1>.数值型
如 :int,float,complex,bool
2>.序列对象
字符串:str

列表:list

元组:tuple
3>.键值对
集合:set

字典:dict
二.数值型
1>.数值型概述
int、float、complex、bool都是class,1、5.0、2+3j都是对象即实例。

int:
  python3的int就是长整型,且没有大小限制,受限于内存区域的大小。

float:
  有整数部分和小数部分组成。支持十进制和科学计数法表示。只有双精度型。

complex:
  有实数和虚数部分组成,实数和虚数部分都是浮点数,3+4.2J。

bool:
  int的子类,仅有2个实例True、False对应1和0,可以和整数直接运算。
2>.类型转换
int(x) 返回一个整数

float(x) 返回一个浮点数

complex(x)、complex(x,y) 返回一个复数

bool(x) 返回布尔值,前面讲过False等价的对象
3>.数字的处理函数
#!/usr/bin/env python
#_*_coding:utf-8_*_
#@author :yinzhengjie
#blog:http://www.cnblogs.com/yinzhengjie/tag/python%E8%87%AA%E5%8A%A8%E5%8C%96%E8%BF%90%E7%BB%B4%E4%B9%8B%E8%B7%AF/
#EMAIL:y1053419035@qq.com

import math

#取整
print(math.floor(3.1))
print(math.floor(3.6))
#取整并加1
print(math.ceil(5.1))
print(math.ceil(5.6))
#查看PI的值
print(math.pi)
#查看自然常数
print(math.e)

#四舍六入,五往偶数靠拢,并非四舍五入.简称:“四舍六入五取偶”
print(round(13.1))
print(round(13.6))
print(round(23.5))
print(round(26.5))

#取最小值
print(min(10,20))
#取最大值
print(max(100,200))
#取平方数
print(pow(5,2))
#二进制表示10
print(bin(10))
#八进制表示10
print(oct(10))
#十六进制表示10
print(hex(10))


3
3
6
6
3.141592653589793
2.718281828459045
13
14
24
26
10
200
25
0b1010
0o12
0xa
4>.类型判断
#!/usr/bin/env python
#_*_coding:utf-8_*_
#@author :yinzhengjie
#blog:http://www.cnblogs.com/yinzhengjie/tag/python%E8%87%AA%E5%8A%A8%E5%8C%96%E8%BF%90%E7%BB%B4%E4%B9%8B%E8%B7%AF/
#EMAIL:y1053419035@qq.com

#定义变量
Name = "Jason  Yin"
Age = 18

#判断数据的类型
print(type(Name))
print(type(Age))
print(type(1+True))
print(type(1+True+2.0))

#查看变量的类型
print(type(Name) == str)
print(type(Age) == int)


#内置断言操作
print(isinstance(Name,str))
print(isinstance(Age,int))
print(isinstance(100,str))
print(isinstance(100,(str,bool,int)))
<class 'str'>
<class 'int'>
<class 'int'>
<class 'float'>
True
True
True
True
False
True
三.列表(list)
1>.列表概述
一个队列,一个排列整齐的队伍

列表内的个体称作元素,由若干元素组成列表

元素可以是任意对象(数字、字符串、对象、列表等)

列表内元素有顺序,可以使用索引

线性的数据结构

使用[ ] 表示

列表是可变的


请自行查阅资料了解:列表(List)、链表(Linked List)、队列(Queue)、栈(Stack)的差异,我大致总结了下这几种数据结构特点:
  列表(List):在内存空间中是连续地址,查询速度快,修改也快,但不利于频繁新增或删除元素(需要注意的是,队尾新增或者删除元素并不影响性能)。
  链表(Linked List):在内存空间中是不连续地址,查询速度慢,但利于频繁新增或删除元素。
  队列(Queue):其实我们有时候发现他和列表很像,但是不支持像列表那样进行修改,First Input First Output(FIFO)简单说就是指先进先出。就好像我们上班时候进地铁站的时候,拍了很长的队伍,有栏杆围着人群,因此基本上没人插队。
  栈(Stack):类似于我们小时候玩枪的上子弹操作,我们会发现先上子弹却最后才能打出去,即Last In First Out 后进先出法(简称LIFO,即先进后出)。
2>.列表list定义,初始化
#!/usr/bin/env python
#_*_coding:utf-8_*_
#@author :yinzhengjie
#blog:http://www.cnblogs.com/yinzhengjie/tag/python%E8%87%AA%E5%8A%A8%E5%8C%96%E8%BF%90%E7%BB%B4%E4%B9%8B%E8%B7%AF/
#EMAIL:y1053419035@qq.com


"""


list() ----> new entry list

list(iterable) ----> new list initalized from iterable's items

列表不能一开始就定义大小

"""

list_1 = list()

list_2 = []

list_3 = ["100","Jason Yin","5.21",[1,3,5,7,9]]

list_4 = list(range(10))


print(list_1)
print(list_2)
print(list_3)
print(list_4)
[]
[]
['100', 'Jason Yin', '5.21', [1, 3, 5, 7, 9]]
[0, 1, 2, 3, 4, 5, 6, 7, 8, 9]
3>. 列表索引访问
索引,也叫下标
正索引:从左至右,从0开始,为列表中每一个元素编号
负索引:从右至左,从-1开始
正负索引不可以超界,否则引发异常IndexError
为了理解方便,可以认为列表是从左至右排列的,左边是头部,右边是尾部,左边是下界,右边是上界

列表通过索引访问
    list[index] ,index就是索引,使用中括号访问,时间复杂度为O(1),随着列表元素规模的增加,通过索引访问元素的效率并不会降低!
4>.列表查询
index(value,[start,[stop]])
  通过值value,从指定区间查找列表内的元素是否匹配
  匹配第一个就立即返回索引
  匹配不到,抛出异常ValueError
  随着列表元素规模的增加,性能会逐渐下降,时间复杂度为O(n)。因为它设计到遍历,因此该方法我们在生产环境中应该尽量少用!

count(value)
    返回列表中匹配value的次数。该方法相比index来说,属于完全的O(n),因为index方法匹配到第一个就立即返回索引,可能不会遍历整个列表,但count方法必须遍历整个列表,因此该方法也应该尽量少用!

时间复杂度
     index和count方法都是O(n)
     随着列表数据规模的增大,而效率下降。

如何返回列表元素的个数?如何遍历?如何设计高效?
    len()
#!/usr/bin/env python
#_*_coding:utf-8_*_
#@author :yinzhengjie
#blog:http://www.cnblogs.com/yinzhengjie/tag/python%E8%87%AA%E5%8A%A8%E5%8C%96%E8%BF%90%E7%BB%B4%E4%B9%8B%E8%B7%AF/
#EMAIL:y1053419035@qq.com


list_1 = ["100","Jason Yin","100","5.21","100",[1,3,5,7,9],"100","300","100"]

#匹配索引,我们可以给该方法传递三个参数,查看源码就知道第一个参数传递的是要查询的值,第二个参数和第三个参数分别为查询的起始位置和结束位置。
print(list_1.index("Jason Yin"))
print(list_1.index("100"))
print(list_1.index("100",1))
print(list_1.index("100",3))
print(list_1.index("100",5,7))

#统计某个值在该列表中出现的次数,该方法的时间复杂度为O(n)
print(list_1.count("100"))


#以上代码运行结果如下:
1
0
2
4
6
5
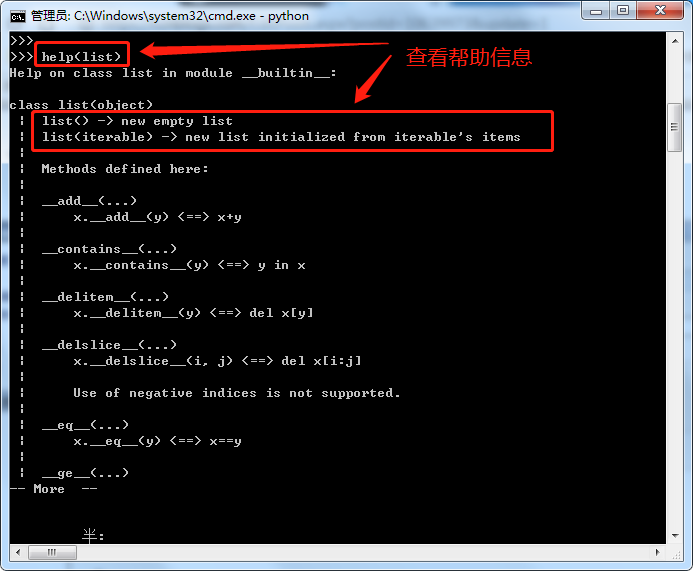
5>.如何查看帮助
6>.列表元素修改
#!/usr/bin/env python
#_*_coding:utf-8_*_
#@author :yinzhengjie
#blog:http://www.cnblogs.com/yinzhengjie/tag/python%E8%87%AA%E5%8A%A8%E5%8C%96%E8%BF%90%E7%BB%B4%E4%B9%8B%E8%B7%AF/
#EMAIL:y1053419035@qq.com

'''
索引访问修改
    list[index] = value
    索引不要超界

'''

list_1 = [1,2,3,4,5]
print(list_1)

list_1[len(list_1)-1] = 100
print(list_1)


#以上代码执行结果如下:
[1, 2, 3, 4, 5]
[1, 2, 3, 4, 100]
7>.列表增加,插入元素
#!/usr/bin/env python
#_*_coding:utf-8_*_
#@author :yinzhengjie
#blog:http://www.cnblogs.com/yinzhengjie/tag/python%E8%87%AA%E5%8A%A8%E5%8C%96%E8%BF%90%E7%BB%B4%E4%B9%8B%E8%B7%AF/
#EMAIL:y1053419035@qq.com

'''
append(object) -> None
    列表尾部追加元素,返回None
    返回None就意味着没有新的列表产生,就地修改
    时间复杂度是O(1)
'''


list_1 = [1,2,3,4,5]
print(list_1)
list_1.append(100)
print(list_1)


#以上代码执行结果如下:
[1, 2, 3, 4, 5]
[1, 2, 3, 4, 5, 100]
#!/usr/bin/env python
#_*_coding:utf-8_*_
#@author :yinzhengjie
#blog:http://www.cnblogs.com/yinzhengjie/tag/python%E8%87%AA%E5%8A%A8%E5%8C%96%E8%BF%90%E7%BB%B4%E4%B9%8B%E8%B7%AF/
#EMAIL:y1053419035@qq.com

'''
insert(index, object) -> None
    在指定的索引index处插入元素object
    返回None就意味着没有新的列表产生,就地修改
    时间复杂度是O(n)
    索引能超上下界吗?
        超越上界,尾部追加
        超越下界,头部追加
'''


list_1 = [1,2,3,4,5]
print(list_1)
list_1.insert(2,300)
print(list_1)


#以上代码执行结果如下:
[1, 2, 3, 4, 5]
[1, 2, 300, 3, 4, 5]
#!/usr/bin/env python
#_*_coding:utf-8_*_
#@author :yinzhengjie
#blog:http://www.cnblogs.com/yinzhengjie/tag/python%E8%87%AA%E5%8A%A8%E5%8C%96%E8%BF%90%E7%BB%B4%E4%B9%8B%E8%B7%AF/
#EMAIL:y1053419035@qq.com

'''
+ -> list
    连接操作,将两个列表连接起来
    产生新的列表,原列表不变
    本质上调用的是__add__()方法

* -> list
    重复操作,将本列表元素重复n次,返回新的列表
'''

list_1 = [1,2,3,4,5]
list_2 = ["a","b","c","d","e"]
print(list_1)
print(list_2)

print(list_1 * 3)
print(list_1 + list_2)


#以上代码执行结果如下:
[1, 2, 3, 4, 5]
['a', 'b', 'c', 'd', 'e']
[1, 2, 3, 4, 5, 1, 2, 3, 4, 5, 1, 2, 3, 4, 5]
[1, 2, 3, 4, 5, 'a', 'b', 'c', 'd', 'e']
#!/usr/bin/env python
#_*_coding:utf-8_*_
#@author :yinzhengjie
#blog:http://www.cnblogs.com/yinzhengjie/tag/python%E8%87%AA%E5%8A%A8%E5%8C%96%E8%BF%90%E7%BB%B4%E4%B9%8B%E8%B7%AF/
#EMAIL:y1053419035@qq.com

'''
extend(iteratable) -> None
    将可迭代对象的元素追加进来,返回None
    就地修改
'''

list_1 = [1,2,3,4,5]
list_2 = ["a","b","c","d","e"]
print(list_1)
print(list_2)
list_1.extend(list_2)
print(list_1)
print(list_2)


#以上代码执行结果如下:
[1, 2, 3, 4, 5]
['a', 'b', 'c', 'd', 'e']
[1, 2, 3, 4, 5, 'a', 'b', 'c', 'd', 'e']
['a', 'b', 'c', 'd', 'e']
8>.列表删除元素
#!/usr/bin/env python
#_*_coding:utf-8_*_
#@author :yinzhengjie
#blog:http://www.cnblogs.com/yinzhengjie/tag/python%E8%87%AA%E5%8A%A8%E5%8C%96%E8%BF%90%E7%BB%B4%E4%B9%8B%E8%B7%AF/
#EMAIL:y1053419035@qq.com

'''
remove(value) -> None
    从左至右查找第一个匹配value的值,移除该元素,返回None
    就地修改
    效率?
'''

list_1 = [1,2,3,4,5]
print(list_1)
list_1.remove(3)
print(list_1)


#以上代码执行结果如下:
[1, 2, 3, 4, 5]
[1, 2, 4, 5]
#!/usr/bin/env python
#_*_coding:utf-8_*_
#@author :yinzhengjie
#blog:http://www.cnblogs.com/yinzhengjie/tag/python%E8%87%AA%E5%8A%A8%E5%8C%96%E8%BF%90%E7%BB%B4%E4%B9%8B%E8%B7%AF/
#EMAIL:y1053419035@qq.com

'''
pop([index]) -> item
    不指定索引index,就从列表尾部弹出一个元素
    指定索引index,就从索引处弹出一个元素,索引超界抛出IndexError错误
    效率?指定索引的的时间复杂度?不指定索引呢?
'''

list_1 = [1,2,3,4,5]
print(list_1)

list_1.pop()
print(list_1)

list_1.pop(2)
print(list_1)


#以上代码执行结果如下:
[1, 2, 3, 4, 5]
[1, 2, 3, 4]
[1, 2, 4]
#!/usr/bin/env python
#_*_coding:utf-8_*_
#@author :yinzhengjie
#blog:http://www.cnblogs.com/yinzhengjie/tag/python%E8%87%AA%E5%8A%A8%E5%8C%96%E8%BF%90%E7%BB%B4%E4%B9%8B%E8%B7%AF/
#EMAIL:y1053419035@qq.com

'''
clear() -> None
    清除列表所有元素,剩下一个空列表
'''

list_1 = [1,2,3,4,5]
print(list_1)

list_1.clear()
print(list_1)


#以上代码执行结果如下:
[1, 2, 3, 4, 5]
[]
9>.列表的其他操作
 1 #!/usr/bin/env python
 2 #_*_coding:utf-8_*_
 3 #@author :yinzhengjie
 4 #blog:http://www.cnblogs.com/yinzhengjie/tag/python%E8%87%AA%E5%8A%A8%E5%8C%96%E8%BF%90%E7%BB%B4%E4%B9%8B%E8%B7%AF/
 5 #EMAIL:y1053419035@qq.com
 6
 7 '''
 8 reverse() -> None
 9     将列表元素反转,返回None
10     就地修改
11 '''
12
13 list_1 = [1,2,3,4,5]
14 print(list_1)
15
16 list_1.reverse()
17 print(list_1)
18
19
20
21
22
23 #以上代码执行结果如下:
24 [1, 2, 3, 4, 5]
25 [5, 4, 3, 2, 1]
 1 #!/usr/bin/env python
 2 #_*_conding:utf-8_*_
 3 #@author :yinzhengjie
 4 #blog:http://www.cnblogs.com/yinzhengjie
 5
 6
 7 '''
 8 sort(key=None, reverse=False) -> None
 9     对列表元素进行排序,就地修改,默认升序
10     reverse为True,反转,降序
11     key一个函数,指定key如何排序,key不会改变元素本身,只是转换时临时用一下,转换后数值用来比较。
12 '''
13
14 list_1 = [100,20,3,40,5]
15 print(list_1)
16 list_1.sort()
17 print(list_1)
18 list_1.sort(reverse=True)
19 print(list_1)
20
21
22
23 #以上代码执行结果如下:
24 [100, 20, 3, 40, 5]
25 [3, 5, 20, 40, 100]
26 [100, 40, 20, 5, 3]
#!/usr/bin/env python
#_*_coding:utf-8_*_
#@author :yinzhengjie
#blog:http://www.cnblogs.com/yinzhengjie/tag/python%E8%87%AA%E5%8A%A8%E5%8C%96%E8%BF%90%E7%BB%B4%E4%B9%8B%E8%B7%AF/
#EMAIL:y1053419035@qq.com


list_1 = [1,3,5,7,9]
print(list_1)

list_2 = [1,2,3,4,5,6,7,8,9,10]
print(list_2)

list_3 = [[1,3,5,7,9],[2,4,6,8,10],[1,2,3],100,300,500]
print(list_1 in list_2)
print(list_1 in list_3)
print(list_2 in list_3)

for i in list_3:
    print(i)


#以上代码执行结果如下:
[1, 3, 5, 7, 9]
[1, 2, 3, 4, 5, 6, 7, 8, 9, 10]
False
True
False
[1, 3, 5, 7, 9]
[2, 4, 6, 8, 10]
[1, 2, 3]
100
300
500
10>.列表复制
#!/usr/bin/env python
#_*_coding:utf-8_*_
#@author :yinzhengjie
#blog:http://www.cnblogs.com/yinzhengjie/tag/python%E8%87%AA%E5%8A%A8%E5%8C%96%E8%BF%90%E7%BB%B4%E4%B9%8B%E8%B7%AF/
#EMAIL:y1053419035@qq.com


list_1 = list(range(4))
list_2 = list(range(4))
print(list_1,id(list_1))
print(list_2,id(list_2))

print(list_1 == list_2)             #注意,它比较的是值并不是比较内存地址!
print(list_1 is  list_2)

list_2[3] = 100
print(list_1)
print(list_2)


#以上代码执行结果如下:
[0, 1, 2, 3] 31938568
[0, 1, 2, 3] 31938632
True
False
[0, 1, 2, 3]
[0, 1, 2, 100]
#!/usr/bin/env python
#_*_coding:utf-8_*_
#@author :yinzhengjie
#blog:http://www.cnblogs.com/yinzhengjie/tag/python%E8%87%AA%E5%8A%A8%E5%8C%96%E8%BF%90%E7%BB%B4%E4%B9%8B%E8%B7%AF/
#EMAIL:y1053419035@qq.com


list_1 = [1,2,3,[100,200,300],4,5]
list_2 = list_1.copy()

print(list_1,id(list_1))
print(list_2,id(list_2))
print(list_2 == list_1)
print(list_2 is list_1)

list_2[3][1] = 666666
print(list_1,id(list_1))
print(list_2,id(list_2))
print(list_2 == list_1)
print(list_2 is list_1)

#以上代码执行结果如下:
[1, 2, 3, [100, 200, 300], 4, 5] 6887112
[1, 2, 3, [100, 200, 300], 4, 5] 33051592
True
False
[1, 2, 3, [100, 666666, 300], 4, 5] 6887112
[1, 2, 3, [100, 666666, 300], 4, 5] 33051592
True
False
#!/usr/bin/env python
#_*_coding:utf-8_*_
#@author :yinzhengjie
#blog:http://www.cnblogs.com/yinzhengjie/tag/python%E8%87%AA%E5%8A%A8%E5%8C%96%E8%BF%90%E7%BB%B4%E4%B9%8B%E8%B7%AF/
#EMAIL:y1053419035@qq.com

import copy

list_1 = [1,2,3,[100,200,300],4,5]
list_2 = copy.deepcopy(list_1)
print(list_1,id(list_1))
print(list_2,id(list_2))
print( list_2 == list_1)
print(list_2 is list_1)

list_2[3][2] = 666
print(list_1,id(list_1))
print(list_2,id(list_2))
print( list_2 == list_1)
print(list_2 is list_1)


#以上代码执行结果如下:
[1, 2, 3, [100, 200, 300], 4, 5] 43582344
[1, 2, 3, [100, 200, 300], 4, 5] 43583176
True
False
[1, 2, 3, [100, 200, 300], 4, 5] 43582344
[1, 2, 3, [100, 200, 666], 4, 5] 43583176
False
False
#!/usr/bin/env python
#_*_coding:utf-8_*_
#@author :yinzhengjie
#blog:http://www.cnblogs.com/yinzhengjie/tag/python%E8%87%AA%E5%8A%A8%E5%8C%96%E8%BF%90%E7%BB%B4%E4%B9%8B%E8%B7%AF/
#EMAIL:y1053419035@qq.com


import random

#返回1-5之间的整数
print(random.randint(1,5))

#从非空序列的元素中随机挑选一个元素
print(random.choice(range(10)))

#从指定范围内,按指定基数递增的集合中获取一个随机数,基数缺省值为1
print(random.randrange(1,9,2))

list_1 = [1,2,3,4,5]
print(list_1)

#就地打乱列表元素
random.shuffle(list_1)
print(list_1)

#从样本空间或总体(序列或者集合类型)中随机取出k个不同的元素,返回一个新的列表
print(random.sample(['a', 'b', 'c', 'd','e','f','g'], 3))
print(random.sample(['a', 'a'], 2))
11>.列表小练习
#!/usr/bin/env python
#_*_conding:utf-8_*_
#@author :yinzhengjie
#blog:http://www.cnblogs.com/yinzhengjie


#打印100内的所有素数
print(1)
print(2)
print(3)
for i in range(3,100,2):        #我们知道由于所有的偶数都能被2整除,因此我们这里可以设置步长直接跳过偶数,可以减少循环的次数!
    m = i ** 0.5                #我们对当前循环的数字进行开方操作
    for j in range(3,i,2):      #原理同上
        if i % j == 0:          #判断当前参数是否能被它之前的数整除,如果不难就直接跳过循环,即把非素数过滤掉!
            break
        if j>m:                 #需要注意的是,这算是优化的一种方式吧,直接就过滤了一半的数据
            print(i)
            break


#以上代码执行结果如下:
1
2
3
5
7
11
13
17
19
23
29
31
37
41
43
47
53
59
61
67
71
73
79
83
89
97
#!/usr/bin/env python
#_*_conding:utf-8_*_
#@author :yinzhengjie
#blog:http://www.cnblogs.com/yinzhengjie

import datetime


#打印100000内的所有素数
num = 100000
count = 1
ops = 0

start = datetime.datetime.now()
for i in range(3,num,2):                #奇数
    if i > 10 and i % 5 == 0:           #直接过滤掉是5的倍数的数字,可以提高效率
        ops += 1
        continue
    for j in range(3,int(i ** 0.5)+1,2):
        ops += 1
        if i %j == 0:                   #合数
            break
    else:
        count += 1                      #素数

delta = (datetime.datetime.now() - start).total_seconds()

print(count)
print(delta)
print(ops)


#以上代码执行结果如下:
9592
0.187501
1338776
#!/usr/bin/env python
#_*_conding:utf-8_*_
#@author :yinzhengjie
#blog:http://www.cnblogs.com/yinzhengjie

import datetime


#打印100000内的所有素数
num = 100000
ops = 0
primenums = [2]             #定义一个素数列表,将素数放在这个列表中。用内存空间换计算时间,即空间换时间

start = datetime.datetime.now()
for i in range(3,num,2):                #奇数
     flag = False                       #定义标志位为Flase,默认当前数字并非素数
     edeg = int(i ** 0.5)
     ops += 1
     for j in  primenums:
         if j > edeg:
             flag = True                #超过了开方值说明是素数,将标志位设置为True并退出本层循环
             break

         ops += 1
         if i % j == 0:                 #合数
             break
     if flag:
         primenums.append(i)

delta = (datetime.datetime.now() - start).total_seconds()

print(len(primenums))
print(delta)
print(ops)


#以上代码执行结果如下:
9592
0.156248
744436
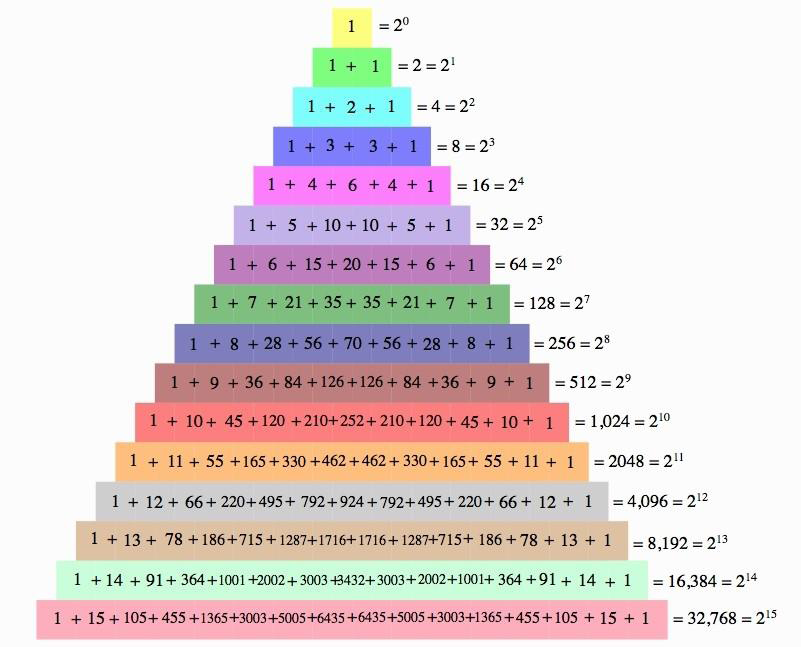
#!/usr/bin/env python
#_*_coding:utf-8_*_
#@author :yinzhengjie
#blog:http://www.cnblogs.com/yinzhengjie/tag/python%E8%87%AA%E5%8A%A8%E5%8C%96%E8%BF%90%E7%BB%B4%E4%B9%8B%E8%B7%AF/
#EMAIL:y1053419035@qq.com

#计算杨辉三角前6行
triangle=[[1], [1,1]]
for i in range(2,6):
    cur = [1]
    pre = triangle[i-1]
    for j in range(len(pre)-1):
        cur.append(pre[j]+pre[j+1])
    cur.append(1)
    triangle.append(cur)
print(triangle)
#!/usr/bin/env python
#_*_coding:utf-8_*_
#@author :yinzhengjie
#blog:http://www.cnblogs.com/yinzhengjie/tag/python%E8%87%AA%E5%8A%A8%E5%8C%96%E8%BF%90%E7%BB%B4%E4%B9%8B%E8%B7%AF/
#EMAIL:y1053419035@qq.com


#计算杨辉三角前6行
triangle=[]
n = 6
for i in range(n):
    row = [1]
    triangle.append(row)
    if i==0:
        continue
    for j in range(i-1):
        row.append(triangle[i-1][ j]+triangle[i-1][ j+1])
    row.append(1)
print(triangle)
#!/usr/bin/env python
#_*_coding:utf-8_*_
#@author :yinzhengjie
#blog:http://www.cnblogs.com/yinzhengjie/tag/python%E8%87%AA%E5%8A%A8%E5%8C%96%E8%BF%90%E7%BB%B4%E4%B9%8B%E8%B7%AF/
#EMAIL:y1053419035@qq.com

#计算杨辉三角前6行
n = 6
newline = [1] # 相当于计算好的第一行
print(newline)

for i in range(1, n):
    oldline = newline.copy() # 浅拷贝并补0
    oldline.append(0) # 尾部补0相当于两端补0
    newline.clear() # 使用append,所以要清除

    offset = 0
    while offset <= i:
         newline.append(oldline[offset-1] + oldline[offset])
         offset += 1
    print(newline)
#!/usr/bin/env python
#_*_coding:utf-8_*_
#@author :yinzhengjie
#blog:http://www.cnblogs.com/yinzhengjie/tag/python%E8%87%AA%E5%8A%A8%E5%8C%96%E8%BF%90%E7%BB%B4%E4%B9%8B%E8%B7%AF/
#EMAIL:y1053419035@qq.com

#计算杨辉三角前6行
n = 6
newline = [1] # 相当于计算好的第一行
print(newline)
for i in range(1, n):
    oldline = newline.copy() # 浅拷贝并补0
    oldline.append(0) # 尾部补0相当于两端补0
    newline.clear() # 使用append,所以要清除
    for j in range(i+1):
        newline.append(oldline[ j - 1] + oldline[j])
    print(newline)
#!/usr/bin/env python
#_*_coding:utf-8_*_
#@author :yinzhengjie
#blog:http://www.cnblogs.com/yinzhengjie/tag/python%E8%87%AA%E5%8A%A8%E5%8C%96%E8%BF%90%E7%BB%B4%E4%B9%8B%E8%B7%AF/
#EMAIL:y1053419035@qq.com

#计算杨辉三角前6行
triangle = []
n = 6
for i in range(n):
    row = [1] # 开始的1
    for k in range(i): # 中间填0,尾部填1
        row.append(1) if k == i-1 else row.append(0)
    triangle.append(row)
    if i == 0:
        continue
    for j in range(1,i//2+1): # i=2第三行才能进来
        val = triangle[i - 1][ j-1] + triangle[i - 1][ j]
        row[j] = val
        if i != 2*j: # 奇数个数的中点跳过
            row[-j-1] = val
print(triangle)
#!/usr/bin/env python
#_*_coding:utf-8_*_
#@author :yinzhengjie
#blog:http://www.cnblogs.com/yinzhengjie/tag/python%E8%87%AA%E5%8A%A8%E5%8C%96%E8%BF%90%E7%BB%B4%E4%B9%8B%E8%B7%AF/
#EMAIL:y1053419035@qq.com

#计算杨辉三角前6行
triangle = []
n = 6
for i in range(n):
    row = [1] * (i+1) # 一次性开辟
    triangle.append(row)
    for j in range(1,i//2+1): # i=2第三行才能进来
        val = triangle[i - 1][ j-1] + triangle[i - 1][ j]
        row[j] = val
        if i != 2*j: # 奇数个数的中点跳过
            row[-j-1] = val
print(triangle)
四.元组(tuple)
1>.元组(tuple)概述
一个有序的元素组成的集合

使用小括号( ) 表示

元组是不可变对象
2>.元组的定义和初始化
#!/usr/bin/env python
#_*_coding:utf-8_*_
#@author :yinzhengjie
#blog:http://www.cnblogs.com/yinzhengjie/tag/python%E8%87%AA%E5%8A%A8%E5%8C%96%E8%BF%90%E7%BB%B4%E4%B9%8B%E8%B7%AF/
#EMAIL:y1053419035@qq.com

#定义元组的几种常见姿势如下所示
t1 = tuple()                    # 工厂方法
t2 = ()
t3 = tuple(range(1,9,2))        # iteratable
t4 = (2,4,6,3,4,2)
t5 = (1,)                       # 一个元素元组的定义,注意有个逗号
t6 = (1,)*5
t7 = (1,2,3) * 6


print(t1)
print(t2)
print(t3)
print(t4)
print(t5)
print(t6)
print(t7)
()
()
(1, 3, 5, 7)
(2, 4, 6, 3, 4, 2)
(1,)
(1, 1, 1, 1, 1)
(1, 2, 3, 1, 2, 3, 1, 2, 3, 1, 2, 3, 1, 2, 3, 1, 2, 3)
3>.元组元素的访问
#!/usr/bin/env python
#_*_coding:utf-8_*_
#@author :yinzhengjie
#blog:http://www.cnblogs.com/yinzhengjie/tag/python%E8%87%AA%E5%8A%A8%E5%8C%96%E8%BF%90%E7%BB%B4%E4%B9%8B%E8%B7%AF/
#EMAIL:y1053419035@qq.com

'''
支持索引(下标)
正索引:从左至右,从0开始,为列表中每一个元素编号
负索引:从右至左,从-1开始
正负索引不可以超界,否则引发异常IndexError
元组通过索引访问
    tuple[index] ,index就是索引,使用中括号访问
'''


name_list = ("Jason Yin","Jennny","Danny","Liming","Dog Cutting",[10,20,30])
print(name_list)
print(name_list,type(name_list))
print(name_list[0])
print(name_list[-2])

name_list[-1][1] = 666
print(name_list)
('Jason Yin', 'Jennny', 'Danny', 'Liming', 'Dog Cutting', [10, 20, 30])
('Jason Yin', 'Jennny', 'Danny', 'Liming', 'Dog Cutting', [10, 20, 30]) <class 'tuple'>
Jason Yin
Dog Cutting
('Jason Yin', 'Jennny', 'Danny', 'Liming', 'Dog Cutting', [10, 666, 30])
4>.元组的查询操作(元组是只读的,所以增,改,删方法都没有!)
#!/usr/bin/env python
#_*_coding:utf-8_*_
#@author :yinzhengjie
#blog:http://www.cnblogs.com/yinzhengjie/tag/python%E8%87%AA%E5%8A%A8%E5%8C%96%E8%BF%90%E7%BB%B4%E4%B9%8B%E8%B7%AF/
#EMAIL:y1053419035@qq.com

'''
index(value,[start,[stop]])
    通过值value,从指定区间查找列表内的元素是否匹配
    匹配第一个就立即返回索引
    匹配不到,抛出异常ValueError
'''
name_list = ("Jason Yin","Jennny","Danny","Liming","Dog Cutting")

print(name_list.index("Jennny"))
print(name_list.index("Jason Yin"))


#以上代码输出结果如下:
1
0
#!/usr/bin/env python
#_*_coding:utf-8_*_
#@author :yinzhengjie
#blog:http://www.cnblogs.com/yinzhengjie/tag/python%E8%87%AA%E5%8A%A8%E5%8C%96%E8%BF%90%E7%BB%B4%E4%B9%8B%E8%B7%AF/
#EMAIL:y1053419035@qq.com

'''
count(value)
    返回列表中匹配value的次数
'''
t1 = (1,3,2,3,4,3,2,3,5,3,2,3,6,3)

print(t1.count(3))
print(t1.count(2))


#以上代码输出结果如下:
7
3
#!/usr/bin/env python
#_*_coding:utf-8_*_
#@author :yinzhengjie
#blog:http://www.cnblogs.com/yinzhengjie/tag/python%E8%87%AA%E5%8A%A8%E5%8C%96%E8%BF%90%E7%BB%B4%E4%B9%8B%E8%B7%AF/
#EMAIL:y1053419035@qq.com

'''
len(tuple)
    返回元素的个数
'''
t1 = (1,3,2,3,4,3,2,3,5,3,2,3,6,3)

print(len(t1))


#以上代码输出结果如下:
14
5>. 命名元组namedtuple使用案例
#!/usr/bin/env python
#_*_coding:utf-8_*_
#@author :yinzhengjie
#blog:http://www.cnblogs.com/yinzhengjie/tag/python%E8%87%AA%E5%8A%A8%E5%8C%96%E8%BF%90%E7%BB%B4%E4%B9%8B%E8%B7%AF/
#EMAIL:y1053419035@qq.com


from collections import namedtuple

Point = namedtuple('_Point',['x','y'])              # Point为返回的类,后面的'x','y'表示定义的属性名称
p = Point(100, 200)
print(p.x)
print(p.y)

Student = namedtuple('Student', 'Name Age')        #Student为返回的类名,这是咱们自定义的,我们可以直接使用该类名,调用我们自定给定的属性名称
tom = Student('tom', 20)
jerry = Student('jerry', 18)

print(tom.Name)
print(tom.Age)
print(jerry.Name)
print(jerry.Age)


#以上代码执行结果如下:
100
200
tom
20
jerry
18
 1 #!/usr/bin/env python
 2 #_*_conding:utf-8_*_
 3 #@author :yinzhengjie
 4 #blog:http://www.cnblogs.com/yinzhengjie
 5
 6 from collections import namedtuple
 7
 8 student = namedtuple("Student",'name,age,address')              #注意,student为标识符,可以通过阅读源码,传入参方式会被转换成list
 9
10 jason = student("尹正杰",18,"北京")
11
12 print(jason.address)
13 print(jason.age)
14 print(jason.name)
15 print(jason)
16
17
18
19
20 #以上代码执行结构如下:
21 北京
22 18
23 尹正杰
24 Student(name='尹正杰', age=18, address='北京')
6>.元组练习 (依次接收用户输入的3个数,排序后打印)
#!/usr/bin/env python
#_*_coding:utf-8_*_
#@author :yinzhengjie
#blog:http://www.cnblogs.com/yinzhengjie/tag/python%E8%87%AA%E5%8A%A8%E5%8C%96%E8%BF%90%E7%BB%B4%E4%B9%8B%E8%B7%AF/
#EMAIL:y1053419035@qq.com


nums = []

for i in range(1,4):
    nums.append(int(input("请输入第{}个整数:>>> ".format(i))))

if nums[0] > nums[1]:
    if nums[0] > nums[2]:
        i3 = nums[0]
        if nums[1] > nums[2]:
            i2 = nums[1]
            i1 = nums[2]
        else:
            i2 = nums[2]
            i1 = nums[1]
    else:
        i3 = nums[2]
        i2 = nums[0]
        i1 = nums[1]
else:#0<1
    if nums[0] > nums[2]:
        i3 = nums[1]
        i2 = nums[0]
        i1 = nums[2]
    else:#0<2
        if nums[1] < nums[2]:
            i3 = nums[2]
            i2 = nums[1]
            i1 = nums[0]
        else:
            i3 = nums[1]
            i2 = nums[2]
            i1 = nums[0]

print(i1,i2,i3)
#!/usr/bin/env python
#_*_coding:utf-8_*_
#@author :yinzhengjie
#blog:http://www.cnblogs.com/yinzhengjie/tag/python%E8%87%AA%E5%8A%A8%E5%8C%96%E8%BF%90%E7%BB%B4%E4%B9%8B%E8%B7%AF/
#EMAIL:y1053419035@qq.com


nums = []

out = None

for i in range(1,4):
    nums.append(int(input("请输入第{}个整数:>>> ".format(i))))

if nums[0] > nums[1]:
    if nums[0] > nums[2]:
        if nums[1] > nums[2]:
            out = [2,1,0]
        else:
            out = [1,2,0]
    else:
        out = [1,2,0]
else:
    if nums[0] > nums[2]:
        out = [2,0,1]
    else:#0<2
        if nums[1] < nums[2]:
            out = [0,1,2]
        else:
           out = [0,2,1]

out.reverse()
for i in out:
    print(nums[i],end=",")
#!/usr/bin/env python
#_*_coding:utf-8_*_
#@author :yinzhengjie
#blog:http://www.cnblogs.com/yinzhengjie/tag/python%E8%87%AA%E5%8A%A8%E5%8C%96%E8%BF%90%E7%BB%B4%E4%B9%8B%E8%B7%AF/
#EMAIL:y1053419035@qq.com


nums = []

for i in range(1,4):
    nums.append(int(input("请输入第{}个整数:>>> ".format(i))))

#此处不能使用for循环,不能一般迭代该列表,同时删除或者增加该列表
while True:
    cur = min(nums)
    print(cur)
    nums.remove(cur)
    if len(nums) == 1:
        print(nums[0])
        break
#!/usr/bin/env python
#_*_coding:utf-8_*_
#@author :yinzhengjie
#blog:http://www.cnblogs.com/yinzhengjie/tag/python%E8%87%AA%E5%8A%A8%E5%8C%96%E8%BF%90%E7%BB%B4%E4%B9%8B%E8%B7%AF/
#EMAIL:y1053419035@qq.com


nums = []

for i in range(1,4):
    nums.append(int(input("请输入第{}个整数:>>> ".format(i))))

nums.sort()

print(nums)
#!/usr/bin/env python
#_*_coding:utf-8_*_
#@author :yinzhengjie
#blog:http://www.cnblogs.com/yinzhengjie/tag/python%E8%87%AA%E5%8A%A8%E5%8C%96%E8%BF%90%E7%BB%B4%E4%B9%8B%E8%B7%AF/
#EMAIL:y1053419035@qq.com


numlist = [
    [1,9,8,5,6,7,4,3,2],
]

nums = numlist[0]

print(nums)

length = len(nums)

count_swap = 0

count = 0

for i in range(length):
    for j in range(length - i - 1):
        count += 1
        if nums[j] > nums[ j + 1]:
            tmp = nums[j]
            nums[j] = nums[j+1]
            nums[j+1] = tmp
            count_swap += 1

print(nums,count_swap,count)
#!/usr/bin/env python
#_*_coding:utf-8_*_
#@author :yinzhengjie
#blog:http://www.cnblogs.com/yinzhengjie/tag/python%E8%87%AA%E5%8A%A8%E5%8C%96%E8%BF%90%E7%BB%B4%E4%B9%8B%E8%B7%AF/
#EMAIL:y1053419035@qq.com


numlist = [
    [1,9,8,5,6,7,4,3,2],
    [1,2,3,4,5,6,7,8,9],
    [1,2,3,4,5,6,7,8,9]
]

nums = numlist[2]
print(nums)
length = len(nums)
count_swap = 0
count = 0

for i in range(length):
   flag = False
   for j in range(length - i -1):
       count += 1
       if nums[j] > nums[j+1]:
           tmp = nums[j]
           nums[j] =nums[j+1]
           nums[j+1] = tmp
           flag = True
           count_swap += 1
   if not flag:
        break

print(nums,count_swap,count)
五.字符串
1>.字符串概述
一个个字符组成的有序的序列,是字符的集合

使用单引号、双引号、三引号引住的字符序列

字符串是不可变对象

Python3起,字符串就是Unicode类型
2>.字符串定义初始化
#!/usr/bin/env python
#_*_coding:utf-8_*_
#@author :yinzhengjie
#blog:http://www.cnblogs.com/yinzhengjie/tag/python%E8%87%AA%E5%8A%A8%E5%8C%96%E8%BF%90%E7%BB%B4%E4%B9%8B%E8%B7%AF/
#EMAIL:y1053419035@qq.com


s1 = 'string'
s2 = "string2"
s3 = '''this's a "String" '''
s4 = 'hello \n http://www.cnblogs.com/yinzhengjie'
s5 = r"hello \n http://www.cnblogs.com/yinzhengjie"
s6 = 'c:\windows\nt'
s7 = R"c:\windows\nt"
s8 = 'c:\windows\\nt'
sql = """select * from user where name='tom' """

print(s1)
print(s2)
print(s3)
print(s4)
print(s5)
print(s6)
print(s7)
print(s8)
print(sql)
string
string2
this's a "String"
hello
 http://www.cnblogs.com/yinzhengjie
hello \n http://www.cnblogs.com/yinzhengjie
c:\windows
t
c:\windows\nt
c:\windows\nt
select * from user where name='tom'
3>.字符串元素访问
#!/usr/bin/env python
#_*_coding:utf-8_*_
#@author :yinzhengjie
#blog:http://www.cnblogs.com/yinzhengjie/tag/python%E8%87%AA%E5%8A%A8%E5%8C%96%E8%BF%90%E7%BB%B4%E4%B9%8B%E8%B7%AF/
#EMAIL:y1053419035@qq.com


sql = "select * from user where name='tom'"
print(sql[5])
print(sql[1:5])
print(sql[-1])
#!/usr/bin/env python
#_*_coding:utf-8_*_
#@author :yinzhengjie
#blog:http://www.cnblogs.com/yinzhengjie/tag/python%E8%87%AA%E5%8A%A8%E5%8C%96%E8%BF%90%E7%BB%B4%E4%B9%8B%E8%B7%AF/
#EMAIL:y1053419035@qq.com


sql = "select * from user where name='tom'"

for item in sql:
    print(item)
    print(type(item))
#!/usr/bin/env python
#_*_coding:utf-8_*_
#@author :yinzhengjie
#blog:http://www.cnblogs.com/yinzhengjie/tag/python%E8%87%AA%E5%8A%A8%E5%8C%96%E8%BF%90%E7%BB%B4%E4%B9%8B%E8%B7%AF/
#EMAIL:y1053419035@qq.com


sql = "select * from user where name='tom'"
list_1 = list(sql)
print(list_1)
print(len(list_1))
print(sql[0])
print(list_1[0])
print(sql[0] == list_1[0])
4>.字符串join连接
#!/usr/bin/env python
#_*_coding:utf-8_*_
#@author :yinzhengjie
#blog:http://www.cnblogs.com/yinzhengjie/tag/python%E8%87%AA%E5%8A%A8%E5%8C%96%E8%BF%90%E7%BB%B4%E4%B9%8B%E8%B7%AF/
#EMAIL:y1053419035@qq.com


'''
"string".join(iterable) -> str
    将可迭代对象连接起来,使用string作为分隔符
    可迭代对象本身元素都是字符串
    返回一个新字符串
'''

list_1 = ['1','2','3']
print("\"".join(list_1)) # 分隔符是双引号
print(" ".join(list_1))
print("\n".join(list_1))
#!/usr/bin/env python
#_*_coding:utf-8_*_
#@author :yinzhengjie
#blog:http://www.cnblogs.com/yinzhengjie/tag/python%E8%87%AA%E5%8A%A8%E5%8C%96%E8%BF%90%E7%BB%B4%E4%B9%8B%E8%B7%AF/
#EMAIL:y1053419035@qq.com


a = "I love you !"
b = "Me too."

c = a + b
print(c)
5>. 字符串分割
#!/usr/bin/env python
#_*_coding:utf-8_*_
#@author :yinzhengjie
#blog:http://www.cnblogs.com/yinzhengjie/tag/python%E8%87%AA%E5%8A%A8%E5%8C%96%E8%BF%90%E7%BB%B4%E4%B9%8B%E8%B7%AF/
#EMAIL:y1053419035@qq.com

'''
split系
    将字符串按照分隔符分割成若干字符串,并返回列表

split(sep=None, maxsplit=-1) -> list of strings
    从左至右
    sep 指定分割字符串,缺省的情况下空白字符串作为分隔符
    maxsplit 指定分割的次数,-1 表示遍历整个字符串

'''

s1 = "I'm \ta super student."
print(s1)
print(s1.split())

print(s1.split('s'))
print(s1.split('super'))
print(s1.split('super '))
print(s1.split(' '))
print(s1.split(' ',maxsplit=2))
print(s1.split('\t',maxsplit=2))
print(s1)
#!/usr/bin/env python
#_*_coding:utf-8_*_
#@author :yinzhengjie
#blog:http://www.cnblogs.com/yinzhengjie/tag/python%E8%87%AA%E5%8A%A8%E5%8C%96%E8%BF%90%E7%BB%B4%E4%B9%8B%E8%B7%AF/
#EMAIL:y1053419035@qq.com


'''
rsplit(sep=None, maxsplit=-1) -> list of strings
    从右向左
    sep 指定分割字符串,缺省的情况下空白字符串作为分隔符
    maxsplit 指定分割的次数,-1 表示遍历整个字符串
'''
s1 = "I'm \ta super student."
print(s1)
print(s1.rsplit())
print(s1.rsplit('s'))
print(s1.rsplit('super'))
print(s1.rsplit('super '))
print(s1.rsplit(' '))
print(s1.rsplit(' ',maxsplit=2))
print(s1.rsplit('\t',maxsplit=2))
#!/usr/bin/env python
#_*_coding:utf-8_*_
#@author :yinzhengjie
#blog:http://www.cnblogs.com/yinzhengjie/tag/python%E8%87%AA%E5%8A%A8%E5%8C%96%E8%BF%90%E7%BB%B4%E4%B9%8B%E8%B7%AF/
#EMAIL:y1053419035@qq.com


'''
splitlines([keepends]) -> list of strings
    按照行来切分字符串
    keepends 指的是是否保留行分隔符
    行分隔符包括\n、\r\n、\r等
'''

print('ab c\n\nde fg\rkl\r\n'.splitlines())
print('ab c\n\nde fg\rkl\r\n'.splitlines(True))
s1 = '''I'm a super student.
You're a super teacher.'''
print(s1)
print(s1.splitlines())
print(s1.splitlines(True))
#!/usr/bin/env python
#_*_coding:utf-8_*_
#@author :yinzhengjie
#blog:http://www.cnblogs.com/yinzhengjie/tag/python%E8%87%AA%E5%8A%A8%E5%8C%96%E8%BF%90%E7%BB%B4%E4%B9%8B%E8%B7%AF/
#EMAIL:y1053419035@qq.com

'''
partition(sep) -> (head, sep, tail)
    从左至右,遇到分隔符就把字符串分割成两部分,返回头、分隔符、尾三部分的三元组;如果没有找到分隔符,就返回头、2个空元素的三元组
    sep 分割字符串,必须指定
'''
s1 = "I'm a super student."
print(s1.partition('s'))
print(s1.partition('stu'))
# print(s1.partition(''))
print(s1.partition('abc'))
6>.字符串大小写
#!/usr/bin/env python
#_*_coding:utf-8_*_
#@author :yinzhengjie
#blog:http://www.cnblogs.com/yinzhengjie/tag/python%E8%87%AA%E5%8A%A8%E5%8C%96%E8%BF%90%E7%BB%B4%E4%B9%8B%E8%B7%AF/
#EMAIL:y1053419035@qq.com

s1 = "I'm a super man"

print(s1)
print(s1.upper())


#以上代码执行结果如下:
I'm a super man
I'M A SUPER MAN
#!/usr/bin/env python
#_*_coding:utf-8_*_
#@author :yinzhengjie
#blog:http://www.cnblogs.com/yinzhengjie/tag/python%E8%87%AA%E5%8A%A8%E5%8C%96%E8%BF%90%E7%BB%B4%E4%B9%8B%E8%B7%AF/
#EMAIL:y1053419035@qq.com

s1 = "I'm a super man"

print(s1)
print(s1.lower())


#以上代码执行结果如下:
I'm a super man
i'm a super man
#!/usr/bin/env python
#_*_coding:utf-8_*_
#@author :yinzhengjie
#blog:http://www.cnblogs.com/yinzhengjie/tag/python%E8%87%AA%E5%8A%A8%E5%8C%96%E8%BF%90%E7%BB%B4%E4%B9%8B%E8%B7%AF/
#EMAIL:y1053419035@qq.com

s1 = "I'm a super man"

print(s1)
print(s1.swapcase())


#以上代码执行结果如下:
I'm a super man
i'M A SUPER MAN
7>.字符串排版
#!/usr/bin/env python
#_*_coding:utf-8_*_
#@author :yinzhengjie
#blog:http://www.cnblogs.com/yinzhengjie/tag/python%E8%87%AA%E5%8A%A8%E5%8C%96%E8%BF%90%E7%BB%B4%E4%B9%8B%E8%B7%AF/
#EMAIL:y1053419035@qq.com

s1 = "I'm a super man"

print(s1)
print(s1.title())


#以上代码执行结果如下:
I'm a super man
I'M A Super Man
#!/usr/bin/env python
#_*_coding:utf-8_*_
#@author :yinzhengjie
#blog:http://www.cnblogs.com/yinzhengjie/tag/python%E8%87%AA%E5%8A%A8%E5%8C%96%E8%BF%90%E7%BB%B4%E4%B9%8B%E8%B7%AF/
#EMAIL:y1053419035@qq.com

s1 = "i'm a super man"

print(s1)
print(s1.capitalize())


#以上代码执行结果如下:
i'm a super man
I'm a super man
#!/usr/bin/env python
#_*_coding:utf-8_*_
#@author :yinzhengjie
#blog:http://www.cnblogs.com/yinzhengjie/tag/python%E8%87%AA%E5%8A%A8%E5%8C%96%E8%BF%90%E7%BB%B4%E4%B9%8B%E8%B7%AF/
#EMAIL:y1053419035@qq.com


'''
center(width[, fillchar]) -> str
    width 打印宽度
    fillchar 填充的字符

'''

s1 = "*"*10

print(s1)
print(s1.center(50))
print(s1.center(50,'#'))


#以上代码执行结果如下:
**********
                    **********
####################**********###################
#!/usr/bin/env python
#_*_coding:utf-8_*_
#@author :yinzhengjie
#blog:http://www.cnblogs.com/yinzhengjie/tag/python%E8%87%AA%E5%8A%A8%E5%8C%96%E8%BF%90%E7%BB%B4%E4%B9%8B%E8%B7%AF/
#EMAIL:y1053419035@qq.com


'''
zfill(width) -> str
    width 打印宽度,居右,左边用0填充
'''

s1 = "*"*10

print(s1)
print(s1.zfill(50))


#以上代码执行结果如下:
**********
0000000000000000000000000000000000000000**********
#!/usr/bin/env python
#_*_coding:utf-8_*_
#@author :yinzhengjie
#blog:http://www.cnblogs.com/yinzhengjie/tag/python%E8%87%AA%E5%8A%A8%E5%8C%96%E8%BF%90%E7%BB%B4%E4%B9%8B%E8%B7%AF/
#EMAIL:y1053419035@qq.com


'''
ljust(width[, fillchar]) -> str 左对齐
'''

s1 = "*"*10

print(s1)
print(s1.ljust(50,"#"))


#以上代码执行结果如下:
**********
**********########################################
#!/usr/bin/env python
#_*_coding:utf-8_*_
#@author :yinzhengjie
#blog:http://www.cnblogs.com/yinzhengjie/tag/python%E8%87%AA%E5%8A%A8%E5%8C%96%E8%BF%90%E7%BB%B4%E4%B9%8B%E8%B7%AF/
#EMAIL:y1053419035@qq.com


'''
    rjust(width[, fillchar]) -> str 右对齐
'''

s1 = "*"*10

print(s1)
print(s1.rjust(50,"#"))


#以上代码执行结果如下:
**********
########################################**********
8>.字符串修改(注意,字符串本身是不可变的,要明白这里的修改其本质是字符串中找到匹配替换为新子串,返回新字符串)
#!/usr/bin/env python
#_*_coding:utf-8_*_
#@author :yinzhengjie
#blog:http://www.cnblogs.com/yinzhengjie/tag/python%E8%87%AA%E5%8A%A8%E5%8C%96%E8%BF%90%E7%BB%B4%E4%B9%8B%E8%B7%AF/
#EMAIL:y1053419035@qq.com


"""
replace(old, new[, count]) -> str
    字符串中找到匹配替换为新子串,返回新字符串
    count表示替换几次,不指定就是全部替换
"""

s1 = "www.yinzhengjie.org.cn"

print(s1)
print(s1.replace('w','p'))
print(s1.replace('w','p',2))
print(s1.replace('w','p',3))
print(s1.replace('ww','p'))
print(s1.replace('ww','p',2))
print(s1.replace('www','python',2))


#以上代码执行结果如下:
www.yinzhengjie.org.cn
ppp.yinzhengjie.org.cn
ppw.yinzhengjie.org.cn
ppp.yinzhengjie.org.cn
pw.yinzhengjie.org.cn
pw.yinzhengjie.org.cn
python.yinzhengjie.org.cn
#!/usr/bin/env python
#_*_coding:utf-8_*_
#@author :yinzhengjie
#blog:http://www.cnblogs.com/yinzhengjie/tag/python%E8%87%AA%E5%8A%A8%E5%8C%96%E8%BF%90%E7%BB%B4%E4%B9%8B%E8%B7%AF/
#EMAIL:y1053419035@qq.com


"""
strip([chars]) -> str
    从字符串两端去除指定的字符集chars中的所有字符
    如果chars没有指定,去除两端的空白字符
"""

s1 = "\r \n \t Hello Python \n \t"
s2 = " I am very very very sorry "

print(s1)
print(s1.strip())
print(s2)
print(s2.strip("r"))
print(s2.strip("r "))
print(s2.strip("r y"))
print(s2.strip("r yIamso"))
#!/usr/bin/env python
#_*_coding:utf-8_*_
#@author :yinzhengjie
#blog:http://www.cnblogs.com/yinzhengjie/tag/python%E8%87%AA%E5%8A%A8%E5%8C%96%E8%BF%90%E7%BB%B4%E4%B9%8B%E8%B7%AF/
#EMAIL:y1053419035@qq.com


"""
rstrip([chars]) -> str
    从字符串右边开始去除指定的字符集chars中的所有字符

"""

s1 = " I am very very very sorry "

print(s1)
print(s1.rstrip("r yIamso"))


#以上代码执行结果如下:
 I am very very very sorry
 I am very very ve
#!/usr/bin/env python
#_*_coding:utf-8_*_
#@author :yinzhengjie
#blog:http://www.cnblogs.com/yinzhengjie/tag/python%E8%87%AA%E5%8A%A8%E5%8C%96%E8%BF%90%E7%BB%B4%E4%B9%8B%E8%B7%AF/
#EMAIL:y1053419035@qq.com


"""
lstrip([chars]) -> str
    从字符串左边开始去除指定的字符集chars中的所有字符

"""

s1 = " I am very very very sorry "

print(s1)
print(s1.lstrip("r yIamso"))
print(s1.rstrip("r yIamso"))


#以上代码执行结果如下:
 I am very very very sorry
very very very sorry
 I am very very ve
9>.字符串查找
时间复杂度:
  find,index,count方法都是O(n)。
  随着列表的数据规模的增大,而效率下降。

len(string):
  返回字符串的长度,即字符的个数。
#!/usr/bin/env python
#_*_coding:utf-8_*_
#@author :yinzhengjie
#blog:http://www.cnblogs.com/yinzhengjie/tag/python%E8%87%AA%E5%8A%A8%E5%8C%96%E8%BF%90%E7%BB%B4%E4%B9%8B%E8%B7%AF/
#EMAIL:y1053419035@qq.com


"""
find(sub[, start[, end]]) -> int
    在指定的区间[start, end),从左至右,查找子串sub。找到返回索引,没找到返回-1
"""

s1 = "I am very very very sorry"


print(s1)
print(s1.find("very"))
print(s1.find("very",5))
print(s1.find("very",6,13))


#以上代码执行结果如下:
I am very very very sorry
5
5
-1
#!/usr/bin/env python
#_*_coding:utf-8_*_
#@author :yinzhengjie
#blog:http://www.cnblogs.com/yinzhengjie/tag/python%E8%87%AA%E5%8A%A8%E5%8C%96%E8%BF%90%E7%BB%B4%E4%B9%8B%E8%B7%AF/
#EMAIL:y1053419035@qq.com


"""
rfind(sub[, start[, end]]) -> int
    在指定的区间[start, end),从右至左,查找子串sub。找到返回索引,没找到返回-1
"""

s1 = "I am very very very sorry"


print(s1)
print(s1.rfind("very"))
print(s1.rfind("very",10,15))
print(s1.rfind("very",-10,-1))


#以上代码执行结果如下:
I am very very very sorry
15
10
15
#!/usr/bin/env python
#_*_coding:utf-8_*_
#@author :yinzhengjie
#blog:http://www.cnblogs.com/yinzhengjie/tag/python%E8%87%AA%E5%8A%A8%E5%8C%96%E8%BF%90%E7%BB%B4%E4%B9%8B%E8%B7%AF/
#EMAIL:y1053419035@qq.com


"""
index(sub[, start[, end]]) -> int
    在指定的区间[start, end),从左至右,查找子串sub。找到返回索引,没找到抛出异常ValueError
"""

s1 = "I am very very very sorry"


print(s1)
print(s1.index("very"))
print(s1.index("very",5))
print(s1.index('very',6,20))


#以上代码执行结果如下:
I am very very very sorry
5
5
10
#!/usr/bin/env python
#_*_coding:utf-8_*_
#@author :yinzhengjie
#blog:http://www.cnblogs.com/yinzhengjie/tag/python%E8%87%AA%E5%8A%A8%E5%8C%96%E8%BF%90%E7%BB%B4%E4%B9%8B%E8%B7%AF/
#EMAIL:y1053419035@qq.com


"""
rindex(sub[, start[, end]]) -> int
    在指定的区间[start, end),从左至右,查找子串sub。找到返回索引,没找到抛出异常ValueError
"""

s1 = "I am very very very sorry"


print(s1)
print(s1.rindex('very',10))
print(s1.rindex('very',10,15))
print(s1.rindex('very',-10,-1))


#以上代码执行结果如下:
I am very very very sorry
15
10
15
#!/usr/bin/env python
#_*_coding:utf-8_*_
#@author :yinzhengjie
#blog:http://www.cnblogs.com/yinzhengjie/tag/python%E8%87%AA%E5%8A%A8%E5%8C%96%E8%BF%90%E7%BB%B4%E4%B9%8B%E8%B7%AF/
#EMAIL:y1053419035@qq.com


"""
len(string)
    返回字符串的长度,即字符的个数
"""

s1 = "I am very very very sorry"


print(s1)
print(len(s1))


#以上代码执行结果如下:
I am very very very sorry
25
#!/usr/bin/env python
#_*_coding:utf-8_*_
#@author :yinzhengjie
#blog:http://www.cnblogs.com/yinzhengjie/tag/python%E8%87%AA%E5%8A%A8%E5%8C%96%E8%BF%90%E7%BB%B4%E4%B9%8B%E8%B7%AF/
#EMAIL:y1053419035@qq.com


"""
时间复杂度
    index和count方法都是O(n)
    随着列表数据规模的增大,而效率下降

count(sub[, start[, end]]) -> int
    在指定的区间[start, end),从左至右,统计子串sub出现的次数
"""

s1 = "I am very very very sorry"


print(s1)
print(s1.count('very',5))
print(s1.count('very',10,14))


#以上代码执行结果如下:
I am very very very sorry
3
1
10>.字符串判断
#!/usr/bin/env python
#_*_coding:utf-8_*_
#@author :yinzhengjie
#blog:http://www.cnblogs.com/yinzhengjie/tag/python%E8%87%AA%E5%8A%A8%E5%8C%96%E8%BF%90%E7%BB%B4%E4%B9%8B%E8%B7%AF/
#EMAIL:y1053419035@qq.com


"""
startswith(prefix[, start[, end]]) -> bool
    在指定的区间[start, end),字符串是否是prefix开头
"""

s1 = "I am very very very sorry"


print(s1)
print(s1.startswith('very'))
print(s1.startswith('very',5))
print(s1.startswith('very',5,9))


#以上代码执行结果如下:
I am very very very sorry
False
True
True
#!/usr/bin/env python
#_*_coding:utf-8_*_
#@author :yinzhengjie
#blog:http://www.cnblogs.com/yinzhengjie/tag/python%E8%87%AA%E5%8A%A8%E5%8C%96%E8%BF%90%E7%BB%B4%E4%B9%8B%E8%B7%AF/
#EMAIL:y1053419035@qq.com


"""
endswith(suffix[, start[, end]]) -> bool
    在指定的区间[start, end),字符串是否是suffix结尾
"""

s1 = "I am very very very sorry"


print(s1)
print(s1.endswith('very',5,9))
print(s1.endswith('sorry',5))
print(s1.endswith('sorry',5,-1))
print(s1.endswith('sorry',5,100))


#以上代码执行结果如下:
I am very very very sorry
True
True
False
True
#!/usr/bin/env python
#_*_coding:utf-8_*_
#@author :yinzhengjie
#blog:http://www.cnblogs.com/yinzhengjie/tag/python%E8%87%AA%E5%8A%A8%E5%8C%96%E8%BF%90%E7%BB%B4%E4%B9%8B%E8%B7%AF/
#EMAIL:y1053419035@qq.com


"""
isalnum() -> bool 是否是字母和数字组成
"""

s1 = "I am very very very sorry"
s2 = 'ABC123'

print(s1)
print(s1.isalnum())
print(s2)
print(s2.isalnum())


#以上代码执行结果如下:
I am very very very sorry
False
ABC123
True
#!/usr/bin/env python
#_*_coding:utf-8_*_
#@author :yinzhengjie
#blog:http://www.cnblogs.com/yinzhengjie/tag/python%E8%87%AA%E5%8A%A8%E5%8C%96%E8%BF%90%E7%BB%B4%E4%B9%8B%E8%B7%AF/
#EMAIL:y1053419035@qq.com


"""
isalpha() 是否是字母
"""

s1 = "I am very very very sorry"
s2 = 'ABCDE'

print(s1)
print(s1.isalpha())
print(s2)
print(s2.isalpha())


#以上代码执行结果如下:
I am very very very sorry
False
ABCDE
True
#!/usr/bin/env python
#_*_coding:utf-8_*_
#@author :yinzhengjie
#blog:http://www.cnblogs.com/yinzhengjie/tag/python%E8%87%AA%E5%8A%A8%E5%8C%96%E8%BF%90%E7%BB%B4%E4%B9%8B%E8%B7%AF/
#EMAIL:y1053419035@qq.com


"""
isdecimal() 是否只包含十进制数字
"""

s1 = '10EF'
s2 = '123456'
print(s1.isdecimal())
print(s2.isdecimal())


#以上代码执行结果如下:
False
True
#!/usr/bin/env python
#_*_coding:utf-8_*_
#@author :yinzhengjie
#blog:http://www.cnblogs.com/yinzhengjie/tag/python%E8%87%AA%E5%8A%A8%E5%8C%96%E8%BF%90%E7%BB%B4%E4%B9%8B%E8%B7%AF/
#EMAIL:y1053419035@qq.com


"""
isdigit() 是否全部数字(0~9)
"""

s1 = '10EF'
s2 = '123456'
print(s1.isdigit())
print(s2.isdigit())


#以上代码执行结果如下:
False
True
#!/usr/bin/env python
#_*_coding:utf-8_*_
#@author :yinzhengjie
#blog:http://www.cnblogs.com/yinzhengjie/tag/python%E8%87%AA%E5%8A%A8%E5%8C%96%E8%BF%90%E7%BB%B4%E4%B9%8B%E8%B7%AF/
#EMAIL:y1053419035@qq.com


"""
    isidentifier() 是不是字母和下划线开头,其他都是字母、数字、下划线
"""

s1 = '10EF'
s2 = '_123456'
s3 = '_len'
s4 = 'Abc_123'
s5 = 'Abc#123'


print(s1.isidentifier())
print(s2.isidentifier())
print(s3.isidentifier())
print(s4.isidentifier())
print(s5.isidentifier())


#以上代码执行结果如下:
False
True
True
True
False
#!/usr/bin/env python
#_*_coding:utf-8_*_
#@author :yinzhengjie
#blog:http://www.cnblogs.com/yinzhengjie/tag/python%E8%87%AA%E5%8A%A8%E5%8C%96%E8%BF%90%E7%BB%B4%E4%B9%8B%E8%B7%AF/
#EMAIL:y1053419035@qq.com


"""
islower() 是否都是小写
"""

s1 = 'Abc'
s2 = 'abc'
print(s1.islower())
print(s2.islower())


#以上代码执行结果如下:
False
True
#!/usr/bin/env python
#_*_coding:utf-8_*_
#@author :yinzhengjie
#blog:http://www.cnblogs.com/yinzhengjie/tag/python%E8%87%AA%E5%8A%A8%E5%8C%96%E8%BF%90%E7%BB%B4%E4%B9%8B%E8%B7%AF/
#EMAIL:y1053419035@qq.com


"""
isupper() 是否全部大写
"""

s1 = 'Abc'
s2 = 'ABC'

print(s1.isupper())
print(s2.isupper())


#以上代码执行结果如下:
False
True
isspace() 是否只包含空白字符11>.字符串格式化
#!/usr/bin/env python
#_*_coding:utf-8_*_
#@author :yinzhengjie
#blog:http://www.cnblogs.com/yinzhengjie/tag/python%E8%87%AA%E5%8A%A8%E5%8C%96%E8%BF%90%E7%BB%B4%E4%B9%8B%E8%B7%AF/
#EMAIL:y1053419035@qq.com


"""
字符串的格式化是一种拼接字符串输出样式的手段,更灵活方便
    join拼接只能使用分隔符,且要求被拼接的是可迭代对象
    + 拼接字符串还算方便,但是非字符串需要先转换为字符串才能拼接

在2.5版本之前,只能使用printf style风格的print输出
    printf-style formatting,来自于C语言的printf函数
    格式要求
        占位符:使用%和格式字符组成,例如%s、%d等
            s调用str(),r会调用repr()。所有对象都可以被这两个转换。
        占位符中还可以插入修饰字符,例如%03d表示打印3个位置,不够前面补零
        format % values,格式字符串和被格式的值之间使用%分隔
        values只能是一个对象,或是一个和格式字符串占位符数目相等的元组,或一个字典
"""

print("I am %05d" % (18,))
print('I like %s.' % 'Python')
print('%3.2f%% , 0x%x, 0X%02X' % (89.7654, 10, 15))
print("I am %-5d" % (20,))


#以上代码执行结果如下:
I am 00018
I like Python.
89.77% , 0xa, 0X0F
I am 20
 1 #!/usr/bin/env python
 2 #_*_conding:utf-8_*_
 3 #@author :yinzhengjie
 4 #blog:http://www.cnblogs.com/yinzhengjie
 5
 6
 7 """
 8 format函数格式字符串语法——Python鼓励使用
 9     "{} {xxx}".format(*args, **kwargs) -> str
10     args是位置参数,是一个元组
11     kwargs是关键字参数,是一个字典
12     花括号表示占位符
13     {}表示按照顺序匹配位置参数,{n}表示取位置参数索引为n的值
14     {xxx}表示在关键字参数中搜索名称一致的
15     {{}} 表示打印花括号
16 """
17
18 #位置参数,,这就是按照位置顺序用位置参数替换前面的格式字符串的占位符中
19 print("{}:{}".format('192.168.1.100',8888))
20
21 #关键字参数或命名参数,,位置参数按照序号匹配,关键字参数按照名词匹配
22 print("{server} {1}:{0}".format(8888, '192.168.1.100', server='Web Server Info : '))
23
24 #访问元素
25 "{0[0]}.{0[1]}".format(('magedu','com'))
26
27 #对象属性访问
28 from collections import namedtuple
29 Point = namedtuple('Point','x y')
30 p = Point(4,5)
31 print("{{{0.x},{0.y}}}".format(p))
32
33 #对齐
34 print('{0}*{1}={2:<2}'.format(3,2,2*3))
35 print('{0}*{1}={2:<02}'.format(3,2,2*3))
36 print('{0}*{1}={2:>02}'.format(3,2,2*3))
37 print('{:^30}'.format('centered'))
38 print('{:*^30}'.format('centered'))
39
40 #进制
41 print("int: {0:d}; hex: {0:x}; oct: {0:o}; bin: {0:b}".format(42))
42 print("int: {0:d}; hex: {0:#x}; oct: {0:#o}; bin: {0:#b}".format(42))
43 octets = [192, 168, 0, 1]
44 print('{:02X}{:02X}{:02X}{:02X}'.format(*octets))
45
46
47 #浮点数
48 print("{}".format(3**0.5))
49 print("{:f}".format(3**0.5))            #精确度默认6
50 print("{:10f}".format(3**0.5))          #右对齐,宽度10
51 print("{:2}".format(102.123))           #宽度为2的数字
52 print("{:.2}".format(3**0.5))           #2个有效数字
53 print("{:.2f}".format(3**0.5))          #保留小数点后2位
54 print("{:3.2f}".format(3**0.5))         #宽度为3,保留小数点后2位
55 print("{:20.3f}".format(0.2745))        #宽度为20,保留小数点后3位,四舍五入
56 print("{:3.3%}".format(1/3))            #宽度位3,保留3位小数,注意宽度可以被撑破,我们发现宽度为3并没有生效,因为光小数点后面保留3为就已经打破了宽度为3的限定,说明宽度限定只是一个软限定,而且数字使用%来显示的哟~
57
58
59
60
61 #以上代码输出结果如下:
62 192.168.1.100:8888
63 Web Server Info :  192.168.1.100:8888
64 {4,5}
65 3*2=6
66 3*2=60
67 3*2=06
68            centered
69 ***********centered***********
70 int: 42; hex: 2a; oct: 52; bin: 101010
71 int: 42; hex: 0x2a; oct: 0o52; bin: 0b101010
72 C0A80001
73 1.7320508075688772
74 1.732051
75   1.732051
76 102.123
77 1.7
78 1.73
79 1.73
80                0.275
81 33.333%
12>.字符串练习
    用户输入一个数字:
        判断是几位数
        打印每一位数字及其重复的次数。打印顺序个,十,百,千,万...位打印

    输入5个数字,打印每个数字的位数,将三个数字排序打印,要求升序打印。
#!/usr/bin/env python
#_*_coding:utf-8_*_
#@author :yinzhengjie
#blog:http://www.cnblogs.com/yinzhengjie/tag/python%E8%87%AA%E5%8A%A8%E5%8C%96%E8%BF%90%E7%BB%B4%E4%B9%8B%E8%B7%AF/
#EMAIL:y1053419035@qq.com


num = " "

while True:
    num = input("请输入一个整数:>>>").strip().lstrip("0")
    if num.isdigit():
        break
    else:
        print("输入错误,请输入一个[0-9]的整数.")

count = [0] * 10


for i in range(10):
    count[i] = num.count(str(i))

for j in range(10):
    if count[j] :
        print("数字 {} 出现了 {} 次".format(j,count[j]))

list_1 = list(num)
list_1.reverse()

print(list_1)
六.bytes和bytearray
1>.bytes概述
Python3引入两个新类型
    bytes
        不可变字节序列
    bytearray
        字节数组
        可变

字符串与bytes
  字符串是字符组成的有序序列,字符可以使用编码来理解
  bytes是字节组成的有序的不可变序列
  bytearray是字节组成的有序的可变序列

编码与解码
  字符串按照不同的字符集编码encode返回字节序列bytes
    encode(encoding='utf-8', errors='strict') -> bytes
  字节序列按照不同的字符集解码decode返回字符串
    bytes.decode(encoding="utf-8", errors="strict") -> str
    bytearray.decode(encoding="utf-8", errors="strict") -> str


ASCII(American StandardCode for InformationInterchange,美国信息交换标准代码)是基于拉丁字母的一套单字节编码系统.

熟记以下结果ASCII对应的字符:
  \t,
  \r,
  \n,
  0-9,
  A-Z,
  a-z,
2>.bytes定义
#!/usr/bin/env python
#_*_coding:utf-8_*_
#@author :yinzhengjie
#blog:http://www.cnblogs.com/yinzhengjie/tag/python%E8%87%AA%E5%8A%A8%E5%8C%96%E8%BF%90%E7%BB%B4%E4%B9%8B%E8%B7%AF/
#EMAIL:y1053419035@qq.com


'''
    定义
        bytes() 空bytes
        bytes(int) 指定字节的bytes,被0填充
        bytes(iterable_of_ints) -> bytes [0,255]的int组成的可迭代对象
        bytes(string, encoding[, errors]) -> bytes 等价于string.encode()
        bytes(bytes_or_buffer) -> immutable copy of bytes_or_buffer 从一个字节序列或者buffer复制出一个新的不可变的bytes对象
        使用b前缀定义:
          案例一:只允许基本ASCII使用字符形式b'abc9'
          案例二:使用16进制表示b"\x41\x61"
'''


#空bytes
b1 = bytes()

#指定字节的bytes,被0填充
b2 = bytes(3)

#bytes [0,255]的int组成的可迭代对象
b3 = bytes([1,3,5,7,9])

#bytes 等价于string.encode()
b4 = bytes("ABC","utf8")
b5 = "ABC".encode()
b6 = b4.decode()
b7 = b5.decode()

#从一个字节序列或者buffer复制出一个新的不可变的bytes对象
a = b'abc'
b = bytes(a)
print(b1)
print(b2)
print(b3)
print(b4)
print(b5)
print(b6)
print(b7)
print(a)
print(b)
print(id(a) == id(b))
print(id(a) is id(b))


#以上代码执行结果如下:
b''
b'\x00\x00\x00'
b'\x01\x03\x05\x07\t'
b'ABC'
b'ABC'
ABC
ABC
b'abc'
b'abc'
True
False
3>.bytes操作
#!/usr/bin/env python
#_*_coding:utf-8_*_
#@author :yinzhengjie
#blog:http://www.cnblogs.com/yinzhengjie/tag/python%E8%87%AA%E5%8A%A8%E5%8C%96%E8%BF%90%E7%BB%B4%E4%B9%8B%E8%B7%AF/
#EMAIL:y1053419035@qq.com


"""
    和str类型类似,都是不可变类型,所以方法很多都一样。只不过bytes的方法,输入是bytes,输出是bytes
"""

print(b'abcdef'.replace(b'f',b'k'))

print(b'abc'.find(b'b'))


#以上代码执行结果如下:
b'abcdek'
1
类方法bytes.fromhex(string),类似于Java的static方法
#!/usr/bin/env python
#_*_coding:utf-8_*_
#@author :yinzhengjie
#blog:http://www.cnblogs.com/yinzhengjie/tag/python%E8%87%AA%E5%8A%A8%E5%8C%96%E8%BF%90%E7%BB%B4%E4%B9%8B%E8%B7%AF/
#EMAIL:y1053419035@qq.com


"""
hex()
    返回16进制表示的字符串
"""

print('abc'.encode().hex())


#以上代码执行结果如下:
616263
#!/usr/bin/env python
#_*_coding:utf-8_*_
#@author :yinzhengjie
#blog:http://www.cnblogs.com/yinzhengjie/tag/python%E8%87%AA%E5%8A%A8%E5%8C%96%E8%BF%90%E7%BB%B4%E4%B9%8B%E8%B7%AF/
#EMAIL:y1053419035@qq.com


"""
索引
    b'abcdef'[2] 返回该字节对应的数,int类型
"""

print(b'abcdef'[2] )


#以上代码执行结果如下:
99
4>.bytearray定义
bytearray() 空bytearray

bytearray(int) 指定字节的bytearray,被0填充

bytearray(iterable_of_ints) -> bytearray [0,255]的int组成的可迭代对象

bytearray(string, encoding[, errors]) -> bytearray 近似string.encode(),不过返回可变对象

bytearray(bytes_or_buffer) 从一个字节序列或者buffer复制出一个新的可变的bytearray对象

注意,b前缀定义的类型是bytes类型
5>.bytearray操作
和bytes类型的方法相同#!/usr/bin/env python #_*_coding:utf-8_*_ #@author :yinzhengjie #blog:http://www.cnblogs.com/yinzhengjie/tag/python%E8%87%AA%E5%8A%A8%E5%8C%96%E8%BF%90%E7%BB%B4%E4%B9%8B%E8%B7%AF/ #EMAIL:y1053419035@qq.com b = bytearray() print(b) #append(int) 尾部追加一个元素 b.append(97) b.append(99) print(b) #insert(index, int) 在指定索引位置插入元素 b.insert(1,98) print(b) #extend(iterable_of_ints) 将一个可迭代的整数集合追加到当前bytearray b.extend([65,66,67]) print(b) #pop(index=-1) 从指定索引上移除元素,默认从尾部移除 b.remove(66) print(b) #remove(value) 找到第一个value移除,找不到抛ValueError异常 b.pop() print(b) #reverse() 翻转bytearray,就地修改 b.reverse() print(b) #clear() 清空bytearray b.clear() print(b) #以上代码执行结果如下: bytearray(b'') bytearray(b'ac') bytearray(b'abc') bytearray(b'abcABC') bytearray(b'abcAC') bytearray(b'abcA') bytearray(b'Acba') bytearray(b'')
6>.字节序
小白一开始听到字节序这个名词,估计会有点蒙蔽,其实顾名思义就是字节的顺序嘛。计算机硬件有两种储存数据的方式:大端字节序(big endian)和小端字节序(little endian)。

ok,我们先不解释大端模式和小端模式,我先问你一个问题,"我喜欢你"这4个字大家都知道啥意思吧?在古代的时候他们会这样写:"你欢喜我"。这就是我们写字的顺序。其实在现代也有很多复古的酒店,参观还保持这种风格。说白了就是读取的顺序不同。

举例来说,数值0x2211使用两个字节储存:高位字节是0x22,低位字节是0x11。
  大端字节序:高位字节在前,低位字节在后,这是人类读写数值的方法。
  小端字节序:低位字节在前,高位字节在后,即以0x1122形式储存。

关于字节序模式的使用,在各个平台可能不太一样,如下所示:
  Intel x86 CPU使用小端模式
  网络传输更多使用大端模式
  Windows,Linux使用小端模式
  Mac OS使用大端模式
  Java虚拟机是大端模式
7>.int和bytes
#!/usr/bin/env python
#_*_conding:utf-8_*_
#@author :yinzhengjie
#blog:http://www.cnblogs.com/yinzhengjie


#将一个字节数组表示成整数
i = int.from_bytes(b"abc","big")
print(i,hex(i))

#将一个整数表达成一个指定长度的字节数组
print(i.to_bytes(3,"big"))

b = bytearray()
b.append(97)
b.extend(range(98,100))
print(b)


#以上代码执行结果如下:
6382179 0x616263
b'abc'
bytearray(b'abc')
七.切片
1>.线性结构
线性结构
  可迭代for ... in
  len()可以获取长度
  通过下标可以访问
  可以切片

学过的线性结构
  列表、元组、字符串、bytes、bytearray
2>.切片概要
切片
  通过索引区间访问线性结构的一段数据
  sequence[start:stop] 表示返回[start, stop)区间的子序列
  支持负索引
  start为0,可以省略
  stop为末尾,可以省略
  超过上界(右边界),就取到末尾;超过下界(左边界),取到开头
  start一定要在stop的左边
  [:] 表示从头至尾,全部元素被取出,等效于copy()方法
3>.切片举例
#!/usr/bin/env python
#_*_coding:utf-8_*_
#@author :yinzhengjie
#blog:http://www.cnblogs.com/yinzhengjie/tag/python%E8%87%AA%E5%8A%A8%E5%8C%96%E8%BF%90%E7%BB%B4%E4%B9%8B%E8%B7%AF/
#EMAIL:y1053419035@qq.com


s = "www.yinzhengjie.org.cn"

print(s[4:10])
print(s[:10])
print(s[4:])
print(s[:])
print(s[:-1])
print(s[4:-4])
print(s[4:-50])
print(s[-40:10])

print(bytearray(b'www.yinzhengjie.org.cn')[-4:10])

print(tuple("www.yinzhengjie.org.cn")[-10:10])

print(list("www.yinzhengjie.org.cn")[-10:-4])


#以上代码执行结果如下:
yinzhe
www.yinzhe
yinzhengjie.org.cn
www.yinzhengjie.org.cn
www.yinzhengjie.org.c
yinzhengjie.or

www.yinzhe
bytearray(b'')
()
['j', 'i', 'e', '.', 'o', 'r']
#!/usr/bin/env python
#_*_coding:utf-8_*_
#@author :yinzhengjie
#blog:http://www.cnblogs.com/yinzhengjie/tag/python%E8%87%AA%E5%8A%A8%E5%8C%96%E8%BF%90%E7%BB%B4%E4%B9%8B%E8%B7%AF/
#EMAIL:y1053419035@qq.com

'''
步长切片
    [start:stop:step]
    step为步长,可以正、负整数,默认是1
    step要和start:stop同向,否则返回空序列
'''

print("www.yinzhengjie.org.cn"[4:10:2])

print(list("www.yinzhengjie.org.cn"[4:10:-2]))

print(tuple("www.yinzhengjie.org.cn")[-10:-4:2])

print(b"www.yinzhengjie.org.cn"[-4:-10:2])

print(bytearray(b"www.yinzhengjie.org.cn")[-4:-10:-2])


#以上代码执行结果如下:
ynh
[]
('j', 'e', 'o')
b''
bytearray(b'goe')
