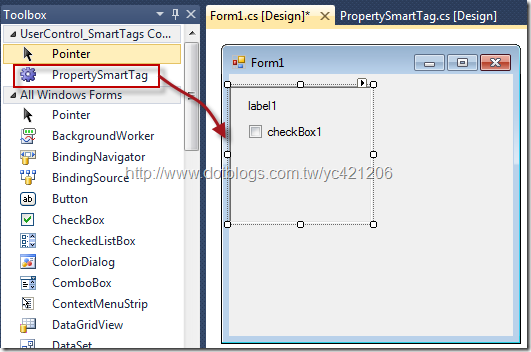
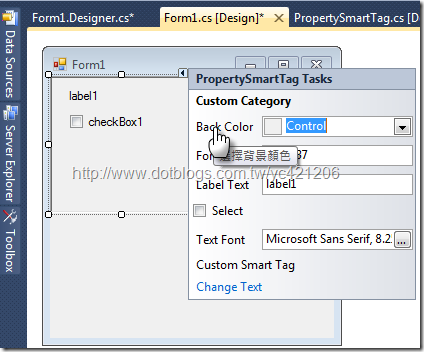
這次我希望能達成下面效果,控制項會有一個小箭頭出現,可以由此設定控制項屬性
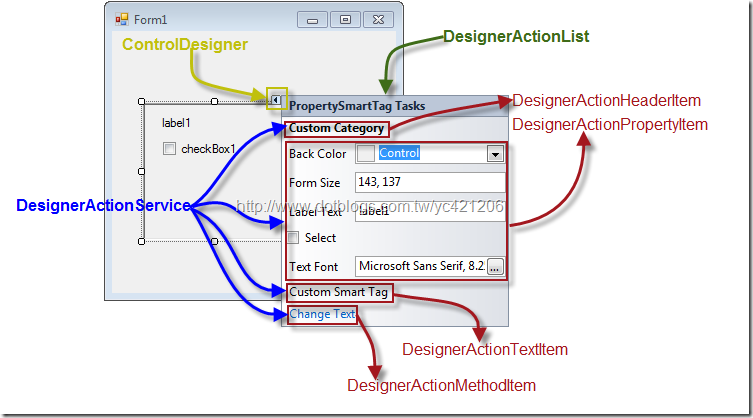
1.在System.Windows.Forms.Design 命名空間的 ControlDesigner 類別:用來建立智能面版的類別
2.在System.ComponentModel.Design 命名空間 裡開頭為 DesignerAction,是用來決定智能面版清單樣式。
以下是實現DesignerActionXXX重要類別。
DesignerActionList:建立一個智能面板清單。
DesignerActionService:建立一個服務,管理收集DesignerActionItem的類別。
DesignerActionItemCollection:收集DesignerActionXXX系列的集合
DesignerActionUIService :管理智能面板UI。
DesignerActionItem:它是一個基底類別,表示一個智能面板的項目。
DesignerActionTextItem:表示智慧面板上的文字敘述,繼承 DesignerActionItem。
DesignerActionPropertyItem:表示智能面板的屬性,繼承 DesignerActionItem。
DesignerActionMethodItem:表示智能面板上建立一個方法,點擊這個項目會去執行相應的方法,繼承 DesignerActionItem。
DesignerActionHeaderItem:表示智能面板分類標題,繼承 DesignerActionItem。
上圖我所要表達的是:
ControlDesigner裡面裝了一個DesignerActionList,DesignerActionItemCollection 收集著UI所要呈現的項目。
3.在 System.ComponentModel命名空間 底下的 PropertyDescriptor 方法:用它來處理智能面版的UI畫面更新
4.DesignerActionUIService.Refresh():更新智能面版方法
瞭解各類別的方法後接下來就可以開始實作;開始之前先加入System.Designer參考,並匯入命名空間
1.建立使用者控制項專案,PropertySmartTag類別繼承UserControl,並為類別加入控制項及屬性
1-1.加入控制項label1及checkBox1
1-2.加入以下屬性
//自訂控制項
public partial class PropertySmartTag : UserControl
{
    public PropertySmartTag()
    {
        InitializeComponent();
    }

    private Size _FormSize;
    /// <summary>
    /// 改變Form尺寸
    /// </summary>
    public Size FormSize
    {
        get
        {
            return _FormSize;
        }
        set
        {
            _FormSize = value;
            base.Size = _FormSize;
        }
    }
    /// <summary>
    /// 覆寫顏色
    /// </summary>
    public override Color BackColor
    {
        get { return base.BackColor; }
        set { base.BackColor = value; }
    }
    /// <summary>
    /// 變更checkBox控制是否勾選
    /// </summary>
    private bool _IsSelect;
    public bool IsSelect
    {
        get { return _IsSelect; }
        set
        {
            _IsSelect = value;
            this.checkBox1.Checked = _IsSelect;
        }
    }
    /// <summary>
    /// Label控制項內容
    /// </summary>
    public string LabelText
    {
        get { return this.label1.Text; }
        set { this.label1.Text = value; }
    }

    /// <summary>
    /// 變更Label控制項字型
    /// </summary>
    private Font _TextFont;
    public Font TextFont
    {
        get
        {
            if (_TextFont == null)
            {
                _TextFont = new Font(this.Font, FontStyle.Bold);
            }
            return _TextFont;
        }
        set
        {
            _TextFont = value;
            this.label1.Font = _TextFont;
        }
    }
}
2.建立CreateControlDesigner 類別,繼承System.Windows.Forms.Design.ControlDesigner。
//建立控制項設計類別
internal class CreateControlDesigner : System.Windows.Forms.Design.ControlDesigner
{
    private DesignerActionListCollection _ActionLists;
    public override DesignerActionListCollection ActionLists
    {
        get
        {
            if (null == _ActionLists)
            {
                //加入智能面版樣式
                _ActionLists = new DesignerActionListCollection();
                _ActionLists.Add(new CustomControlActionList(this.Component));
            }
            return _ActionLists;
        }
    }
}
3.建立CustomControlActionList類別,繼承System.ComponentModel.Design.DesignerActionList。
//定義智能面版樣式類別
[System.Security.Permissions.PermissionSet(System.Security.Permissions.SecurityAction.Demand, Name = "FullTrust")]
internal class CustomControlActionList : System.ComponentModel.Design.DesignerActionList
{
    //建立面版UI服務
    private PropertySmartTag _PropertySmartTag;
    private DesignerActionUIService _DesignerActionUIService = null;//我主要用來更新面版UI,若不更新可以省略。
    public CustomControlActionList(IComponent component)
        : base(component)//建構子
    {
        this._PropertySmartTag = component as PropertySmartTag;//表示綁定到"PropertySmartTag使用者控制項"類別
        this._DesignerActionUIService = GetService(typeof(DesignerActionUIService)) as DesignerActionUIService;
    }

    //更新自訂控制項的屬性
    private PropertyDescriptor GetPropertyByName(String PropertyName)
    {
        PropertyDescriptor prop;
        prop = TypeDescriptor.GetProperties(_PropertySmartTag)[PropertyName];
        if (null == prop)
            throw new ArgumentException("找不到此屬性名稱!", PropertyName);
        else
            return prop;
    }
    //定義智能面版的屬性,面版屬性會與綁定的"PropertySmartTag使用者控制項"屬性同步
    public Size FormSize
    {
        get { return _PropertySmartTag.Size; }
        set { GetPropertyByName("FormSize").SetValue(_PropertySmartTag, value); }
    }
    public Color BackColor
    {
        get { return _PropertySmartTag.BackColor; }
        set { GetPropertyByName("BackColor").SetValue(_PropertySmartTag, value); }
    }
    public string LabelText
    {
        get { return _PropertySmartTag.LabelText; }
        set { GetPropertyByName("LabelText").SetValue(_PropertySmartTag, value); }
    }
    public bool IsSelect
    {
        get { return _PropertySmartTag.IsSelect; }
        set { GetPropertyByName("IsSelect").SetValue(_PropertySmartTag, value); }
    }
    public Font TextFont
    {
        get { return _PropertySmartTag.TextFont; }
        set { GetPropertyByName("TextFont").SetValue(_PropertySmartTag, value); }
    }
    //方法
    public void ChangeText()
    {
        GetPropertyByName("LabelText").SetValue(_PropertySmartTag, "Call Method");
        _DesignerActionUIService.Refresh(this.Component);//更新智能面版
    }
    //設計智能面版項目
    public override DesignerActionItemCollection GetSortedActionItems()
    {
        DesignerActionItemCollection items = new DesignerActionItemCollection();

        //Define static section header entries.
        items.Add(new DesignerActionHeaderItem("Custom Category"));
        items.Add(new DesignerActionPropertyItem("BackColor", "Back Color", "Custom Category", "選擇背景顏色"));
        items.Add(new DesignerActionPropertyItem("FormSize", "Form Size", "Custom Category", "選擇尺寸"));
        items.Add(new DesignerActionPropertyItem("LabelText", "Label Text", "Custom Category", "隨便輸入"));
        items.Add(new DesignerActionPropertyItem("IsSelect", "Select", "Custom Category", "是否選擇"));
        items.Add(new DesignerActionPropertyItem("TextFont", "Text Font", "Custom Category", "選擇字型"));

        items.Add(new DesignerActionTextItem("Custom Smart Tag", "Custom Category"));
        items.Add(new DesignerActionMethodItem(this, "ChangeText", "Change Text", "Custom Category", "呼叫方法", true));
        return items;
    }
}
4.在PropertySmartTag類別定義Designer attribute
[Designer(typeof(CreateControlDesigner))]
//自訂控制項
public partial class PropertySmartTag : UserControl
{

}
5.加入WinForm專案,用來測試PropertySmartTag控制項
執行結果如下
接下來我們再來看VS幫我們產生出了哪些程式碼
這次我們並沒有幫屬性定義Attribute [DesignerSerializationVisibility(DesignerSerializationVisibility.Content)],可是VS還是幫我們把Code生出來了。
範例下載:
參考資料
http://www.codeproject.com/KB/dialog/usercontrolsmarttag.aspx


![201072212655130[1] 201072212655130[1]](https://images.cnblogs.com/cnblogs_com/yc421206/WindowsLiveWriter/C.NETVB.NETUserControlofSmartTag_1198B/201072212655130%5B1%5D_thumb.png)


【推荐】国内首个AI IDE,深度理解中文开发场景,立即下载体验Trae
【推荐】编程新体验,更懂你的AI,立即体验豆包MarsCode编程助手
【推荐】抖音旗下AI助手豆包,你的智能百科全书,全免费不限次数
【推荐】轻量又高性能的 SSH 工具 IShell:AI 加持,快人一步