【插件开发】—— 2 插件入门
最近由于特殊需要,开始学习插件开发。
以前接触java也算有些时日,但是一直不知道有插件开发这样一种技术路径,本想着这开发工具都给你备好了,直接用不就行了。但是总有些IT工厂,为了要节约成本,开发自己的开发工具,但是又要节省时间,总不能一切都自己来。毕竟开发一个eclipse也要很长时间的。因此,插件开发出现在历史舞台。
首先要了解插件开发,就得从SWT/JFACE说起了。SWT是一种开源的界面开发框架,以前学java的时候,总是用一些panel,就类似这个。JFace又是一种基于SWT的UI不见的API。Eclipse就是用这个开发出来的,它提供了Eclipse强大的扩展性,因此可以让用户任意的插入自己想要的插件,开发自己的IDE。
下面就直接弄一个简单的插件吧!
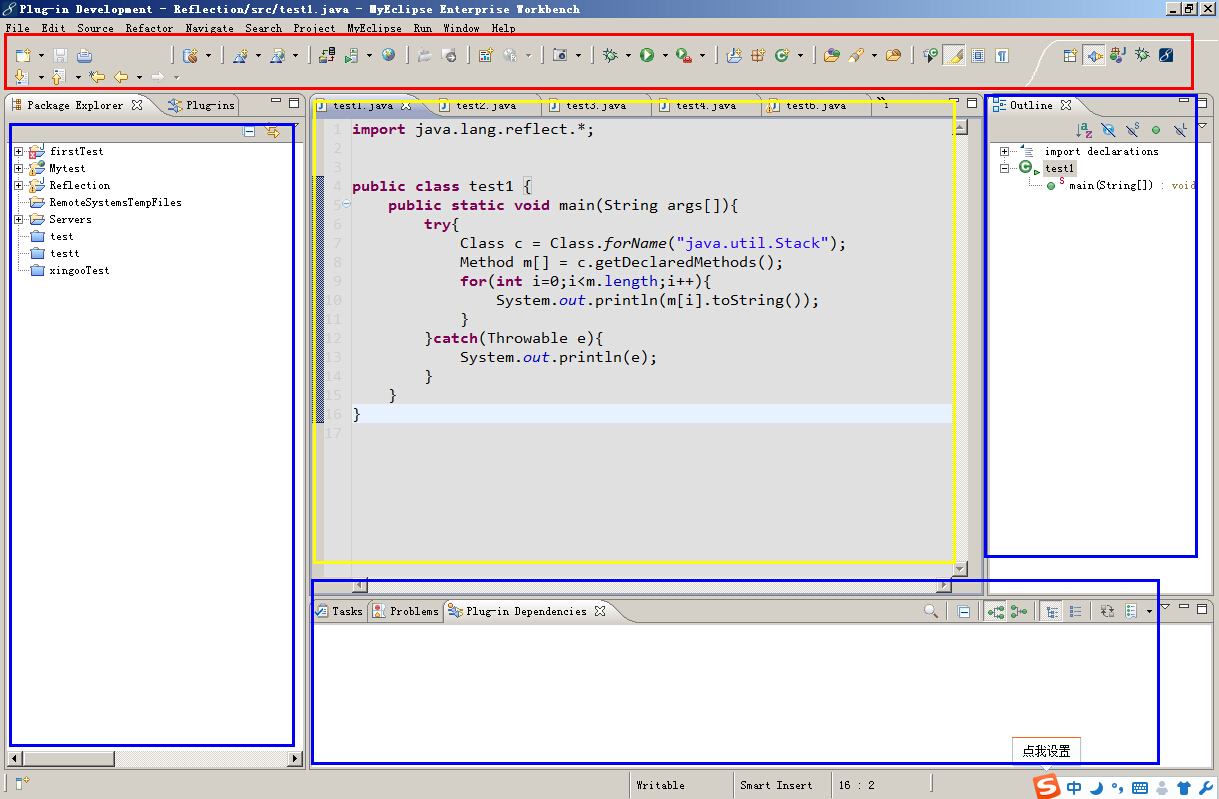
首先认识一下Eclipse,这个大家应该很熟了!
1 红色部分是我们的工具栏
2 蓝色部分是视图
3 黄色部分是编辑器
通常我们使用编辑器,进行代码操作,或者业务操作。在视图,进行一些资源的查看等。红色引入一些常用的功能,辅助我们的操作。
我们先做一个简单的工具栏的控件,了解一下eclipse的插件开发流程!
1 新建一个插件工程
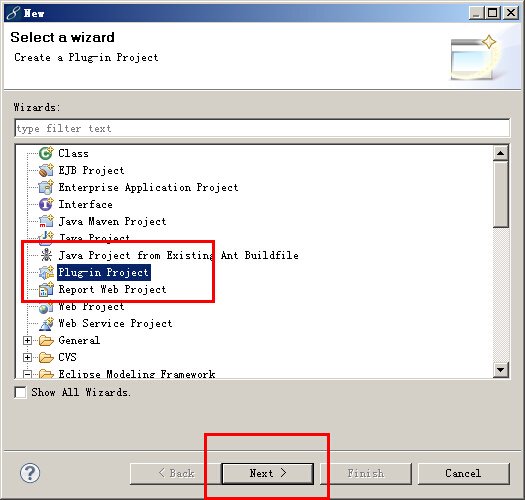
2 创建自己的插件名字,这个名字最好特殊一点,一遍融合到eclipse的时候,不会发生冲突。
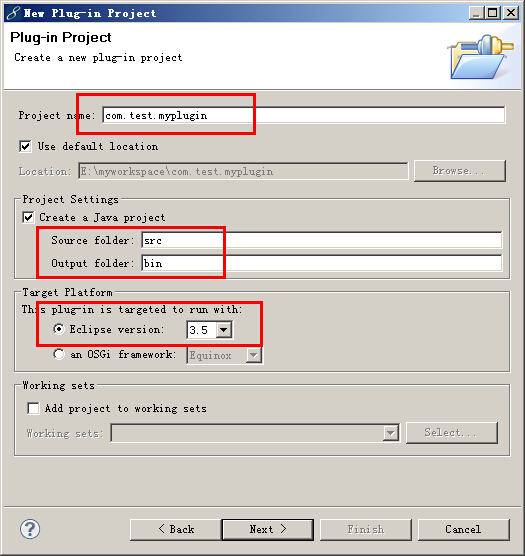
首先,写入自己的插件名字。
source folder 是插件的代码路径。
output folder是插件输出的目标路径。
下面是开发插件的eclipse的版本。
3 下一步,进行插件的具体详情设置
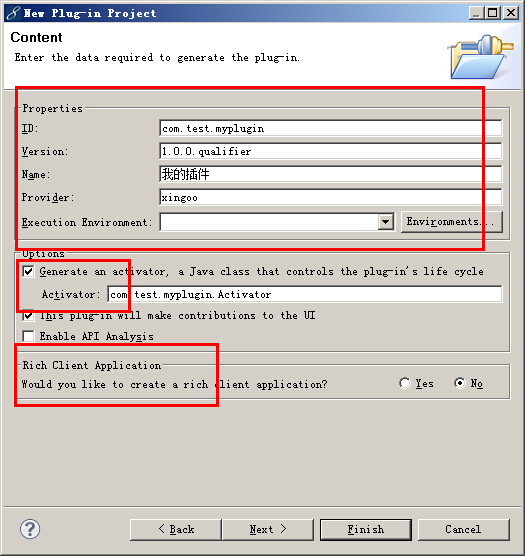
ID 是插件的标识
version 是插件的版本
Name是插件的名字
Provider是开发者的信息
下面的Activator,是插件的激活类,用来管理插件的生命周期。
最后是选择是否开发RCP,富客户端应用,暂且不用,选否就行了。
4 使用插件模板,创建一个插件工具

选择hello world.这是一个工具栏的按钮。
5 下一步,进行按钮的信息设置。

默认会生成类的名字,路径(包名),以及工具栏按钮出发的消息提示。
6 点击finish,完成插件的创建。
这样,我们就完成了一个插件的创建,那么看一下,eclipse都为我们生成了什么。
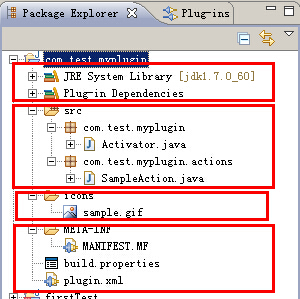
1 导入了插件所需要用到的jar包
2 导入了插件依赖的库
3 源文件
4 插件按钮图片
5 插件的配置信息
MANIFEST.MF 插件的捆绑信息
Manifest-Version: 1.0
Bundle-ManifestVersion: 2
Bundle-Name: 我的插件
Bundle-SymbolicName: com.test.myplugin; singleton:=true
Bundle-Version: 1.0.0.qualifier
Bundle-Activator: com.test.myplugin.Activator
Bundle-Vendor: xingoo
Require-Bundle: org.eclipse.ui,
 org.eclipse.core.runtime
Bundle-ActivationPolicy: lazy
Name 是我们之前设置的插件名字
SymblicName 是我们插件的包名
version 是插件的版本
Activator 是插件的激活类
Vendor 是插件开发者的信息
Bundle 是插件以来的库
这些信息都对应着插件的overview页面的信息。
plugin.xml 插件的详细设置文档,包含插件的扩展点信息,以及插件自己的信息
<?xml version="1.0" encoding="UTF-8"?> <?eclipse version="3.4"?> <plugin> <extension point="org.eclipse.ui.actionSets"> <actionSet label="Sample Action Set" visible="true" id="com.test.myplugin.actionSet"> <menu label="Sample &Menu" id="sampleMenu"> <separator name="sampleGroup"> </separator> </menu> <action label="&Sample Action" icon="icons/sample.gif" class="com.test.myplugin.actions.SampleAction" tooltip="Hello, Eclipse world" menubarPath="sampleMenu/sampleGroup" toolbarPath="sampleGroup" id="com.test.myplugin.actions.SampleAction"> </action> </actionSet> </extension> </plugin>
<plugin>元素清单的主体
<extension>插件的功能扩展,里面包括 point 扩展点的标识、id 扩展实例的标识、name 提供的用户的名称等等
build.properties 构建的元素列表
source.. = src/
output.. = bin/
bin.includes = plugin.xml,\
               META-INF/,\
               .,\
               icons/
里面包括插件的源文件目录,生成文件目录,还有一些配置信息的引入。
提供的插件类Activator.java
 1 package com.test.myplugin;
 2
 3 import org.eclipse.jface.resource.ImageDescriptor;
 4 import org.eclipse.ui.plugin.AbstractUIPlugin;
 5 import org.osgi.framework.BundleContext;
 6
 7 /**
 8  * The activator class controls the plug-in life cycle
 9  */
10 public class Activator extends AbstractUIPlugin {
11
12     // The plug-in ID
13     public static final String PLUGIN_ID = "com.test.myplugin";
14
15     // The shared instance
16     private static Activator plugin;
17
18     /**
19      * The constructor
20      */
21     public Activator() {
22     }
23
24     /*
25      * (non-Javadoc)
26      * @see org.eclipse.ui.plugin.AbstractUIPlugin#start(org.osgi.framework.BundleContext)
27      */
28     public void start(BundleContext context) throws Exception {
29         super.start(context);
30         plugin = this;
31     }
32
33     /*
34      * (non-Javadoc)
35      * @see org.eclipse.ui.plugin.AbstractUIPlugin#stop(org.osgi.framework.BundleContext)
36      */
37     public void stop(BundleContext context) throws Exception {
38         plugin = null;
39         super.stop(context);
40     }
41
42     /**
43      * Returns the shared instance
44      *
45      * @return the shared instance
46      */
47     public static Activator getDefault() {
48         return plugin;
49     }
50
51     /**
52      * Returns an image descriptor for the image file at the given
53      * plug-in relative path
54      *
55      * @param path the path
56      * @return the image descriptor
57      */
58     public static ImageDescriptor getImageDescriptor(String path) {
59         return imageDescriptorFromPlugin(PLUGIN_ID, path);
60     }
61 }
start()和stop()分别用于插件开始与停止调用的函数。
最后让我们运行一下这个插件吧!
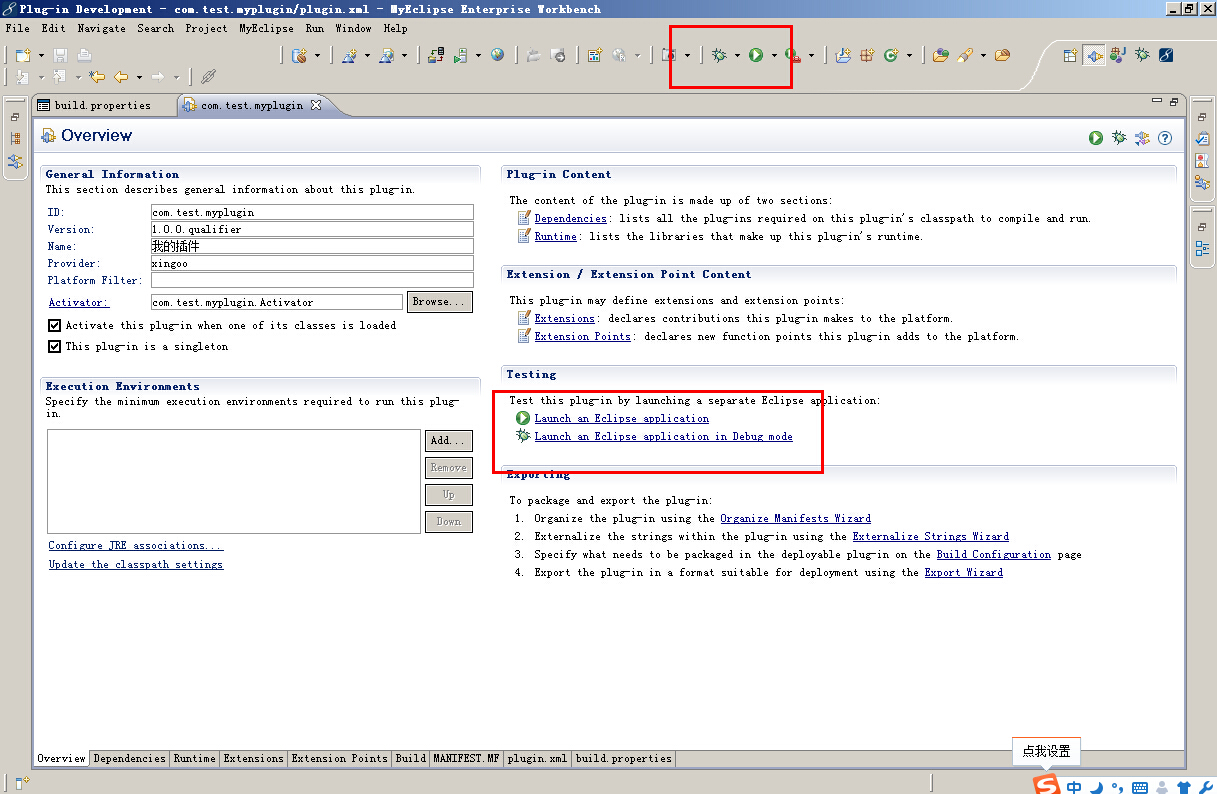
启动方式1 直接在overview界面点击;
启动方式2 也可以点击运行或者DEBUG按钮,运行方式选择Eclipse Application。
点击启动后,会为我们重新开启一个Eclipse,这个Eclipse就是带有我们创建的插件的新Eclipse。启动效果如下:
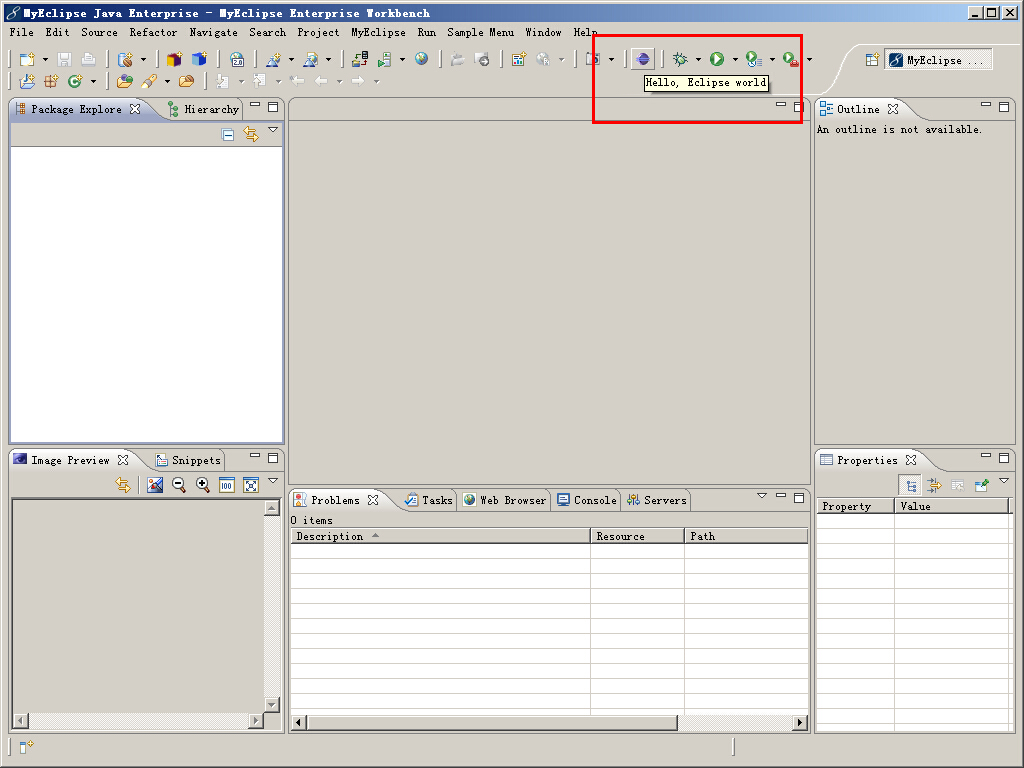
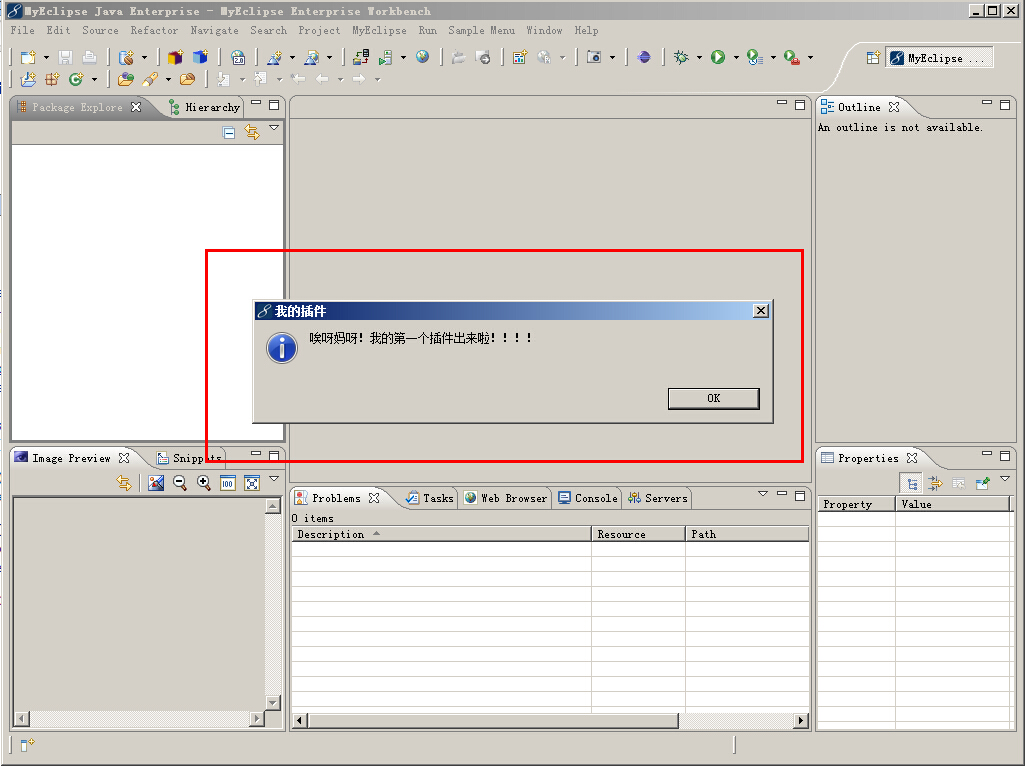
这样一个简单的插件就开发完啦!让我们就此真正的起航吧!!!


 浙公网安备 33010602011771号