IDEA上创建 Maven SpringBoot+mybatisplus+thymeleaf 项目
概述
在WEB领域,Java也是在不断的探索和改进,从开始的JSP--->Struts1--->Struts2+Spring--->Spring MVC--->SpringBoot--->Spring Cloud。在WEB领域,Java框架不断的变化与改进。Spring Boot将Spring MVC所需要的依赖包环境集成到一个大的包环境中,便于快速开发,特别适合构建微服务系统,另外给我们封装了各种经常使用的套件,比如mybatis、hibernate、redis、mongodb等。由于Java没有像其他语言(C#)那也具有属性的操作,Spring结合IOC与AOP等技术将POJO进行注解到上下文,没有那么繁琐的XML配置,调用起来灵活方便。本文主要将自己搭建SpringBoot+mybatisplus+thymeleaf的过程记录下来,便于以后学习使用。
环境
IDEA 2017.02 + Maven +Jdk1.8+Oracle10g
由于SpringBoot集成Tomcat,这里不需要配置Tomcat,直接调试使用即可。
操作
1、利用Maven搭建项目骨架
1.1、 打开新建项目页面

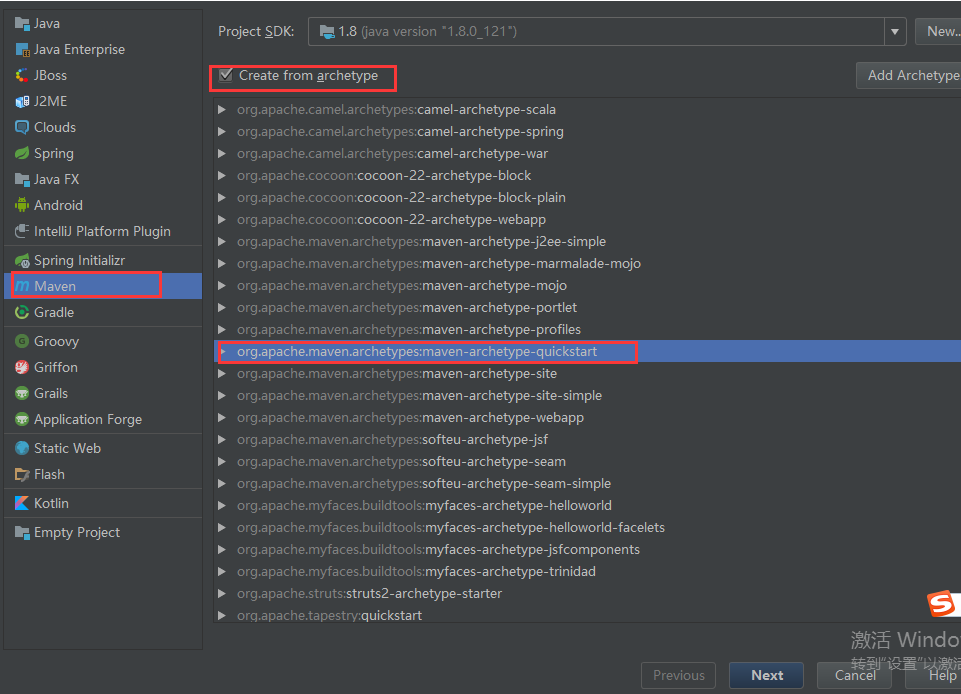
1.2、选择Create New Project,后打开响应的创建项目的页面,选择Maven,按下图标准选择响应的archetype
1.3、输入响应的项目名称信息,点击Next,为了提高项目的构建速度,我们可以直接访问http://repo1.maven.org/maven2/archetype-catalog.xml,把这个xml下载下来放到本地的maven目录中,然后在添加一个参数 archetypeCatalog=internal

1.4、 点击Next-->Finish,即完成项目的构建,Maven构造完成之后的项目结构如下

2、配置项目代码结构
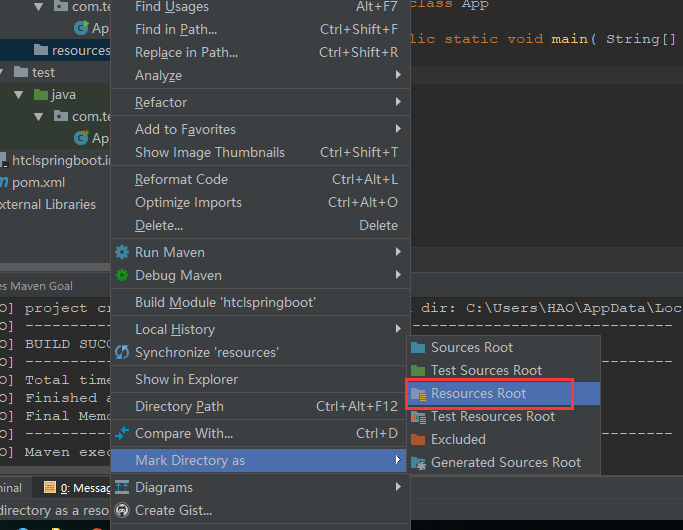
2.1、这个时候,我们需要在main下面添加文件夹resources,右键单击resources设置为Resources Root
2.2、由于是spring boot 项目,pom.xml的parent必须继承spring-boot-starter-parent,同时需要引用spring-boot-starter-web包,里面整合了Spring MVC依赖的包文件。另外由于要使用mybatis访问数据库,所以这里需要加入mybatis-spring-boot-starter和Mybatis-plus的包依赖。pom.xml配置如下
<project xmlns="http://maven.apache.org/POM/4.0.0" xmlns:xsi="http://www.w3.org/2001/XMLSchema-instance"
  xsi:schemaLocation="http://maven.apache.org/POM/4.0.0 http://maven.apache.org/maven-v4_0_0.xsd">
  <modelVersion>4.0.0</modelVersion>
  <groupId>com.justin</groupId>
  <artifactId>htcspringboot</artifactId>
  <packaging>jar</packaging>
  <version>1.0-SNAPSHOT</version>
  <name>Maven Quick Start Archetype</name>
  <url>http://maven.apache.org</url>

  <parent>
    <groupId>org.springframework.boot</groupId>
    <artifactId>spring-boot-starter-parent</artifactId>
    <version>1.5.2.RELEASE</version>
    <relativePath />
  </parent>

  <properties>
    <project.build.sourceEncoding>UTF-8</project.build.sourceEncoding>
    <java.version>1.8</java.version>
    <mybatis-starter-version>1.2.0</mybatis-starter-version>
    <mybatis.plus.version>2.1.0</mybatis.plus.version>
    <ojdbc14.version>10.2.0.5.0</ojdbc14.version>
    <druid.version>1.0.28</druid.version>
    <spring.boot.version>1.5.2.RELEASE</spring.boot.version>
  </properties>

  <dependencies>
    <dependency>
      <groupId>org.springframework.boot</groupId>
      <artifactId>spring-boot-starter-web</artifactId>
    </dependency>

    <dependency>
      <groupId>org.springframework.boot</groupId>
      <artifactId>spring-boot-starter-thymeleaf</artifactId>
      <version>${spring.boot.version}</version>
    </dependency>

    <dependency>
      <groupId>org.mybatis.spring.boot</groupId>
      <artifactId>mybatis-spring-boot-starter</artifactId>
      <version>${mybatis-starter-version}</version>
    </dependency>

    <dependency>
      <groupId>com.baomidou</groupId>
      <artifactId>mybatis-plus</artifactId>
      <version>${mybatis.plus.version}</version>
    </dependency>

    <dependency>
      <groupId>com.oracle</groupId>
      <artifactId>ojdbc14</artifactId>
      <version>${ojdbc14.version}</version>
    </dependency>
    <dependency>
      <groupId>com.alibaba</groupId>
      <artifactId>druid</artifactId>
      <version>${druid.version}</version>
    </dependency>
  </dependencies>

  <build>
    <plugins>
      <plugin>
        <groupId>org.springframework.boot</groupId>
        <artifactId>spring-boot-maven-plugin</artifactId>
      </plugin>
    </plugins>
  </build>

</project>
2.3、下面我们需要在Resources的目录下面,添加application.properties文件,在SpringBoot项目中,系统默认读取项目下的application.properties的文件,所以名称不能名错了;在application.properties添加如下内容
# Tomcat
server.tomcat.max-threads=1000
server.tomcat.min-spare-threads=30
server.port=812    #修改Tomcat端口
server.context-path=/htc #修改相对路径

# 环境 dev|test|pro
spring.profiles.active=dev

cxf.path=/soap

#spring.mvc.view.prefix=/WEB-INF/views/
#spring.mvc.view.suffix=.jsp

# Mybatis配置
mybatis.mapperLocations=classpath:/mapper/*.xml  #Mybatis项目的映射,默认映射到Class下的mapper目录下,寻找以Mapper.xml结尾的文件
#mybatis.mapper-locations=classpath:mybatis/mapper/*Mapper.xml
#mybatis.mapperLocations=classpath:/mapper/**/*.xml

# jackson时间格式化
spring.jackson.time-zone=GMT+8
spring.jackson.date-format=yyyy-MM-dd HH:mm:ss

#Spring.thymeleaf

#资源文件的约定目录结构
#Maven的资源文件目录:/src/java/resources
#spring-boot项目静态文件目录:/src/java/resources/static
#spring-boot项目模板文件目录:/src/java/resources/templates

spring.thymeleaf.cache=false
spring.thymeleaf.mode=HTML5
spring.thymeleaf.content-type=text/html
spring.thymeleaf.prefix=classpath:/templates/
spring.thymeleaf.suffix=.html
2.4、添加application-dev.properties文件,对照application.properties文件,里面放置数据库的配置信息
spring.datasource.url=jdbc:oracle:thin:@127.0.0.1:1521:LZSORCL
#spring.datasource.type=com.alibaba.druid.pool.DruidDataSource
spring.datasource.type=oracle.jdbc.pool.OracleDataSource
spring.datasource.driverClassName=oracle.jdbc.driver.OracleDriver
#db
spring.datasource.username=javaAcmemgr
spring.datasource.password=javaAcmemgr

# 下面为连接池的补充设置,应用到上面所有数据源中
# 初始化大小,最小,最大
spring.datasource.initialSize=20
spring.datasource.minIdle=20
spring.datasource.maxActive=100
# 配置获取连接等待超时的时间
spring.datasource.maxWait=60000
# 配置间隔多久才进行一次检测,检测需要关闭的空闲连接,单位是毫秒
spring.datasource.timeBetweenEvictionRunsMillis=60000
# 配置一个连接在池中最小生存的时间,单位是毫秒
spring.datasource.minEvictableIdleTimeMillis=300000
spring.datasource.validationQuery=SELECT 1 FROM DUAL
spring.datasource.testWhileIdle=true
spring.datasource.testOnBorrow=false
spring.datasource.testOnReturn=false
# 打开PSCache,并且指定每个连接上PSCache的大小
spring.datasource.poolPreparedStatements=true
spring.datasource.maxPoolPreparedStatementPerConnectionSize=20
# 配置监控统计拦截的filters,去掉后监控界面sql无法统计,'wall'用于防火墙
spring.datasource.filters=stat,wall,log4j
# 通过connectProperties属性来打开mergeSql功能;慢SQL记录
spring.datasource.connectionProperties=druid.stat.mergeSql=true;druid.stat.slowSqlMillis=5000
# 合并多个DruidDataSource的监控数据
#spring.datasource.useGlobalDataSourceStat=true
2.5、现在添加修改Mybatis-plus的配置,里面的具体内容不过解释,可以参考Mybatis-plus官网文档
package com.justin.config;

import com.baomidou.mybatisplus.MybatisConfiguration;
import com.baomidou.mybatisplus.MybatisXMLLanguageDriver;
import com.baomidou.mybatisplus.entity.GlobalConfiguration;
import com.baomidou.mybatisplus.enums.DBType;
import com.baomidou.mybatisplus.plugins.PaginationInterceptor;
import com.baomidou.mybatisplus.spring.MybatisSqlSessionFactoryBean;
import org.apache.ibatis.mapping.DatabaseIdProvider;
import org.apache.ibatis.plugin.Interceptor;
import org.mybatis.spring.boot.autoconfigure.MybatisProperties;
import org.mybatis.spring.boot.autoconfigure.SpringBootVFS;
import org.springframework.beans.factory.annotation.Autowired;
import org.springframework.boot.context.properties.EnableConfigurationProperties;
import org.springframework.context.annotation.Bean;
import org.springframework.context.annotation.Configuration;
import org.springframework.context.annotation.Primary;
import org.springframework.core.io.DefaultResourceLoader;
import org.springframework.core.io.ResourceLoader;
import org.springframework.jdbc.datasource.DataSourceTransactionManager;
import org.springframework.util.ObjectUtils;
import org.springframework.util.StringUtils;
import javax.sql.DataSource;

@Configuration
@EnableConfigurationProperties(MybatisProperties.class)
public class MybatisPlusConfig {
        @Autowired
        private DataSource dataSource;

        @Autowired
        private MybatisProperties properties;

        @Autowired
        private ResourceLoader resourceLoader = new DefaultResourceLoader();

        @Autowired(required = false)
        private Interceptor[] interceptors;

        @Autowired(required = false)
        private DatabaseIdProvider databaseIdProvider;

        /**
         * 配置事务管理器
         */
        @Bean("transactionManager")
        @Primary
        public DataSourceTransactionManager transactionManager() throws Exception{
            return new DataSourceTransactionManager(dataSource);
        }

        /**
         * mybatis-plus分页插件
         */
        @Bean
        public PaginationInterceptor paginationInterceptor() {
            //CachePaginationInterceptor page = new CachePaginationInterceptor();
            PaginationInterceptor page = new PaginationInterceptor();
            page.setDialectType(DBType.ORACLE.getDb());
            return page;
        }


        /**
         * 查询性能分析
         */
    /*@Bean
    public PerformanceInterceptor performanceInterceptor() {
        //CachePaginationInterceptor page = new CachePaginationInterceptor();
        PerformanceInterceptor performanceInterceptor = new PerformanceInterceptor();
        //PaginationInterceptor page = new PaginationInterceptor();
        return performanceInterceptor;
    }
*/

        /**
         * 这里全部使用mybatis-autoconfigure 已经自动加载的资源。不手动指定
         * 配置文件和mybatis-boot的配置文件同步
         *
         * @return
         */
        @Bean
        public MybatisSqlSessionFactoryBean mybatisSqlSessionFactoryBean() {
            MybatisSqlSessionFactoryBean mybatisPlus = new MybatisSqlSessionFactoryBean();
            mybatisPlus.setDataSource(dataSource);
            mybatisPlus.setVfs(SpringBootVFS.class);
            if (StringUtils.hasText(this.properties.getConfigLocation())) {
                mybatisPlus.setConfigLocation(this.resourceLoader.getResource(this.properties.getConfigLocation()));
            }
            mybatisPlus.setConfiguration(properties.getConfiguration());
            if (!ObjectUtils.isEmpty(this.interceptors)) {
                mybatisPlus.setPlugins(this.interceptors);
            }
            // MP 全局配置,更多内容进入类看注释
            GlobalConfiguration globalConfig = new GlobalConfiguration();
            globalConfig.setDbType(DBType.ORACLE.name());//数据库类型
            // ID 策略 AUTO->`0`("数据库ID自增") INPUT->`1`(用户输入ID") ID_WORKER->`2`("全局唯一ID") UUID->`3`("全局唯一ID")
            globalConfig.setIdType(2);
            //MP 属性下划线 转 驼峰 , 如果原生配置 mc.setMapUnderscoreToCamelCase(true) 开启,该配置可以无。
            globalConfig.setDbColumnUnderline(true);
            mybatisPlus.setGlobalConfig(globalConfig);
            MybatisConfiguration mc = new MybatisConfiguration();
            // 对于完全自定义的mapper需要加此项配置,才能实现下划线转驼峰
            //mc.setMapUnderscoreToCamelCase(true);
            mc.setDefaultScriptingLanguage(MybatisXMLLanguageDriver.class);
            mybatisPlus.setConfiguration(mc);
            if (this.databaseIdProvider != null) {
                mybatisPlus.setDatabaseIdProvider(this.databaseIdProvider);
            }
            if (StringUtils.hasLength(this.properties.getTypeAliasesPackage())) {
                mybatisPlus.setTypeAliasesPackage(this.properties.getTypeAliasesPackage());
            }
            if (StringUtils.hasLength(this.properties.getTypeHandlersPackage())) {
                mybatisPlus.setTypeHandlersPackage(this.properties.getTypeHandlersPackage());
            }
            if (!ObjectUtils.isEmpty(this.properties.resolveMapperLocations())) {
                mybatisPlus.setMapperLocations(this.properties.resolveMapperLocations());
            }
            return mybatisPlus;
        }
}
2.6、下面来配置数据库DAO层和业务逻辑层;新建Pojo文件。这里面用到了Mybatisplus的注解内容
package com.justin.model
import com.baomidou.mybatisplus.annotations.TableName;
import com.fasterxml.jackson.databind.annotation.JsonSerialize;
import com.justin.com.LongSerializer;
import java.io.Serializable;

@TableName("TBL_EINVOICE")
public class Einvoice  implements Serializable {
    private static final long serialVersionUID = 1L;

    //id
    private Long id;

    public String getInvoicenum() {
        return invoicenum;
    }

    public void setInvoicenum(String invoicenum) {
        this.invoicenum = invoicenum;
    }

    public String getInvoicecode() {
        return invoicecode;
    }

    public void setInvoicecode(String invoicecode) {
        this.invoicecode = invoicecode;
    }

    private String invoicenum;

    private  String invoicecode;

    /**
     * 设置:id     */

    public void setId(Long id) {
        this.id = id;
    }
    /**
     * 获取:id     */
    @JsonSerialize(using = LongSerializer.class)
    public Long getId() {
        return id;
    }
}
public class LongSerializer extends JsonSerializer {
    @Override
    public void serialize(Object value, JsonGenerator jsonGenerator, SerializerProvider serializerProvider) throws IOException, JsonProcessingException {
        jsonGenerator.writeString(value.toString());
    }
}
2.7、添加相应DAO,代码如下,切记EInvoiceMapper要继承BaseMapper<T>类型,这样EInvoiceMapper即可实现里面的诸多方法,比如CRUD
package com.justin.dao;

import com.baomidou.mybatisplus.mapper.BaseMapper;
import com.justin.model.Einvoice;
import org.apache.ibatis.annotations.Param;

public interface EInvoiceMapper extends BaseMapper<Einvoice> {
//    Integer countBy();
    void updatenum(@Param("INUM") String Invoicenum,@Param("ICODE") String Invoicecode);
}
同时我们需要在Resources->Mapper目录下,新建EInvoiceMapper.xml文件,当然Mapper里面节点,可以不用配置映射内容项;如果配置了则要和EInvoiceMapper.java保持一致;
<?xml version="1.0" encoding="UTF-8"?>
<!DOCTYPE mapper PUBLIC "-//mybatis.org//DTD Mapper 3.0//EN" "http://mybatis.org/dtd/mybatis-3-mapper.dtd">

<mapper namespace="com.justin.dao.EInvoiceMapper">
    <!--<select id="countBy"  resultType="int">-->
    <!--SELECT  count(ID) FROM TBL_EINVOICE-->
    <!--</select>-->
    <update id="updatenum">
        UPDATE  TBL_EINVOICE SET INVOICENUM=#{INUM} WHERE INVOICECODE=#{ICODE}
    </update>
</mapper>
2.8、现在配置业务逻辑层的Service代码,新建EinvoiceService.java文件,内容如下,特别注意需要继承由Mybatisplus提供的IService<T>接口
package com.justin.serviceapi;

import com.baomidou.mybatisplus.service.IService;
import com.justin.model.Einvoice;

public interface EinvoiceService extends IService<Einvoice>
{
    String GetInvoiceNUmByCode(String InvoiceCode);

    /**
     * 插入单个用户信息
     * @param einvoice
     */
    void insertOne(Einvoice einvoice);

//    //修改代码结构
   void ChangeCode(String num,String Code);
}
添加接口实现项EinvoiceServiceImpl,代码内容如下。特别注意需要继承由Mybatisplus提供的ServiceImpl类,同时也要实现EinvoiceService的接口
package com.justin.serviceapi.impl;

import com.baomidou.mybatisplus.mapper.EntityWrapper;
import com.baomidou.mybatisplus.service.impl.ServiceImpl;
import com.justin.dao.EInvoiceMapper;
import com.justin.model.Einvoice;
import com.justin.serviceapi.EinvoiceService;
import org.springframework.beans.factory.annotation.Autowired;
import org.springframework.stereotype.Service;

@Service("einvoiceservice")
public class EinvoiceServiceImpl extends  ServiceImpl<EInvoiceMapper,Einvoice> implements EinvoiceService
{
    @Autowired
    private  EinvoiceService einvoiceservice;
    @Override
    public String GetInvoiceNUmByCode(String InvoiceCode)
    {

        EntityWrapper<Einvoice> ew = new EntityWrapper<>();
        ew.eq("INVOICECODE", InvoiceCode);
       Einvoice Result= einvoiceservice.selectOne(ew);
       if(Result== null){
           return  "Noting";
       }
       else
       {
           return  Result.getInvoicenum();

       }
    }
    @Override
    public void insertOne(Einvoice einvoice) {
        einvoiceservice.insert(einvoice);
        //baseMapper.SumitEinvocie(einvoice.get());
    }

    public void  ChangeCode(String num,String Code)
    {
//        baseMapper.countBy();
        baseMapper.updatenum(num,Code);
    }

}
完成以上配置之后,下面来看Web的入口程序代码。这个没什么可说的,需要而别注意启动程序类需要添加SpringBootApplication标明是springboot的主程序启动类;添加ResutController注解是为了将Body内容直接输出到浏览器里面;@ResutController和@Controller是有区别的;
package com.justin;
import com.justin.model.Einvoice;
import com.justin.serviceapi.EinvoiceService;
import org.mybatis.spring.annotation.MapperScan;
import org.springframework.beans.factory.annotation.Autowired;
import org.springframework.boot.SpringApplication;
import org.springframework.boot.autoconfigure.SpringBootApplication;
import org.springframework.web.bind.annotation.PathVariable;
import org.springframework.web.bind.annotation.RequestMapping;
import org.springframework.web.bind.annotation.RestController;

@SpringBootApplication
@RestController
@MapperScan("com.justin.dao")
public class Application
{
    @Autowired
    private EinvoiceService einvoiceservice;

    @RequestMapping("/")
    public  String Greeting()
    {
        return "Justin Say Hello WOrld!";
    }

    @RequestMapping("/Add")
    public  String AddEinvoice()
    {
        Einvoice Einv=new Einvoice();
        Einv.setInvoicecode("98234728");
        Einv.setInvoicenum("1111111");
        einvoiceservice.insertOne(Einv);
        return  "INser SUCC";
    }

    @RequestMapping("/check/{invoicecode}")
    public  String ShowInfo(@PathVariable("invoicecode") String invoicecode)
    {
        return einvoiceservice.GetInvoiceNUmByCode(invoicecode);
    }
    @RequestMapping("/Update/{invoicecode}/{invoicenum}")
    public  String UpInfo(@PathVariable("invoicecode") String invoicecode,@PathVariable("invoicenum") String invoicenum)
    {
        einvoiceservice.ChangeCode(invoicenum,invoicecode);
        return  "SUCC";
    }

    public static void main(String[] args)
    {
        SpringApplication.run(Application.class,args);
    }
}
3、thymeleaf使用
3.1、为了使用thymeleaf提供的模板,我们需要在pom.xml添加spring-boot-starter-thymeleaf依赖包文件,在Springboot中默认规定静态文件目录:/src/java/resources/static;模板文件目录:/src/java/resources/templates目录下。所以我们在templates里面新建模板文件Eindex.html,内容如下
<!DOCTYPE html>
<html xmlns:th="http://www.thymeleaf.org">
<head>
    <meta http-equiv="Content-Type" content="text/html; charset=UTF-8" />
    <title>Title</title>
</head>
<body>
<p th:text="${Message}"></p>
</body>
</html>
3.2、为了使用这个模板,我们新建一个控制器HelloController,代码如下
package com.justin.controller;

import org.springframework.stereotype.Controller;
import org.springframework.web.bind.annotation.RequestMapping;

import java.util.Map;

@Controller
@RequestMapping("/HE")
public class HelloController {

    @RequestMapping("/CIndex")
    public  String HIndex(Map<String,Object> map){

        map.put("Message","from TemplateController.helloHtml");
        return  "Eindex";
    }
}
添加完成之后的,最终的项目结构如下
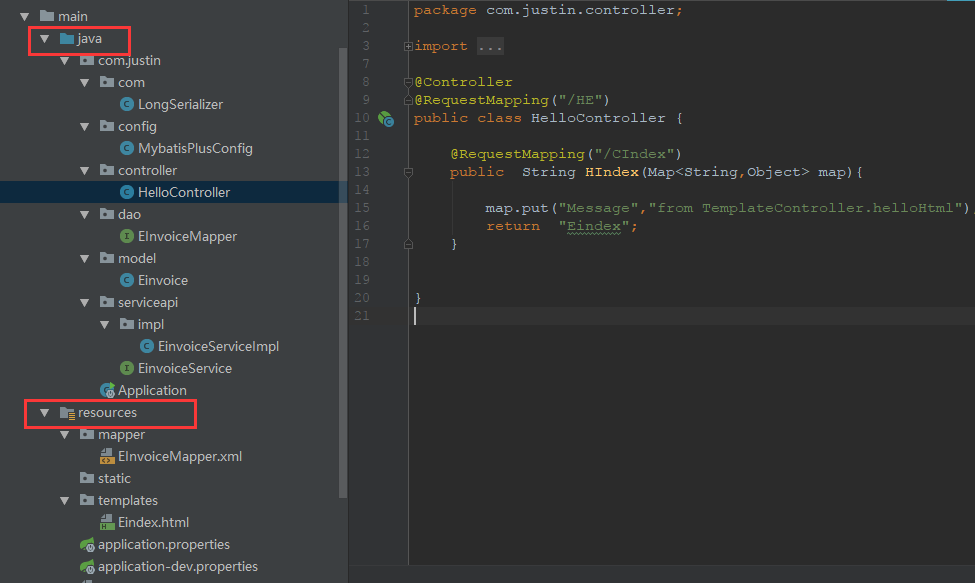
点击Application运行之后,在浏览器里面输入 htpp://localhost:812/htc/HE/CIndex 即可预览自己配置的网页内容;
thymeleaf能够自动实现映射,但是有些情况需要注意:
1、如果注解写的@Controller,则可以在RequestMapping对应方法返回String类型(也就是html对应名称即可);
@Controller
@RequestMapping("msg")
public class MessageController {
@RequestMapping("/inTimeMsg/{startSendDate}")
    public String timelyMsg(Map<String, Object> map, @PathVariable("startSendDate") String startSendDate) {
        //消息日期
        if (CommonStringUtils.isNotEmpty(startSendDate)) {
            Map<String, Object> params = new HashMap<>();
            params.put("startSendDate", DateUtil.stringToDate(startSendDate,DateUtil.DF_DATE_TIME));
            params.put("recipientid", ContextHelper.getContext().getUserId());
            params.put("topnum", 15);
            params.put("msgtype", 20);
            List<Message> result = messageService.selectinTimeTopMsg(params);
            if(result.size()>0)
                map.put("msgdataList", result);
        }
        return "messagelist";
    }
}
2、如果注解写的@RestController,则可以在RequestMapping对应方法返回ModelAndView类型(也就是html对应名称和参数);
@RestController
@RequestMapping("msg")
public class MessageController {
@RequestMapping("/inTimeMsg/{startSendDate}")
    public ModelAndView timelyMsg(@PathVariable("startSendDate") String startSendDate) {
    Map<String, Object> map=new HashMap<>();
        //消息日期
        if (CommonStringUtils.isNotEmpty(startSendDate)) {
            Map<String, Object> params = new HashMap<>();
            params.put("startSendDate", DateUtil.stringToDate(startSendDate,DateUtil.DF_DATE_TIME));
            params.put("recipientid", ContextHelper.getContext().getUserId());
            params.put("topnum", 15);
            params.put("msgtype", 20);
            List<Message> result = messageService.selectinTimeTopMsg(params);
            if(result.size()>0)
                map.put("msgdataList", result);
        }
        ModelAndView modelAndView=new ModelAndView("messagelist",map);
        return modelAndView;
    }
}
