Winform开发框架之权限管理系统改进的经验总结(1)-TreeListLookupEdit控件的使用
最近一直在做一些技术性的研究和框架改进工作,博客也落下好几天没有更新了,也该是时候静下心来,总结这段时间的一些技术改进的经验了。和上一阶段的CRM系统开发和技术研究一样,我都喜欢在一个项目或者模块完成后,做一些相关的总结性工作,记录下前一阶段的技术脚印,希望给自己留下一个脚印快照,同时给读者了解自己的技术动向外,也有所收获。本随笔主要介绍在下拉列表中展示一个列表,以便实现数据结构的良好展示,并能快速选定所需的节点,这个就是TreeListLookupEdit控件的使用。
1、界面效果展示
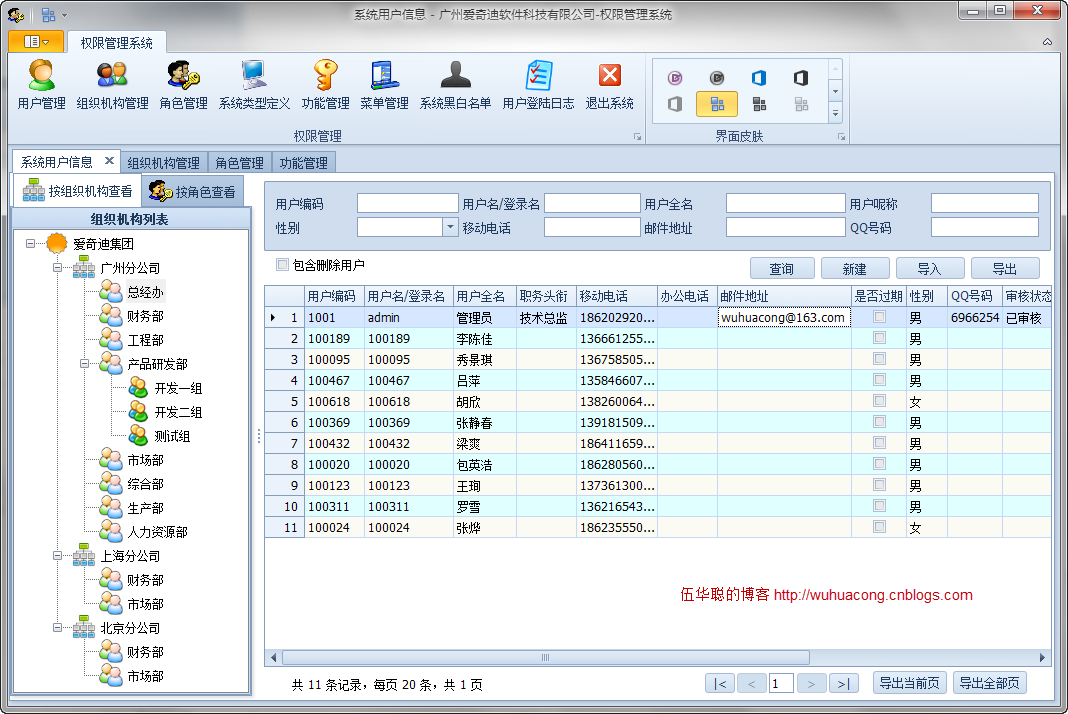
首先我们来看看我的Winform开发框架之权限管理系统模块改进完善后的主界面,然后在介绍其中用到的功能点,以及技术实现。
系统用户信息管理界面如下所示。
其中用户信息编辑界面如下所示。
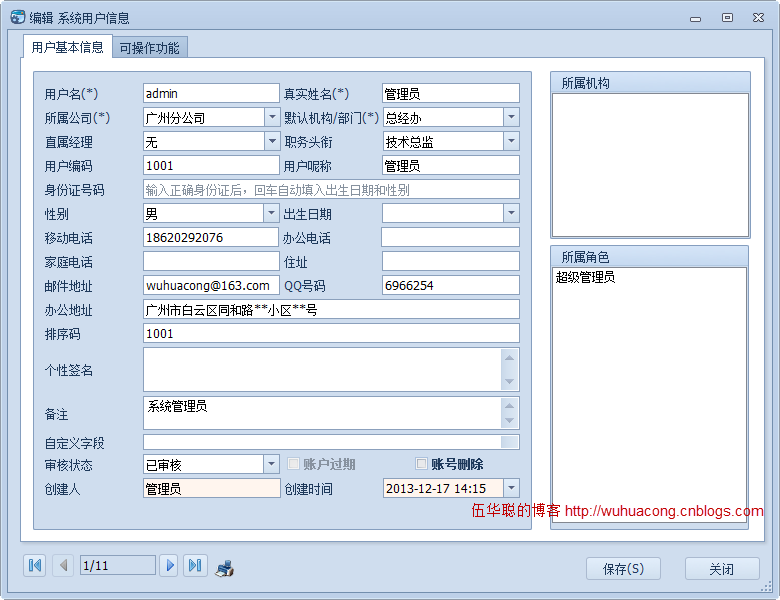
其中编辑用户信息的界面包括了所属公司、所属部门、直属经理三个输入的内容,为了减少数据量的显示,这几个输入框是通过级联的方式进行展示,也就是说,先选定所属公司,然后在所属公司中列出该公司的部门列表,选定部门后,再通过获取指定部门的人员信息,作为直属经理的人员展示。
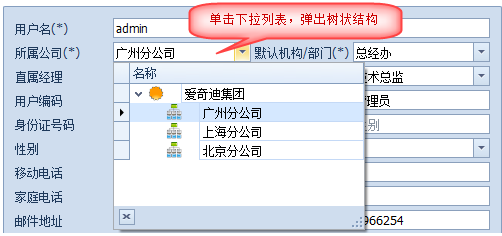
了解这些逻辑关系后,我们来看看所属公司的列表展示,如下所示。
选定了所属公司后,所属部门就根据公司来进行过滤了,如下所示。
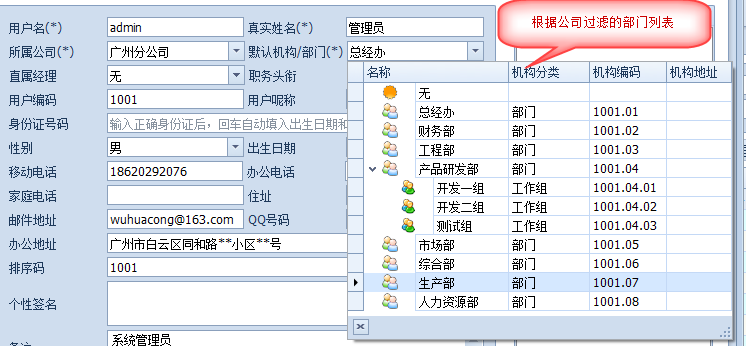
通过公司和部门的条件,我们就可以列出有限的人员列表,作为直属经理的人员列表了,这个列表使用普通的下拉列表展示即可,在此不再赘述。
以上的树状结构的下拉列表,在DevExpress控件中是通过TreeListLookupEdit控件进行实现的。
2、基于DevExpress控件的功能实现及代码展示
由于这些所属公司、所属部门的功能模块,一般需要不少代码进行处理,为了更好重用这些模块,我们通过用户控件的封装方式进行,然后在数据编辑界面上,通过拖动控件方式即可实现布局,并只需要设置或者访问某个属性即可,封装的用户界面控件如下所示。
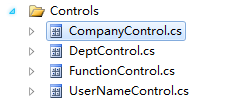
1)所属公司控件代码
所属公司是一个用户控件,让其继承自XtraUserControl即可,为了在选择内容后触发值的变化事件,我们定义了一个事件EventHandler EditValueChanged,这样我们在内部控件的值变化的时候,可以通知外部的界面进行处理。
    public partial class CompanyControl : XtraUserControl
    {
        /// <summary>
        /// 选择的值发生变化的时候
        /// </summary>
        public event EventHandler EditValueChanged;

        public CompanyControl()
        {
            InitializeComponent();

            this.txtCompany.EditValueChanged += new EventHandler(txtCompany_EditValueChanged);
        }

        void txtCompany_EditValueChanged(object sender, EventArgs e)
        {
            if (EditValueChanged != null)
            {
                EditValueChanged(sender, e);
            }
        }
为了实现列表数据的绑定,以及增加图标作为区分节点,TreeListLookupEdit控件的数据绑定操作是这个控件的核心所在。
在下面的代码逻辑里面,我们通过获取公司列表,然后把它转换为一个DataTable,并根据集团、公司的层次给予不同的图标,绑定数据,并设置好控件的KeyFieldName、ParentFieldName、ValueMember、DisplayMember几个重要属性即可,如下所示。
        /// <summary>
        /// 初始化数据
        /// </summary>
        public void Init()
        {
            DataTable dt = DataTableHelper.CreateTable("ImageIndex|int,ID,PID,Name");
            List<OUInfo> list = BLLFactory<OU>.Instance.GetGroupCompany();
            DataRow dr = null;
            foreach (OUInfo info in list)
            {
                dr = dt.NewRow();
                dr["ImageIndex"] = Portal.gc.GetImageIndex(info.Category);
                dr["ID"] = info.ID.ToString();
                dr["PID"] = info.PID.ToString();
                dr["Name"] = info.Name;
                dt.Rows.Add(dr);
            }


            //设置图形序号
            this.treeListLookUpEdit1TreeList.SelectImageList = this.imageList2;
            this.treeListLookUpEdit1TreeList.StateImageList = this.imageList2;

            this.txtCompany.Properties.TreeList.KeyFieldName = "ID";
            this.txtCompany.Properties.TreeList.ParentFieldName = "PID";
            this.txtCompany.Properties.DataSource = dt;
            this.txtCompany.Properties.ValueMember = "ID";
            this.txtCompany.Properties.DisplayMember = "Name";
        }
为了方便编辑界面中,对所属公司的赋值与获取操作,我们需要增加一个Text属性和一个Value属性。我们需要重载Text属性,用来获取或设置所属公司的名称;添加一个Value属性,用来获取所属公司的ID,如下所示。
        /// <summary>
        /// 公司名称
        /// </summary>
        public override string Text
        {
            get
            {
                return this.txtCompany.Text;
            }
            set
            {
                this.txtCompany.Text = value;
            }
        }

        /// <summary>
        /// 公司ID
        /// </summary>
        public string Value
        {
            get
            {
                string result = "-1";
                if (this.txtCompany.EditValue == null || this.txtCompany.EditValue.ToString() == "0")
                {
                    result = "-1";
                }
                else
                {
                    result = this.txtCompany.EditValue.ToString();
                }
                return result;
            }
            set
            {
                this.txtCompany.EditValue = value;
            }
        }
2)所属部门的控件代码
所属部门的代码逻辑和所属公司差不多,唯一不同的是,所属部门需要一个上级的部门标识(公司ID)作为数据的过滤获取,如下所示。
        /// <summary>
        /// 初始化部门信息
        /// </summary>
        public void Init()
        {
            //InitUpperOU
            DataTable dt = DataTableHelper.CreateTable("ImageIndex|int,ID,PID,Name,HandNo,Category,Address,Note");
            DataRow dr = null;

            if (!string.IsNullOrEmpty(ParentOuID))
            {
                List<OUInfo> list = BLLFactory<OU>.Instance.GetAllOUsByParent(ParentOuID.ToInt32());
                foreach (OUInfo info in list)
                {
                    dr = dt.NewRow();
                    dr["ImageIndex"] = Portal.gc.GetImageIndex(info.Category);
                    dr["ID"] = info.ID.ToString();
                    dr["PID"] = info.PID.ToString();
                    dr["Name"] = info.Name;
                    dr["HandNo"] = info.HandNo;
                    dr["Category"] = info.Category;
                    dr["Address"] = info.Address;
                    dr["Note"] = info.Note;
                    dt.Rows.Add(dr);
                }
            }
            //增加一行空的
            dr = dt.NewRow();
            dr["ID"] = "0"; //使用0代替-1,避免出现节点的嵌套显示,因为-1已经作为了一般节点的顶级标识
            dr["PID"] = "-1";
            dr["Name"] = "无";
            dt.Rows.InsertAt(dr, 0);

            //设置图形序号
            this.treeListLookUpEdit1TreeList.SelectImageList = this.imageList2;
            this.treeListLookUpEdit1TreeList.StateImageList = this.imageList2;

            this.txtDept.Properties.TreeList.KeyFieldName = "ID";
            this.txtDept.Properties.TreeList.ParentFieldName = "PID";
            this.txtDept.Properties.DataSource = dt;
            this.txtDept.Properties.ValueMember = "ID";
            this.txtDept.Properties.DisplayMember = "Name";
        }
3)主界面的控件使用
封装好所属公司和所属部门的控件后,我们就可以通过在工具箱里面拖动控件到主编辑界面里面去了,这样我们只需要简单对控件进行设置和赋值即可实现,减少对控件逻辑过多的代码处理。
数据编辑界面中,控件的使用代码如下所示。
a)界面赋值操作
                    this.txtCompany.Value = info.Company_ID;
                    this.txtDept.Value = info.Dept_ID;
b)界面数据获取操作
            info.Dept_ID = txtDept.Value;
            info.DeptName = txtDept.Text;
            info.Company_ID = txtCompany.Value;
            info.CompanyName = txtCompany.Text;
c)界面事件的处理操作
由于界面上两个控件是级联的关系,因此需要处理他们控件的值发生变化的事件,如下所示。
    public partial class FrmEditUser : BaseEditForm
    {
        public FrmEditUser()
        {
            InitializeComponent();

            this.txtCompany.EditValueChanged += new EventHandler(txtCompany_EditValueChanged);
            this.txtDept.EditValueChanged += new EventHandler(txtDept_EditValueChanged);
        }

        void txtCompany_EditValueChanged(object sender, EventArgs e)
        {
            if (!string.IsNullOrEmpty(this.txtCompany.Value))
            {
                //赋值给部门控件,并重新初始化部门列表
                txtDept.ParentOuID = this.txtCompany.Value;
                txtDept.Init();
            }
        }

        void txtDept_EditValueChanged(object sender, EventArgs e)
        {
            if (!string.IsNullOrEmpty(txtDept.Value))
            {
                //获取所属部门后,就通过部门ID来初始化直属经理的人员列表
                InitManagers(txtDept.Value.ToInt32());
            }
        }
.................
3、基于传统Winform界面的控件实现
上面的介绍内容是基于DevExpress的控件组进行功能实现的,有些人可能会问,我使用传统样式的界面控件,这种效果如何实现呢,其实如果是使用内置的控件,是比较困难实现这个效果的,但是这样的界面控件有很多人开发好组件可以利用的,我在做这个模块的时候,也考虑到了这一点,因此也针对这些做了一些搜索查询,发现国外有一个同行封装的控件做的非常不错,地址是http://www.brad-smith.info/blog/archives/477,上面的效果基本上没问题的。这个人的博客和下载的例子里面,没有使用Demo的代码,我自己根据控件的属性进行了一个Demo例子的编写,效果和代码如下所示。
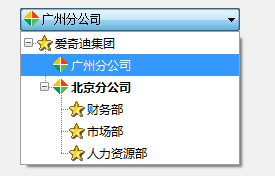
总体来说,这个控件实现的效果还是非常不错的,例子代码如下所示,其节点和TreeView的操作类似,通过ComboTreeNode对象进行添加即可。
        private void Form1_Load(object sender, EventArgs e)
        {
            if (!this.DesignMode)
            {
                this.comboTreeBox1.Nodes.Clear();

                ComboTreeNode parentNode = new ComboTreeNode();
                parentNode.Text = "爱奇迪集团";
                parentNode.Nodes.Add("gz", "广州分公司");
                parentNode.Nodes["gz"].ImageIndex = 1;//通过名字引用
                parentNode.Nodes["gz"].ExpandedImageIndex = 1;//通过名字引用

                ComboTreeNode bjNode = new ComboTreeNode();
                bjNode.Name = "bj";
                bjNode.Text = "北京分公司";
                bjNode.ImageIndex = 1;
                bjNode.ExpandedImageIndex = 1;
                bjNode.FontStyle = FontStyle.Bold;

                bjNode.Nodes.Add("财务部");
                bjNode.Nodes.Add("市场部");
                bjNode.Nodes.Add("人力资源部");

                parentNode.Nodes.Add(bjNode);
                this.comboTreeBox1.Nodes.Add(parentNode);

                comboTreeBox1.ExpandAll();
            }
        }
除了这个可以实现传统界面效果的下拉树展现外,CodeProject上的http://www.codeproject.com/Articles/25471/Customizable-ComboBox-Drop-Down这篇文字实现的效果也还不错。
不过可能没有上面的那个效果好一点。
4、总结
以上这些就是关于级联下拉列表,并在下拉列表里面展示层次关系的树形结构的功能实现和核心代码的操作,本随笔介绍了基于DevExpress样式和传统样式两种方案的实现过程,重点对DevExpress控件中的TreeListLookupEdit控件的实现进行介绍,希望大家能够在实际工作中用上。
 专注于代码生成工具、.Net/.NetCore 框架架构及软件开发,以及各种Vue.js的前端技术应用。著有Winform开发框架/混合式开发框架、微信开发框架、Bootstrap开发框架、ABP开发框架、SqlSugar开发框架等框架产品。
转载请注明出处:撰写人:伍华聪 http://www.iqidi.com


