Sharepoint学习笔记---Sandbox Solution-- Full Trust Proxy--开发步骤
Sandbox Solution是Sharepoint2010推出的一种新的解决方案,它在管理,部署以及网站安全等方面带来了巨大的好处,这也正是为什么微软极力推荐尽量多使用Sandbox Solution,在实在无法用Sandbox Solution解决问题时才使用Farm Solution。然而我们知道,Sandbox Solution的安全是以牺牲其操作的灵活性为代价的,有时候,我们不得不在安全性和灵活性之间进行折中,这就是Sandbox Solution Full Trust Proxy作用所在。
既然Sandbox Solution有着诸多的限制来保证它所带来的好处,而我们却又想要通过Sandbox Solution Full Trust Proxy来突破这种限制?是否有点糊涂了?有人认为,微软这样作的意图在于让你在进行方案构架时,针对Sandbox Solution采取两个层面的结构组织:
1、完全的Sandbox Solution解决方案。此类方案完全享受Sandbox Solution带来的好处,你不用担心因突破安全限制而带来的问题。
2、采用了Full Trust Proxy的Sandbox Solution解决方案。此方案相当于一个警戒区(特区),你可以对此区域的Solution进行特殊的关照。
因此,通过这样的细分,保证了你最大限度的享用Sandbox Solution给你带来的好处,不管是在网站管理上还是在方案部署上。
下图对Sandbox Solution如何调用一个full-trust proxy operation(完全信任代理进程)进行了描述
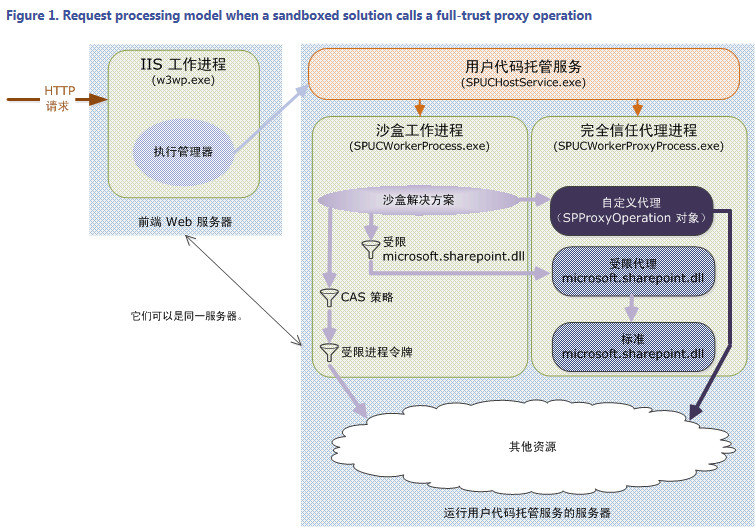 。
。
此处,我们通过一个具体的操作实例来描述开发一个Sanbox Solution Full Trust Proxy的基本步骤并附带介绍一下Sandbox Solution的调试。
开发Sandbox Solution的Full trust Proxy可以分为下面4个步骤:
1、Full trust proxy 类的DLL开发,此DLL包括两大部分,一是操作类的开发,此类继承自Microsoft.SharePoint.Usercode.SPProxyOperation.在它内部定义了你意图突破Sandbox限制所进行的相关操作(eg:读写文件,读写数据库等等在Sandbox中禁止的操作)。 二是传参类的开发,义,此类继承自Microsoft.SharePoint.Usercode.SPProxyOperationArgs,它是可以序列化的,它将会被传递给Proxy操作类。
2、 把前面的类编译成一个强命名的DLL,并部署到GAC中。
3、前面的2个步骤还并没有创建出一个可以使用的Full trust proxy,我们还需要使用相关工具如:Powershell把上面开发和部署的DLL注册为一个Sharepoint可以使用的full trust proxy。
4、在Sharepoint的Sandbox Solution中调用前面创建的full trust proxy,这就要用到SPUtility.ExecuteRegisteredProxyOperation方法。
下面进入实例操作 :(为此我创建了一个新的网站集 http://sd1-sp1dev:2100/site/SPTestSite,后面所作的测试都将基于此测试网站集进行)
1、在VS2010中新创建一个空的Sharepoint Project (取名为:ZLTestSandBoxSolutionProxy),把它关联到我们上面提到的测试网站上。

2、此Project下新建一个目录,取名TestProxyCode,并在此目录下新建两个类,分别命名为CreateFileOperation.cs 和 FileArgs.cs

3、修改上面创建的两个类CreateFileOperation.cs 和FileArgs.cs。使其内容分别如下:
CreateFileOperation.cs 类的代码如下
using System.Collections.Generic;
using System.Linq;
using System.Text;
using System.IO;
using Microsoft.SharePoint;
using Microsoft.SharePoint.Administration;
using Microsoft.SharePoint.UserCode;
namespace ZLTestSandBoxSolutionProxy.TestProxyCode
{
public class CreateFileOperation : SPProxyOperation
{
public override object Execute(SPProxyOperationArgs args)
{
if (args != null)
{
FileArgs fileArgs = args as FileArgs;
//在指定的位置创建一个文件,并将会写入用户在Webpart控件中输入的内容
string fileName = "C:\\inetpub\\wwwroot\\wss\\VirtualDirectories\\2100\\" + fileArgs.FileName.Trim();
FileStream fStream = new FileStream(fileName, FileMode.CreateNew);
//用户输入的内容将通过FileArgs参数类传递给CreateFileOperation类
fStream.Write(System.Text.ASCIIEncoding.ASCII.GetBytes(fileArgs.FileContents), 0, fileArgs.FileContents.Length);
fStream.Flush();
fStream.Close(); ;
return fileArgs.FileContents;
}
else return null;
}
}
}
FileArgs.cs 类的代码如下:
using System.Collections.Generic;
using System.Linq;
using System.Text;
using Microsoft.SharePoint;
using Microsoft.SharePoint.UserCode;
namespace ZLTestSandBoxSolutionProxy.TestProxyCode
{
//定义full trust proxy的传参类,它继承自SPProxyOperationArgs
[Serializable]
public class FileArgs:SPProxyOperationArgs
{
public string FileContents { get; set; }
public string FileName { get; set; }
public FileArgs(string fileContents, string fileName)
{
this.FileContents = fileContents;
this.FileName = fileName;
}
}
}
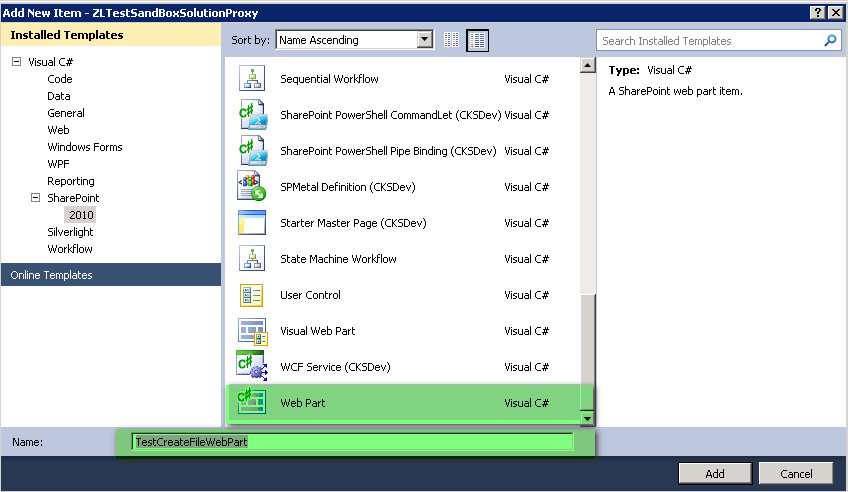
4、通常我们会把前面开发的两个类打包成一个独立的DLL,此处为了让测试变得简单些,我们直接在此同一Project中创建调用Full trust proxy的 sandbox sloution web part。所以,直接选择此Project,添加新项目,选择新建Webpart,命名为:TestCreateFileWebPart。
; 
using System.ComponentModel;
using System.Web;
using System.Web.UI;
using System.Web.UI.WebControls;
using System.Web.UI.WebControls.WebParts;
using Microsoft.SharePoint;
using Microsoft.SharePoint.WebControls;
using Microsoft.SharePoint.UserCode;
using Microsoft.SharePoint.Administration;
using Microsoft.SharePoint.Utilities;
namespace ZLTestSandBoxSolutionProxy.TestCreateFileWebPart
{
[ToolboxItemAttribute(false)]
public class TestCreateFileWebPart : WebPart
{
private TextBox txtFileContents = new TextBox();
private TextBox txtFileName = new TextBox() { Text = @"ZLProxyInput.txt" };
private Button createFileButton = new Button() { Text = "Create File" };
private Label results = new Label();
private Label lblFileContent = new Label() { Text = "Input File Content :" };
private Label lblFileName = new Label() { Text = "Input File Name :" };
public TestCreateFileWebPart()
{
createFileButton.Click += (object sender, EventArgs e) =>
{
results.Text =
SPUtility.ExecuteRegisteredProxyOperation("ZLTestSandBoxSolutionProxy, Version=1.0.0.0, Culture=neutral, PublicKeyToken=3ecabc9591c4d5a0",
"ZLTestSandBoxSolutionProxy.TestProxyCode.CreateFileOperation",
new ZLTestSandBoxSolutionProxy.TestProxyCode.FileArgs(txtFileContents.Text,txtFileName.Text)).ToString();
};
}
protected override void CreateChildControls()
{
Table layoutTable = new Table();
//Input File Content Row
layoutTable.Rows.Add(new TableRow());
layoutTable.Rows[0].Cells.Add(new TableCell());
layoutTable.Rows[0].Cells.Add(new TableCell());
//Input File Location Row
layoutTable.Rows.Add(new TableRow());
layoutTable.Rows[1].Cells.Add(new TableCell());
layoutTable.Rows[1].Cells.Add(new TableCell());
//Create File button Row
layoutTable.Rows.Add(new TableRow());
layoutTable.Rows[2].Cells.Add(new TableCell() { ColumnSpan = 2 });
//Show Result Row
layoutTable.Rows.Add(new TableRow());
layoutTable.Rows[3].Cells.Add(new TableCell() { ColumnSpan = 2 });
layoutTable.Rows[0].Cells[0].Controls.Add(lblFileContent);
layoutTable.Rows[0].Cells[1].Controls.Add(txtFileContents);
layoutTable.Rows[1].Cells[0].Controls.Add(lblFileName);
layoutTable.Rows[1].Cells[1].Controls.Add(txtFileName);
layoutTable.Rows[2].Cells[0].Controls.Add(createFileButton);
layoutTable.Rows[3].Cells[0].Controls.Add(results);
this.Controls.Add(layoutTable);
base.CreateChildControls();
}
protected override void RenderContents(HtmlTextWriter writer)
{
base.RenderContents(writer);
}
}
}
WebPart的代码说明:
a、我们在此Sandbox Solution的Webpart中创建了两个TextBox控件,分别用来输入文件的内容和文件名,还有一个按钮控件,为此按钮控件Attach了Click事件,在此事件中通过ExecuteRegisteredProxyOperation方法调用我们前面创建的full trust proxy,此proxy把两个TextBox控件中的文本内容作为参数初始化给proxy的传参类FileArgs。
b、在ExecuteRegisteredProxyOperation方法中,第一个参数是ExecuteRegisteredProxyOperation方法需要知道的注册在Sharepoint中的那个full trust proxy的DLL程序集(ProxyAssemblyName)的名称,第二个是此程序集中的操作类(Operation Class Name)的名称,第三个是此程序集的传参类的初始化值。需要注意的是,你必须要在自己的测试环境中修改第一个参数中的Token值,否则你的测试就不会成功,要取得此Token值,请参见另一篇文章:Sharepoint学习笔记--- 快速确定VisualStudio2010当前Project的assembly name
。按照此文的操作取得Output窗口中的值后,Copy并Paste到此处就行了。
6、编译此Project,把Bin\debug目录下的DLL部署到GAC中。如何部署可以参见此文:Sharepoint学习笔记-- 如何在Windows 2008中部署dll到GAC
7、部署到DLL后,我们需要借助Powershell来把此DLL注册为Sharepoint的full trust proxy。操作步骤如下
7.1打开txt记事本,在里面输入如下内容,然后保存为ZLTestRegisterProxy.ps1。
$userCodeService = [Microsoft.SharePoint.Administration.SPUserCodeService]::Local
$proxyOperationType = new-object -typename Microsoft.SharePoint.UserCode.SPProxyOperationType -argumentlist $assemblyName, $typeName
$userCodeService.ProxyOperationTypes.Add($proxyOperationType)
$userCodeService.Update()
7.2 在Powershell命令窗口中运行上面的文件

注册成功后就可以在我们的Webpart中去测试这个full trust proxy了。
在测试之前 ,请用如下的PowerShell命令去验证你的Proxy是否已成功注册到Sharepoint中
运行后你会看到许多已经注册成功的proxy的列表,看看你刚才注册的那个proxy是否在里面。
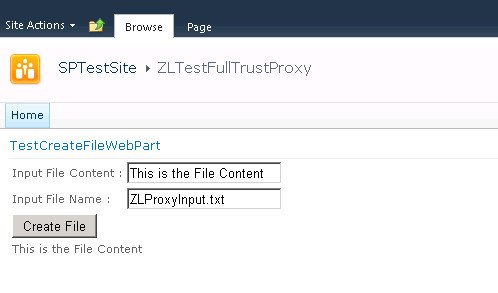
8、打包和部署我们的Project,这样我们就可以在我们的测试网站上新建一个Webpart Page页来嵌入我们开发的Webpart,外观如下图
; 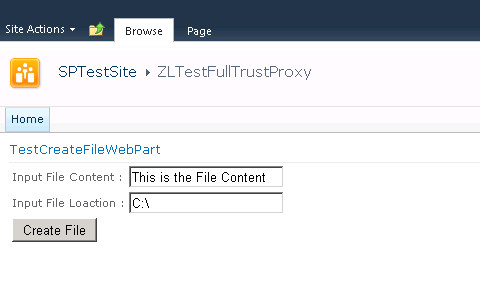
输入文件名(是txt文档)和文件内容,点击Create File按钮,执行成功,如下图
;
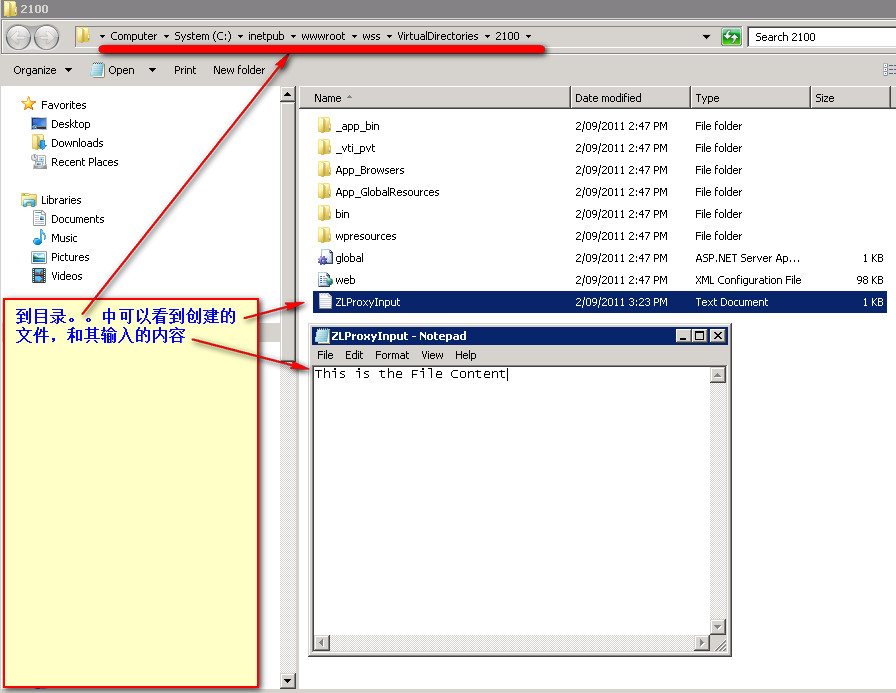
到对应目录下去找到文件如下:
;
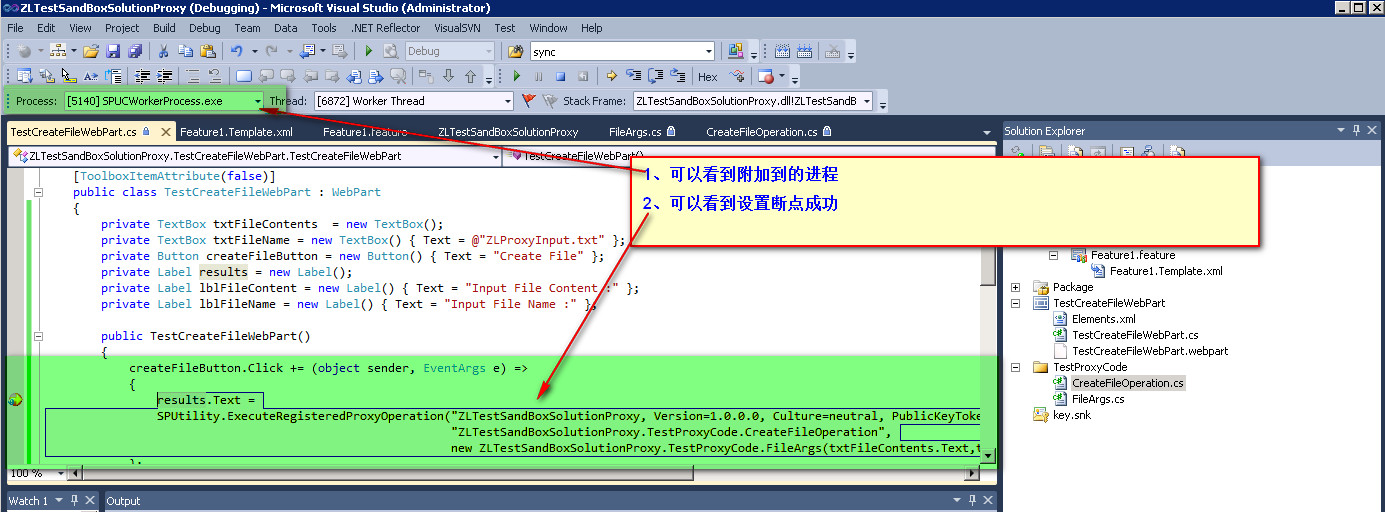
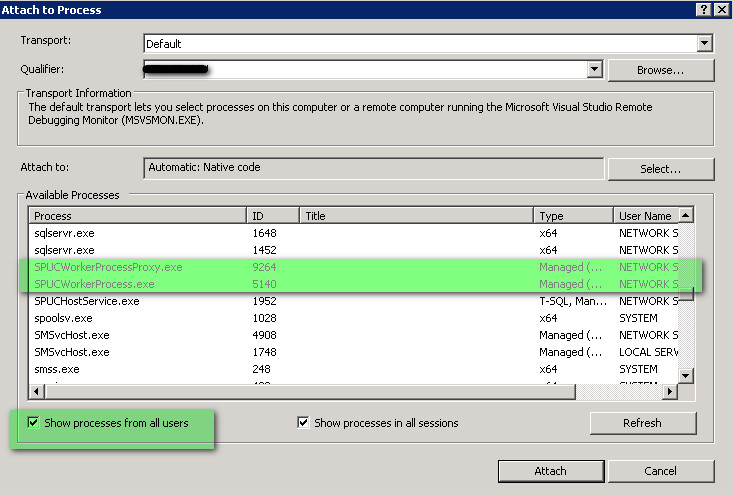
注意:如果你在测试时做了改动,或者开始时没有调试成功,则每一次你重新编译了这个Project,你都需要重新部署DLL到GAC,Register它为full trust proxy,并重新部署你的Webpart。尤其在你对此Project进行调试时更是如此。如果要调试错误,记住,要Attach
SPUCWorkerProcess和SPUCWorkerProxyProcess两个进程,前一个进程是我们的Sandbox Solution所在进程,我们可以在我们Webpart的SPUtility.ExecuteRegisteredProxyOperation方法上设置断点看观测它的执行。后一个进程是我们的full trust proxy运行的进程,我们可以在proxy的CreateFileOperation类的 FileStream fStream = new FileStream(fileName, FileMode.CreateNew)代码行设置断点来观测它的执行。
调试过程如下图:
;
;