SilverLight学习笔记--silverlight如何在客户端写入文件
Silverlight出于安全考虑,不允许在客户端读写客户端硬盘上的文件。但是它还是给程序员提供了变通的方法--独立存储(Isolated Storage)
Isolated Storage是Silverlight 2中提供的一个客户端安全的存储,它是一个与Cookie机制类似的局部信任机制。独立存储机制的APIs 提供了一个虚拟的文件系统和可以访问这个虚拟文件系统的数据流对象。Silverlight中的独立存储是基于 .NET Framework中的独立存储来建立的,所以它仅仅是.NET Framework中独立存储的一个子集。
Silverlight中的独立存储有以下一些特征:
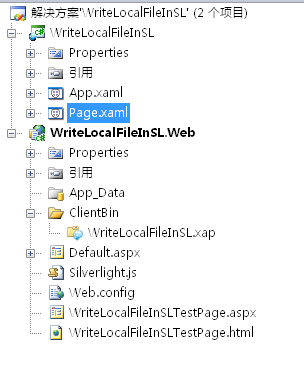
首先,我们在VS2008中建立新Silverligth应用程序,命名为:WriteLocalFileInSL。
如图:

下面我们先建立程序界面:page.xaml代码如下 :
(在本例中我们命名为:MyText.txt)的文件中。再点击"读出文件"按钮,把MyText.txt文件中的文本内容读取出来,显示在右侧文本框内。

在page.xaml.cs后台代码中,我们要使用IsolatedStorage就必须先引入命名空间:System.IO.IsolatedStorage,
此空间下有一些类用于访问Isolated Storage的文件系统。
下面是写入文件的代码:
 Code
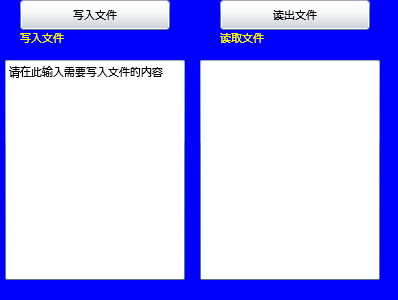
按下F5,运行,效果如下:
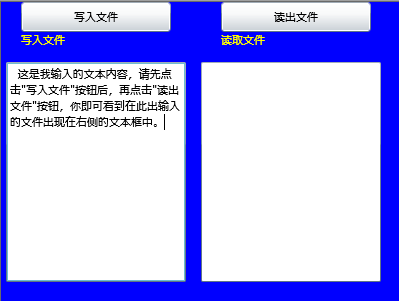
正在左侧文本框输入文本内容,然后按下写入文件按钮进行保存,效果如下:

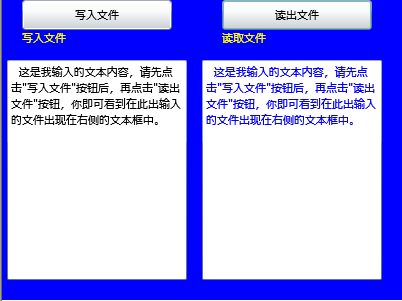
保存文件后,再按下读出文件按钮显示刚才保存的文件内容在右侧文本框内:

我们还可以运用IsolatedStorage来操作Binary和Xml类型的文件。
需要注意的是,用户可以通过Silverlight设置可以禁用这个功能
前往:Silverlight学习笔记清单
本文参照了部分网络资料,希望能够抛砖引玉,大家共同学习。
(转载本文请注明出处)
Isolated Storage是Silverlight 2中提供的一个客户端安全的存储,它是一个与Cookie机制类似的局部信任机制。独立存储机制的APIs 提供了一个虚拟的文件系统和可以访问这个虚拟文件系统的数据流对象。Silverlight中的独立存储是基于 .NET Framework中的独立存储来建立的,所以它仅仅是.NET Framework中独立存储的一个子集。
Silverlight中的独立存储有以下一些特征:
1.每个基于Silverlight的应用程序都被分配了属于它自己的一部分存储空间, 但是应用程序中的程序集却是在存储空间中共享的。一个应用程序被服务器赋给了一个唯一的固定的标识值。
基于Silverlight的应用程序的虚拟文件系统现在就以一个标识值的方式来访问了。这个标识值必须是一个常量,这样每次应用程序运行时才可以找到这个共享的位置。
2.独立存储的APIs 其实和其它的文件操作APIs类似,比如 File 和 Directory 这些用来访问和维护文件或文件夹的类。 它们都是基于FileStream APIs 来维护文件的内容的。
3.独立存储严格的限制了应用程序可以存储的数据的大小,目前的上限是每个应用程序为1 MB。
下面,我们就要初试如何使用Isolated Storage来读写客户端的文件(以text文件为例)基于Silverlight的应用程序的虚拟文件系统现在就以一个标识值的方式来访问了。这个标识值必须是一个常量,这样每次应用程序运行时才可以找到这个共享的位置。
2.独立存储的APIs 其实和其它的文件操作APIs类似,比如 File 和 Directory 这些用来访问和维护文件或文件夹的类。 它们都是基于FileStream APIs 来维护文件的内容的。
3.独立存储严格的限制了应用程序可以存储的数据的大小,目前的上限是每个应用程序为1 MB。
首先,我们在VS2008中建立新Silverligth应用程序,命名为:WriteLocalFileInSL。
如图:

下面我们先建立程序界面:page.xaml代码如下 :
<UserControl x:Class="WriteLocalFileInSL.Page"
xmlns="http://schemas.microsoft.com/winfx/2006/xaml/presentation"
xmlns:x="http://schemas.microsoft.com/winfx/2006/xaml"
Width="400" Height="300">
<StackPanel Width="400" Height="400" Orientation="Vertical" Background="Blue" >
<StackPanel Width="400" Height="30" Orientation="Horizontal" Background="Blue">
<Button x:Name="btnWrite" Height="30" Width="150" Content="写入文件" Click="btnWrite_Click" Margin="20,0,0,0" ></Button>
<Button x:Name="btnRead" Height="30" Width="150" Content="读出文件" Click="btnRead_Click" Margin="50,0,0,0" ></Button>
</StackPanel>
<StackPanel Width="400" Height="20" Orientation="Horizontal" Background="Blue">
<TextBlock Height="20" Width="150" Text="写入文件" Margin="20,0,0,0" Foreground="Yellow" ></TextBlock>
<TextBlock Height="20" Width="150" Text="读取文件" Margin="50,0,0,0" Foreground="Yellow" ></TextBlock>
</StackPanel>
<StackPanel Width="400" Height="250" Orientation="Horizontal" Background="Blue">
<TextBox x:Name="tbTexts" Height="220" Width="180" Foreground="Black" TextWrapping="Wrap" Margin="5,0,10,10" Text="请在此输入需要写入文件的内容"></TextBox>
<TextBox x:Name="tbTextsRead" Height="220" Width="180" Foreground="Blue" TextWrapping="Wrap" Margin="5,0,10,10"></TextBox>
</StackPanel>
</StackPanel>
</UserControl>
在界面上,我们设置了两个按钮,两个文本框,我们要先在左边文本框中输入文本,然后点击“写入文件”按钮把左侧文本框中的文本写入我们指定名称xmlns="http://schemas.microsoft.com/winfx/2006/xaml/presentation"
xmlns:x="http://schemas.microsoft.com/winfx/2006/xaml"
Width="400" Height="300">
<StackPanel Width="400" Height="400" Orientation="Vertical" Background="Blue" >
<StackPanel Width="400" Height="30" Orientation="Horizontal" Background="Blue">
<Button x:Name="btnWrite" Height="30" Width="150" Content="写入文件" Click="btnWrite_Click" Margin="20,0,0,0" ></Button>
<Button x:Name="btnRead" Height="30" Width="150" Content="读出文件" Click="btnRead_Click" Margin="50,0,0,0" ></Button>
</StackPanel>
<StackPanel Width="400" Height="20" Orientation="Horizontal" Background="Blue">
<TextBlock Height="20" Width="150" Text="写入文件" Margin="20,0,0,0" Foreground="Yellow" ></TextBlock>
<TextBlock Height="20" Width="150" Text="读取文件" Margin="50,0,0,0" Foreground="Yellow" ></TextBlock>
</StackPanel>
<StackPanel Width="400" Height="250" Orientation="Horizontal" Background="Blue">
<TextBox x:Name="tbTexts" Height="220" Width="180" Foreground="Black" TextWrapping="Wrap" Margin="5,0,10,10" Text="请在此输入需要写入文件的内容"></TextBox>
<TextBox x:Name="tbTextsRead" Height="220" Width="180" Foreground="Blue" TextWrapping="Wrap" Margin="5,0,10,10"></TextBox>
</StackPanel>
</StackPanel>
</UserControl>
(在本例中我们命名为:MyText.txt)的文件中。再点击"读出文件"按钮,把MyText.txt文件中的文本内容读取出来,显示在右侧文本框内。

在page.xaml.cs后台代码中,我们要使用IsolatedStorage就必须先引入命名空间:System.IO.IsolatedStorage,
此空间下有一些类用于访问Isolated Storage的文件系统。
下面是写入文件的代码:
// Get the storage file for the application
//Step1, you need to access an IsolatedStorageFile.
//This is done by calling IsolatedStorageFile.GetUserStoreForApplication() or IsolatedStorageFile.GetUserStoreForSite().
//There are some differences between the functions, but either will get you a private file system in which you can read and write files.
IsolatedStorageFile isf = IsolatedStorageFile.GetUserStoreForApplication();
// Open&Create the file for writing
//Step2, you need create or open your file almost as you would normally.
//Instead of using FileStream, you would use IsolatedStorageFileStream (which is derived from FileStream).
//This means that once you have your stream, you can use it anywhere you would have normally used a normal FileStream.
stream = new IsolatedStorageFileStream("MyText.txt", System.IO.FileMode.Create, System.IO.FileAccess.Write, isf);
// Use the stream normally in a TextWriter
//Step3, you read or write as you normally would.
System.IO.TextWriter writer = new System.IO.StreamWriter(stream);
writer.WriteLine(this.tbTexts.Text.ToString());
writer.Close(); // Close the writer so data is flushed
stream.Close(); // Close the stream too
下面是读取文件的代码://Step1, you need to access an IsolatedStorageFile.
//This is done by calling IsolatedStorageFile.GetUserStoreForApplication() or IsolatedStorageFile.GetUserStoreForSite().
//There are some differences between the functions, but either will get you a private file system in which you can read and write files.
IsolatedStorageFile isf = IsolatedStorageFile.GetUserStoreForApplication();
// Open&Create the file for writing
//Step2, you need create or open your file almost as you would normally.
//Instead of using FileStream, you would use IsolatedStorageFileStream (which is derived from FileStream).
//This means that once you have your stream, you can use it anywhere you would have normally used a normal FileStream.
stream = new IsolatedStorageFileStream("MyText.txt", System.IO.FileMode.Create, System.IO.FileAccess.Write, isf);
// Use the stream normally in a TextWriter
//Step3, you read or write as you normally would.
System.IO.TextWriter writer = new System.IO.StreamWriter(stream);
writer.WriteLine(this.tbTexts.Text.ToString());
writer.Close(); // Close the writer so data is flushed
stream.Close(); // Close the stream too
IsolatedStorageFile isf = IsolatedStorageFile.GetUserStoreForApplication();
// Open the file for reading
stream = new IsolatedStorageFileStream("MyText.txt", System.IO.FileMode.Open, System.IO.FileAccess.Read,isf);
// Use the stream normally in a TextReader
System.IO.TextReader reader = new System.IO.StreamReader(stream);
string sLine = reader.ReadLine();
this.tbTextsRead.Text = sLine;
reader.Close(); // Close the reader
stream.Close(); // Close the stream
而Page.xaml.cs的代码全部如下:// Open the file for reading
stream = new IsolatedStorageFileStream("MyText.txt", System.IO.FileMode.Open, System.IO.FileAccess.Read,isf);
// Use the stream normally in a TextReader
System.IO.TextReader reader = new System.IO.StreamReader(stream);
string sLine = reader.ReadLine();
this.tbTextsRead.Text = sLine;
reader.Close(); // Close the reader
stream.Close(); // Close the stream
正在左侧文本框输入文本内容,然后按下写入文件按钮进行保存,效果如下:

保存文件后,再按下读出文件按钮显示刚才保存的文件内容在右侧文本框内:

我们还可以运用IsolatedStorage来操作Binary和Xml类型的文件。
需要注意的是,用户可以通过Silverlight设置可以禁用这个功能
前往:Silverlight学习笔记清单
本文参照了部分网络资料,希望能够抛砖引玉,大家共同学习。
(转载本文请注明出处)


