iOS开发基础-九宫格坐标(1)

一、功能分析
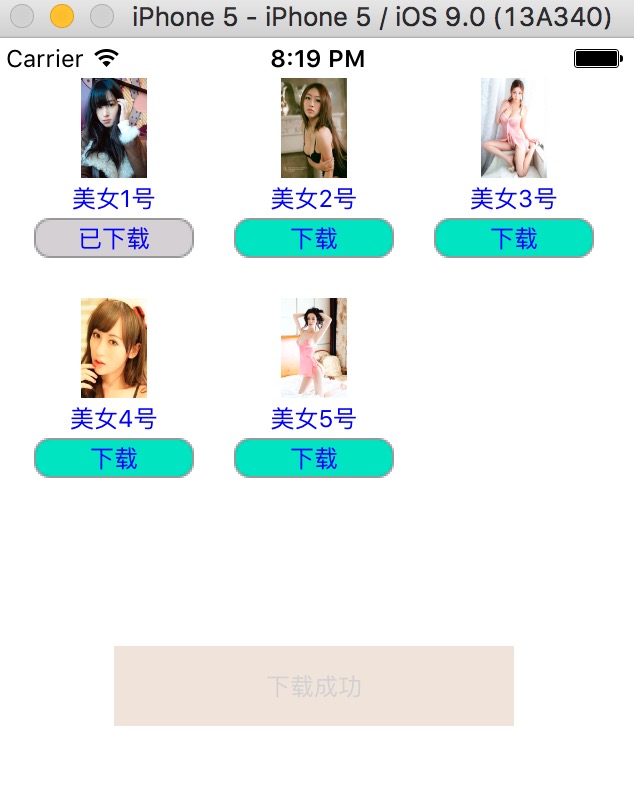
1)以九宫格展示图片信息,每一个 UIView 包含一个 UIImageView 、一个 UILabel 和一个 UIButton 。
2)加载App数据,根据数据长度创建对应的格子数;
3)点击下载按钮后,做出相应操作。
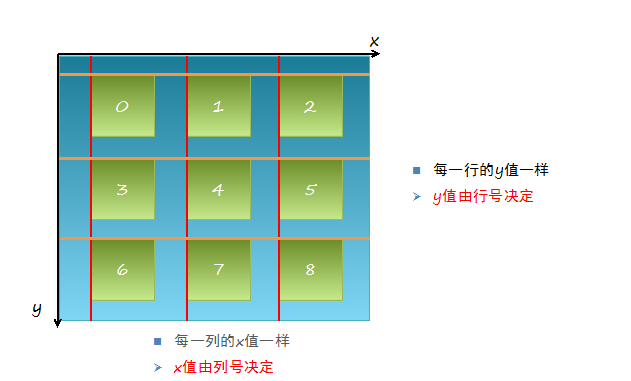
二、九宫格信息分析

三、实例代码
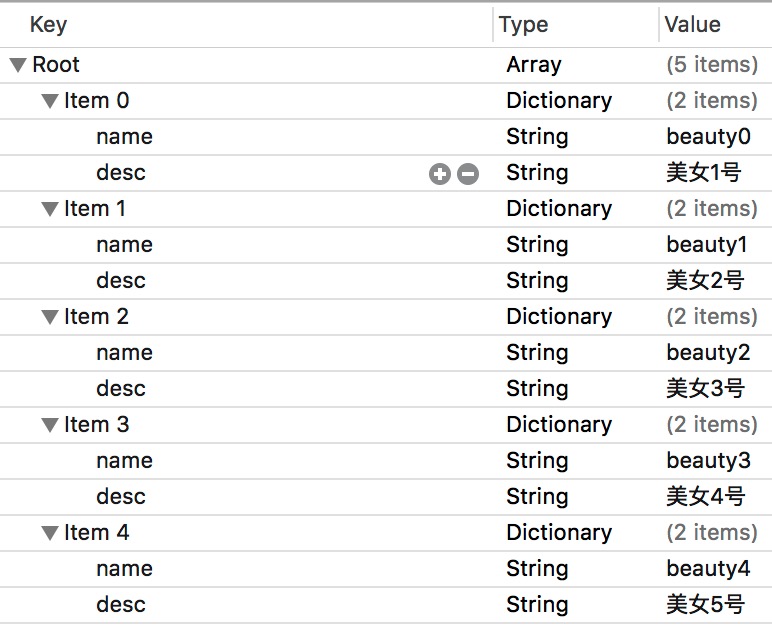
新建Plist属性文件,并命名为Data,修改属性列表成如下形式:

定义每一个 UIview 的宽度和高度:
//ViewController.m
const CGFloat appViewWidth = 80;        //子视图宽度
const CGFloat appViewHeight = 90;       //子视图高度
在类扩展中声明 NSArray 属性,用于存放属性列表中的数据:
@interface ViewController ()
@property (nonatomic, weak) NSArray *apps;
@end
懒加载 apps 属性,即重写 getter 方法:
1 - (NSArray *)apps {
2     if (!_apps) {
3         NSString *path = [[NSBundle mainBundle] pathForResource:@"Data" ofType:@"plist"];
4         _apps = [NSArray arrayWithContentsOfFile:path];
5     }
6     return _apps;
7 }
修改 viewDidLoad 方法,让其加载视图:
 1 - (void)viewDidLoad {
 2     [super viewDidLoad];
 3
 4     int totalColumn = 3;        //3列
 5     CGFloat margin = (self.view.frame.size.width - totalColumn*appViewWidth) / (totalColumn + 1);
 6     int count = self.apps.count;
 7     NSLog(@"%d", count);
 8
 9     for (int i = 0; i < count; i++) {
10         int row = i/totalColumn;        //行号,从0开始
11         int column = i%totalColumn;     //列号,从0开始
12         CGFloat appViewX = margin + (margin + appViewWidth) * column;       //子视图的X坐标
13         CGFloat appViewY = margin + (margin + appViewHeight) * row;      //子视图的Y坐标
14
15         //创建UIView控件
16         UIView *appView = [[UIView alloc] initWithFrame:CGRectMake(appViewX, appViewY, appViewWidth, appViewHeight)];
17         [self.view addSubview:appView];
18         //创建上述UIView控件的子视图,创建图像信息
19         UIImageView *appImageView = [[UIImageView alloc] initWithFrame:CGRectMake(0, 0, 80, 50)];
20         UIImage *appImage = [UIImage imageNamed:self.apps[i][@"name"]];
21         appImageView.image = appImage;
22         [appImageView setContentMode:UIViewContentModeScaleAspectFit];
23         [appView addSubview:appImageView];
24         //创建上述UIView控件的子视图,创建UILabel信息描述标签
25         UILabel *appLabel = [[UILabel alloc] initWithFrame:CGRectMake(0, 50, 80, 20)];
26         [appLabel setText:self.apps[i][@"desc"]];
27         [appLabel setTextAlignment:NSTextAlignmentCenter];
28         [appLabel setFont:[UIFont systemFontOfSize:12.0]];
29         [appLabel setTextColor:[UIColor blueColor]];
30         [appView addSubview:appLabel];
31         //创建下载按钮
32         UIButton *appButton = [UIButton buttonWithType:UIButtonTypeCustom];
33         appButton.frame = CGRectMake(0, 70, 80, 20);
34         [appButton setBackgroundImage:[UIImage imageNamed:@"download"] forState:UIControlStateNormal];
35         [appButton setBackgroundImage:[UIImage imageNamed:@"downloaded"] forState:UIControlStateHighlighted];
36         [appButton setTitle:@"下载" forState:UIControlStateNormal];
37         appButton.titleLabel.font = [UIFont systemFontOfSize:12.0];
38         [appButton setTitleColor:[UIColor blueColor] forState:UIControlStateNormal];
39         [appView addSubview:appButton];
40         [appButton addTarget:self action:@selector(buttonClicked:) forControlEvents:UIControlEventTouchUpInside];
41     }
42 }
创建下载按钮的响应事件:
 1 - (void)buttonClicked:(UIButton *)button {
 2     //动画标签
 3     UILabel *animaLabel = [[UILabel alloc] initWithFrame:CGRectMake(self.view.center.x-100, self.view.center.y+20, 200, 40)];
 4     [animaLabel setText:@"下载成功"];
 5     [animaLabel setTextAlignment:NSTextAlignmentCenter];
 6     animaLabel.font = [UIFont systemFontOfSize:12.0];
 7     [animaLabel setBackgroundColor:[UIColor brownColor]];
 8     [animaLabel setAlpha:0.0];
 9     [self.view addSubview:animaLabel];
10
11     [UIView animateWithDuration:4.0 animations:^{
12         //逐渐显示标签
13         [animaLabel setAlpha:1.0];
14     } completion:^(BOOL finished) {
15         //动画结束时,移除显示下载完成的标签
16         [animaLabel removeFromSuperview];
17         //已下载时,改变按钮标题,及背景图片
18         [button setTitle:@"已下载" forState:UIControlStateNormal];
19         [button setBackgroundImage:[UIImage imageNamed:@"downloaded"] forState:UIControlStateNormal];
20         //已下载完成的,取消按钮下载触发事件
21         [button removeTarget:self action:@selector(buttonClicked:) forControlEvents:UIControlEventTouchUpInside];
22     }];
23 }
实例:

参考博客:iOS开发UI篇—九宫格坐标计算
实例代码:http://pan.baidu.com/s/1qXyZhWK


