

一.DialogFragment简单介绍:
1.基本概念
DialogFrament 指一个与fragment建立了关联的Dialog, 随fragment生, 随fragment死, 即Dialog随Fragment的生命周期而变.
2.使用背景
像常规的Dialog或者是Popupwindow, 都依附于Activity而存在, 如果Activity突然销毁了, 在Dialog和Popupwindow已经show的情况下, 程序会报android.view.WindowLeaked, 当然也是有办法解决的, 在Activity的onDestroy方法中判断不为空时dismiss即可
DialogFrament的优点有 ① 保持和Fragment相同的生命周期 ② 屏幕旋转相关数据不会被销毁 ③ 像Activity,Fragment一样网络请求 (英语趣配音这个App 在点击1请求得到单词发音,如果还没响应,再点击2返回时, 会一直卡在那里, 应该是线程阻塞了,导致这个原因很可能 是此App的弹框用的是PopupWindow, 然后在 PopupWindow中做网络请求了, 在调用 onBackPressed方法时, 网络请求还没完成导致的, 欢迎对这个假设进行反驳)

可以说DialogFragment 能够实现 Dialog 和 PopupWindow能实现的功能, 何乐而不为呢
二.DialogFragment的创建
1.两种不同的创建方式
①和②的整体流程都是如此:

① .使用onCreateView
在onCreate中接收传递过来的参数
在onCreateView中创建布局文件
在onViewCreated中对布局控件处理
在onStart中设置布局在屏幕中的属性
使用展示Fragment的方式展示DialogFragment
这里将重点讲下onStart方法中的操作
为什么不在onCreateView中对布局在屏幕中的位置,宽高进行设置的,而是要在onStart中操作?
其实看下DialogFragment 的onStart()的源码会发现
@Override
    public void onStart() {
        super.onStart();
        if (mDialog != null) {
            mViewDestroyed = false;
            mDialog.show();
        }
    }
注意mDialog.show();
回想下当初是怎么设置自定义Dialog的位置和宽高的,是不是先调用show方法,再进行设置Dialog位置和宽高才有效, 同理这里也是如此; 因此就不能再onCreateView中设置Dialog的布局属性了.
可以以BottomDialog作为参考
还有个问题,如何DialogFragment在屏幕中的位置
和Dialog一样,DialogFragment默认是在屏幕中心, 如果你想把他设置在某个具体的位置, 可以把它先设置到坐标(0,0)的位置, 然后设置DialogFragment离左边的距离是多少,离顶部的距离是多少
@Override
    public void onStart() {
        super.onStart();
        Window window = getDialog().getWindow();
        WindowManager.LayoutParams params = window.getAttributes();
        params.gravity = Gravity.TOP | Gravity.LEFT;
        params.y = mTop;
        params.x = mLeft;
        window.setAttributes(params);
        window.setBackgroundDrawable(new ColorDrawable(Color.parseColor("#00000000")));
    }
可以这么说,DialogFragment 就是 Dialog套了一层 Fragment的皮, 源码也不长,真值得研究
②. onCreateDialog(Bundle)
可以做从onCreate到onStart的事, 可以说是一步到位
三.DialogFragment应用场景
1. 底部弹出框 如分享/打开相册+底部弹出动画
2. 请求网络加载中,清理缓存如ProgressBar
3. QQ列表长按 弹出框提示 置顶,删除
场景一

为了显得易读, 我觉得 用① .使用onCreateView比较好
这里有个问题没搞清楚?
public boolean onTouch(View v, MotionEvent event) { dismiss(); return true; }
return true 弹出动画会执行
return false 弹出动画就不执行, 哪位高人知道的还望指点
public class BottomDialog extends DialogFragment {

    private String mTitle;
    private String mCancle;
    private String[] mItems;
    private BottomDialogListener mListener;
    private boolean mIsDismiss = false;
    private View mRootView;

    public static BottomDialog newInstance(String title, String cancle, String[] items) {
        BottomDialog dialog = new BottomDialog();
        // Supply as arguments.
        Bundle args = new Bundle();
        args.putString("title", title);
        args.putString("cancle", cancle);
        args.putStringArray("items", items);
        dialog.setArguments(args);
        return dialog;
    }

    @Override
    public void onCreate(Bundle savedInstanceState) {
        super.onCreate(savedInstanceState);
        mTitle = getArguments().getString("title");
        mCancle = getArguments().getString("cancle");
        mItems = getArguments().getStringArray("items");
    }

    @Nullable
    @Override
    public View onCreateView(LayoutInflater inflater, @Nullable ViewGroup container, Bundle savedInstanceState) {
        Log.e("Wislie", "onCreateView");
        getDialog().requestWindowFeature(Window.FEATURE_NO_TITLE);
        mRootView = inflater.inflate(R.layout.dialog_bottom, container, false);
        mRootView.startAnimation(AnimationUtils.loadAnimation(getActivity(), R.anim.fade_in));
        return mRootView;
    }

    @Override
    public void onViewCreated(View view, @Nullable Bundle savedInstanceState) {
        super.onViewCreated(view, savedInstanceState);
        Log.e("Wislie", "onCreateDialog");

        TextView title = (TextView) view.findViewById(R.id.title);
        ListView listView = (ListView) view.findViewById(R.id.listview);
        TextView cancel = (TextView) view.findViewById(R.id.cancel);
        title.setText(mTitle);
        listView.setAdapter(new ArrayAdapter(getActivity(),
                android.R.layout.simple_list_item_1, android.R.id.text1, mItems));
        cancel.setText(mCancle);

        listView.setOnItemClickListener(new AdapterView.OnItemClickListener() {
            @Override
            public void onItemClick(AdapterView<?> parent, View view, int position, long id) {
                if (mListener != null) {
                    mListener.onItemClick(position);
                }
            }
        });

        cancel.setOnClickListener(new View.OnClickListener() {
            @Override
            public void onClick(View v) {
                dismiss();
                if (mListener != null) {
                    mListener.onConfirm();
                }

            }
        });
    }

    @Override
    public void onStart() {
        super.onStart();
        Log.e("Wislie", "onStart");
        Window window = getDialog().getWindow();
        WindowManager.LayoutParams params = window.getAttributes();

        params.gravity = Gravity.BOTTOM;
        params.width = WindowManager.LayoutParams.MATCH_PARENT;
        window.setAttributes(params);

        window.setBackgroundDrawable(new ColorDrawable(Color.parseColor("#00000000")));
        window.getDecorView().setOnTouchListener(new View.OnTouchListener() {
            @Override
            public boolean onTouch(View v, MotionEvent event) {
                dismiss();
                return true;
            }
        });
    }

    /*
    * 也可以通过 onCreateDialog 来创建Dialog
    @Override
    public Dialog onCreateDialog(Bundle savedInstanceState) {

        Dialog dialog = new Dialog(getActivity());
        dialog.requestWindowFeature(Window.FEATURE_NO_TITLE);
        dialog.setContentView(R.layout.dialog_bottom);
        Window window = dialog.getWindow();
        WindowManager.LayoutParams params = window.getAttributes();

        params.gravity = Gravity.BOTTOM;
        params.width = WindowManager.LayoutParams.MATCH_PARENT;
        params.height = WindowManager.LayoutParams.WRAP_CONTENT;
        window.setAttributes(params);
        return dialog;
    }*/

    /**
     *  弹出对话框
     * @param fragmentManager
     */
    public void showDialog(FragmentManager fragmentManager) {
        if(this == null) return;

        // DialogFragment.show() will take care of adding the fragment
        // in a transaction.  We also want to remove any currently showing
        // dialog, so make our own transaction and take care of that here.
        FragmentTransaction ft = fragmentManager.beginTransaction();
        Fragment prev = fragmentManager.findFragmentByTag(getTag());
        if (prev != null) {
            ft.remove(prev);
        }
        ft.addToBackStack(null);
        // Create and show the dialog.
        show(ft, getTag());
    }

    /**
     * 对话框消失
     */
    @Override
    public void dismiss() {

        if (mIsDismiss) {
            return;
        }
        mIsDismiss = true;

        Animation fadeOutAnim = AnimationUtils.loadAnimation(getActivity(), R.anim.fade_out);
        mRootView.startAnimation(fadeOutAnim);
        fadeOutAnim.setAnimationListener(new Animation.AnimationListener() {
            @Override
            public void onAnimationStart(Animation animation) {

            }

            @Override
            public void onAnimationEnd(Animation animation) {
                Log.e("Wislie","animation end");
               BottomDialog.super.dismiss();
            }

            @Override
            public void onAnimationRepeat(Animation animation) {

            }
        });

    }

    public interface BottomDialogListener {

        void onConfirm();

        void onItemClick(int position);
    }

    public void setOnBottomDialogListener(BottomDialogListener listener) {
        mListener = listener;
    }
}
场景二


实现的步骤大同小异, 关键是布局文件
布局文件由一个ProgressBar 和 TextView文本构成, ProgressBar 有个重要的属性 indeterminateDrawable, 指向一个drawable的 xml文件, 该drawable 实现围绕自身旋转, 有多种实现方式
方式1:
<?xml version="1.0" encoding="utf-8"?>
<animated-rotate xmlns:android="http://schemas.android.com/apk/res/android"
    android:drawable="@mipmap/ic_loading_white"
    android:fromDegrees="0"
    android:pivotX="50%"
    android:pivotY="50%"
    android:toDegrees="360" />
方式2: drawable用帧动画集合
场景三
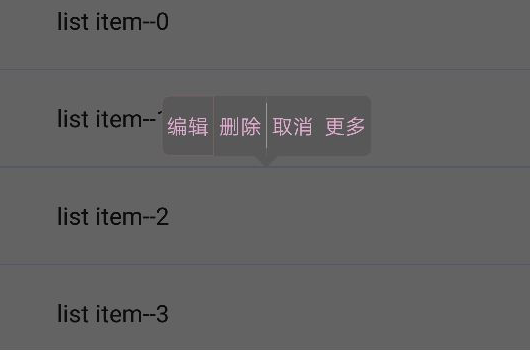
实现这一效果的代码 是参考PopupList, 在Github上可以找到这个资源, 这里我是用DialogFragment实现的
关键的几点思路: 1.横向的布局嵌入TextView; 2.背景点击和文字点击状态的变化; 3.上下三角形的绘制
代码看个大概就好了,因为都是差不多的套路
public class HintDialogFragment extends BaseDialogFragment {

    private int mTop;
    private boolean mIsTop;
    private View mRootView;
    private TriangleView mTopArrow;
    private TriangleView mBottomArrow;

    public static HintDialogFragment newInstance(int top, boolean isTop) {
        HintDialogFragment dialog = new HintDialogFragment();
        // Supply as arguments.
        Bundle args = new Bundle();
        args.putInt("top", top);
        args.putBoolean("isTop",isTop);
        dialog.setArguments(args);
        return dialog;
    }

    @Override
    public void onCreate(Bundle savedInstanceState) {
        super.onCreate(savedInstanceState);
        mTop = getArguments().getInt("top");
        mIsTop = getArguments().getBoolean("isTop");
    }

    @Nullable
    @Override
    public View onCreateView(LayoutInflater inflater, @Nullable ViewGroup container, Bundle savedInstanceState) {
        getDialog().requestWindowFeature(Window.FEATURE_NO_TITLE);
        mRootView = inflater.inflate(R.layout.dialog_hint, container, false);
        mTopArrow = (TriangleView) mRootView.findViewById(R.id.top_arrow);
        mBottomArrow = (TriangleView) mRootView.findViewById(R.id.bottom_arrow);
        if(mIsTop){
            ViewUtils.measureView(mTopArrow);

            mTop = mTop - mTopArrow.getMeasuredHeight();
            mTopArrow.setVisibility(View.VISIBLE);
            mBottomArrow.setVisibility(View.GONE);
        }else{
            mTopArrow.setVisibility(View.GONE);
            mBottomArrow.setVisibility(View.VISIBLE);
        }
        return mRootView;
    }


    @Override
    public void onStart() {
        super.onStart();
        Window window = getDialog().getWindow();
        WindowManager.LayoutParams params = window.getAttributes();
        params.gravity = Gravity.TOP;
        params.y = mTop;
        window.setAttributes(params);
        window.setBackgroundDrawable(new ColorDrawable(Color.parseColor("#00000000")));

    }
}
布局文字是这样子的 dialog_hint.xml:
<?xml version="1.0" encoding="utf-8"?>
<LinearLayout xmlns:android="http://schemas.android.com/apk/res/android"
    xmlns:app="http://schemas.android.com/apk/res-auto"
    android:layout_width="wrap_content"
    android:layout_height="wrap_content"
    android:gravity="center"
    android:orientation="vertical">

    <wislie.com.widgets_sample.widgets.TriangleView
        android:id="@+id/bottom_arrow"
        android:layout_width="30dp"
        android:layout_height="15dp"
        android:visibility="gone"
        app:is_top="false" />

    <wislie.com.widgets_sample.widgets.listview.HintView
        android:id="@+id/horizontal_listview"
        android:layout_width="wrap_content"
        android:layout_height="40dp" />

    <wislie.com.widgets_sample.widgets.TriangleView
        android:id="@+id/top_arrow"
        android:layout_width="30dp"
        android:layout_height="15dp"
        android:visibility="gone"
        app:is_top="true" />

</LinearLayout>
看HintView, 这里主要涉及到文字点击的ColorStateList 和 背景点击的StateListDrawable
public class HintView extends LinearLayout {

    //TextView的样式
    private static final int STYLE_LEFT = 0;
    private static final int STYLE_RIGHT = 1;
    private static final int STYLE_BOTH_SIDES = 2;
    private static final int STYLE_NONE = 3;
    //这里的数量可以随便增加 减少
    private List<String> inputList = Arrays.asList("编辑","删除","取消","更多");

    public HintView(Context context) {
        super(context);
    }

    public HintView(Context context, @Nullable AttributeSet attrs) {
        this(context, attrs, 0);
    }

    public HintView(Context context, @Nullable AttributeSet attrs, int defStyleAttr) {
        super(context, attrs, defStyleAttr);
        init();
    }

    private void init() {

        setOrientation(HORIZONTAL);
        setGravity(Gravity.CENTER_VERTICAL);
        addData(inputList);
    }

    public void addData(List<String> inputDatas){
        if(inputDatas == null || inputDatas.size() == 0) return;

        // 1  2 多个

        switch (inputDatas.size()){
            case 1:
                createTextView(0, inputDatas.get(0), STYLE_BOTH_SIDES);
                break;
            case 2:
                createTextView(0, inputDatas.get(0), STYLE_LEFT);
                createView();
                createTextView(1, inputDatas.get(1), STYLE_RIGHT);
                break;
            default:
                createTextView(0, inputDatas.get(0), STYLE_LEFT);
                createView();
                for(int i = 1; i < inputDatas.size() - 1; i++) {
                    createTextView(i, inputDatas.get(i), STYLE_NONE);
                    createView();
                }
                createTextView(inputDatas.size() - 1, inputDatas.get(inputDatas.size() - 1), STYLE_RIGHT);
                break;
        }

    }

    private void createTextView(int index, String inputData, int style){
        TextView textView = new TextView(getContext());
        textView.setGravity(Gravity.CENTER);
        textView.setText(inputData);
        //文字点击
        ColorStateList colorStateList =  getResources().getColorStateList(R.color.press_text);
        textView.setTextColor(colorStateList);

        //背景点击
        StateListDrawable stateListDrawable = null;
        if(style == STYLE_BOTH_SIDES){
            stateListDrawable = (StateListDrawable) getResources().getDrawable(R.drawable.press_bg_round);
        }else if(style == STYLE_LEFT){
            stateListDrawable = (StateListDrawable) getResources().getDrawable(R.drawable.press_bg_left_round);
        }else if(style == STYLE_RIGHT){
            stateListDrawable = (StateListDrawable) getResources().getDrawable(R.drawable.press_bg_right_round);
        }else if(style == STYLE_NONE){
            stateListDrawable = (StateListDrawable) getResources().getDrawable(R.drawable.press_bg_rect);
        }

        textView.setBackground(stateListDrawable);
        LayoutParams params = new LayoutParams(LayoutParams.WRAP_CONTENT, LayoutParams.MATCH_PARENT);
        params.gravity = Gravity.CENTER;
        textView.setPadding(10, 10, 10, 10);
        textView.setLayoutParams(params);
        textView.setTag(index);
        textView.setOnClickListener(new OnClickListener() {
            @Override
            public void onClick(View v) {
                int index = (int) v.getTag();
                Toast.makeText(getContext(),inputList.get(index), Toast.LENGTH_SHORT).show();
            }
        });
        addView(textView);
    }

    private void createView(){
        View view = new View(getContext());
        LayoutParams params = new LayoutParams(1, LayoutParams.MATCH_PARENT);
        view.setLayoutParams(params);
        view.setBackgroundColor(Color.parseColor("#ffffff"));
        addView(view);
    }
}
TriangleView 三角形的绘制看看就好
public class TriangleView extends View {

    private Paint mPaint = new Paint(Paint.ANTI_ALIAS_FLAG);
    private Path mPath = new Path();

    private float[][] mPointsBottom = new float[3][2];
    private float[][] mPointsTop = new float[3][2];

    private boolean mIsTop = false;
    public TriangleView(Context context) {
        super(context);
    }

    public TriangleView(Context context, @Nullable AttributeSet attrs) {
        this(context, attrs, 0);
    }

    public TriangleView(Context context, @Nullable AttributeSet attrs, int defStyleAttr) {
        super(context, attrs, defStyleAttr);
        TypedArray typedArray = context.obtainStyledAttributes(attrs, R.styleable.TriangleView, defStyleAttr, 0);
        mIsTop = typedArray.getBoolean(R.styleable.TriangleView_is_top, mIsTop);

    }

    private void init(){
        if(getWidth() == 0 || getHeight() == 0) return;
        int width = getWidth();
        int height = getHeight();
        if(mIsTop){
            mPointsTop[0][0] = 0;
            mPointsTop[0][1] = 0;
            mPointsTop[1][0] = width;
            mPointsTop[1][1] = 0;
            mPointsTop[2][0] = width/2;
            mPointsTop[2][1] = height;
        }else{
            mPointsBottom[0][0] = width/2;
            mPointsBottom[0][1] = 0;
            mPointsBottom[1][0] = width;
            mPointsBottom[1][1] = height;
            mPointsBottom[2][0] = 0;
            mPointsBottom[2][1] = height;
        }

    }

    @Override
    protected void onSizeChanged(int w, int h, int oldw, int oldh) {
        super.onSizeChanged(w, h, oldw, oldh);
        init();
    }

    @Override
    protected void onDraw(Canvas canvas) {
        super.onDraw(canvas);
        if(getWidth() == 0 || getHeight() == 0) return;
        mPaint.setColor(Color.parseColor("#585858"));
        mPaint.setStyle(Paint.Style.FILL);
        if(mIsTop){
            mPath.moveTo(mPointsTop[0][0], mPointsTop[0][1]);
            mPath.lineTo(mPointsTop[1][0], mPointsTop[1][1]);
            mPath.lineTo(mPointsTop[2][0], mPointsTop[2][1]);
            mPath.close();
        }else{
            mPath.moveTo(mPointsBottom[0][0], mPointsBottom[0][1]);
            mPath.lineTo(mPointsBottom[1][0], mPointsBottom[1][1]);
            mPath.lineTo(mPointsBottom[2][0], mPointsBottom[2][1]);
            mPath.close();
        }
        canvas.drawPath(mPath, mPaint);
    }
}
在这里, 万分抱歉, 代码没有写明注释~~~
github链接地址:https://github.com/A18767101271/widgets_sample
