wp7天气预报源代码(三UI的制作)下载地址更新
天气预报的部分代码公布到了博客后,很多网友就要求喜欢能下载到整个项目。昨天早上把源代码传到了csdn,晚上写了一篇博文介绍序列化谷歌数据的工具类,顺便把整个项目的源代码下载地址加上了。
很多网友反映csdn的积分问题,在此把下载地址更新一下。
天气预报源代码(一):http://www.cnblogs.com/wildfeng/archive/2012/03/21/2410504.html
wp7天气预报源代码(二)公布源代码下载地址:http://www.cnblogs.com/wildfeng/archive/2012/03/24/2415327.html
新下载地址:http://download.csdn.net/detail/wildfeng04/4170526(无需积分)
原下载地址:http://download.csdn.net/detail/wildfeng04/4168595
因为我最新版本1.5已经在csdn上传过了,系统不让我再传。不管是重新压缩还是更改名字还是新建文件夹都没法跳过。(csdn过滤太严了 - -)
我新上传了1.4版本,有些小BUG,不过不影响整体,通过此链接下载无需积分。
在此郑重声明一下,csdn是我第一个接触的技术交流社区,我写的源代码只会传到csdn的资源里和大家分享。但我也需要积分去下载别人的资料,我也只会在csdn里下载,别的地方都不知道。申请的csdn的号用不了5分钟吧,随便一个新号都能下载的,希望大家都能有消费精神,积分又不是人民币。
下面我顺便介绍一些UI方面的代码吧。
设计UI,用Blend最为适合了。学siliverlight的时候初次解除Blend,感觉很多地方跟flash很像。以前就有点flash的底子,对于Blend就没有感觉到那么难了。
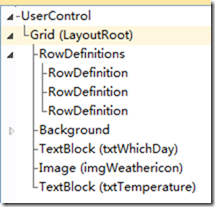 此空间的文档大纲
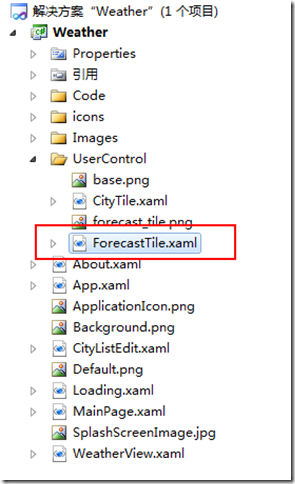
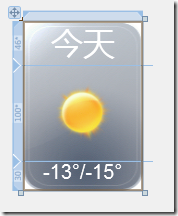 可以很清晰得看出,这是由一个三行一列的布局表格组成,行高分别为46*、100*、30。每一行中各有一个控件。代码如下:
UserControl标签就是指用户自定义控件。
1 2 3 4 5 6 7 8 9 10 11 12 13 14 15 16 17 18 19 20 21 22 | <UserControl mc:Ignorable="d" x:Class="Weather.ForecastTile" d:DesignWidth="120" d:DesignHeight="170"> <Grid x:Name="LayoutRoot"> <Grid.RowDefinitions> <RowDefinition Height="46*"/> <RowDefinition Height="100*"/> <RowDefinition Height="30"/> </Grid.RowDefinitions> <Grid.Background> <ImageBrush Stretch="Fill" ImageSource="/Weather;component/UserControl/forecast_tile.png"/> </Grid.Background> <TextBlock Name="txtWhichDay" HorizontalAlignment="Center" VerticalAlignment="Bottom" Text="今天" Foreground="White" FontFamily="Segoe WP Bold" FontSize="32" Grid.Row="0" /> <Image Name="imgWeathericon" Margin="0,0,0,0" Source="/Images/forecasts/day/sunny.png" Grid.Row="1" Stretch="Uniform"/> <TextBlock x:Name="txtTemperature" Grid.Row="2" Foreground="White" FontSize="20" HorizontalAlignment="Center" VerticalAlignment="Top" FontFamily="Arial" Text="-13°/-15°" /> </Grid></UserControl> |
然后在写好此控件的属性器,那么自己做的控件就弄好了。用法就跟微软工具箱里面的控件一个用法了,就不用多说了。
代码如下:
1 2 3 4 5 6 7 8 9 10 11 12 13 14 | public partial class ForecastTile : UserControl { public ForecastTile() { // 为初始化变量所必需 InitializeComponent(); } public ImageSource Weathericon { get { return imgWeathericon.Source; } set { imgWeathericon.Source = value; } } public string WhichDay { get { return txtWhichDay.Text; } set { txtWhichDay.Text = value; } } public string Temperature { get { return txtTemperature.Text; } set { txtTemperature.Text = value; } } } |
这个控件因为是静止的,我没有做任何动态的效果,没有做Storyboard。以后的文章会详细讲这个地方。我第一次接触的时候感觉跟flash里面的时间轴类似,可以制作影片剪辑。
4月中旬就要考试了,没多少时间可以写博文了,得抓紧学习了。



【推荐】国内首个AI IDE,深度理解中文开发场景,立即下载体验Trae
【推荐】编程新体验,更懂你的AI,立即体验豆包MarsCode编程助手
【推荐】抖音旗下AI助手豆包,你的智能百科全书,全免费不限次数
【推荐】轻量又高性能的 SSH 工具 IShell:AI 加持,快人一步
· .NET Core 中如何实现缓存的预热?
· 从 HTTP 原因短语缺失研究 HTTP/2 和 HTTP/3 的设计差异
· AI与.NET技术实操系列:向量存储与相似性搜索在 .NET 中的实现
· 基于Microsoft.Extensions.AI核心库实现RAG应用
· Linux系列:如何用heaptrack跟踪.NET程序的非托管内存泄露
· TypeScript + Deepseek 打造卜卦网站:技术与玄学的结合
· 阿里巴巴 QwQ-32B真的超越了 DeepSeek R-1吗?
· 【译】Visual Studio 中新的强大生产力特性
· 10年+ .NET Coder 心语 ── 封装的思维:从隐藏、稳定开始理解其本质意义
· 【设计模式】告别冗长if-else语句:使用策略模式优化代码结构