[Shiro] - Shiro之进阶
上一个知识点ssm, 哪里需要权限,哪里写注解@RequirePermission就行. 但是,真正项目开发的时候, 这种方式就很有局限性了,
当权限配置关系发生变化, 每次都要修改代码, 编译打包重启系统, 这肯定是不能够被接受的.
最好的方式,是通过动态配置,哪个给不同的用户配置不同的角色,权限,修改之后立马生效这种方式. 为了实现这个效果, 就需要基于URL配置的方式来做了.
接下来要做基于URL配置权限的讲解. 但是基于URL配置权限需要自己能够进行权限信息的灵活配置, 那么就需要对权限信息一套进行维护.
而权限一套本身的维护就很复杂,为了学习的平滑,本知识仅仅对权限一套信息的维护,进行开发, 以此为后续的基于URL配置权限做准备.
https://github.com/deadzq/shiro_demo2
applicationContext-shiro.xml
这个xml文件配置了shiro过滤器工厂类 会话ID生成器 会话DAO 会话管理器 等等
<?xml version="1.0" encoding="UTF-8"?>
<beans xmlns:xsi="http://www.w3.org/2001/XMLSchema-instance"
    xmlns="http://www.springframework.org/schema/beans" xmlns:util="http://www.springframework.org/schema/util"
    xmlns:context="http://www.springframework.org/schema/context" xmlns:p="http://www.springframework.org/schema/p"
    xmlns:tx="http://www.springframework.org/schema/tx" xmlns:mvc="http://www.springframework.org/schema/mvc"
    xmlns:aop="http://www.springframework.org/schema/aop"
    xsi:schemaLocation="http://www.springframework.org/schema/beans
    http://www.springframework.org/schema/beans/spring-beans-4.0.xsd http://www.springframework.org/schema/tx
    http://www.springframework.org/schema/tx/spring-tx-4.0.xsd http://www.springframework.org/schema/context
    http://www.springframework.org/schema/context/spring-context-4.0.xsd http://www.springframework.org/schema/mvc
    http://www.springframework.org/schema/mvc/spring-mvc.xsd http://www.springframework.org/schema/aop
    http://www.springframework.org/schema/aop/spring-aop-4.0.xsd http://www.springframework.org/schema/util
    http://www.springframework.org/schema/util/spring-util.xsd">

    <!-- 配置shiro的过滤器工厂类,id- shiroFilter要和我们在web.xml中配置的过滤器一致 -->
    <bean id="shiroFilter" class="org.apache.shiro.spring.web.ShiroFilterFactoryBean">
        <!-- 调用我们配置的权限管理器 -->
        <property name="securityManager" ref="securityManager" />
        <!-- 配置我们的登录请求地址 -->
        <property name="loginUrl" value="/login" />
        <!-- 如果您请求的资源不再您的权限范围,则跳转到/403请求地址 -->
        <property name="unauthorizedUrl" value="/unauthorized" />
        <!-- 退出 -->
        <property name="filters">
            <util:map>
                <entry key="logout" value-ref="logoutFilter" />
            </util:map>
        </property>
        <!-- 权限配置 -->
        <property name="filterChainDefinitions">
            <value>
                <!-- anon表示此地址不需要任何权限即可访问 -->
                /login=anon
                /index=anon
                /static/**=anon
                <!-- 只对业务功能进行权限管理,权限配置本身不需要没有做权限要求,这样做是为了不让初学者混淆 -->
                /config/**=anon
                /doLogout=logout
                <!--所有的请求(除去配置的静态资源请求或请求地址为anon的请求)都要通过登录验证,如果未登录则跳到/login -->
                /** = authc
            </value>
        </property>
    </bean>
    <!-- 退出过滤器 -->
    <bean id="logoutFilter" class="org.apache.shiro.web.filter.authc.LogoutFilter">
        <property name="redirectUrl" value="/index" />
    </bean>

    <!-- 会话ID生成器 -->
    <bean id="sessionIdGenerator"
        class="org.apache.shiro.session.mgt.eis.JavaUuidSessionIdGenerator" />
    <!-- 会话Cookie模板 关闭浏览器立即失效 -->
    <bean id="sessionIdCookie" class="org.apache.shiro.web.servlet.SimpleCookie">
        <constructor-arg value="sid" />
        <property name="httpOnly" value="true" />
        <property name="maxAge" value="-1" />
    </bean>
    <!-- 会话DAO -->
    <bean id="sessionDAO"
        class="org.apache.shiro.session.mgt.eis.EnterpriseCacheSessionDAO">
        <property name="sessionIdGenerator" ref="sessionIdGenerator" />
    </bean>
    <!-- 会话验证调度器,每30分钟执行一次验证 ,设定会话超时及保存 -->
    <bean name="sessionValidationScheduler"
        class="org.apache.shiro.session.mgt.ExecutorServiceSessionValidationScheduler">
        <property name="interval" value="1800000" />
        <property name="sessionManager" ref="sessionManager" />
    </bean>
    <!-- 会话管理器 -->
    <bean id="sessionManager"
        class="org.apache.shiro.web.session.mgt.DefaultWebSessionManager">
        <!-- 全局会话超时时间(单位毫秒),默认30分钟 -->
        <property name="globalSessionTimeout" value="1800000" />
        <property name="deleteInvalidSessions" value="true" />
        <property name="sessionValidationSchedulerEnabled" value="true" />
        <property name="sessionValidationScheduler" ref="sessionValidationScheduler" />
        <property name="sessionDAO" ref="sessionDAO" />
        <property name="sessionIdCookieEnabled" value="true" />
        <property name="sessionIdCookie" ref="sessionIdCookie" />
    </bean>

    <!-- 安全管理器 -->
    <bean id="securityManager" class="org.apache.shiro.web.mgt.DefaultWebSecurityManager">
        <property name="realm" ref="databaseRealm" />
        <property name="sessionManager" ref="sessionManager" />
    </bean>
    <!-- 相当于调用SecurityUtils.setSecurityManager(securityManager) -->
    <bean
        class="org.springframework.beans.factory.config.MethodInvokingFactoryBean">
        <property name="staticMethod"
            value="org.apache.shiro.SecurityUtils.setSecurityManager" />
        <property name="arguments" ref="securityManager" />
    </bean>

    <!-- 密码匹配器 -->
    <bean id="credentialsMatcher" class="org.apache.shiro.authc.credential.HashedCredentialsMatcher">
        <property name="hashAlgorithmName" value="md5"/>
        <property name="hashIterations" value="2"/>
        <property name="storedCredentialsHexEncoded" value="true"/>
    </bean>

    <bean id="databaseRealm" class="com.how2java.realm.DatabaseRealm">
        <property name="credentialsMatcher" ref="credentialsMatcher"/>
    </bean>

    <!-- 保证实现了Shiro内部lifecycle函数的bean执行 -->
    <bean id="lifecycleBeanPostProcessor" class="org.apache.shiro.spring.LifecycleBeanPostProcessor" />
</beans>
这些bean说明Spring的ioc容器要自动注入这个bean实例
虽然还不太清除会话ID和会话Cookie的具体实现,也许是当客户端和服务器进行一次交互时.
<?xml version="1.0" encoding="UTF-8"?>
<beans xmlns="http://www.springframework.org/schema/beans"
    xmlns:xsi="http://www.w3.org/2001/XMLSchema-instance" xmlns:aop="http://www.springframework.org/schema/aop"
    xmlns:tx="http://www.springframework.org/schema/tx" xmlns:jdbc="http://www.springframework.org/schema/jdbc"
    xmlns:context="http://www.springframework.org/schema/context"
    xmlns:mvc="http://www.springframework.org/schema/mvc"
    xsi:schemaLocation="http://www.springframework.org/schema/jdbc http://www.springframework.org/schema/jdbc/spring-jdbc-3.0.xsd
        http://www.springframework.org/schema/aop http://www.springframework.org/schema/aop/spring-aop-3.0.xsd
        http://www.springframework.org/schema/beans http://www.springframework.org/schema/beans/spring-beans-3.0.xsd
        http://www.springframework.org/schema/context http://www.springframework.org/schema/context/spring-context-3.0.xsd
        http://www.springframework.org/schema/tx http://www.springframework.org/schema/tx/spring-tx-3.0.xsd
        http://www.springframework.org/schema/mvc http://www.springframework.org/schema/mvc/spring-mvc-3.2.xsd">


    <context:annotation-config/>

    <context:component-scan base-package="com.how2java.controller">
          <context:include-filter type="annotation"
          expression="org.springframework.stereotype.Controller"/>
    </context:component-scan>

    <mvc:annotation-driven />

    <mvc:default-servlet-handler />


    <bean
        class="org.springframework.web.servlet.view.InternalResourceViewResolver">
        <property name="viewClass"
            value="org.springframework.web.servlet.view.JstlView" />
        <property name="prefix" value="/WEB-INF/jsp/" />
        <property name="suffix" value=".jsp" />
    </bean>

    <!--启用shiro注解 -->
    <bean
        class="org.springframework.aop.framework.autoproxy.DefaultAdvisorAutoProxyCreator"
        depends-on="lifecycleBeanPostProcessor">
        <property name="proxyTargetClass" value="true" />
    </bean>
    <bean
        class="org.apache.shiro.spring.security.interceptor.AuthorizationAttributeSourceAdvisor">
        <property name="securityManager" ref="securityManager" />
    </bean>

    <!-- 控制器异常处理 -->
    <bean id="exceptionHandlerExceptionResolver" class="org.springframework.web.servlet.mvc.method.annotation.ExceptionHandlerExceptionResolver">
    </bean>
    <bean class="com.how2java.exception.DefaultExceptionHandler"/>

</beans>
<mvc:annotation-driven /> 这个是启用mvc的注解的作用

下面还有启用shiro注解的bean
下面这个是包扫描
   <context:component-scan base-package="com.how2java.controller">
         <context:include-filter type="annotation"
          expression="org.springframework.stereotype.Controller"/>
    </context:component-scan>
demo中使用了log4j打印日志
# Global logging configuration
log4j.rootLogger=ERROR, stdout
# MyBatis logging configuration...
log4j.logger.com.how2java=TRACE
# Console output...
log4j.appender.stdout=org.apache.log4j.ConsoleAppender
log4j.appender.stdout.layout=org.apache.log4j.PatternLayout
log4j.appender.stdout.layout.ConversionPattern=%5p [%t] - %m%n
这个是之前的spring-mvc.xml
<?xml version="1.0" encoding="UTF-8"?>
<beans xmlns="http://www.springframework.org/schema/beans"
    xmlns:xsi="http://www.w3.org/2001/XMLSchema-instance"
    xmlns:context="http://www.springframework.org/schema/context"
    xmlns:aop="http://www.springframework.org/schema/aop"
    xmlns:tx="http://www.springframework.org/schema/tx"
    xmlns:mvc="http://www.springframework.org/schema/mvc"
    xsi:schemaLocation="
           http://www.springframework.org/schema/beans
           http://www.springframework.org/schema/beans/spring-beans.xsd
           http://www.springframework.org/schema/context
           http://www.springframework.org/schema/context/spring-context.xsd
           http://www.springframework.org/schema/tx
           http://www.springframework.org/schema/tx/spring-tx.xsd
           http://www.springframework.org/schema/aop
           http://www.springframework.org/schema/aop/spring-aop.xsd
           http://www.springframework.org/schema/mvc
           http://www.springframework.org/schema/mvc/spring-mvc.xsd">


    <!-- 默认扫描的包路径 自动注册类 -->
    <context:component-scan base-package="com.ykmimi.control" />

    <!-- 手动处理器 -->
    <bean id="/my.do" class="com.ykmimi.control.MyController" />

    <!-- 添加注解驱动 -->
    <mvc:annotation-driven />

    <mvc:default-servlet-handler />

    <!-- 视图解析器 -->
    <bean id="viewResolver"
        class="org.springframework.web.servlet.view.InternalResourceViewResolver">
        <property name="prefix" value="/" />
        <property name="suffix" value=".jsp" />
    </bean>

</beans>
可以看到<mvc:annotation-driven />是注解驱动
可以看到基础的Java类,以及老式的写法我这里还是比较多的
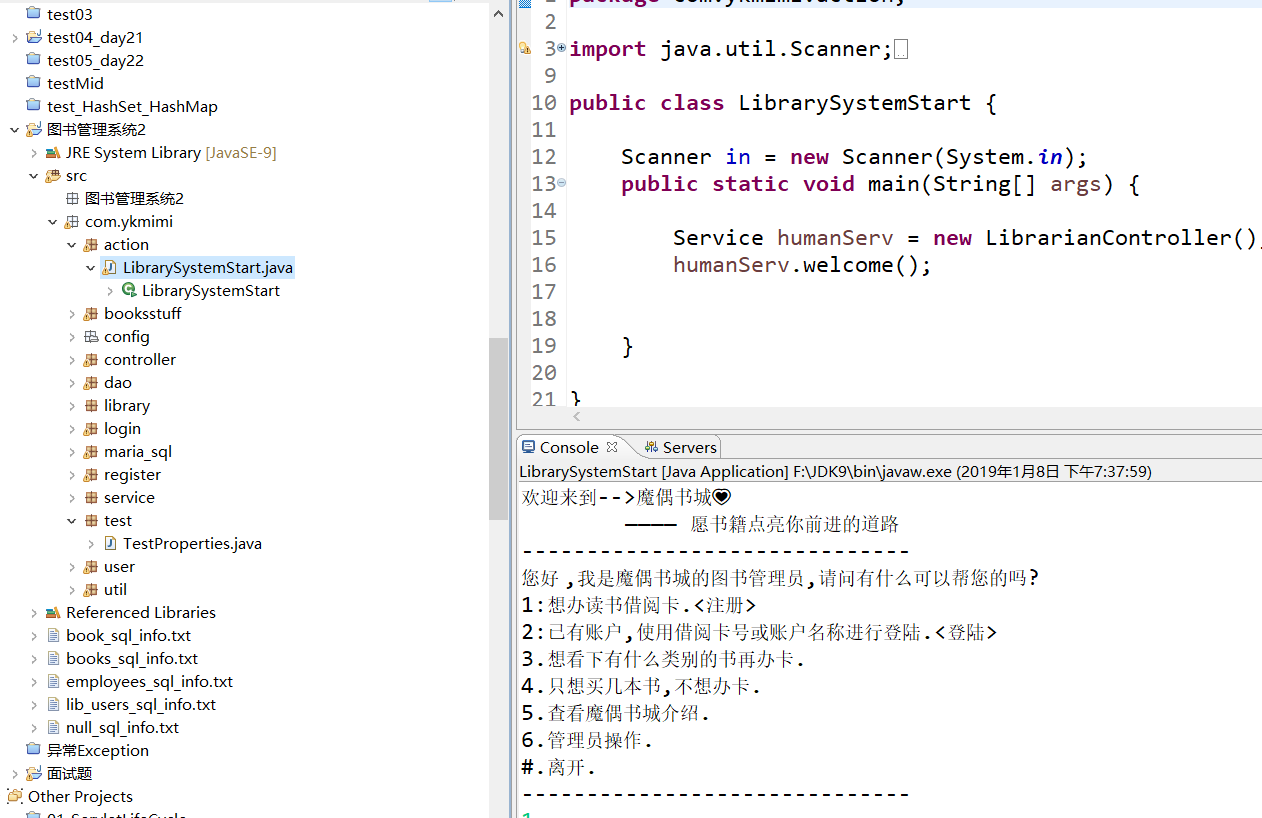
当时设计这个图书馆系统运用的Java面向对象的思想,比如书,书在书架上,每个书架都有分类,一个图书馆里有很多书架.
当然也可以把图书管理员设想成一个service
在booksstuff包中,有Books和BookShelf类
package com.ykmimi.booksstuff;

import java.math.BigDecimal;

/**
 * 放书的那一类
 *
 * @author SeeClanUkyo
 *
 */
public class Books {

    ///// *📕 书是人类进步的阶梯📕*/////

    BigDecimal bookID = null;
    public String bookName;
    String authorName;
    String bookConcernName;
    public Integer beBorrowed = null;
    String categoryName;
    double price;
    // int amountOfAllLibraryBooks;// 图书馆藏书量总量
    // int amountOfOneCategoryBooks;// 某种类书的总量
    // int amountOfOneNameBooks;// 某名字的书的总量
    // int issueYear;

    public Integer getBeBorrowed() {
        return beBorrowed;
    }

    public BigDecimal getBookID() {
        return bookID;
    }

    public void setBookID(BigDecimal bookID) {
        this.bookID = bookID;
    }

    public String getBookName() {
        return bookName;
    }

    public void setBookName(String bookName) {
        this.bookName = bookName;
    }

    public String getAuthorName() {
        return authorName;
    }

    public void setAuthorName(String authorName) {
        this.authorName = authorName;
    }

    public String getBookConcernName() {
        return bookConcernName;
    }

    public void setBookConcernName(String bookConcernName) {
        this.bookConcernName = bookConcernName;
    }

    public String getCategoryName() {
        return categoryName;
    }

    public void setCategoryName(String categoryName) {
        this.categoryName = categoryName;
    }

    public double getPrice() {
        return price;
    }

    public void setPrice(double price) {
        this.price = price;
    }

    public void setBeBorrowed(Integer beBorrowed) {
        this.beBorrowed = beBorrowed;
    }

    public Books(BigDecimal bookID, String bookName, String authorName, String bookConcernName, int beBorrowed,
            String categoryName, double price) {
        this.bookID = bookID;
        this.bookName = bookName;
        this.authorName = authorName;
        this.bookConcernName = bookConcernName;
        this.beBorrowed = beBorrowed;
        this.categoryName = categoryName;
        this.price = price;
    }

    public String toString() {
        String borrowedInfo = "";
        if (beBorrowed == 0) {
            borrowedInfo = "未借阅";
        } else {
            borrowedInfo = "已借阅";
        }
        return "图书编号:" + bookID + "\n" + "书名:" + bookName + "\n" + "类别:" + categoryName + "\n" + "作者:" + authorName
                + "\n" + "出版社:" + bookConcernName + "\n" + "价格:" + price + "\n" + borrowedInfo + "\n";
    }

}
那么怎样去建立一个物流信息平台?
shiro在物流平台中起什么角色?
整个平台除了Java作为整个后端与数据库交互的语言外,让客户操作的,让客服操作的,财务操作的,以及管理员,以及程序维护者操作的地方,需要进行shiro权限分级.
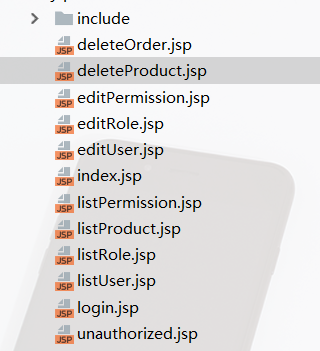
(最后在下面的jsp中使用ajax进行controller层的调用执行增删改查即可,同样在调用的路径中使用shiro判定是否有此权限)
(更简单的理解是当判定zhang3有deleteProduct路径的权限时,才可以进入执行deleteProduct的delete数据库操作)
本文来自博客园,作者:ukyo--君君小时候,转载请注明原文链接:https://www.cnblogs.com/ukzq/p/10231472.html
