《Windows Azure Platform 系列文章目录》
这几天工作上的内容,把项目文件和源代码拿出来给大家分享下。
我们在写WEB服务的时候,经常需要把本地的文件上传至服务器端进行保存,类似于上传附件的功能。
在本章中,我们将新建WCF服务并上传至Azure云端,实现把本地的图片通过WCF保存至Azure Storage。
本章需要掌握的技术点:
1.WCF服务
2.Azure Storage
本章将首先介绍服务器端程序代码。
1.首先我们用管理员身份,运行VS2013。
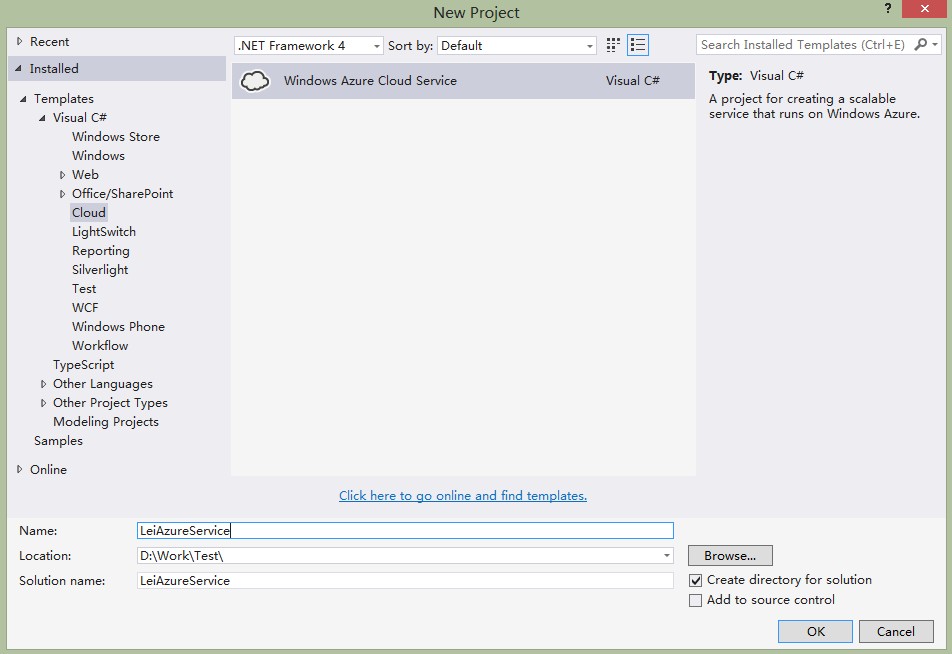
2.新建Windows Azure Cloud Project,并命名为LeiAzureService

3.添加"WCF Service Web Role",并重命名为LeiWCFService。

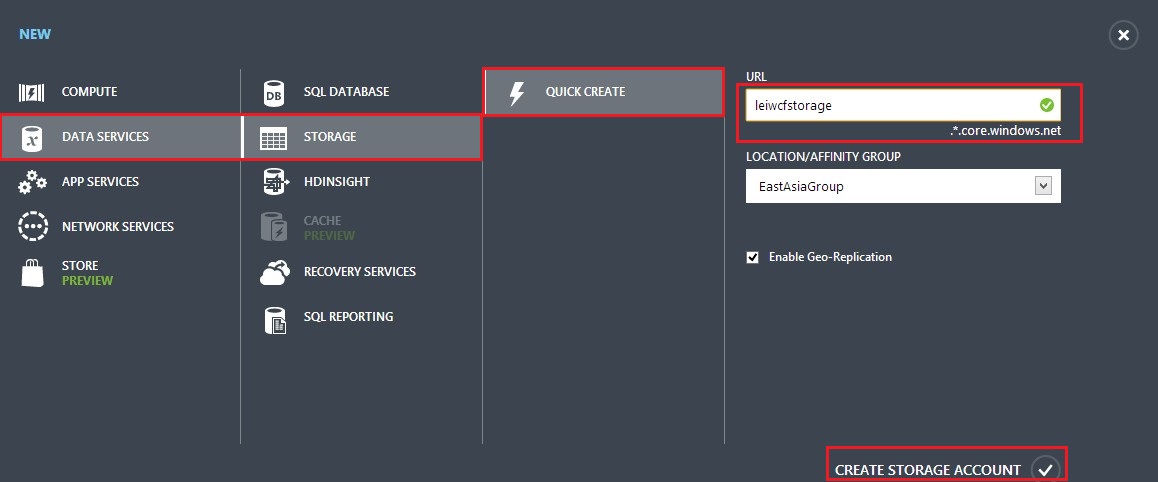
4.打开IE浏览器,登录http://manage.windowsazure.com,在Storage栏,新建storage name为leiwcfstorage

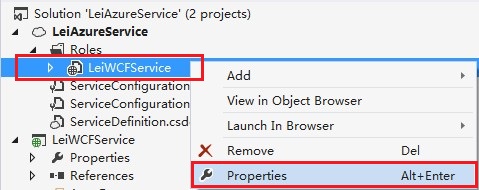
5.我们回到VS2013,选择Project LeiAzureService,展开Roles->LeiWCFService,右键属性

6.在弹出的窗口里,Configuration栏,将Instance count设置成2, VM Size选择Small

这样,就同时有2台 small size(1core/1.75GB)的Cloud Service自动做负载均衡了。
7.在Settings栏,选择Add Setting,设置Name为StorageConnectionString,Type选择Connection String,然后点击Value栏的按钮
在Create Storage Connection String中,选择Account Name为我们在步骤4中创建的leiwcfstorage

8.再次点击Add Setting,设置Name为ContainerName,Type选择String,Value设置为photos。切记Value的值必须是小写

9.在Project LeiWCFService中,修改IService1.cs
using System;
using System.Collections.Generic;
using System.IO;
using System.Linq;
using System.Runtime.Serialization;
using System.ServiceModel;
using System.ServiceModel.Web;
using System.Text;

namespace LeiWCFService
{
    // NOTE: You can use the "Rename" command on the "Refactor" menu to change the interface name "IService1" in both code and config file together.
    [ServiceContract]
    public interface IService1
    {
        [OperationContract]
        [WebInvoke(Method = "POST", UriTemplate = "/UploadPic", RequestFormat = WebMessageFormat.Json, ResponseFormat = WebMessageFormat.Json)]
        string UploadPic(Stream ImageStream);

    }
}
10.修改Service1.svc
这个类的主要功能是读取Azure配置文件cscfg的节点信息,并根据storage connection string,创建Container,并将本地的图片文件名重命名为GUID,并保存至Container
项目中需要添加相关的引用,笔者就不详述了。
using Microsoft.WindowsAzure;
using Microsoft.WindowsAzure.Storage;
using Microsoft.WindowsAzure.Storage.Blob;
using System;
using System.Collections.Generic;
using System.IO;
using System.Linq;
using System.Runtime.Serialization;
using System.ServiceModel;
using System.ServiceModel.Activation;
using System.ServiceModel.Web;
using System.Text;


namespace LeiWCFService
{
    // NOTE: You can use the "Rename" command on the "Refactor" menu to change the class name "Service1" in code, svc and config file together.
    // NOTE: In order to launch WCF Test Client for testing this service, please select Service1.svc or Service1.svc.cs at the Solution Explorer and start debugging.
    [AspNetCompatibilityRequirements(RequirementsMode = AspNetCompatibilityRequirementsMode.Allowed)]
    public class Service1 : IService1
    {
        public string UploadPic(Stream ImageStream)
        {
            try
            {
                //获取ServiceConfiguration.cscfg配置文件的信息
                var account = CloudStorageAccount.Parse(
                    CloudConfigurationManager.GetSetting("StorageConnectionString"));

                var client = account.CreateCloudBlobClient();

                //获得BlobContainer对象
                CloudBlobContainer blobContainer
                    = client.GetContainerReference(CloudConfigurationManager.GetSetting("ContainerName"));

                if (!blobContainer.Exists())
                {
                    // 检查container是否被创建,如果没有,创建container

                    blobContainer.CreateIfNotExists();
                    var permissions = blobContainer.GetPermissions();

                    //对Storage的访问权限是可以浏览Container
                    permissions.PublicAccess = BlobContainerPublicAccessType.Container;
                    blobContainer.SetPermissions(permissions);
                }


                Guid guid = Guid.NewGuid();
                CloudBlockBlob blob = blobContainer.GetBlockBlobReference(guid.ToString() + ".jpg");
                blob.Properties.ContentType = "image/jpeg";
                //request.Content.Headers.ContentType.MediaType

                //blob.UploadFromByteArray(content, 0, content.Length);
                blob.UploadFromStream(ImageStream);
                blob.SetProperties();

                return guid.ToString();
            }
            catch (Exception ex)
            {
                return ex.InnerException.ToString();
            }
        }
    }
}
以上代码和配置,实现了以下功能点:
1.在Windows Azure Storage里创建名为photos的Container,并且设置Storage的访问权限
2.设置上传的BlockbName为GUID
3.通过UploadFromStream,将客户端POST的Stream保存到Azure Storage里
11.修改Web.config的 <system.serviceModel>节点。设置WCF的相关配置。
  <system.serviceModel>
    <bindings>
      <!--<webHttpBinding></webHttpBinding>-->
      <webHttpBinding>
        <binding name="WCFServiceBinding"
                 maxReceivedMessageSize="10485760"
                 maxBufferSize="10485760"
                 closeTimeout="00:01:00" openTimeout="00:01:00"
                 receiveTimeout="00:10:00" sendTimeout="00:01:00">
          <security mode="None"/>
        </binding>
      </webHttpBinding>
    </bindings>
    <services>
      <service name="LeiWCFService.Service1" behaviorConfiguration="ServiceBehaviour">
        <endpoint address="" binding="webHttpBinding" behaviorConfiguration="web" contract="LeiWCFService.IService1"></endpoint>
      </service>
    </services>
    <behaviors>
      <endpointBehaviors>
        <behavior name="web">
          <webHttp helpEnabled="true" />
        </behavior>
      </endpointBehaviors>
      <serviceBehaviors>
        <behavior name="ServiceBehaviour">
          <serviceMetadata httpGetEnabled="true" />
          <serviceDebug includeExceptionDetailInFaults="false" />
        </behavior>
        <behavior name="">
          <serviceMetadata httpGetEnabled="true" />
          <serviceDebug includeExceptionDetailInFaults="false" />
        </behavior>
      </serviceBehaviors>
    </behaviors>
    <serviceHostingEnvironment multipleSiteBindingsEnabled="true" />
  </system.serviceModel>
12.在VS2013离,点击Save All,并将项目发布至Windows Azure。
DNS我们设置为LeiAzureService
13.等待项目发布结束后,在IE浏览器中输入http://leiazureservice.cloudapp.net/service1.svc/help,看到如下的图片,就证明发布成功了


