【读书笔记】Asp.Net MVC 上传图片到数据库(会的绕行)
2014-03-17 08:30 stoneniqiu 阅读(4881) 评论(5) 编辑 收藏 举报之前上传图片的做法都是上传到服务器上的文件夹中,再将url保存到数据库。其实在MVC中将图片上传到数据库很便捷的事情,而且不用去存url了。而且这种方式支持ie6(ie6不支持jquery自动提交form,认为其不安全,这里form是主动点击提交的,所以就没有这个问题,而uploadify自动提交是flash的方式)。
一、建立模型
场景是假设我们需要给一个Product编辑一张图片。在模型中,先定义好两个属性,ImageData和ImageType
 public class Product {

        [HiddenInput(DisplayValue=false)]
        public int ProductID { get; set; }

        [Required(ErrorMessage = "Please enter a product name")]
        public string Name { get; set; }

        [Required(ErrorMessage = "Please enter a description")]
        [DataType(DataType.MultilineText)]// 在前台会渲染成Textarea
        public string Description { get; set; }

        [Required]
        [Range(0.01, double.MaxValue, ErrorMessage = "Please enter a positive price")]
        public decimal Price { get; set; }

        [Required(ErrorMessage = "Please specify a category")]
        public string Category { get; set; }
        public byte[] ImageData { get; set; }
        [HiddenInput(DisplayValue = false)]//会让改属性在编辑的时候不显示出来。
        public string ImageType{ get; set; }
    }
二、存取方法
那在我们的控制器中,这样定义Edit方法。MVC强大的模型绑定机制会自动的将前台form中的数据根据name转换成我们需要的C#对象。当然后台代码这里只是简单的实现,文件大小和类型的判断先略过。
       [HttpPost] //保存
        public ActionResult Edit(Product product, HttpPostedFileBase image) {

            if (ModelState.IsValid) {
                if (image != null) {
                    product.ImageType = image.ContentType;//获取图片类型
                    product.ImageData = new byte[image.ContentLength];//新建一个长度等于图片大小的二进制地址
                    image.InputStream.Read(product.ImageData, 0, image.ContentLength);//将image读取到ImageData中
                }
                // save the product
                repository.UpdateProduct(product);//更新一下 保存模型。
                // add a message to the viewbag
                TempData["message"] = string.Format("{0} has been saved", product.Name);
                // return the user to the list
                return RedirectToAction("Index");
            } else {
                // there is something wrong with the data values
                return View(product);
            }
        }
HttpPostedFileBase.inputStream 获取一个Stream 对象,该对象指向一个上载文件,以准备读取该文件的内容。

然后通过ID,将二进制转化为图片。
 public FileContentResult GetImage(int productId) {
            Product prod = repository.Products.FirstOrDefault(p => p.ProductID == productId);
            if (prod != null) {
                return File(prod.ImageData, prod.ImageMimeType);//File方法直接将二进制转化为指定类型了。
            } else {
                return null;
            }
        }
FileContentResult 最适合将二进制数据转换成文件,同类型还有FileStreamResult,FilePathResult,这三个都是继承与FileResult。

更详细的解释大家可以参考Artech大神的博客 :了解ASP.Net MVC几种ActionResult的本质
三、前台代码
@using (Html.BeginForm("Edit", "Admin", FormMethod.Post,
    new { enctype = "multipart/form-data" })) {

    @Html.EditorForModel()

    <div class="editor-label">Image</div>
    <div class="editor-field"><div>Upload new image: <input type="file" name="Image" /></div>
    </div>

    <input type="submit" value="Save" />
    @Html.ActionLink("Cancel and return to List", "Index")
}
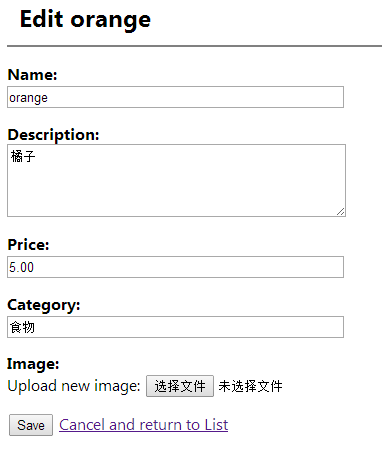
@Html.EditorForModel() 会根据我们的模型自动渲染出编辑界面,比如是bool型,就会生成checkbox,而不用一条一条去写。不是太复杂的模型可以用这种较为快捷的方式
自动渲染的效果如下(勿喷,未处理样式)

那再获取图片的时候,就可以通过调用GetImage方法来获取。 和获取验证码的方式一样。 这种方式比之前上传写一堆脚本要好很多。
<div class="item">
    @if (Model.ImageData != null) {
        <div style="float:left;margin-right:20px">
            <img width="75" height="75" src="@Url.Action("GetImage", "Product",
                new { Model.ProductID })" />
        </div>
    }
    .......
    <h4>@Model.Price.ToString("c")</h4>
</div>
希望这次分享对你有帮助~
参考书籍:Pro Asp.Net MVC3 Framwork
关注书山有路,用自己的知识体系去丈量世界!
书山有路群:452450927

书山有路群:452450927


