

从零到一,利用kubeadm在ubuntu server 16.04 64位系统离线安装kubernetes v1.10.0
说明
- 初步接触
kubernets,记录学习过程 - 本教程目的利用
kubeadm在ubuntu server 16.04 64位系统离线安装kubernets v1.10.0
环境信息
| 节点IP地址 | 角色 |
|---|---|
| 192.168.1.196 | master(管理节点) |
| 192.168.1.197 | worker(计算节点) |
安装软件
所需软件打包k8s_v1.10.0.zip,密码cqaa
以下操作需要在所有的master和worker节点上执行
-
安装以下依赖,命令:
dpkg -i *.debroot@k8s-master-01:/home/zcs/dep# ls -lh total 6.1M -rw-r--r-- 1 root root 78K Jun 1 2017 ebtables_2.0.10.4-3.4ubuntu2_amd64.deb -rw-r--r-- 1 root root 5.7M Mar 29 17:06 kubernetes-cni_0.6.0-00_amd64.deb -rw-r--r-- 1 root root 38K Feb 8 2016 libltdl7_2.4.6-0.1_amd64.deb -rw-r--r-- 1 root root 314K Feb 3 2016 socat_1.7.3.1-1_amd64.deb root@k8s-master-01:/home/zcs/deb# dpkg -i *.deb -
安装
docker,kubeadm,kubectl,kubelet,命令:dpkg -i *.debroot@k8s-master-01:/home/zcs/deb# ls -lh total 67M -rw-r--r-- 1 root root 19M Jun 28 2017 docker-ce_17.03.2~ce-0~ubuntu-xenial_amd64.deb -rw-r--r-- 1 root root 20M Mar 29 17:04 kubeadm_1.10.0-00_amd64.deb -rw-r--r-- 1 root root 8.5M Mar 29 17:04 kubectl_1.10.0-00_amd64.deb -rw-r--r-- 1 root root 21M Mar 29 17:05 kubelet_1.10.0-00_amd64.deb root@k8s-master-01:/home/zcs/deb# dpkg -i *.debkubernets官方说支持docker到17.03,高于此版本的未测试,可能出现问题不同的操作系统依赖可能不一样,如果有缺少依赖的情况,可以使用
apt-get -f install命令修复依赖(需要联网) -
导入以下镜像,
for images in $(ls | grep img); do docker load < $images;doneroot@k8s-master-01:/home/zcs# ls -lh|grep img -rw-r--r-- 1 root root 15M Apr 2 21:48 k8s-dns-kube-dns-amd64_1.14.9.img -rw-r--r-- 1 root root 185M Mar 30 14:01 k8s.gcr.io_etcd-amd64_3.1.12.img -rw-r--r-- 1 root root 40M Mar 30 14:01 k8s.gcr.io_k8s-dns-dnsmasq-nanny-amd64_1.14.8.img -rw-r--r-- 1 root root 49M Mar 30 14:01 k8s.gcr.io_k8s-dns-kube-dns-amd64_1.14.8.img -rw-r--r-- 1 root root 41M Mar 30 14:01 k8s.gcr.io_k8s-dns-sidecar-amd64_1.14.8.img -rw-r--r-- 1 root root 215M Mar 30 14:01 k8s.gcr.io_kube-apiserver-amd64_v1.10.0.img -rw-r--r-- 1 root root 142M Mar 30 14:01 k8s.gcr.io_kube-controller-manager-amd64_v1.10.0.img -rw-r--r-- 1 root root 95M Mar 30 14:01 k8s.gcr.io_kube-proxy-amd64_v1.10.0.img -rw-r--r-- 1 root root 99M Mar 30 14:01 k8s.gcr.io_kubernetes-dashboard-amd64_v1.8.3.img -rw-r--r-- 1 root root 49M Mar 30 14:01 k8s.gcr.io_kube-scheduler-amd64_v1.10.0.img -rw-r--r-- 1 root root 737K Mar 30 14:01 k8s.gcr.io_pause-amd64_3.1.img -rw-r--r-- 1 root root 67M Mar 30 14:01 quay.io_calico_cni_v2.0.3.img -rw-r--r-- 1 root root 53M Mar 30 14:01 quay.io_calico_kube-controllers_v2.0.2.img -rw-r--r-- 1 root root 266M Mar 30 14:01 quay.io_calico_node_v3.0.4.img -rw-r--r-- 1 root root 34M Apr 3 17:12 quay.io_coreos_etcd-v3.1.10.img root@k8s-master-01:/home/zcs# for images in $(ls | grep img); do docker load < $images;done · · · root@k8s-master-01:/home/zcs# docker images REPOSITORY TAG IMAGE ID CREATED SIZE quay.io/calico/node v3.0.4 5361c5a52912 6 days ago 278 MB k8s.gcr.io/kube-proxy-amd64 v1.10.0 bfc21aadc7d3 8 days ago 97 MB k8s.gcr.io/kube-scheduler-amd64 v1.10.0 704ba848e69a 8 days ago 50.4 MB k8s.gcr.io/kube-controller-manager-amd64 v1.10.0 ad86dbed1555 8 days ago 148 MB k8s.gcr.io/kube-apiserver-amd64 v1.10.0 af20925d51a3 8 days ago 225 MB quay.io/calico/kube-controllers v2.0.2 0754e1c707e7 13 days ago 55.1 MB quay.io/calico/cni v2.0.3 cef0252b1749 13 days ago 69.1 MB k8s.gcr.io/etcd-amd64 3.1.12 52920ad46f5b 3 weeks ago 193 MB k8s.gcr.io/kubernetes-dashboard-amd64 v1.8.3 0c60bcf89900 7 weeks ago 102 MB k8s.gcr.io/k8s-dns-dnsmasq-nanny-amd64 1.14.8 c2ce1ffb51ed 2 months ago 41 MB k8s.gcr.io/k8s-dns-sidecar-amd64 1.14.8 6f7f2dc7fab5 2 months ago 42.2 MB k8s.gcr.io/k8s-dns-kube-dns-amd64 1.14.8 80cc5ea4b547 2 months ago 50.5 MB k8s.gcr.io/pause-amd64 3.1 da86e6ba6ca1 3 months ago 742 kB quay.io/coreos/etcd v3.1.10 47bb9dd99916 8 months ago 34.6 MB
宿主机设置
以下操作需要在所有的master和worker节点上执行
-
设置hostname
root@k8s-master-01:/home/zcs# hostname k8s-master-01
root@k8s-master-01:/home/zcs# echo "k8s-master-01" > /etc/hostname
推荐修改成容易识别的主机名,方便管理
-
关闭swap
root@k8s-master-01:/home/zcs# swapoff -a root@k8s-master-01:/home/zcs# sed -i 's/^\(.*swap.*$\)/#\1/' /etc/fstab -
设置hosts
root@k8s-master-01:/home/zcs# echo "192.168.1.196   k8s-master-01" >> /etc/hosts
root@k8s-master-01:/home/zcs# echo "192.168.1.197   k8s-worker-01" >> /etc/hosts
注意这里要把集群中所有的机器添加进来,每台机器的
hosts文件都要包括集群中所有机器 -
关闭防火墙
root@k8s-master-01:/home/zcs# ufw disable -
配置
master到worker的无密码访问
此操作只需要在master执行root@k8s-master-01:/home/zcs# ssh-keygen Generating public/private rsa key pair. Enter file in which to save the key (/root/.ssh/id_rsa): Created directory '/root/.ssh'. Enter passphrase (empty for no passphrase): Enter same passphrase again: Your identification has been saved in /root/.ssh/id_rsa. Your public key has been saved in /root/.ssh/id_rsa.pub. The key fingerprint is: SHA256:QvRfjA1qvfdhqo9rXAcg8EHdcu9/QZCoP5rOaArpd8E root@k8s-master-01 The key's randomart image is: +---[RSA 2048]----+ | ooo.... . | | . o.++*oo | | . =.+++.. | | . . o o. .. | | o S + .o+ | | . E +.+oo | | o ..o.o....| | . .. ooooo o| | ...+..++o. .| +----[SHA256]-----+ root@k8s-master-01:/home/zcs# ssh-copy-id k8s-worker-01 /usr/bin/ssh-copy-id: INFO: Source of key(s) to be installed: "/root/.ssh/id_rsa.pub" The authenticity of host 'k8s-worker-01 (192.168.1.197)' can't be established. ECDSA key fingerprint is SHA256:HRWd/qs0nqKPGkiyVyXC2uAN5vIVepBokkSh8UtkYOw. Are you sure you want to continue connecting (yes/no)? yes /usr/bin/ssh-copy-id: INFO: attempting to log in with the new key(s), to filter out any that are already installed /usr/bin/ssh-copy-id: INFO: 1 key(s) remain to be installed -- if you are prompted now it is to install the new keys root@k8s-worker-01's password: Number of key(s) added: 1 Now try logging into the machine, with: "ssh 'k8s-worker-01'" and check to make sure that only the key(s) you wanted were added.
初始化k8s集群
-
利用
kubeadm初始化集群:kubeadm init --pod-network-cidr=10.244.0.0/16root@k8s-master-01:/home/zcs# kubeadm init --pod-network-cidr=10.244.0.0/16 [init] Using Kubernetes version: v1.10.0 [init] Using Authorization modes: [Node RBAC] [preflight] Running pre-flight checks. [WARNING FileExisting-crictl]: crictl not found in system path Suggestion: go get github.com/kubernetes-incubator/cri-tools/cmd/crictl [preflight] Starting the kubelet service [certificates] Generated ca certificate and key. [certificates] Generated apiserver certificate and key. [certificates] apiserver serving cert is signed for DNS names [k8s-master-01 kubernetes kubernetes.default kubernetes.default.svc kubernetes.default.svc.cluster.local] and IPs [10.96.0.1 192.168.1.196] [certificates] Generated apiserver-kubelet-client certificate and key. [certificates] Generated etcd/ca certificate and key. [certificates] Generated etcd/server certificate and key. [certificates] etcd/server serving cert is signed for DNS names [localhost] and IPs [127.0.0.1] [certificates] Generated etcd/peer certificate and key. [certificates] etcd/peer serving cert is signed for DNS names [k8s-master-01] and IPs [192.168.1.196] [certificates] Generated etcd/healthcheck-client certificate and key. [certificates] Generated apiserver-etcd-client certificate and key. [certificates] Generated sa key and public key. [certificates] Generated front-proxy-ca certificate and key. [certificates] Generated front-proxy-client certificate and key. [certificates] Valid certificates and keys now exist in "/etc/kubernetes/pki" [kubeconfig] Wrote KubeConfig file to disk: "/etc/kubernetes/admin.conf" [kubeconfig] Wrote KubeConfig file to disk: "/etc/kubernetes/kubelet.conf" [kubeconfig] Wrote KubeConfig file to disk: "/etc/kubernetes/controller-manager.conf" [kubeconfig] Wrote KubeConfig file to disk: "/etc/kubernetes/scheduler.conf" [controlplane] Wrote Static Pod manifest for component kube-apiserver to "/etc/kubernetes/manifests/kube-apiserver.yaml" [controlplane] Wrote Static Pod manifest for component kube-controller-manager to "/etc/kubernetes/manifests/kube-controller-manager.yaml" [controlplane] Wrote Static Pod manifest for component kube-scheduler to "/etc/kubernetes/manifests/kube-scheduler.yaml" [etcd] Wrote Static Pod manifest for a local etcd instance to "/etc/kubernetes/manifests/etcd.yaml" [init] Waiting for the kubelet to boot up the control plane as Static Pods from directory "/etc/kubernetes/manifests". [init] This might take a minute or longer if the control plane images have to be pulled. [apiclient] All control plane components are healthy after 22.520833 seconds [uploadconfig] Storing the configuration used in ConfigMap "kubeadm-config" in the "kube-system" Namespace [markmaster] Will mark node k8s-master-01 as master by adding a label and a taint [markmaster] Master k8s-master-01 tainted and labelled with key/value: node-role.kubernetes.io/master="" [bootstraptoken] Using token: 7odzio.v63p658llil3cij9 [bootstraptoken] Configured RBAC rules to allow Node Bootstrap tokens to post CSRs in order for nodes to get long term certificate credentials [bootstraptoken] Configured RBAC rules to allow the csrapprover controller automatically approve CSRs from a Node Bootstrap Token [bootstraptoken] Configured RBAC rules to allow certificate rotation for all node client certificates in the cluster [bootstraptoken] Creating the "cluster-info" ConfigMap in the "kube-public" namespace [addons] Applied essential addon: kube-dns [addons] Applied essential addon: kube-proxy Your Kubernetes master has initialized successfully! To start using your cluster, you need to run the following as a regular user: mkdir -p $HOME/.kube sudo cp -i /etc/kubernetes/admin.conf $HOME/.kube/config sudo chown $(id -u):$(id -g) $HOME/.kube/config You should now deploy a pod network to the cluster. Run "kubectl apply -f [podnetwork].yaml" with one of the options listed at: https://kubernetes.io/docs/concepts/cluster-administration/addons/ You can now join any number of machines by running the following on each node as root: kubeadm join 192.168.1.196:6443 --token 7odzio.v63p658llil3cij9 --discovery-token-ca-cert-hash sha256:3ea30427d276996f214adba1794af4e37262cdfaa4326dac0c33534fd45a843d上面的
kubeadm join xxx要记住,后面worker节点加入集群时需要用到踩坑记1:各种教程里面,包括
kubernets官方教程,对calico网络方案指定的--pod-network-cidr值是192.168.0.0/16,但是安装完成后kube-dns总是无法正常启动,推测是因为与物理机网卡ip段(192.168.1.0/24)重合有关,换成10.244.0.0/16后kube-dns启动正常 -
按照上一步的提示执行以下命令:
root@k8s-master-01:/home/zcs# mkdir -p $HOME/.kube
root@k8s-master-01:/home/zcs# sudo cp -i /etc/kubernetes/admin.conf $HOME/.kube/config
root@k8s-master-01:/home/zcs# sudo chown $(id -u):$(id -g) $HOME/.kube/config
此时可以执行
kubectl get pods --all-namespaces命令查看pod信息root@k8s-master-01:/home/zcs# kubectl get pods --all-namespaces NAMESPACE NAME READY STATUS RESTARTS AGE kube-system etcd-k8s-master-01 1/1 Running 0 9m kube-system kube-apiserver-k8s-master-01 1/1 Running 0 9m kube-system kube-controller-manager-k8s-master-01 1/1 Running 0 9m kube-system kube-dns-86f4d74b45-sbbfr 0/3 Pending 0 9m kube-system kube-proxy-4n7bh 1/1 Running 0 9m kube-system kube-scheduler-k8s-master-01 1/1 Running 0 8m可以看到
kube-dns的READY状态为0/3,这是因为kube-dns默认跑在worker节点的,用kubectl describe命令查看详细描述可以看到原因root@k8s-master-01:/home/zcs# kubectl describe -n kube-system pod kube-dns-86f4d74b45-sbbfr Name: kube-dns-86f4d74b45-sbbfr Namespace: kube-system Node: <none> Labels: k8s-app=kube-dns pod-template-hash=4290830601 Annotations: <none> Status: Pending IP: Controlled By: ReplicaSet/kube-dns-86f4d74b45 Containers: kubedns: Image: k8s.gcr.io/k8s-dns-kube-dns-amd64:1.14.8 Ports: 10053/UDP, 10053/TCP, 10055/TCP Host Ports: 0/UDP, 0/TCP, 0/TCP Args: --domain=cluster.local. --dns-port=10053 --config-dir=/kube-dns-config --v=2 Limits: memory: 170Mi Requests: cpu: 100m memory: 70Mi Liveness: http-get http://:10054/healthcheck/kubedns delay=60s timeout=5s period=10s #success=1 #failure=5 Readiness: http-get http://:8081/readiness delay=3s timeout=5s period=10s #success=1 #failure=3 Environment: PROMETHEUS_PORT: 10055 Mounts: /kube-dns-config from kube-dns-config (rw) /var/run/secrets/kubernetes.io/serviceaccount from kube-dns-token-q96xn (ro) dnsmasq: Image: k8s.gcr.io/k8s-dns-dnsmasq-nanny-amd64:1.14.8 Ports: 53/UDP, 53/TCP Host Ports: 0/UDP, 0/TCP Args: -v=2 -logtostderr -configDir=/etc/k8s/dns/dnsmasq-nanny -restartDnsmasq=true -- -k --cache-size=1000 --no-negcache --log-facility=- --server=/cluster.local/127.0.0.1#10053 --server=/in-addr.arpa/127.0.0.1#10053 --server=/ip6.arpa/127.0.0.1#10053 Requests: cpu: 150m memory: 20Mi Liveness: http-get http://:10054/healthcheck/dnsmasq delay=60s timeout=5s period=10s #success=1 #failure=5 Environment: <none> Mounts: /etc/k8s/dns/dnsmasq-nanny from kube-dns-config (rw) /var/run/secrets/kubernetes.io/serviceaccount from kube-dns-token-q96xn (ro) sidecar: Image: k8s.gcr.io/k8s-dns-sidecar-amd64:1.14.8 Port: 10054/TCP Host Port: 0/TCP Args: --v=2 --logtostderr --probe=kubedns,127.0.0.1:10053,kubernetes.default.svc.cluster.local,5,SRV --probe=dnsmasq,127.0.0.1:53,kubernetes.default.svc.cluster.local,5,SRV Requests: cpu: 10m memory: 20Mi Liveness: http-get http://:10054/metrics delay=60s timeout=5s period=10s #success=1 #failure=5 Environment: <none> Mounts: /var/run/secrets/kubernetes.io/serviceaccount from kube-dns-token-q96xn (ro) Conditions: Type Status PodScheduled False Volumes: kube-dns-config: Type: ConfigMap (a volume populated by a ConfigMap) Name: kube-dns Optional: true kube-dns-token-q96xn: Type: Secret (a volume populated by a Secret) SecretName: kube-dns-token-q96xn Optional: false QoS Class: Burstable Node-Selectors: <none> Tolerations: CriticalAddonsOnly node-role.kubernetes.io/master:NoSchedule node.kubernetes.io/not-ready:NoExecute for 300s node.kubernetes.io/unreachable:NoExecute for 300s Events: Type Reason Age From Message ---- ------ ---- ---- ------- Warning FailedScheduling 20s (x57 over 15m) default-scheduler 0/1 nodes are available: 1 node(s) were not ready.可以看到未成功启动的原因为
FailedScheduling(调度失败),Message:0/1 nodes are available: 1 node(s) were not ready.,大致意思是需要1个可用节点,但是现在0个节点可用,Age:20s (x57 over 15m),大致意思是15分钟内此错误发生了57次
worker节点加入集群
-
在
worker节点执行kubeadm join xxx命令,此命令在初始化master节点的时候会给出root@k8s-worker-01:~# kubeadm join 192.168.1.196:6443 --token 7odzio.v63p658llil3cij9 --discovery-token-ca-cert-hash sha256:3ea30427d276996f214adba1794af4e37262cdfaa4326dac0c33534fd45a843d [preflight] Running pre-flight checks. [WARNING FileExisting-crictl]: crictl not found in system path Suggestion: go get github.com/kubernetes-incubator/cri-tools/cmd/crictl [preflight] Starting the kubelet service [discovery] Trying to connect to API Server "192.168.1.196:6443" [discovery] Created cluster-info discovery client, requesting info from "https://192.168.1.196:6443" [discovery] Requesting info from "https://192.168.1.196:6443" again to validate TLS against the pinned public key [discovery] Cluster info signature and contents are valid and TLS certificate validates against pinned roots, will use API Server "192.168.1.196:6443" [discovery] Successfully established connection with API Server "192.168.1.196:6443" This node has joined the cluster: * Certificate signing request was sent to master and a response was received. * The Kubelet was informed of the new secure connection details. Run 'kubectl get nodes' on the master to see this node join the cluster. -
此时可以用
kubectl get nodes命令查看node信息root@k8s-master-01:/home/zcs# kubectl get nodes NAME STATUS ROLES AGE VERSION k8s-master-01 NotReady master 37m v1.10.0 k8s-worker-01 NotReady <none> 12m v1.10.0可以看到
STATUS都是NotReady,这是因为还未安装pod network,官方教程中说明了这一点
kubernets官方教程You MUST install a pod network add-on so that your pods can communicate with each other. The network must be deployed before any applications. Also, kube-dns, an internal helper service, will not start up before a network is installed. kubeadm only supports Container Network Interface (CNI) based networks (and does not support kubenet).kubectl get pods --all-namespaces查看pod信息,kube-dns仍然是READY:0/3
安装pod network
-
执行命令
root@k8s-master-01:/home/zcs# wget https://docs.projectcalico.org/v3.0/getting-started/kubernetes/installation/hosted/kubeadm/1.7/calico.yaml --2018-04-04 15:42:16-- https://docs.projectcalico.org/v3.0/getting-started/kubernetes/installation/hosted/kubeadm/1.7/calico.yaml Resolving docs.projectcalico.org (docs.projectcalico.org)... 209.58.185.108 Connecting to docs.projectcalico.org (docs.projectcalico.org)|209.58.185.108|:443... connected. HTTP request sent, awaiting response... 200 OK Length: 13711 (13K) [text/yaml] Saving to: ‘calico.yaml’ calico.yaml 100%[====================================================================================================================>] 13.39K --.-KB/s in 0s 2018-04-04 15:42:26 (624 MB/s) - ‘calico.yaml’ saved [13711/13711] -
修改
calico.yaml文件,将CALICO_IPV4POOL_CIDR的value修改为10.244.0.0/16. . . # The default IPv4 pool to create on startup if none exists. Pod IPs will be # chosen from this range. Changing this value after installation will have # no effect. This should fall within `--cluster-cidr`. - name: CALICO_IPV4POOL_CIDR value: "10.244.0.0/16" - name: CALICO_IPV4POOL_IPIP value: "Always" . . .特别注意
CALICO_IPV4POOL_CIDR的值必须与初始化master节点时的--pod-network-cidr值保持一致 -
执行
kubectl apply -f calico.yaml安装pod networkroot@k8s-master-01:/home/zcs# kubectl apply -f calico.yaml configmap "calico-config" created daemonset.extensions "calico-etcd" created service "calico-etcd" created daemonset.extensions "calico-node" created deployment.extensions "calico-kube-controllers" created clusterrolebinding.rbac.authorization.k8s.io "calico-cni-plugin" created clusterrole.rbac.authorization.k8s.io "calico-cni-plugin" created serviceaccount "calico-cni-plugin" created clusterrolebinding.rbac.authorization.k8s.io "calico-kube-controllers" created clusterrole.rbac.authorization.k8s.io "calico-kube-controllers" created serviceaccount "calico-kube-controllers" createdpod network有很多种:Calico, Canla, Flannel, Kube-router...等等,但是一个集群只能安装一个pod network -
此时在
master节点执行ifconfig命令可以看到多了一个tunl0网卡,ip为10.244.151.128,符合10.244.0.0/16这个网段,worker节点同理root@k8s-master-01:/home/zcs# ifconfig docker0 Link encap:Ethernet HWaddr 02:42:15:08:2f:c3 inet addr:172.17.0.1 Bcast:0.0.0.0 Mask:255.255.0.0 UP BROADCAST MULTICAST MTU:1500 Metric:1 RX packets:0 errors:0 dropped:0 overruns:0 frame:0 TX packets:0 errors:0 dropped:0 overruns:0 carrier:0 collisions:0 txqueuelen:0 RX bytes:0 (0.0 B) TX bytes:0 (0.0 B) enp0s3 Link encap:Ethernet HWaddr 08:00:27:3a:12:10 inet addr:192.168.1.196 Bcast:192.168.1.255 Mask:255.255.255.0 inet6 addr: fe80::a00:27ff:fe3a:1210/64 Scope:Link UP BROADCAST RUNNING MULTICAST MTU:1500 Metric:1 RX packets:166348 errors:0 dropped:0 overruns:0 frame:0 TX packets:91331 errors:0 dropped:0 overruns:0 carrier:0 collisions:0 txqueuelen:1000 RX bytes:21802344 (21.8 MB) TX bytes:71423851 (71.4 MB) lo Link encap:Local Loopback inet addr:127.0.0.1 Mask:255.0.0.0 inet6 addr: ::1/128 Scope:Host UP LOOPBACK RUNNING MTU:65536 Metric:1 RX packets:2075906 errors:0 dropped:0 overruns:0 frame:0 TX packets:2075906 errors:0 dropped:0 overruns:0 carrier:0 collisions:0 txqueuelen:1 RX bytes:449818079 (449.8 MB) TX bytes:449818079 (449.8 MB) tunl0 Link encap:IPIP Tunnel HWaddr inet addr:10.244.151.128 Mask:255.255.255.255 UP RUNNING NOARP MTU:1440 Metric:1 RX packets:0 errors:0 dropped:0 overruns:0 frame:0 TX packets:0 errors:0 dropped:0 overruns:0 carrier:0 collisions:0 txqueuelen:1 RX bytes:0 (0.0 B) TX bytes:0 (0.0 B)踩坑记2:卸载
Calico再重装,指定不同的CALICO_IPV4POOL_CIDR,但是生成的虚拟网卡IP网段仍然是第一次设置的值,猜测是卸载Calico时虚拟网卡未删除导致的 -
此时再执行
kubectl get pods --all-namespaces可以看到kube-dns变成了READY:3/3,正常启动了root@k8s-master-01:/home/zcs# kubectl get pods --all-namespaces NAMESPACE NAME READY STATUS RESTARTS AGE kube-system calico-etcd-9r6vq 1/1 Running 0 8m kube-system calico-kube-controllers-5449fdfcd-rc5mb 1/1 Running 0 8m kube-system calico-node-fs95d 2/2 Running 0 8m kube-system calico-node-pbxvh 2/2 Running 0 8m kube-system etcd-k8s-master-01 1/1 Running 0 57m kube-system kube-apiserver-k8s-master-01 1/1 Running 0 57m kube-system kube-controller-manager-k8s-master-01 1/1 Running 0 57m kube-system kube-dns-86f4d74b45-sbbfr 3/3 Running 0 58m kube-system kube-proxy-4n7bh 1/1 Running 0 58m kube-system kube-proxy-k8pkv 1/1 Running 0 33m kube-system kube-scheduler-k8s-master-01 1/1 Running 0 57m -
此时再执行
kubectl get nodes可以看到master和worker节点的STATUS都变成了Readyroot@k8s-master-01:/home/zcs# kubectl get nodes NAME STATUS ROLES AGE VERSION k8s-master-01 Ready master 1h v1.10.0 k8s-worker-01 Ready <none> 35m v1.10.0
安装kubernets dashboard
-
编辑
kubernetes-dashboard.yaml文件,写入以下内容# Copyright 2017 The Kubernetes Authors. # # Licensed under the Apache License, Version 2.0 (the "License"); # you may not use this file except in compliance with the License. # You may obtain a copy of the License at # # http://www.apache.org/licenses/LICENSE-2.0 # # Unless required by applicable law or agreed to in writing, software # distributed under the License is distributed on an "AS IS" BASIS, # WITHOUT WARRANTIES OR CONDITIONS OF ANY KIND, either express or implied. # See the License for the specific language governing permissions and # limitations under the License. # Configuration to deploy release version of the Dashboard UI compatible with # Kubernetes 1.8. # # Example usage: kubectl create -f <this_file> # ------------------- Dashboard Secret ------------------- # apiVersion: v1 kind: Secret metadata: labels: k8s-app: kubernetes-dashboard name: kubernetes-dashboard-certs namespace: kube-system type: Opaque --- # ------------------- Dashboard Service Account ------------------- # apiVersion: v1 kind: ServiceAccount metadata: labels: k8s-app: kubernetes-dashboard name: kubernetes-dashboard namespace: kube-system --- # ------------------- Dashboard Role & Role Binding ------------------- # kind: Role apiVersion: rbac.authorization.k8s.io/v1 metadata: name: kubernetes-dashboard-minimal namespace: kube-system rules: # Allow Dashboard to create 'kubernetes-dashboard-key-holder' secret. - apiGroups: [""] resources: ["secrets"] verbs: ["create"] # Allow Dashboard to create 'kubernetes-dashboard-settings' config map. - apiGroups: [""] resources: ["configmaps"] verbs: ["create"] # Allow Dashboard to get, update and delete Dashboard exclusive secrets. - apiGroups: [""] resources: ["secrets"] resourceNames: ["kubernetes-dashboard-key-holder", "kubernetes-dashboard-certs"] verbs: ["get", "update", "delete"] # Allow Dashboard to get and update 'kubernetes-dashboard-settings' config map. - apiGroups: [""] resources: ["configmaps"] resourceNames: ["kubernetes-dashboard-settings"] verbs: ["get", "update"] # Allow Dashboard to get metrics from heapster. - apiGroups: [""] resources: ["services"] resourceNames: ["heapster"] verbs: ["proxy"] - apiGroups: [""] resources: ["services/proxy"] resourceNames: ["heapster", "http:heapster:", "https:heapster:"] verbs: ["get"] --- apiVersion: rbac.authorization.k8s.io/v1 kind: RoleBinding metadata: name: kubernetes-dashboard-minimal namespace: kube-system roleRef: apiGroup: rbac.authorization.k8s.io kind: Role name: kubernetes-dashboard-minimal subjects: - kind: ServiceAccount name: kubernetes-dashboard namespace: kube-system --- # ------------------- Dashboard Deployment ------------------- # kind: Deployment apiVersion: apps/v1beta2 metadata: labels: k8s-app: kubernetes-dashboard name: kubernetes-dashboard namespace: kube-system spec: replicas: 1 revisionHistoryLimit: 10 selector: matchLabels: k8s-app: kubernetes-dashboard template: metadata: labels: k8s-app: kubernetes-dashboard spec: containers: - name: kubernetes-dashboard image: k8s.gcr.io/kubernetes-dashboard-amd64:v1.8.3 ports: - containerPort: 8443 protocol: TCP args: - --auto-generate-certificates # Uncomment the following line to manually specify Kubernetes API server Host # If not specified, Dashboard will attempt to auto discover the API server and connect # to it. Uncomment only if the default does not work. # - --apiserver-host=http://my-address:port # - --apiserver-host=http://192.168.1.196:6443 volumeMounts: - name: kubernetes-dashboard-certs mountPath: /certs # Create on-disk volume to store exec logs - mountPath: /tmp name: tmp-volume livenessProbe: httpGet: scheme: HTTPS path: / port: 8443 initialDelaySeconds: 30 timeoutSeconds: 30 volumes: - name: kubernetes-dashboard-certs secret: secretName: kubernetes-dashboard-certs - name: tmp-volume emptyDir: {} serviceAccountName: kubernetes-dashboard # Comment the following tolerations if Dashboard must not be deployed on master tolerations: - key: node-role.kubernetes.io/master effect: NoSchedule --- # ------------------- Dashboard Service ------------------- # kind: Service apiVersion: v1 metadata: labels: k8s-app: kubernetes-dashboard name: kubernetes-dashboard namespace: kube-system spec: type: NodePort ports: - port: 443 targetPort: 8443 selector: k8s-app: kubernetes-dashboard -
编辑
kubernetes-dashboard-admin.rbac.yaml,写入以下内容--- apiVersion: v1 kind: ServiceAccount metadata: name: admin-user namespace: kube-system --- apiVersion: rbac.authorization.k8s.io/v1beta1 kind: ClusterRoleBinding metadata: name: admin-user roleRef: apiGroup: rbac.authorization.k8s.io kind: ClusterRole name: cluster-admin subjects: - kind: ServiceAccount name: admin-user namespace: kube-system -
执行
kubectl create -f xxx.yaml命令安装dashboardroot@k8s-master-01:/home/zcs# kubectl create -f kubernetes-dashboard.yaml secret "kubernetes-dashboard-certs" created serviceaccount "kubernetes-dashboard" created role.rbac.authorization.k8s.io "kubernetes-dashboard-minimal" created rolebinding.rbac.authorization.k8s.io "kubernetes-dashboard-minimal" created deployment.apps "kubernetes-dashboard" created service "kubernetes-dashboard" created root@k8s-master-01:/home/zcs# kubectl create -f kubernetes-dashboard-admin.rbac.yaml serviceaccount "admin-user" created clusterrolebinding.rbac.authorization.k8s.io "admin-user" created -
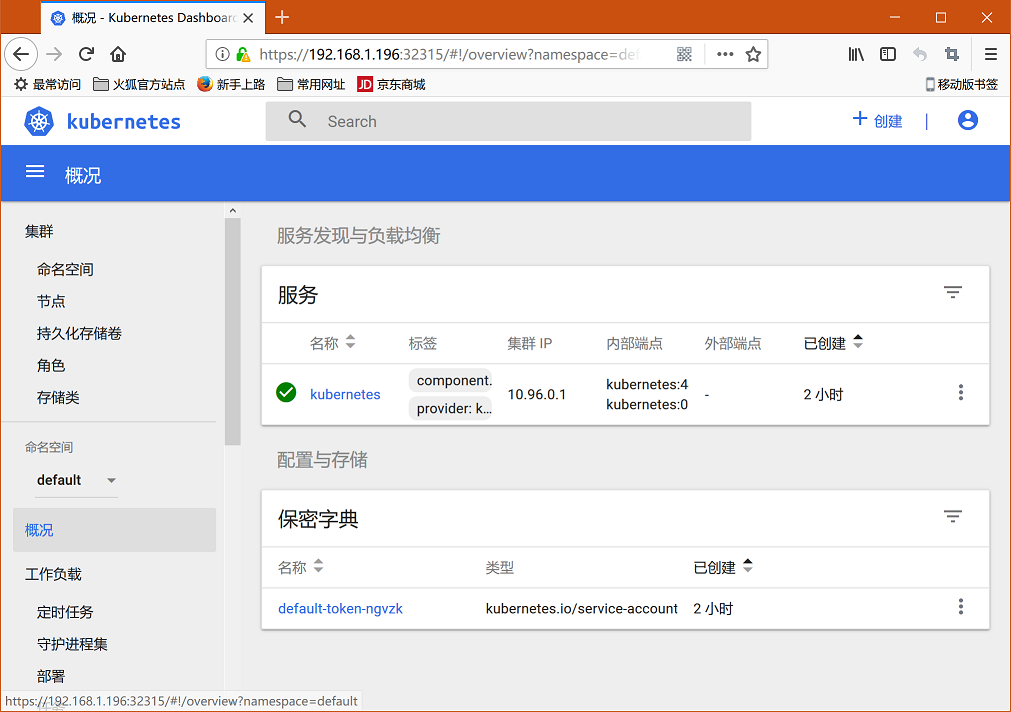
查看
pod状态,可以看到kubernetes-dashboard正常运行了root@k8s-master-01:/home/zcs# kubectl get pods --all-namespaces NAMESPACE NAME READY STATUS RESTARTS AGE kube-system calico-etcd-9r6vq 1/1 Running 0 43m kube-system calico-kube-controllers-5449fdfcd-rc5mb 1/1 Running 0 43m kube-system calico-node-fs95d 2/2 Running 0 43m kube-system calico-node-pbxvh 2/2 Running 0 43m kube-system etcd-k8s-master-01 1/1 Running 0 1h kube-system kube-apiserver-k8s-master-01 1/1 Running 0 1h kube-system kube-controller-manager-k8s-master-01 1/1 Running 0 1h kube-system kube-dns-86f4d74b45-sbbfr 3/3 Running 0 1h kube-system kube-proxy-4n7bh 1/1 Running 0 1h kube-system kube-proxy-k8pkv 1/1 Running 0 1h kube-system kube-scheduler-k8s-master-01 1/1 Running 0 1h kube-system kubernetes-dashboard-7d5dcdb6d9-trj44 1/1 Running 0 3m
登录dashboard
kubernets采用了rabc(基于角色的权限访问控制Role-Based Access Control),登录过程如下
-
获取
dashboard服务端口为32315root@k8s-master-01:/home/zcs# kubectl get services kubernetes-dashboard -n kube-system NAME TYPE CLUSTER-IP EXTERNAL-IP PORT(S) AGE kubernetes-dashboard NodePort 10.97.122.226 <none> 443:32315/TCP 19m -
浏览器访问 https://masterip:32315,本文中的例子应该是 https://192.168.1.196:32315,需注意,由于没有证书,在
Chrome浏览器中会无法访问,推荐Firefox,添加列外后,不出意外出现认证页面,选择令牌登录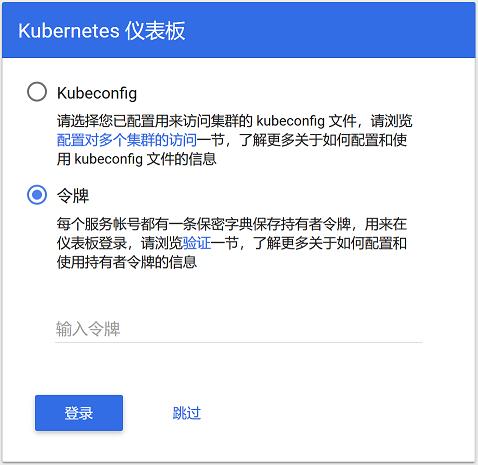
-
获取登录令牌(
token)
查看当前集群的secretroot@k8s-master-01:/home/zcs# kubectl get secret -n kube-system NAME TYPE DATA AGE admin-user-token-sbv24 kubernetes.io/service-account-token 3 27m attachdetach-controller-token-7lfj6 kubernetes.io/service-account-token 3 1h bootstrap-signer-token-w48vj kubernetes.io/service-account-token 3 1h bootstrap-token-7odzio bootstrap.kubernetes.io/token 7 1h calico-cni-plugin-token-dxlw9 kubernetes.io/service-account-token 3 1h calico-kube-controllers-token-vt6k7 kubernetes.io/service-account-token 3 1h certificate-controller-token-9jtj7 kubernetes.io/service-account-token 3 1h clusterrole-aggregation-controller-token-wfn6r kubernetes.io/service-account-token 3 1h cronjob-controller-token-thz64 kubernetes.io/service-account-token 3 1h daemon-set-controller-token-2rn8k kubernetes.io/service-account-token 3 1h default-token-678zj kubernetes.io/service-account-token 3 1h deployment-controller-token-69kkf kubernetes.io/service-account-token 3 1h disruption-controller-token-bnkkm kubernetes.io/service-account-token 3 1h endpoint-controller-token-78l4k kubernetes.io/service-account-token 3 1h generic-garbage-collector-token-kb94r kubernetes.io/service-account-token 3 1h horizontal-pod-autoscaler-token-6txtt kubernetes.io/service-account-token 3 1h job-controller-token-dpcz7 kubernetes.io/service-account-token 3 1h kube-dns-token-q96xn kubernetes.io/service-account-token 3 1h kube-proxy-token-l46s6 kubernetes.io/service-account-token 3 1h kubernetes-dashboard-certs Opaque 0 27m kubernetes-dashboard-key-holder Opaque 2 27m kubernetes-dashboard-token-kd6qc kubernetes.io/service-account-token 3 27m namespace-controller-token-4hdl4 kubernetes.io/service-account-token 3 1h node-controller-token-72cf8 kubernetes.io/service-account-token 3 1h persistent-volume-binder-token-ntwvn kubernetes.io/service-account-token 3 1h pod-garbage-collector-token-pdgbs kubernetes.io/service-account-token 3 1h pv-protection-controller-token-84fjx kubernetes.io/service-account-token 3 1h pvc-protection-controller-token-b48jp kubernetes.io/service-account-token 3 1h replicaset-controller-token-2dn65 kubernetes.io/service-account-token 3 1h replication-controller-token-nxr7j kubernetes.io/service-account-token 3 1h resourcequota-controller-token-l82vw kubernetes.io/service-account-token 3 1h service-account-controller-token-q7cfj kubernetes.io/service-account-token 3 1h service-controller-token-d8jc7 kubernetes.io/service-account-token 3 1h statefulset-controller-token-87ps7 kubernetes.io/service-account-token 3 1h token-cleaner-token-dpf9c kubernetes.io/service-account-token 3 1h ttl-controller-token-tklm5 kubernetes.io/service-account-token 3 1h -
获取超级用户
admin-user-token-sbv24的令牌root@k8s-master-01:/home/zcs# kubectl describe -n kube-system secret admin-user-token-sbv24 Name: admin-user-token-sbv24 Namespace: kube-system Labels: <none> Annotations: kubernetes.io/service-account.name=admin-user kubernetes.io/service-account.uid=fd35a522-37e1-11e8-a1c3-0800273a1210 Type: kubernetes.io/service-account-token Data ==== token: eyJhbGciOiJSUzI1NiIsImtpZCI6IiJ9.eyJpc3MiOiJrdWJlcm5ldGVzL3NlcnZpY2VhY2NvdW50Iiwia3ViZXJuZXRlcy5pby9zZXJ2aWNlYWNjb3VudC9uYW1lc3BhY2UiOiJrdWJlLXN5c3RlbSIsImt1YmVybmV0ZXMuaW8vc2VydmljZWFjY291bnQvc2VjcmV0Lm5hbWUiOiJhZG1pbi11c2VyLXRva2VuLXNidjI0Iiwia3ViZXJuZXRlcy5pby9zZXJ2aWNlYWNjb3VudC9zZXJ2aWNlLWFjY291bnQubmFtZSI6ImFkbWluLXVzZXIiLCJrdWJlcm5ldGVzLmlvL3NlcnZpY2VhY2NvdW50L3NlcnZpY2UtYWNjb3VudC51aWQiOiJmZDM1YTUyMi0zN2UxLTExZTgtYTFjMy0wODAwMjczYTEyMTAiLCJzdWIiOiJzeXN0ZW06c2VydmljZWFjY291bnQ6a3ViZS1zeXN0ZW06YWRtaW4tdXNlciJ9.FOh6fIXsNVJqsnrVbkmjwrO1xbEG-DIhZP0YXyxlCrjqEWHIEsYI_uy6-6arSYmOz2gtEEjU-6ksjndjcSHp5hOIQYVXGriAnmj2NPaqi58hToLgyB5qnLGc2IU2BceyaMrdmNT57TFWtLe8kIYdLKEfJG9GNalghnj9H250cenZjxknvRlK3jYRVdcbui5u6ogq0fe9ETtGnIuw_1vvVigy0nFBH4XK4g79QbJNCeqWYcwsERW3htUNztg8I0IeWcE-RGD1oi0xGWEwllhEOWKnkQV077sp3Tk-QkPA8qUIMLm244Ct8cyoKxyv3QPCc0hIxyHDJQyyCHyU683jAA ca.crt: 1025 bytes namespace: 11 bytes -
复制获取到的token,粘贴到浏览器,登录,就成功啦
一些操作指导,经验
-
kubectl命令中--all-namespaces与-n kube-system是等价的 -
获取
pod状态kubectl get pods --all-namespaceskubectl get pods -o wide --all-namespaces
-
获取
node状态kubectl get nodes
-
获取
endpoint状态kubectl get endpoints --all-namespaces
-
获取
service状态kubectl get services kubernetes-dashboard -n kube-system
-
删除
podkubectl delete --namespace=kube-system pod kube-dns-86f4d74b45-d2vh6
-
查看
pod日志kubectl logs -n kube-system kube-controller-manager-k8s-managerkubectl logs -n kube-system kube-dns-86f4d74b45-8f87x kubedns
-
查看
pod详细描述kubectl describe -n kube-system pod kube-dns-86f4d74b45-sw7wl
-
kube-apiserver配置文件路径/etc/kubernetes/manifests/kube-apiserver.yaml
-
导出系统中的镜像
for images in `docker images|awk '{print $1":"$2}'`;do docker save $images > $(echo $images |sed 's/\//_/g').img; done -
批量加载
docker镜像for images in $(ls|grep img);do docker load < $images;done
-
执行
kubectl xxx命令报错,这是因为执行了kubeadm reset后再重装集群导致的,解决方法:删除$HOME/.kube文件夹root@k8s-Manager:/home# kubectl get nodes Unable to connect to the server: x509: certificate signed by unknown authority (possibly because of "crypto/rsa: verification error" while trying to verify candidate authority certificate "kubernetes") -
编辑
kube-proxykubectl -n kube-system edit ds kube-proxy
-
便捷初始化脚本
-
master节点hostname k8s-master-01 echo "k8s-master-01" > /etc/hostname swapoff -a sed -i 's/^\(.*swap.*$\)/#\1/' /etc/fstab ufw disable echo "192.168.1.196 k8s-master-01" >> /etc/hosts echo "192.168.1.197 k8s-worker-01" >> /etc/hosts -
worker节点hostname k8s-worker-01 echo "k8s-worker-01" > /etc/hostname swapoff -a sed -i 's/^\(.*swap.*$\)/#\1/' /etc/fstab ufw disable echo "192.168.1.196 k8s-master-01" >> /etc/hosts echo "192.168.1.197 k8s-worker-01" >> /etc/hosts
-
