Unity 之 Redux 模式(第一篇)—— 人物移动
2016-12-06 12:33 软件猫 阅读(1339) 评论(1) 编辑 收藏 举报作者:软件猫
日期:2016年12月6日
转载请注明出处:http://www.cnblogs.com/softcat/p/6135195.html
在朋友的怂恿下,终于开始学 Unity 了,于是有了这篇文章。
本文用一个控制小人移动的示例,讲述如何在 Unity 中实现 Redux 架构。
关于 Flux、单向数据流是什么,请参考 阮一峰 大大的文章 http://www.ruanyifeng.com/blog/2016/01/flux.html
Redux 是什么鬼
Reflux是根据 Facebook 提出的 Flux 创建的 node.js 单向数据流类库。它实现了一个简化版的 Flux 单向数据流。
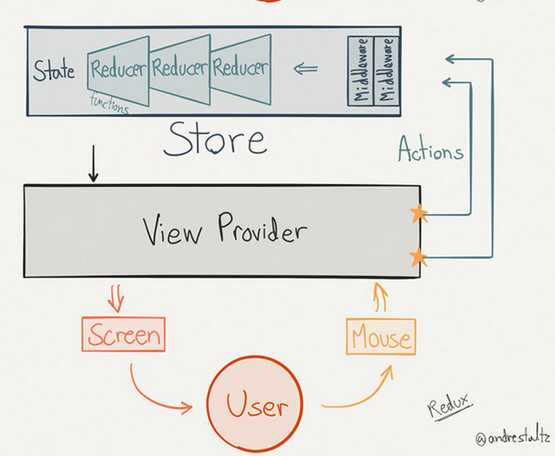
如下图所示:

小明(User)在家打游戏,边看着屏幕,边用键盘鼠标控制游戏中的人物。
屏幕后面有个 ViewProvider(当然,小明才不管这个)。
ViewProvider 负责两个事情:
1、每一帧渲染前,根据数据(State)更新 GameObject 中的参数。
2、获取键盘鼠标的输入,然后向 Store 发 Action,告诉 Store,小明按了键盘⬆️键
别的事情它就不管了。它不能亲自去修改 State 数据。
Store 也负责两件事情:
1、保存游戏的数据,这里我们叫 State。
2、建了一个处理管道,里面丢了一堆 Reducer。Action 来了以后,会丢进这个管道里。管道中的 Reducer 会判断这个 Action 自己是否关心,如果关心,则处理 Action 中承载的数据,并更新 State。
它们两各司其职,并形成了一个单项数据流。
每个游戏通常只有一个 Store,集中管理游戏数据,方便 Load & Save。
Store 中的 State 是一个很大的数据树,保存了游戏中所有的数据。
通常建议这个树是扁平化的,一般只有两三层。这样在序列化和反序列化的时候可以得到更好的性能。
Unity 中的 GameObject 通常会对应一到多个 ViewProvider。
每个 ViewProvider 通常都会发出 Action。
每个 Action 都有对应的一到多个 Reducer 来处理数据。
实践1: 用常规的方式实现一个可以控制走动的小人
1、创建一个 Unity 2D 项目。
2、将下面的小人作为 Sprite 资源拖入 Project。
3、将小人从 Project 中拖入 Scene,并重命名为 Player。
4、设置 Position 为 0,0,0。
5、设置 Rotation 为 0,0,90,让小人面向上方。
6、选中 Player,点击菜单 Component -> Physics 2D -> Rigidbody 2D,为小人添加刚体组件。
7、创建如下脚本,并拖放到 Player 上。这段脚本用于处理 Player
using UnityEngine;
using System.Collections;

public class PlayerMovement : MonoBehaviour
{
    [SerializeField]
    float speed = 3f;

    Rigidbody2D rigid;

    float ax, ay;

    void Start ()
    {
        rigid = GetComponent<Rigidbody2D> ();
    }

    void FixedUpdate ()
    {
        getInput ();
        rotate ();
        move ();
    }

    // 获取摇杆输入
    void getInput ()
    {
        ax = Input.GetAxis ("Horizontal");
        ay = Input.GetAxis ("Vertical");
    }

    // 处理旋转
    void rotate ()
    {
        if (ax == 0 && ay == 0)
            return;

        float r = Mathf.Atan2 (ay, ax) * Mathf.Rad2Deg;

        rigid.MoveRotation (r);
    }

    // 处理移动
    void move ()
    {
        Vector2 m = new Vector2 (ax, ay);
        m = Vector2.ClampMagnitude (m, 1);

        Vector2 dest = (Vector2)transform.position + m;
        Vector2 p = Vector2.MoveTowards (transform.position, dest, speed * Time.fixedDeltaTime);

        rigid.MovePosition (p);
    }

}
我们设置了一个 speed 参数,用于设置小人行走的速度。
我们创建了 FixedUpdate 方法,接受摇杆输入数据,然后分别处理小人的转向和移动。

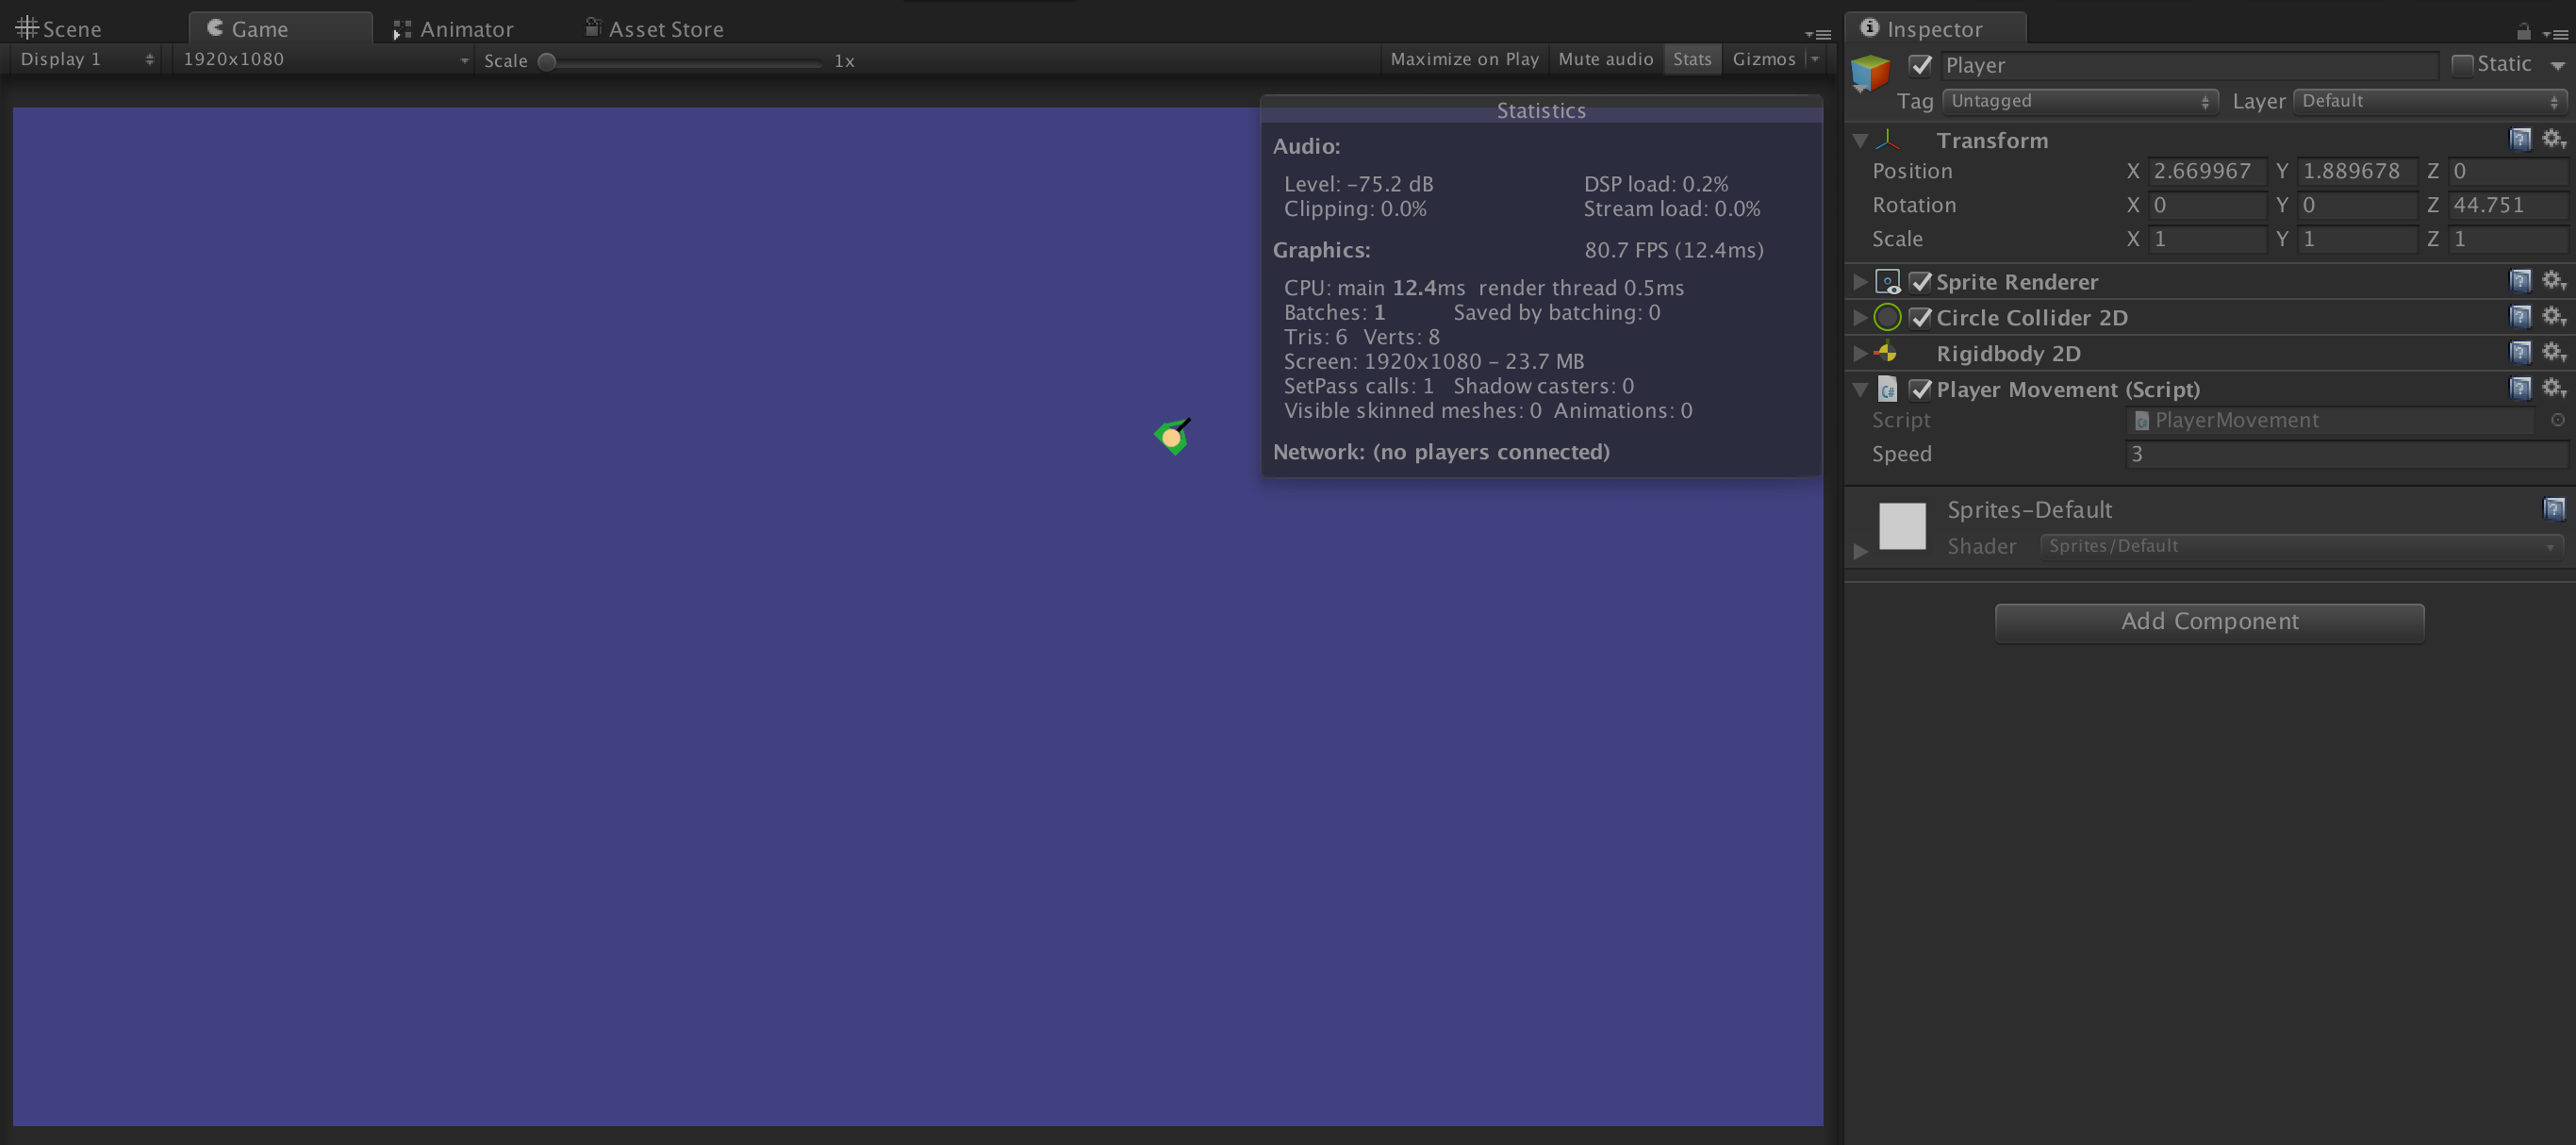
完成后点击 Play ,小人可以在 Game 视图中通过方向键控制移动。
实践2: 实现Redux模式
现在,我们来实现 Redux。
首先创建如下脚本文件:
| 文件名 | 描述 |
| IAction.cs | Action 接口 |
| IReducer.cs | Reducer 接口 |
| Store.cs | 存放 State,构建 Reducer 管道 |
| State.cs | State 数据的根 |
| ViewProvider.cs | PlayerViewProvider 的基类 |
| PlayerActions.cs | 存放多个 Player 相关的 Action |
| PlayerReducers.cs | 存放多个 Player 相关的 Reducer |
| PlayerState.cs | 保存和 Player 相关的 State |
| PlayerViewProvider.cs | 继承 ViewProvider,实现 Action 和 Render |
文件建好后,我们直接上代码:
1、IAction.cs
public interface IAction
{

}
这个比较简单,一个空接口。用于识别 Action 而已。
2、IReducer.cs
public interface IReducer
{
    State Reduce (State state, IAction action);
}
创建了一个接口,声明了 Reduce 方法。在 Store 管道中,循环调用所有的 Reducer,并执行这个方法。
方法传入当前的 State 和要处理的 Action。Reducer 判断如果是自己的 Action,则处理数据,并修改 State,然后将 State 返回。
注意:在 Redux 模式中,通常建议 State 是一个不变量,Reducer 并不直接修改它,而是创建一个修改过的 State 的副本,然后将其返回。
使用不变量有很多好处,比如我们可以轻松实现一个 Do - Undo 的功能。不过游戏里这个功能大多时候不太有用(特例:纸牌)
但是在游戏开发中,由于考虑到性能问题,这里还是舍弃了这个特性。
3、Store.cs
using UnityEngine;
using System;
using System.Collections;
using System.Collections.Generic;
using System.Linq;
using System.Reflection;

public class Store : MonoBehaviour
{
    // 保存 State 数据
    public static State State { get; private set; }

    // Reducer 列表
    static List<IReducer> reducerList;

    // 静态构造函数
    static Store ()
    {
        State = new State ();

        // 反射获取项目中所有继承 IReducer 的类,生成实例,并加入 reducerList 列表
        reducerList = AppDomain.CurrentDomain.GetAssemblies ()
            .SelectMany (a => a.GetTypes ().Where (t => t.GetInterfaces ().Contains (typeof(IReducer))))
            .Select (t => Activator.CreateInstance (t) as IReducer)
            .ToList ();
    }

    // ViewProvider 调用 Dispatch 方法,传入 Action
    // 循环调用所有的 Reducer,传入当前的 State 与 Action
    // 将 Reducer 返回的 State 保存
    public static void Dispatch (IAction action)
    {
        foreach (IReducer reducer in reducerList) {
            State = reducer.Reduce (State, action);
        }
    }

    // 状态改变事件
    public static Action<State> StateChanged;
    public static Action<State> FixedStateChanged;

    // FixedUpdate 时执行,监测 State 是否变更,并抛出 FixedStateChanged 事件
    void FixedUpdate ()
    {
        StartCoroutine (AfterFixedUpdate ());
    }

    IEnumerator AfterFixedUpdate ()
    {
        yield return new WaitForFixedUpdate ();

        if (!State.IsFixedStateChanged)
            yield break;

        State.IsFixedStateChanged = false;

        if (FixedStateChanged != null)
            FixedStateChanged (State);
    }

    // LateUpdate 时执行,监测 State 是否变更,并抛出 StateChanged 事件
    void LateUpdate ()
    {
        if (!State.IsStateChanged)
            return;

        State.IsStateChanged = false;

        if (StateChanged != null)
            StateChanged (State);
    }

}
Store 负责下面的事情:
a、保存 State
b、创建 Reducer 管道,用于处理 Action
c、在每一个固定帧,所有的 GameObject 执行完 FixedUpdate 后,执行 AfterFixedUpdate,抛出 FixedStateChanged 事件。
详见 Unity 之 AfterFixedUpdate,在所有 GameObject FixedUpdate 后执行
d、在 LateUpdate 时,抛出 StateChanged 事件。
由于物理引擎需要使用固定帧率的 FixedUpdate,这里把 FixedStateChanged 和 StateChanged 分开,分别抛出事件。
4、State.cs
// State 根。用于存放其他模块定义的 State。
public class State
{
    // 变更标记。Reducer 如果更改了 State 中的数据,需要将此值设置为 True。
    public bool IsStateChanged { get; set; }

    // 物理引擎的数据变更单独记录
    public bool IsFixedStateChanged { get; set; }

    // Player 模块定义的 State
    public Player.PlayerState Player { get; private set; }

    public State ()
    {
        Player = new Player.PlayerState ();
    }
}
IsStateChanged 会被 Reducer 修改为 True。Store 会通过 IsChanged 触发 OnStateChanged 事件,并通知 ViewProvider。
同样,IsFixedStateChanged = true 会触发 OnFixedStateChanged 事件。
5、ViewProvider.cs
using UnityEngine;

// 继承了 MonoBehaviour,可用于附加到 GameObject 上
public class ViewProvider : MonoBehaviour
{
    // 注册 StateChanged 和 FixedStateChanged 事件
    protected virtual void Awake ()
    {
        Store.StateChanged += OnStateChanged;
        Store.FixedStateChanged += OnFixedStateChanged;
    }

    // 注销 StateChanged 和 FixedStateChanged 事件
    protected virtual void OnDestroy ()
    {
        Store.StateChanged -= OnStateChanged;
        Store.FixedStateChanged -= OnFixedStateChanged;
    }

    // 处理状态变更
    protected virtual void OnStateChanged (State state)
    {

    }

    // 处理物理引擎相关状态变更
    protected virtual void OnFixedStateChanged (State state)
    {

    }

}
ViewProvider 基类。注册/注销 OnStateChanged 和 OnFixedStateChanged 事件。子类可以 override 这两个方法,实现相应的游戏数据变更。
1-5 我们把框架搭好了,下面开始实现 PlayerMovement 。
6、PlayerActions.cs
using UnityEngine;

namespace Player
{
    // Player 初始化,设置坐标、旋转角度与移动速度
    public class InitAction : IAction
    {
        public Vector2 position { get; set; }

        public float rotation { get; set; }

        public float speed { get; set; }
    }

    // 移动轴
    public class AxisAction : IAction
    {
        public float x { get; set; }

        public float y { get; set; }
    }
}
两个 Action
7、PlayerReducers.cs
using UnityEngine;

namespace Player
{
    // 处理初始化过程
    public class InitReducer : IReducer
    {
        public State Reduce (State state, IAction action)
        {
            // 检测 action 类型是不是自己想要的,如果不是,则说明自己不需要做什么,直接返回 state 即可。
            if (!(action is InitAction))
                return state;

            InitAction a = action as InitAction;

            // 初始化 PlayerState
            state.Player.Position = a.position;
            state.Player.Rotation = a.rotation;
            state.Player.Speed = a.speed;

            return state;
        }
    }

    // 处理摇杆数据
    public class AxisReducer : IReducer
    {
        public State Reduce (State state, IAction action)
        {
            // 检测 action 类型是不是自己想要的,如果不是,则说明自己不需要做什么,直接返回 state 即可。
            if (!(action is AxisAction))
                return state;

            AxisAction a = action as AxisAction;

            // 如果摇杆在 0 点,则不需要处理数据,直接返回 state。
            if (a.x == 0 && a.y == 0)
                return state;

            // 根据 action 传入的摇杆数据修改 state
            float speed = state.Player.Speed;
            Vector2 position = state.Player.Position;

            // 旋转
            state.Player.Rotation = Mathf.Atan2 (a.y, a.x) * Mathf.Rad2Deg;

            // 位移
            Vector2 m = new Vector2 (a.x, a.y);
            m = Vector2.ClampMagnitude (m, 1);

            Vector2 dest = position + m;
            state.Player.Position = Vector2.MoveTowards (position, dest, speed * Time.fixedDeltaTime);

            // 每次修改 state 之后,需要告诉 state 已经被修改过了
            state.IsFixedStateChanged = true;

            return state;
        }
    }

}
InitReducer:读取了游戏的初始化数据,并传给State。它并不知道初始化数据是从哪里来的(也许是某个xml,或者来自网络),只管自己执行初始化动作。
AxisReducer:我们把 PlayerMovement 中的代码搬了过来。
8、PlayerState.cs
using UnityEngine;

namespace Player
{
    public class PlayerState
    {
        // 玩家坐标
        public Vector2 Position { get; set; }

        // 玩家面向的方向
        public float Rotation { get; set; }

        // 移动速度
        public float Speed { get; set; }
    }
}
这个文件写好后,在 State 中加入 PlayerState 类型的属性,并在 State 构造函数中初始化。
9、PlayerViewProvider.cs
using UnityEngine;

namespace Player
{
    public class PlayerViewProvider: ViewProvider
    {
        [SerializeField]
        float speed = 3f;

        Rigidbody2D rigid = null;

        void Start ()
        {
            rigid = GetComponent<Rigidbody2D> ();

            // 执行初始化
            Store.Dispatch (new InitAction () {
                position = transform.position,
                rotation = transform.rotation.eulerAngles.z,
                speed = this.speed,
            });
        }

        void FixedUpdate ()
        {
            // 获取轴数据,并传递 Action
            float ax = Input.GetAxis ("Horizontal");
            float ay = Input.GetAxis ("Vertical");

            if (ax != 0 || ay != 0) {
                Store.Dispatch (new AxisAction () { x = ax, y = ay });
            }
        }

        protected override void OnFixedStateChanged (State state)
        {
            if (rigid != null) {
                // 刚体旋转和移动
                rigid.MoveRotation (state.Player.Rotation);
                rigid.MovePosition (state.Player.Position);
            }
        }

    }
}
最终,我们通过 PlayerViewProvider 将上面所有的代码连起来。
在 Start 时初始化数据,这里我们是直接取的 Unity 编辑器中的数据。真实游戏数据会来自网络或游戏存档。
在 FixedUpdate 时获取移动轴数据,然后执行 Action。
在 OnFixedStateChanged 中改变刚体数据。
脚本写好后,我们创建一个空 GameObject,重命名为 Store,拖入 Store 脚本。
然后把 PlayerViewProvider 拖到 Player 这个 GameObject 上,并关掉实践1中的 PlayerMovement。
执行游戏!大功告成!
重要!这一篇旨在说明 Redux 模式。实际开发中,Rigidbody2D.MovePosition 会根据碰撞物来决定最终的 Position 和 Rotation。在下一篇,我们会针对这个问题进行改造。


