WPF应用基础篇---TreeView
1.前言
最近有部分朋友经常问我,WPF的TreeView控件,如何用MVVM来实现绑定和显示?所以写下了这篇WPF应用基础篇---TreeView.
2.介绍
- 案例浏览:
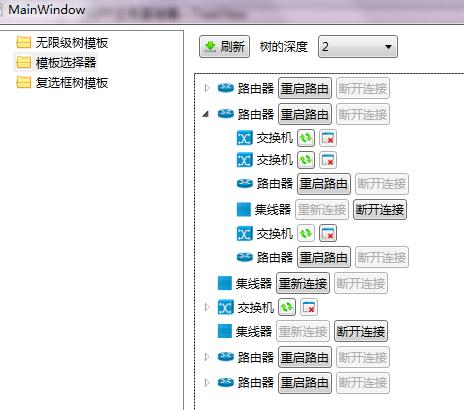
图 1-1(案例结构图)
- 目的:本文中做了三个简单的Demo给刚刚入门或者入门不久而且不熟悉TreeView控件在MVVM中具体实现的朋友们。希望以下3个例子能够给他们带来帮助。
- 背景:Demo是采用现实生活中一个大网络的某一部分网络来作为案例。这里为了演示方便,整个网络由路由器、交换机、集线器等服务器组成。他们的之间的关系是多对多的关系,一个网络中有可能一个路由器包含了多个路由器、交换机、集线器;而且交换机、集线器也是相同的原理。
- 数据:本文中用到的数据随机产生的测试数据。根据界面中树的深度(下拉框)来选择树最多有多少层,然后创建树结构的数据。这里需要注意的是我们TreeView提供的数据源必须是树结构的;为什么需要树结构的数据呢?大家可能会觉得很奇怪,其实,我们ViewModel要将数据Binding到TreeView控件上就必须指定一个ItemsSource,所以必须把节点的子节点集合绑定到模板中的ItemsSource中。
- 案例解析:
整个Demo分为两部分:左边是功能菜单,右边是显示具体内容,可以参考图1-1。
基础数据:为了实现一下案例功能,我建立了一个SmlAnt.DataLibrary的数据类库,专门提供原始基本类型和基本数据。下面是具体代码:
实体类:
 View Code
2 {
3 /// <summary>
4 /// 设备状态
5 /// </summary>
6 public enum DeviceStatus
7 {
8 Connected,Off
9 }
10
11 /// <summary>
12 /// 设备基类
13 /// </summary>
14 public class Device:INotifyPropertyChanged
15 {
16 //是否被选中
17 private bool? isSelected;
18 public bool? IsSelected
19 {
20 get { return isSelected; }
21 set
22 {
23 if (isSelected != value)
24 {
25 isSelected = value;
26 ChangeChildNodes(this);
27 ChangedParentNodes(this);
28 NotifyPropertyChanged("IsSelected");
29 }
30 }
31 }
32
33 private DeviceStatus status;
34 public DeviceStatus Status
35 {
36 get { return status; }
37 set
38 {
39 if (status != value)
40 {
41 status = value;
42 NotifyPropertyChanged("Status");
43 }
44 }
45 }
46
47 public string Name { get; set; }
48 public string ImageUrl{get;set;}
49
50 private List<Device> childNodes;
51 public List<Device> ChildNodes
52 {
53 get { return childNodes; }
54 set
55 {
56 if (childNodes != value)
57 {
58 childNodes = value;
59 NotifyPropertyChanged("ChildNodes");
60 }
61 }
62 }
63
64 private Device parentNode;
65 public Device ParentNode
66 {
67 get { return parentNode; }
68 set
69 {
70 if (parentNode != value)
71 {
72 parentNode = value;
73 NotifyPropertyChanged("ParentNode");
74 }
75 }
76 }
77
78 /// <summary>
79 /// 向下遍历,更改孩子节点状态
80 /// 注意:这里的父节点不是属性而是字段
81 /// 采用字段的原因是因为不想让父节点触发访问器而触发Setter
82 /// </summary>
83 /// <param name="CurrentNode"></param>
84 public void ChangeChildNodes(Device CurrentNode)
85 {
86 if (ChildNodes != null)
87 {
88 foreach (var data in childNodes)
89 {
90 data.isSelected = CurrentNode.IsSelected;
91 CurrentNode.NotifyPropertyChanged("IsSelected");
92 if (data.ChildNodes != null)
93 {
94 data.ChangeChildNodes(data);
95 }
96 }
97 }
98 }
99
100 /// <summary>
101 /// 向上遍历,更改父节点状态
102 /// 注意:这里的父节点不是属性而是字段
103 /// 采用字段的原因是因为不想让父节点触发访问器而触发Setter
104 /// </summary>
105 /// <param name="CurrentNode"></param>
106 public void ChangedParentNodes(Device CurrentNode)
107 {
108 if (CurrentNode.ParentNode != null)
109 {
110 bool? parentNodeState = true;
111 int selectedCount = 0; //被选中的个数
112 int noSelectedCount = 0; //不被选中的个数
113
114 foreach (var data in CurrentNode.ParentNode.ChildNodes)
115 {
116 if (data.IsSelected == true)
117 {
118 selectedCount++;
119 }
120 else if (data.IsSelected == false)
121 {
122 noSelectedCount++;
123 }
124 }
125
126 //如果全部被选中,则修改父节点为选中
127 if (selectedCount ==
128 CurrentNode.ParentNode.ChildNodes.Count)
129 {
130 parentNodeState = true;
131 }
132 //如果全部不被选中,则修改父节点为不被选中
133 else if (noSelectedCount ==
134 CurrentNode.ParentNode.ChildNodes.Count)
135 {
136 parentNodeState = false;
137 }
138 //否则标记父节点(例如用实体矩形填满)
139 else
140 {
141 parentNodeState = null;
142 }
143
144 CurrentNode.parentNode.isSelected = parentNodeState;
145 CurrentNode.parentNode.NotifyPropertyChanged("IsSelected");
146
147 if (CurrentNode.ParentNode.ParentNode != null)
148 {
149 ChangedParentNodes(CurrentNode.parentNode);
150 }
151 }
152 }
153
154 public void NotifyPropertyChanged(string name)
155 {
156 if(PropertyChanged!=null)
157 PropertyChanged(this,new PropertyChangedEventArgs(name));
158 }
159 public event PropertyChangedEventHandler PropertyChanged;
160 }
161
162 /// <summary>
163 /// 路由器
164 /// </summary>
165 public class Router : Device
166 {
167
168 }
169
170 /// <summary>
171 /// 交换机
172 /// </summary>
173 public class Switcher : Device
174 {
175
176 }
177
178 /// <summary>
179 /// 集线器
180 /// </summary>
181 public class Concentrator : Device
182 {
183
184 }
185 }
数据工厂:
 View Code
2 {
3 /// <summary>
4 /// 随机数据产生器
5 /// </summary>
6 static Random random = new Random();
7
8 /// <summary>
9 /// 根据参数获取设备状态
10 /// </summary>
11 /// <param name="intValue"></param>
12 /// <returns></returns>
13 private static DeviceStatus GetStatus(int intValue)
14 {
15 return intValue % 2 == 0 ? DeviceStatus.Off : DeviceStatus.Connected;
16 }
17
18 /// <summary>
19 ///
20 /// </summary>
21 /// <param name="intValue"></param>
22 /// <returns></returns>
23 private static String GetName(int intValue)
24 {
25 string refValue = "路由器";
26 if (intValue % 3 == 0)
27 {
28 refValue = "路由器";
29 }
30 else if (intValue % 3 == 1)
31 {
32 refValue = "交换机";
33 }
34 else
35 {
36 refValue = "集线器";
37 }
38 return refValue;
39 }
40
41 /// <summary>
42 /// 根据参数创建设备(简单工厂-参数工厂)
43 /// </summary>
44 /// <param name="typeValue"></param>
45 /// <returns></returns>
46 public static Device DeviceFactory(int typeValue)
47 {
48 Device refEntity = null;
49 if (typeValue % 3 == 0)
50 {
51 refEntity = new Router();
52 }
53 else if (typeValue % 3 == 1)
54 {
55 refEntity = new Switcher();
56 }
57 else
58 {
59 refEntity = new Concentrator();
60 }
61 return refEntity;
62 }
63
64 /// <summary>
65 /// 随即获取基类设备数据
66 /// </summary>
67 /// <param name="level">当前节点所在层</param>
68 /// <param name="MaxLevel">树最大深度</param>
69 /// <returns>设备树</returns>
70 public static List<Device> GetBaseTypeDevices(int level, int MaxLevel)
71 {
72 level++;
73 var count = random.Next(6, 10);
74 List<Device> listTo = new List<Device>();
75 for (int i = 1; i < count; i++)
76 {
77 Device entity = new Device();
78 var typeValue = random.Next(1, 6);
79 entity.Name = GetName(typeValue);
80 entity.ImageUrl = "..\\..\\Resource\\" + entity.Name + ".png";
81 entity.Status = GetStatus(typeValue);
82 if (level <= MaxLevel)
83 entity.ChildNodes = GetBaseTypeDevices(level, MaxLevel);
84 listTo.Add(entity);
85 }
86 return listTo;
87 }
88
89 /// <summary>
90 /// 随即获取所有子类型设备数据
91 /// </summary>
92 /// <param name="level">当前节点所在层</param>
93 /// <param name="MaxLevel">树最大深度</param>
94 /// <returns>设备树</returns>
95 public static List<Device> GetAllTypeDevice(int level,int MaxLevel)
96 {
97 level++;
98 var count = random.Next(6, 10);
99 List<Device> listTo = new List<Device>();
100 for (int i = 1; i < count; i++)
101 {
102 var typeValue = random.Next(1, 6);
103 Device entity = DeviceFactory(typeValue);
104 entity.Name = GetName(typeValue);
105 entity.ImageUrl = "..\\..\\Resource\\" + entity.Name + ".png";
106 entity.Status = GetStatus(typeValue);
107 if (level <= MaxLevel)
108 entity.ChildNodes = GetAllTypeDevice(level,MaxLevel);
109 listTo.Add(entity);
110 }
111 return listTo;
112 }
113
114 /// <summary>
115 /// 随即获取所有子类型设备数据
116 /// </summary>
117 /// <param name="level">当前节点所在层</param>
118 /// <param name="MaxLevel">树最大深度</param>
119 /// <param name="parentNode">父节点</param>
120 /// <returns>设备树</returns>
121 public static List<Device> GetAllTypeDevice(int level, int MaxLevel, Device parentNode)
122 {
123 level++;
124 var count = random.Next(6, 10);
125 List<Device> listTo = new List<Device>();
126 for (int i = 1; i < count; i++)
127 {
128 var typeValue = random.Next(1, 6);
129 Device entity = DeviceFactory(typeValue);
130 entity.IsSelected = false;
131 entity.Name = GetName(typeValue);
132 entity.ParentNode = parentNode;
133 entity.ImageUrl = "..\\..\\Resource\\" + entity.Name + ".png";
134 entity.Status = GetStatus(typeValue);
135 if (level <= MaxLevel)
136 entity.ChildNodes = GetAllTypeDevice(level, MaxLevel, entity);
137 listTo.Add(entity);
138 }
139 return listTo;
140 }
141 }
案例一,主要为大家介绍如何创建一个无限级的树,其实说简单点就是采用HierarchicalDataTemplate 作为树模板,然后通过Binding把数据绑定到树上。因为模板是HierarchicalDataTemplate这个模板,这里就不详细讲解,如果了解多点可以到MSDN,所以会无限级别的增加,只要数据结构上能支持,数据有多少级别,View中显示的树也会对应有多少级别。而如果采用的是DataTemplate的话,则只能有一层的数据。
效果图如下:
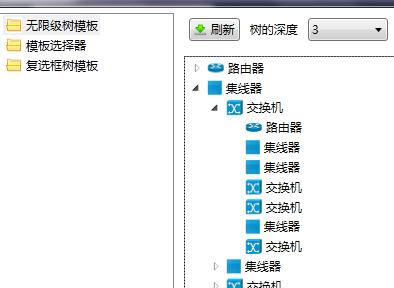
图 1-2(无限级别树)
View(XAML)代码 代码1-3:
 View Code
2 <StackPanel Orientation="Horizontal">
3 <Image Source="{Binding ImageUrl}" Margin="2"/>
4 <TextBlock Text="{Binding Name}" Margin="2"/>
5 </StackPanel>
6 </HierarchicalDataTemplate>
7
8 <TreeView Grid.Row="1" ItemTemplate="{StaticResource TreeViewTemplate}" ItemsSource="{Binding DataSource}" Margin="5"/>
ViewModel代码:
 View Code
2 public List<Device> DataSource
3 {
4 get { return dataSource; }
5 set
6 {
7 if (dataSource != value)
8 {
9 dataSource = value;
10 RaisePropertyChanged("DataSource");
11 }
12 }
13 }
14
15 DataSource = DataFactory.GetBaseTypeDevices(1, SelectedLevel);
案例二,主要给大家讲解的是,如何采用DataTmeplateSelector通过重写SelectTemplate方法来实现的。来控制显示样式、右键菜单等功能。这里主要讲的是,不同服务器之间显示不一样,而且连快捷菜单也对应不一样。这里有个特别说明的是:因为功能显示的需求,这里把集线器定义为没有子设备的模板。还有另外一个功能就是当我按下重启的时候,断开按钮就不能使用。这里用到的是Command。园里前辈们写了很多这方面的文章,我这里就不对ICommand进行详细讨论。
效果图:图1-1
快捷菜单(如下图):
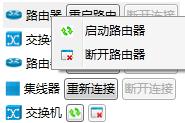
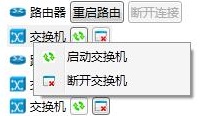

图 1-3(路由器快捷菜单) 图 1-4(交换机快捷菜单) 图1-5(集线器快捷菜单)
快捷菜单代码:
 View Code
2 <MenuItem Header="启动路由器">
3 <MenuItem.Icon>
4 <Image Source="..\..\Resource\Connect.png"/>
5 </MenuItem.Icon>
6 </MenuItem>
7 <MenuItem Header="断开路由器">
8 <MenuItem.Icon>
9 <Image Source="..\..\Resource\Break.png"/>
10 </MenuItem.Icon>
11 </MenuItem>
12 </ContextMenu>
13 <ContextMenu x:Key="SwitchMenu">
14 <MenuItem Header="启动交换机">
15 <MenuItem.Icon>
16 <Image Source="..\..\Resource\Connect.png"/>
17 </MenuItem.Icon>
18 </MenuItem>
19 <MenuItem Header="断开交换机">
20 <MenuItem.Icon>
21 <Image Source="..\..\Resource\Break.png"/>
22 </MenuItem.Icon>
23 </MenuItem>
24 </ContextMenu>
25 <ContextMenu x:Key="ConcentratorMenu">
26 <MenuItem Header="启动集线器">
27 <MenuItem.Icon>
28 <Image Source="..\..\Resource\Connect.png"/>
29 </MenuItem.Icon>
30 </MenuItem>
31 <MenuItem Header="断开集线器">
32 <MenuItem.Icon>
33 <Image Source="..\..\Resource\Break.png"/>
34 </MenuItem.Icon>
35 </MenuItem>
36 </ContextMenu>
TreeView模板代码:
 View Code
2
3 <LocalTmeplate:ContextMenuDataTemplateSelector x:Key="ContextMenuDataTemplateSelector"/>
4
5 <!--交换机模板-->
6 <HierarchicalDataTemplate x:Key="SwitchTemplate" ItemsSource="{Binding ChildNodes}" DataType="{x:Type DataLib:Switcher}">
7 <StackPanel Orientation="Horizontal" ContextMenu="{StaticResource SwitchMenu}">
8 <Image Source="{Binding ImageUrl}" Margin="2"/>
9 <TextBlock Text="{Binding Name}" Margin="2" VerticalAlignment="Center"/>
10 <Button Margin="2" Command="{Binding DataContext.OffCommand,RelativeSource={RelativeSource Mode=FindAncestor,AncestorType=UserControl}}"
11 CommandParameter="{Binding}">
12 <StackPanel>
13 <Image Source="..\..\Resource\Connect.png" ToolTip="重新连接"/>
14 </StackPanel>
15 </Button>
16 <Button Margin="2" Command="{Binding DataContext.ConnectionCommand,RelativeSource={RelativeSource Mode=FindAncestor,AncestorType=UserControl}}"
17 CommandParameter="{Binding}">
18 <StackPanel>
19 <Image Source="..\..\Resource\Break.png" ToolTip="断开连接"/>
20 </StackPanel>
21 </Button>
22 </StackPanel>
23 </HierarchicalDataTemplate>
24 <!--路由器模板-->
25 <HierarchicalDataTemplate x:Key="RouterTemplate" ItemsSource="{Binding ChildNodes}" DataType="{x:Type DataLib:Router}">
26 <StackPanel Orientation="Horizontal" ContextMenu="{StaticResource RouterMenu}">
27 <Image Source="{Binding ImageUrl}" Margin="2"/>
28 <TextBlock Text="{Binding Name}" Margin="2" VerticalAlignment="Center"/>
29 <Button Margin="2" Content="重启路由" Command="{Binding DataContext.OffCommand,RelativeSource={RelativeSource Mode=FindAncestor,AncestorType=UserControl}}"
30 CommandParameter="{Binding}">
31 </Button>
32 <Button Margin="2" Content="断开连接" Command="{Binding DataContext.ConnectionCommand,RelativeSource={RelativeSource Mode=FindAncestor,AncestorType=UserControl}}"
33 CommandParameter="{Binding}">
34 </Button>
35 </StackPanel>
36 </HierarchicalDataTemplate>
37 <!--集线器模板-->
38 <DataTemplate x:Key="ConcentratorTemplate" DataType="{x:Type DataLib:Concentrator}">
39 <StackPanel Orientation="Horizontal" ContextMenu="{StaticResource ConcentratorMenu}">
40 <Image Source="{Binding ImageUrl}" Margin="2"/>
41 <TextBlock Text="{Binding Name}" Margin="2" VerticalAlignment="Center"/>
42 <Button Margin="2" Content="重新连接" Command="{Binding DataContext.OffCommand,RelativeSource={RelativeSource Mode=FindAncestor,AncestorType=UserControl}}"
43 CommandParameter="{Binding}"/>
44 <Button Margin="2" Content="断开连接" Command="{Binding DataContext.ConnectionCommand,RelativeSource={RelativeSource Mode=FindAncestor,AncestorType=UserControl}}"
45 CommandParameter="{Binding}"/>
46 </StackPanel>
47 </DataTemplate>
DataTemplateSelector代码:
 View Code
2 {
3 public override System.Windows.DataTemplate SelectTemplate(object item, System.Windows.DependencyObject container)
4 {
5 FrameworkElement element = container as FrameworkElement;
6 DataTemplate template = null;
7 if (item is Router)
8 {
9 template = element.FindResource("RouterTemplate") as HierarchicalDataTemplate;
10 }
11 else if (item is Switcher)
12 {
13 template = element.FindResource("SwitchTemplate") as HierarchicalDataTemplate;
14 }
15 else if (item is Concentrator)
16 {
17 template = element.FindResource("ConcentratorTemplate") as DataTemplate;
18 }
19 return template;
20 }
21 }
ViewModel代码:
 View Code
2 public List<Device> DataSource
3 {
4 get { return dataSource; }
5 set
6 {
7 if (dataSource != value)
8 {
9 dataSource = value;
10 RaisePropertyChanged("DataSource");
11 }
12 }
13 }
14
15 DataSource = DataFactory.GetAllTypeDevice(1, SelectedLevel);
案例三,主要跟大家分享的是,如何在TreeView上实现三态树的功能。具体什么是三态树的话我在这里就不多说了。以下是案例三的具体结构图和代码:
结构图:
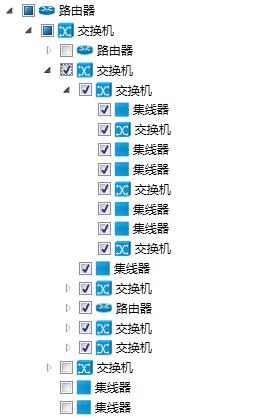
图 1-6(三态树)
代码:具体代码实现在上面的实体类代码的 IDevice中实现。请参考上面代码。
3.个人观点
很多朋友都抱怨说WPF的TreeView是一个很麻烦的东西,而且不好用。这点我持反对的意见,每一种新东西,在我们还不熟悉的时候,是挺麻烦的。但是WPF--TreeView较WinForm--Tree来说,WPF提供一个强大的模板功能,能让我们根据自己的需要,灵活地更换模板。如果在做WinForm开发的时候,我想实现一棵树上保存N种数据类型的数据,而且根据不同的类型,在节点上显示不一样的状态和样式,也许你会花很多的时间来重写Tree的控件,而WPF提供了一个模板功能,而且具体的模板是我们自己来实现的。
4.附加代码:
百度网盘 :http://pan.baidu.com/s/1kVqRyrt
密码:cm4k


【推荐】国内首个AI IDE,深度理解中文开发场景,立即下载体验Trae
【推荐】编程新体验,更懂你的AI,立即体验豆包MarsCode编程助手
【推荐】抖音旗下AI助手豆包,你的智能百科全书,全免费不限次数
【推荐】轻量又高性能的 SSH 工具 IShell:AI 加持,快人一步
· 10年+ .NET Coder 心语,封装的思维:从隐藏、稳定开始理解其本质意义
· .NET Core 中如何实现缓存的预热?
· 从 HTTP 原因短语缺失研究 HTTP/2 和 HTTP/3 的设计差异
· AI与.NET技术实操系列:向量存储与相似性搜索在 .NET 中的实现
· 基于Microsoft.Extensions.AI核心库实现RAG应用
· 10年+ .NET Coder 心语 ── 封装的思维:从隐藏、稳定开始理解其本质意义
· 地球OL攻略 —— 某应届生求职总结
· 提示词工程——AI应用必不可少的技术
· Open-Sora 2.0 重磅开源!
· 周边上新:园子的第一款马克杯温暖上架