pepperoni-app-kit
我们首先可以看项目的效果
看Index.js我们可以看到有使用redux和react-react-native
import {Provider} from 'react-redux';
import store from './src/redux/store';
import AppViewContainer from './src/modules/AppViewContainer';

import React, {Component} from 'react';
import {AppRegistry} from 'react-native';

class PepperoniAppTemplate extends Component {
  render() {
    return (
      <Provider store={store}>
        <AppViewContainer />
      </Provider>
    );
  }
}

AppRegistry.registerComponent('PepperoniAppTemplate', () => PepperoniAppTemplate);
打开文件,我们可以看到项目的目录
接下来我们一步一步分析
//navigator.js
import {Platform} from 'react-native';
import {TabNavigator, StackNavigator} from 'react-navigation';

import CounterViewContainer from '../counter/CounterViewContainer';
import ColorViewContainer from '../colors/ColorViewContainer';
// headerColor控制的是背景色
// activeColor控制的是选中的颜色
const headerColor = '#39babd';
const activeColor = 'red';

// TabNavigator is nested inside StackNavigator
// 从组件react-navigation中取得 TabNavigator
export const MainScreenNavigator = TabNavigator({
  //定义两个组件counter和color组件
  Counter: {screen: CounterViewContainer},
  Color: {screen: ColorViewContainer}
}, {
  tabBarOptions: {
    ...Platform.select({
      android: {
        activeTintColor: activeColor,
        indicatorStyle: {backgroundColor: activeColor},
        style: {backgroundColor: headerColor}
      }
    })
  }
});

MainScreenNavigator.navigationOptions = {
  title: 'Pepperoni App Template',
  headerTitleStyle: {color: 'white'},
  headerStyle: {
    backgroundColor: headerColor,
    elevation: 0 // disable header elevation when TabNavigator visible
  }
};

// Root navigator is a StackNavigator
//定义初始化的页面为MainScreenNavigator
const AppNavigator = StackNavigator({
  Home: {screen: MainScreenNavigator},
  InfiniteColorStack: {screen: ColorViewContainer}
});

export default AppNavigator;
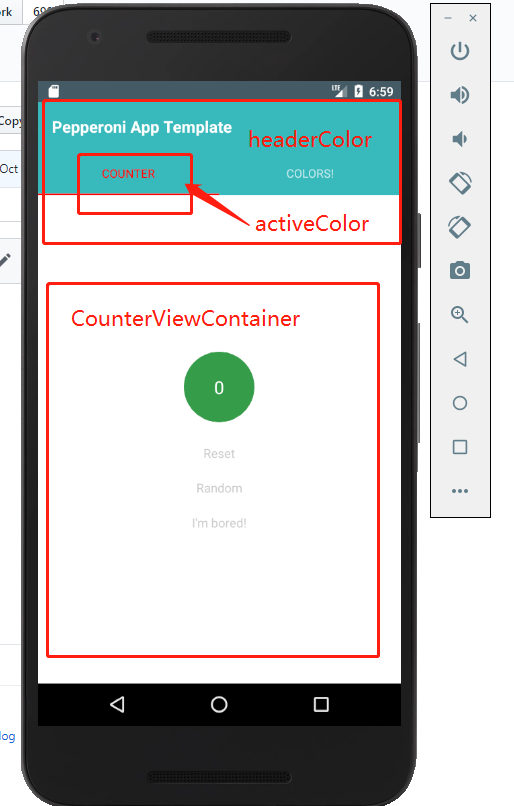
页面如下:
与redux交互
//NavigatorViewContainer.js
import {connect} from 'react-redux';
import NavigatorView from './NavigatorView';

export default connect(
  state => ({
    navigatorState: state.get('navigatorState').toJS()
  })
)(NavigatorView);
//NavigatorView.js
import React, {Component} from 'react';
import PropTypes from 'prop-types';
import {addNavigationHelpers} from 'react-navigation';

import AppNavigator from './Navigator';

class NavigatorView extends Component {
  static displayName = 'NavigationView';

  static propTypes = {
    dispatch: PropTypes.func.isRequired,
    navigatorState: PropTypes.shape({
      index: PropTypes.number.isRequired,
      routes: PropTypes.arrayOf(PropTypes.shape({
        key: PropTypes.string.isRequired,
        routeName: PropTypes.string.isRequired
      }))
    }).isRequired
  };

  render() {
    return (
      <AppNavigator
        navigation={
          addNavigationHelpers({
            dispatch: this.props.dispatch,
            state: this.props.navigatorState
          })
        }
      />
    );
  }
}

export default NavigatorView;
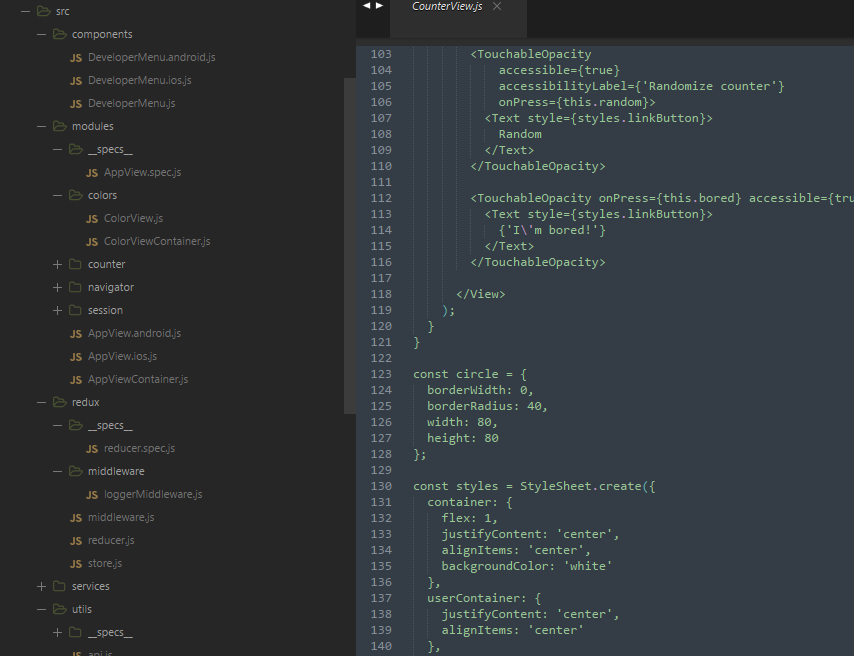
我们来看
//CounterView.js
import React, {Component} from 'react';
import PropTypes from 'prop-types';
import {
  StyleSheet,
  TouchableOpacity,
  Image,
  Text,
  View
} from 'react-native';

import Icon from 'react-native-vector-icons/MaterialIcons';

class CounterView extends Component {
  //定义静态组件
  static displayName = 'CounterView';

  static navigationOptions = {
    title: 'Counter',
    tabBarIcon: (props) => (
        <Icon name='plus-one' size={24} color={props.tintColor} />
      )
  }
  //静态属性
  static propTypes = {
    counter: PropTypes.number.isRequired,
    userName: PropTypes.string,
    userProfilePhoto: PropTypes.string,
    loading: PropTypes.bool.isRequired,
    counterStateActions: PropTypes.shape({
      increment: PropTypes.func.isRequired,
      reset: PropTypes.func.isRequired,
      random: PropTypes.func.isRequired
    }).isRequired,
    navigate: PropTypes.func.isRequired
  };
  // 点击增加的方法
  increment = () => {
    this.props.counterStateActions.increment();
  };
  // 清除
  reset = () => {
    this.props.counterStateActions.reset();
  };
  // 随机数
  random = () => {
    this.props.counterStateActions.random();
  };
  //跳转到另一个页面
  bored = () => {
    this.props.navigate({routeName: 'Color'});
  };

  renderUserInfo = () => {
    if (!this.props.userName) {
      return null;
    }

    return (
      <View style={styles.userContainer}>
        <Image
          style={styles.userProfilePhoto}
          source={{
            uri: this.props.userProfilePhoto,
            width: 80,
            height: 80
          }}
          />
        <Text style={styles.linkButton}>
          Welcome, {this.props.userName}!
        </Text>
      </View>
    );
  };

  render() {
    //点击随机数的那个背景色会loading变红色
    const loadingStyle = this.props.loading
      ? {backgroundColor: 'red'}
      : null;

    return (
      <View style={styles.container}>

        {this.renderUserInfo()}

        <TouchableOpacity
          accessible={true}
          accessibilityLabel={'Increment counter'}
          onPress={this.increment}
          style={[styles.counterButton, loadingStyle]}>
          <Text style={styles.counter}>
            {this.props.counter}
          </Text>
        </TouchableOpacity>

        <TouchableOpacity
            accessible={true}
            accessibilityLabel={'Reset counter'}
            onPress={this.reset}>
          <Text style={styles.linkButton}>
            Reset
          </Text>
        </TouchableOpacity>

        <TouchableOpacity
            accessible={true}
            accessibilityLabel={'Randomize counter'}
            onPress={this.random}>
          <Text style={styles.linkButton}>
            Random
          </Text>
        </TouchableOpacity>

        <TouchableOpacity onPress={this.bored} accessible={true}>
          <Text style={styles.linkButton}>
            {'I\'m bored!'}
          </Text>
        </TouchableOpacity>

      </View>
    );
  }
}
//一种新式写法,定义一个circle
const circle = {
  borderWidth: 0,
  borderRadius: 40,
  width: 80,
  height: 80
};

const styles = StyleSheet.create({
  container: {
    flex: 1,
    justifyContent: 'center',
    alignItems: 'center',
    backgroundColor: 'white'
  },
  userContainer: {
    justifyContent: 'center',
    alignItems: 'center'
  },
  //这里的是...circle扩展这个属性,厉害的写法哇
  userProfilePhoto: {
    ...circle,
    alignSelf: 'center'
  },
  counterButton: {
    ...circle,
    backgroundColor: '#349d4a',
    alignItems: 'center',
    justifyContent: 'center',
    margin: 20
  },
  counter: {
    color: 'white',
    fontSize: 20,
    textAlign: 'center'
  },
  welcome: {
    textAlign: 'center',
    color: 'black',
    marginBottom: 5,
    padding: 5
  },
  linkButton: {
    textAlign: 'center',
    color: '#CCCCCC',
    marginBottom: 10,
    padding: 5
  }
});

export default CounterView;
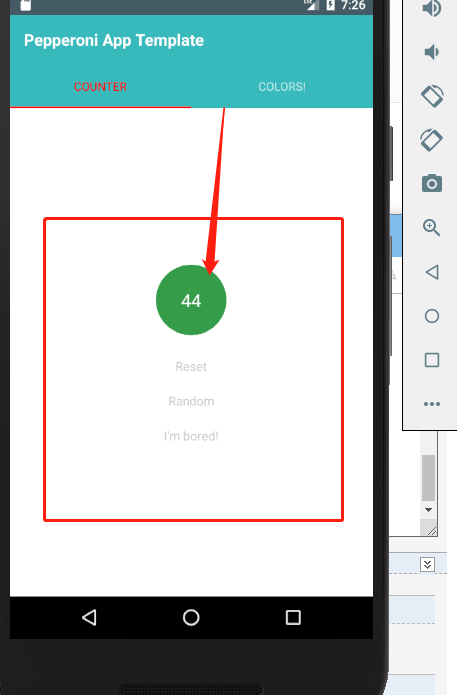
页面效果为
//CounterState.js
//里面定义的是state状态
import {Map} from 'immutable';
import {loop, Effects} from 'redux-loop-symbol-ponyfill';
import {generateRandomNumber} from '../../services/randomNumberService';

// Initial state
const initialState = Map({
  value: 0,
  loading: false
});

// Actions
const INCREMENT = 'CounterState/INCREMENT';
const RESET = 'CounterState/RESET';
const RANDOM_REQUEST = 'CounterState/RANDOM_REQUEST';
const RANDOM_RESPONSE = 'CounterState/RANDOM_RESPONSE';

// Action creators
export function increment() {
  return {type: INCREMENT};
}

export function reset() {
  return {type: RESET};
}

export function random() {
  return {
    type: RANDOM_REQUEST
  };
}

export async function requestRandomNumber() {
  return {
    type: RANDOM_RESPONSE,
    payload: await generateRandomNumber()
  };
}

// Reducer
export default function CounterStateReducer(state = initialState, action = {}) {
  switch (action.type) {
    case INCREMENT:
      return state.update('value', value => value + 1);

    case RESET:
      return initialState;

    case RANDOM_REQUEST:
      return loop(
        state.set('loading', true),
        Effects.promise(requestRandomNumber)
      );

    case RANDOM_RESPONSE:
      return state
        .set('loading', false)
        .set('value', action.payload);

    default:
      return state;
  }
}
//CounterViewContainer.js
这个里面是dispatch方法,改变state的状态
import {connect} from 'react-redux';
import {bindActionCreators} from 'redux';
//引入UI组件
import CounterView from './CounterView';
import {NavigationActions} from 'react-navigation';
//引入action
import * as CounterStateActions from '../counter/CounterState';

export default connect(
  state => ({
    counter: state.getIn(['counter', 'value']),
    loading: state.getIn(['counter', 'loading'])
  }),
  dispatch => {
    return {
      navigate: bindActionCreators(NavigationActions.navigate, dispatch),
      counterStateActions: bindActionCreators(CounterStateActions, dispatch)
    };
  }
)(CounterView);
//ColorView.js
import React, {Component} from 'react';
import PropTypes from 'prop-types';
import {
Button,
View,
StyleSheet
} from 'react-native';
import Icon from 'react-native-vector-icons/MaterialIcons';
const color = () => Math.floor(255 * Math.random());
/**
* Sample view to demonstrate StackNavigator
* @TODO remove this module in a live application.
*/
class ColorView extends Component {
static displayName = 'ColorView';
static navigationOptions = {
title: 'Colors!',
tabBarIcon: (props) => (
<Icon name='color-lens' size={24} color={props.tintColor} />
),
// TODO: move this into global config?
headerTintColor: 'white',
headerStyle: {
backgroundColor: '#39babd'
}
}
static propTypes = {
navigate: PropTypes.func.isRequired
};
constructor(props) {
super(props);
//初始化的背景色
this.state = {
background: `rgba(${color()},${color()},${color()}, 1)`
};
}
//点击open进入新的页面
open = () => {
this.props.navigate({routeName: 'InfiniteColorStack'});
};
//点击colors,页面进入就显示这个
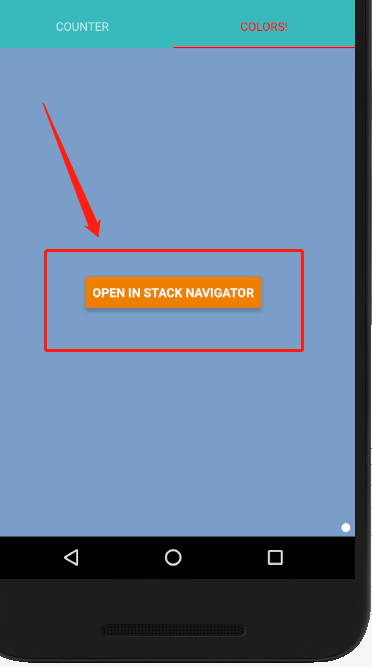
render() {
const buttonText = 'Open in Stack Navigator';
return (
<View style={[styles.container, {backgroundColor: this.state.background}]}>
<Button color='#ee7f06' title={buttonText} onPress={this.open}/>
</View>
);
}
}
const styles = StyleSheet.create({
container: {
flex: 1,
justifyContent: 'center',
alignItems: 'center'
}
});
export default ColorView;
项目运行效果为
当进行多次点击颜色的时候,会将状态存储起来
//ColorViewContainer.js
import {connect} from 'react-redux';
import {bindActionCreators} from 'redux';
import {NavigationActions} from 'react-navigation';
import ColorView from './ColorView';

export default connect(
   null,
   dispatch => {
     return {
       navigate: bindActionCreators(NavigationActions.navigate, dispatch)
     };
   }
)(ColorView);

by我理解的十分浅显,但是会继续找项目与大家一起进步的
作者:jser_dimple
-------------------------------------------
个性签名:一个人在年轻的时候浪费自己的才华与天赋是一件非常可惜的事情
如果觉得这篇文章对你有小小的帮助的话,记得在右下角点个“推荐”哦,博主在此感谢!
万水千山总是情,打赏5毛买辣条行不行,所以如果你心情还比较高兴,也是可以扫码打赏博主,哈哈哈(っ•̀ω•́)っ✎⁾⁾!
微信

支付宝

