Zabbix实战-简易教程--大型分布式监控系统实现Agent批量快速接入
作者:@skyflask
转载本文请注明出处:https://www.cnblogs.com/skyflask/p/8358256.html
目录
一、分布式架构
二、Agent定位
三、实现接入
四、更快、批量执行
一、分布式架构
相信使用zabbix的大神都熟悉他的分布式架构,分布式的优势相当明显,分而治之。比如目前我的架构图如下:
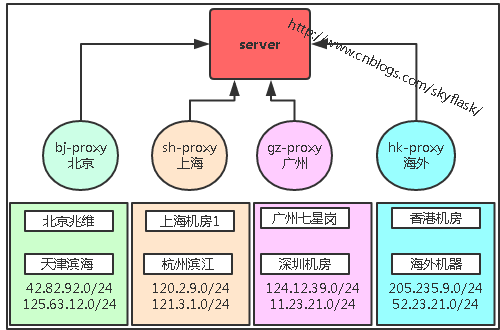
那么,对将要接入监控系统的任何一个agent如何快速定位,并进行接入呢?
问题分析:
1、目标IP定位
2、目标IP定位后,可能有些是纯内网环境(比如DB机器)
3、proxy管辖范围
4、被管辖目标和管辖者范围确定后,具体用什么方法实现?
解决办法:
1、目标IP基本上是可控的,因为我们自己有哪些IP网段,在CMDB里面一查便知;
2、对于纯内网环境,由于机器无法直接出外网,而只能通过内网IP进行通信,我们可以使用Nginx的反向代理来解决。(重要)
3、proxy的管辖范围也是可控的,因为我们自己清楚自己有哪些proxy,proxy到哪些区域速度更快;
4、目标IP和所要接入的proxy都已经可控,最后就是实现手段:shell脚本。
实现图如下:
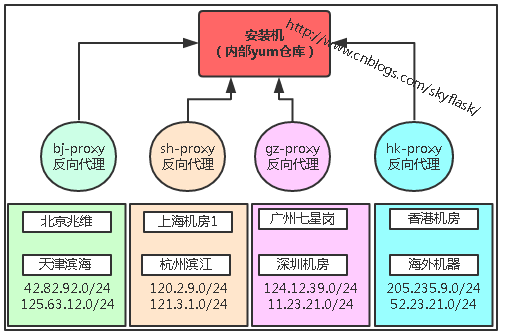
前提:proxy必须和安装机能够通过外网通讯。
已经知道解决问题的办法,那么实现起来的话就不是那么难了。方法千千万万种,就看你喜欢哪一种了。
我这里用最简单的,shell脚本方法。
二、Agent定位
1、通过本机解析方式
1 2 3 4 5 6 7 8 9 10 11 12 13 14 15 16 17 18 19 20 21 22 23 24 25 26 27 28 29 30 31 32 33 | #!/bin/bashipaddr_shhb=`ip a| grep -E -o "(25[0-5]|2[0-4][0-9]|[01]?[0-9][0-9]?)\.(25[0-5]|2[0-4][0-9]|[01]?[0-9][0-9]?)\.(25[0-5]|2[0-4][0-9]|[01]?[0-9][0-9]?)\.(25[0-5]|2[0-4][0-9]|[01]?[0-9][0-9]?)"|grep -E "42.82.92\.|125.63.12\."|wc -l`ipaddr_shhb_proxy='42.82.92.22'ipaddr_gzqxg=`ip a| grep -E -o "(25[0-5]|2[0-4][0-9]|[01]?[0-9][0-9]?)\.(25[0-5]|2[0-4][0-9]|[01]?[0-9][0-9]?)\.(25[0-5]|2[0-4][0-9]|[01]?[0-9][0-9]?)\.(25[0-5]|2[0-4][0-9]|[01]?[0-9][0-9]?)"|grep -E "120.2.9\.|121.13.1\."|wc -l`ipaddr_gzqxg_proxy='121.114.30.25'ipaddr_hk=`ip a| grep -E -o "(25[0-5]|2[0-4][0-9]|[01]?[0-9][0-9]?)\.(25[0-5]|2[0-4][0-9]|[01]?[0-9][0-9]?)\.(25[0-5]|2[0-4][0-9]|[01]?[0-9][0-9]?)\.(25[0-5]|2[0-4][0-9]|[01]?[0-9][0-9]?)"|grep -E "124.12.39\.|11.23.21\."|wc -l`ipaddr_hk_proxy='124.12.39.33'function install_agent() { wget http://安装机:端口/zabbix/zabbix-2.2.4-agent.sh /bin/bash zabbix-2.2.4-agent.sh uninstall $1 /bin/bash zabbix-2.2.4-agent.sh install_proxy_agent $1 rm -rf zabbix-2.2.4-agent.sh}if [ ${ipaddr_shhb} -ge 1 ];then install_agent ${ipaddr_shhb_proxy}elif [ ${ipaddr_gzqxg} -ge 1 ];then install_agent ${ipaddr_gzqxg_proxy}else install_agent ${ipaddr_hk_proxy}fi |
2、通过外部解析方式
由于有些云主机通过上面的方式可能不行,因为内网可能重复(不同VPS内网IP可相同)。
1 2 3 4 5 6 7 8 9 10 11 12 13 14 15 16 17 18 19 20 21 22 23 24 25 26 27 28 29 30 31 32 33 | #!/bin/bashpubip=`curl -s http://ipinfo.io|grep ip|awk -F[\"] '{print $4}'`ipaddr_shhb=`echo $pubip|grep -E "42.82.92\.|125.63.12\."|wc -l`ipaddr_shhb_proxy='42.82.92.22'ipaddr_gzqxg=`echo $pubip|grep -E "120.2.9\.|121.13.1\."|wc -l`ipaddr_gzqxg_proxy='121.114.30.25'ipaddr_hk=`echo $pubip|grep -E "124.12.39\.|11.23.21\."|wc -l`ipaddr_hk_proxy='124.12.39.33'function install_agent() { wget http://安装机:端口/zabbix/zabbix-2.2.4-agent.sh /bin/bash zabbix-2.2.4-agent.sh uninstall $1 /bin/bash zabbix-2.2.4-agent.sh install_proxy_agent $1 rm -rf zabbix-2.2.4-agent.sh}if [ ${ipaddr_shhb} -ge 1 ];then install_agent ${ipaddr_shhb_proxy}elif [ ${ipaddr_gzqxg} -ge 1 ];then install_agent ${ipaddr_gzqxg_proxy}else install_agent ${ipaddr_hk_proxy}fi |
通过以上2种方式,就可以定位AgentIP和PorxyIP的对应关系,同时,将proxyIP作为参数传入脚本,这样,在安装的时候proxyIP地址就可以动态选定了。
三、实现接入
正式安装时,将proxy的ip作为安装脚本的传入参数即可。其他可以定制化你所需要安装的一切!
1 2 3 4 5 6 7 8 9 10 11 12 13 14 15 16 17 18 19 20 21 22 23 24 25 26 27 28 29 30 31 32 33 34 35 36 37 38 39 40 41 42 43 44 45 46 47 48 49 50 51 52 53 54 55 56 57 58 59 60 61 62 63 64 65 66 67 68 69 70 71 72 73 74 75 76 77 78 79 80 81 82 83 84 85 86 87 88 89 90 91 92 93 94 95 96 97 98 99 100 101 102 103 104 105 106 107 108 109 110 111 112 113 114 115 116 117 118 119 120 121 122 123 124 125 126 127 128 129 130 131 132 133 134 135 136 137 138 139 140 141 142 143 144 145 146 147 148 149 150 151 152 153 154 155 156 157 158 159 160 161 162 163 164 165 166 167 168 169 170 171 172 173 174 175 176 177 178 179 180 181 182 183 184 185 186 187 188 189 190 191 192 193 194 195 196 197 198 199 200 201 202 203 204 205 206 207 208 209 210 211 212 213 214 215 216 217 218 219 220 221 222 223 224 225 226 227 228 229 230 231 | #!/bin/bash#author qunxue#version 0.1#update logs:#1.add install/uninstall function at 2015/3/27#2.change zabbix_agent_ip get method(CentOS7's ifconfig cmd is not worked! at 2015/3/30#3.add install for CentOS7 Version at 2015/3/30#4.add web、DB for base at 2015/09/08#5.add zabbix_agent_ip check as pubilic#6.add login ssh monitor#7.modify zabbix_agent_ip get method#8.add gpu monitor###set variableszabbix_agent_hostname=$(hostname)zabbix_server_port='10051'zabbix_server_ip='zabbixseverip'zabbix_proxy_server_ip=$2zabbix_agent_ip=$(/sbin/ip addr|grep -w "inet"|grep -v 127.0.0.1|awk -F/ '{print $1}'|awk '{print $2}'|head -n 1)#############Check selinux status#############function check_selinux() {if [[ $(getenforce|grep -w "Enforcing"|wc -l) = 1 ]];then echo -e "\033[1;31mYour system's Selinux is enforced!Now must be disabled....\033[0m" setenforce 0 sed -i 's/SELINUX=enforcing/SELINUX=disabled/g' /etc/selinux/config echo -e "\033[1;32mSelinux is disabled Now!\033[0m" else echo -e "\033[1;32mSelinux had been disabled,there is no need to be modified!\033[0m"fi}#############Check OS version and change dash for Ubuntu##################function modify_dash() {if [[ $(uname -a|grep -E "el6|el5|el7|debian"|wc -l) = 1 ]];then echo "OK.bash is default!" else echo "Ubuntu system must modify dash!" ln -s /bin/bash /bin/sh 2>/dev/null echo "link created success!"fi}#############Check if running script's user is root######################function install_zabbix_proxy_agent() {if [ $(id -u) != "0" ]; then echo -e "\033[1;31m Error: You must be root to run this script!\033[0m" exit 1fisystem_version=$(uname -m)if [[ $(grep -i -E -c -w "Red|CentOS" /etc/issue) = 1 ]] && [[ $(grep -i -c "release 6" /etc/issue) = 1 ]];then if [ $system_version == 'x86_64' ];then rpm -ivh http://PorxyIP:8888/base/rpm/zabbix-2.2.4-1.el6.x86_64.rpm rpm -ivh http://PorxyIP:8888/base/rpm/zabbix-agent-2.2.4-1.el6.x86_64.rpm rm -rf zabbix-2.2.4-1.el6.x86_64.rpm rm -rf zabbix-agent-2.2.4-1.el6.x86_64.rpm chkconfig zabbix-agent on else rpm -ivh http://PorxyIP:8888/base/rpm/zabbix-2.2.4-1.el6.i386.rpm rpm -ivh http://PorxyIP:8888/base/rpm/zabbix-agent-2.2.4-1.el6.i386.rpm rm -rf zabbix-2.2.4-1.el6.i386.rpm rm -rf zabbix-agent-2.2.4-1.el6.i386.rpm chkconfig zabbix-agent on fielif [[ $(grep -i -E -c -w "Red|CentOS" /etc/issue) = 1 ]] && [[ $(grep -i -c "release 5" /etc/issue) = 1 ]];then if [ $system_version == 'x86_64' ];then rpm -ivh http://PorxyIP:8888/base/rpm/zabbix-2.2.4-1.el5.x86_64.rpm rpm -ivh http://PorxyIP:8888/base/rpm/zabbix-agent-2.2.4-1.el5.x86_64.rpm rm -rf zabbix-2.2.4-1.el5.x86_64.rpm rm -rf zabbix-agent-2.2.4-1.el5.x86_64.rpm chkconfig zabbix-agent on else rpm -ivh http://PorxyIP:8888/base/rpm/zabbix-2.2.4-1.el5.i386.rpm rpm -ivh http://PorxyIP:8888/base/rpm/zabbix-agent-2.2.4-1.el5.i386.rpm rm -rf zabbix-2.2.4-1.el5.i386.rpm rm -rf zabbix-agent-2.2.4-1.el5.i386.rpm chkconfig zabbix-agent on fielif [[ $(grep -i -E -c -w "Red|CentOS" /etc/redhat-release) = 1 ]] && [[ $(grep -i -c "release 7" /etc/redhat-release) = 1 ]];then if [ $system_version == 'x86_64' ];then rpm -ivh http://PorxyIP:8888/base/rpm/zabbix-2.2.7-2.el7.x86_64.rpm rpm -ivh http://PorxyIP:8888/base/rpm/zabbix-agent-2.2.7-2.el7.x86_64.rpm rm -rf zabbix-2.2.7-2.el7.x86_64.rpm rm -rf zabbix-agent-2.2.7-2.el7.x86_64.rpm chkconfig zabbix-agent on fielif [[ $(grep -i -c "ubuntu" /etc/issue) = 1 ]];then if [ $(grep -i -c "ubuntu 12" /etc/issue) == 1 ];then wget http://PorxyIP:8888/base/rpm/zabbix-release_2.2-1+precise_all.deb dpkg -i zabbix-release_2.2-1+precise_all.deb #apt-get update apt-get install zabbix-agent rm -rf zabbix-release_2.2-1+precise_all.deb else wget http://PorxyIP:8888/base/rpm/zabbix-release_2.2-1+trusty_all.deb dpkg -i zabbix-release_2.2-1+trusty_all.deb #apt-get update apt-get install zabbix-agent rm -rf zabbix-release_2.2-1+trusty_all.deb fielse if [ $(grep -i -c "Debian GNU/Linux 6" /etc/issue) == 1 ];then wget http://PorxyIP:8888/base/rpm/zabbix-release_2.2-1+squeeze_all.deb dpkg -i zabbix-release_2.2-1+squeeze_all.deb #apt-get update apt-get install zabbix-agent rm -rf zabbix-release_2.2-1+squeeze_all.deb else wget http://PorxyIP:8888/base/rpm/zabbix-release_2.2-1+wheezy_all.deb dpkg -i zabbix-release_2.2-1+wheezy_all.deb #apt-get update apt-get install zabbix-agent rm -rf zabbix-release_2.2-1+wheezy_all.deb fifi################mondiy zabbix agent conf###################sed -i 's/LogFileSize=0/LogFileSize=1/g' /etc/zabbix/zabbix_agentd.confsed -i 's/Server=127.0.0.1/Server='${zabbix_server_ip}'/g' /etc/zabbix/zabbix_agentd.confsed -i 's/ServerActive=127.0.0.1/ServerActive='${zabbix_server_ip}:10051'/g' /etc/zabbix/zabbix_agentd.confsed -i '/\# Timeout=3/a Timeout=30' /etc/zabbix/zabbix_agentd.confsed -i '/\# UnsafeUserParameters=0/a UnsafeUserParameters=1' /etc/zabbix/zabbix_agentd.confsed -i 's#Hostname=Zabbix server#Hostname='$zabbix_agent_hostname'#' /etc/zabbix/zabbix_agentd.confsed -i 's@# SourceIP=@SourceIP='$zabbix_agent_ip'@' /etc/zabbix/zabbix_agentd.conf###############set discovery disk io########################cat >>/etc/zabbix/zabbix_agentd.conf<<EOFUserParameter=custom.vfs.dev.discovery,/bin/sh /etc/zabbix/externalscripts/disk.sh# reads completed successfullyUserParameter=custom.vfs.dev.read.ops[*],cat /proc/diskstats | egrep \$1 | head -1 | awk '{print \$\$4}'# sectors readUserParameter=custom.vfs.dev.read.sectors[*],cat /proc/diskstats | egrep \$1 | head -1 | awk '{print \$\$6}'# time spent reading (ms)UserParameter=custom.vfs.dev.read.ms[*],cat /proc/diskstats | egrep \$1 | head -1 | awk '{print \$\$7}'# writes completedUserParameter=custom.vfs.dev.write.ops[*],cat /proc/diskstats | egrep \$1 | head -1 | awk '{print \$\$8}'# sectors writtenUserParameter=custom.vfs.dev.write.sectors[*],cat /proc/diskstats | egrep \$1 | head -1 | awk '{print \$\$10}'# time spent writing (ms)UserParameter=custom.vfs.dev.write.ms[*],cat /proc/diskstats | egrep \$1 | head -1 | awk '{print \$\$11}'# I/Os currently in progressUserParameter=custom.vfs.dev.io.active[*],cat /proc/diskstats | egrep \$1 | head -1 | awk '{print \$\$12}'# time spent doing I/Os (ms)UserParameter=custom.vfs.dev.io.ms[*],cat /proc/diskstats | egrep \$1 | head -1 | awk '{print \$\$13}'UserParameter=custom.vfs.dev.util[*],iostat -x -d 1 1|egrep \$1|awk '{print \$NF}'EOFmkdir -p /etc/zabbix/externalscripts/cat >/etc/zabbix/externalscripts/disk.sh <<EOF#!/bin/bashdiskarray=(\`cat /proc/diskstats |grep -E "\bvd[a-z]\b|\bhd[a-z]\b|\bsd[a-z]\b|\bc0d0p[0-9]\b"|grep -i "\b\$1\b"|awk '{print \$3}'|sort|uniq 2>/dev/null\`)length2=\${#diskarray[@]}printf "{\n"printf '\t'"\"data\":["for ((i=0;i<\$length2;i++))do printf '\n\t\t{' printf "\"{#DISK}\":\"\${diskarray[\$i]}\"}" if [ \$i -lt \$[\$length2-1] ];then printf ',' fidoneprintf "\n\t]\n"printf "}\n"EOF#########Disk monitor############chown -R zabbix:zabbix /etc/zabbix/externalscripts/disk.shchmod 755 /etc/zabbix/externalscripts/disk.sh########################add iptables for zabbix server/proxy###############iptable_num=`iptables-save |grep ${zabbix_server_ip}|wc -l`if [ ${iptable_num} -ge 1 ];thenecho -e "\033[1;31miptables had been added!\033[0m"elseiptables -I INPUT 3 -s ${zabbix_server_ip}/32 -j ACCEPTiptables-save >/etc/sysconfig/iptablesfiecho -e "\033[1;31mCongratulations on you successful installation!\033[0m"service zabbix-agent restart}function uninstall_zabbix_agent() {################uninstall zabbix##############if [ $(id -u) != "0" ]; then echo -e "\033[1;31m Error: You must be root to run this script!\033[0m" exit 1fisystem_version=$(uname -m)if [[ $(grep -i -E -c "CentOS|Oracle|Red" /etc/redhat-release) = 1 ]];then rpm -e zabbix-agent rpm -e zabbixelse [[ $(grep -E -c "Ubuntu|Debian" /etc/issue) = 1 ]] dpkg -P zabbix-agentfi iptables -D INPUT -s ${zabbix_server_ip}/32 -j ACCEPT iptables -D INPUT -s ${zabbix_proxy_server_ip}/32 -j ACCEPT}case $1 in install_proxy_agent) check_selinux modify_dash install_zabbix_proxy_agent ;; uninstall) uninstall_zabbix_agent ;; *) echo " " echo "Usage:$0(install_agent|install_proxy_agent|uninstall)" echo "NAME" echo " used to install zabbix agent" echo "DESCRIPTION" echo " install_agent:install zabbix agent" echo " install_proxy_agent:install zabbix proxy agent" echo " uninstall:unintall agent" ;;esac |
以上脚本中需要修改的变量和注意事项:
1、zabbix_server_ip='zabbixseverip' #更换成你自己的ServerIP
2、PorxyIP #更换成你自己的安装代理机IP(纯内网环境需要通过反向代理到安装机器下载脚本安装)
3、我上面是通过安装机上下载Agent安装需要的所有包的方式来安装的,你可以通过自己做yum仓库的方式。
四、更快、批量执行
以上是通过脚本,在服务器初始化的时候进行agent安装。
安装方式:
wget -qO- http://安装机:端口/zabbix/agent-install-2.2.4.sh |/bin/bash
当然,你也可以更快、批量执行。怎么实现?
推荐几种方法:
Ansible
saltstack
都支持高并发,甚至是异步方式。
骚年们,赶紧搞起来。


【推荐】国内首个AI IDE,深度理解中文开发场景,立即下载体验Trae
【推荐】编程新体验,更懂你的AI,立即体验豆包MarsCode编程助手
【推荐】抖音旗下AI助手豆包,你的智能百科全书,全免费不限次数
【推荐】轻量又高性能的 SSH 工具 IShell:AI 加持,快人一步
· 从 HTTP 原因短语缺失研究 HTTP/2 和 HTTP/3 的设计差异
· AI与.NET技术实操系列:向量存储与相似性搜索在 .NET 中的实现
· 基于Microsoft.Extensions.AI核心库实现RAG应用
· Linux系列:如何用heaptrack跟踪.NET程序的非托管内存泄露
· 开发者必知的日志记录最佳实践
· winform 绘制太阳,地球,月球 运作规律
· AI与.NET技术实操系列(五):向量存储与相似性搜索在 .NET 中的实现
· 超详细:普通电脑也行Windows部署deepseek R1训练数据并当服务器共享给他人
· 上周热点回顾(3.3-3.9)
· AI 智能体引爆开源社区「GitHub 热点速览」