[原创]ExtAspNet秘密花园(十四) — 布局之垂直盒子布局和水平盒子布局
垂直盒子布局和水平盒子布局非常灵活易用,在很大程度上能够取代锚点布局,行布局和列布局,因此希望大家能够熟练掌握。
垂直盒子布局的结构
一个典型的垂直盒子布局的结构如下:
1: <ext:Panel Layout="VBox" BoxConfigAlign="Stretch" BoxConfigPosition="Start" BoxConfigPadding="5"
2: BoxConfigChildMargin="0 0 5 0">
3: <Items>
4: <ext:Panel BoxFlex="1"></ext:Panel>
5: <ext:Panel Height="100px"></ext:Panel>
6: <ext:Panel BoxFlex="2" BoxMargin="0"></ext:Panel>
7: </Items>
8: </ext:Panel>
有如下几个关键点:
- 为父容器控件设置Layout属性为VBox,还可以设置其他几个属性:
- BoxConfigAlign:用来控制容器子控件的尺寸,有四种取值。
- Start:所有子控件位于父容器的开始位置(默认值)
- Center:所有子控件位于父容器的中间位置;
- Stretch:所有子控件被拉伸至父容器的大小;
- StretchMax:所有子控件被拉伸至最大子控件的大小。
- BoxConfigPosition:用来控制子容器的位置,有三种取值。
- Start:子控件靠父容器的开始位置排列(默认值);
- End:子控件靠父容器的结束位置排列;
- Center:子控件靠父容器的中间位置排列;
- BoxConfigChildMargin:每个子容器的外边距。
- 如果是四个数字组成的字符串,分别表示上边距、右边距、下边距、左边距;
- 如果是三个数字组成的字符串,分别表示上边距、右边距、下边距,左边距同右边距;
- 如果是两个数字组成的字符串,分别表示上边距、右边距,左边距同右边距,下边距同上边距;
- 如果是一个数字组成的字符串,四个方面的边距都为此值。
- BoxConfigPadding:父容器的内边距(规则同上)。
- 此属性和BodyPadding的作用相同,只不过此时BodyPadding失效了,需要使用此属性设置内边距。
- BoxConfigAlign:用来控制容器子控件的尺寸,有四种取值。
- 对于需要固定高度的子容器控件,设置Height属性;也可以设置Width属性,其行为取决于父容器BoxConfigAlign属性。
- 对于需要自适应高度的子容器控件,设置BoxFlex属性(整型值)。
- BoxFlex属性是一个相对值,相对于其他具有BoxFlex属性的子容器。
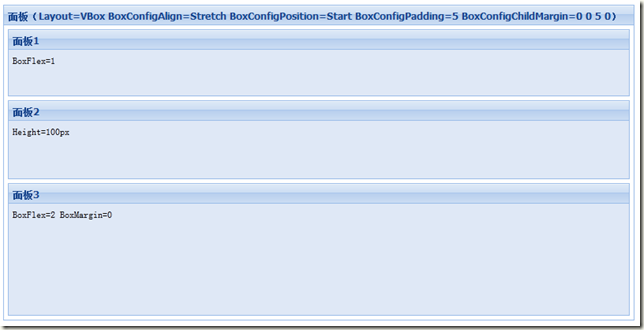
- 在本例中,第一个子容器BoxFlex=1,第三个子容器BoxFlex=2。所以第一个子容器占据(除去第二个固定高度的子容器)1/3的高度,相应的第三个子容器占据2/3的高度。并且第一个和第三个子容器的高度随着父容器的高度变化而变化。
- 对于需要自定义外边距的子容器控件,设置BoxMargin属性。
- 这个属性一般用来覆盖父容器的BoxConfigChildMargin属性。
来看下上面结构生成的界面截图:
这里有个小技巧,父容器设置了BoxConfigChildMargin=0 0 5 0,也即是说每个子容器的下边距为5px,不过最后一个子容器通过BoxMargin=0覆盖了这一属性,从而保证最后一个子容器距离父容器下边界也是5px。
为了让大家对这些属性有更深入的了解,下面通过几个示例来展示。
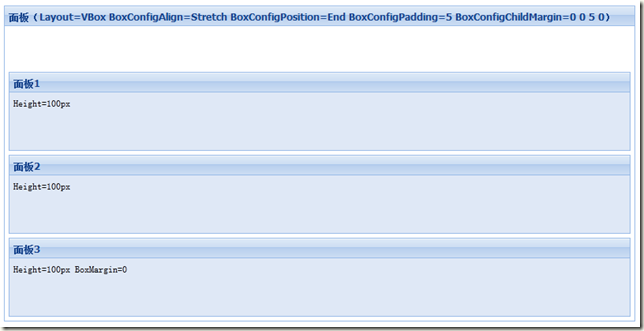
垂直盒子布局示例一
1: <ext:Panel Layout="VBox" BoxConfigAlign="Stretch" BoxConfigPosition="End" BoxConfigPadding="5"
2: BoxConfigChildMargin="0 0 5 0">
3: <Items>
4: <ext:Panel BoxFlex="1"></ext:Panel>
5: <ext:Panel Height="100px"></ext:Panel>
6: <ext:Panel BoxFlex="2" BoxMargin="0"></ext:Panel>
7: </Items>
8: </ext:Panel>
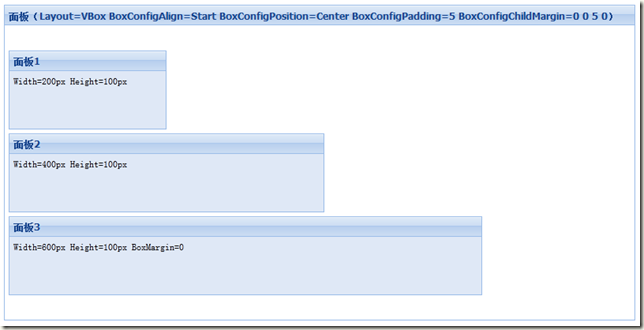
垂直盒子布局示例二
1: <ext:Panel Layout="VBox" BoxConfigAlign="Start" BoxConfigPosition="Center" BoxConfigPadding="5"
2: BoxConfigChildMargin="0 0 5 0">
3: <Items>
4: <ext:Panel BoxFlex="1"></ext:Panel>
5: <ext:Panel Height="100px"></ext:Panel>
6: <ext:Panel BoxFlex="2" BoxMargin="0"></ext:Panel>
7: </Items>
8: </ext:Panel>
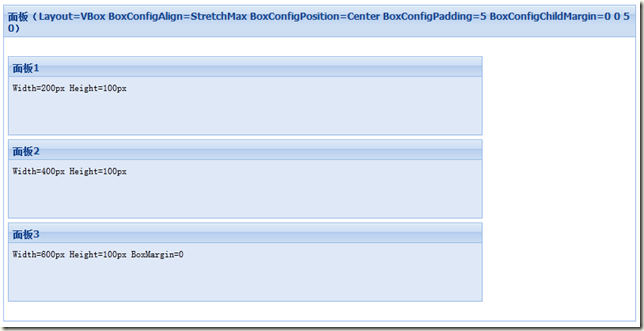
垂直盒子布局示例三
1: <ext:Panel Layout="VBox" BoxConfigAlign="StretchMax" BoxConfigPosition="Center" BoxConfigPadding="5"
2: BoxConfigChildMargin="0 0 5 0">
3: <Items>
4: <ext:Panel BoxFlex="1"></ext:Panel>
5: <ext:Panel Height="100px"></ext:Panel>
6: <ext:Panel BoxFlex="2" BoxMargin="0"></ext:Panel>
7: </Items>
8: </ext:Panel>
水平盒子布局的结构
一个典型的水平盒子布局的结构如下:
1: <ext:Panel Layout="HBox" BoxConfigAlign="Stretch" BoxConfigPosition="Start" BoxConfigPadding="5"
2: BoxConfigChildMargin="0 5 0 0">
3: <Items>
4: <ext:Panel BoxFlex="1"></ext:Panel>
5: <ext:Panel Width="100px"></ext:Panel>
6: <ext:Panel BoxFlex="2" BoxMargin="0"></ext:Panel>
7: </Items>
8: </ext:Panel>
其中参数的含义和垂直盒子布局的类似,这里就不再赘述。
来看下上面结构生成的界面截图:
水平盒子布局示例一
1: <ext:Panel Layout="HBox" BoxConfigAlign="Stretch" BoxConfigPosition="End" BoxConfigPadding="5"
2: BoxConfigChildMargin="0 5 0 0">
3: <Items>
4: <ext:Panel Width="200px"></ext:Panel>
5: <ext:Panel Width="200px"></ext:Panel>
6: <ext:Panel Width="200px" BoxMargin="0"></ext:Panel>
7: </Items>
8: </ext:Panel>
水平盒子布局示例二
1: <ext:Panel Layout="HBox" BoxConfigAlign="Center" BoxConfigPosition="Center" BoxConfigPadding="5"
2: BoxConfigChildMargin="0 5 0 0">
3: <Items>
4: <ext:Panel Width="200px" Height="100px"></ext:Panel>
5: <ext:Panel Width="200px" Height="150px"></ext:Panel>
6: <ext:Panel Width="200px" Height="200px" BoxMargin="0"></ext:Panel>
7: </Items>
8: </ext:Panel>
水平盒子布局示例三
1: <ext:Panel Layout="HBox" BoxConfigAlign="StretchMax" BoxConfigPosition="Center" BoxConfigPadding="5"
2: BoxConfigChildMargin="0 5 0 0">
3: <Items>
4: <ext:Panel Width="200px" Height="100px"></ext:Panel>
5: <ext:Panel Width="200px" Height="150px"></ext:Panel>
6: <ext:Panel Width="200px" Height="200px" BoxMargin="0"></ext:Panel>
7: </Items>
8: </ext:Panel>
![]()
![]()
![]()
使用垂直盒子布局替代锚点布局示例
还记得我们在讲解锚点布局时最后一个示例吗?
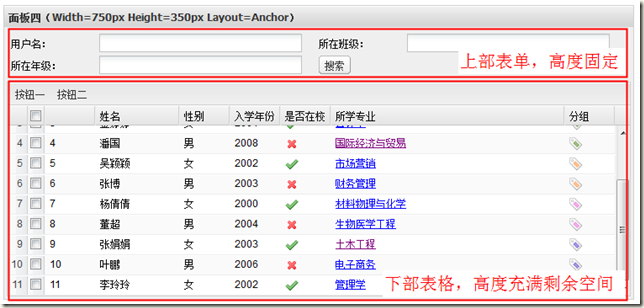
当时我们提到需要为下面的表格设置AnchorValue=”100% -62”,其中62这个数值是通过Firebug查看渲染后的HTML得到的。
这种做法令人有点尴尬,类似莫名其妙的常数也给项目的维护带来一定的麻烦。
下面使用垂直盒子布局来轻松解决这个问题:
1: <ext:Panel EnableBackgroundColor="true" Layout="VBox"
2: BoxConfigAlign="Stretch" BoxConfigPosition="Start" BoxConfigPadding="3" BoxConfigChildMargin="0"
3: ShowBorder="True" ShowHeader="True" Width="750px" Height="350px" >
4: <Items>
5: <ext:Form ShowBorder="False" BodyPadding="5px" EnableBackgroundColor="true" ShowHeader="False">
6: <Rows>
7: <ext:FormRow>
8: <Items>
9: // 此处省略...
10: </Items>
11: </ext:FormRow>
12: <ext:FormRow>
13: <Items>
14: // 此处省略...
15: </Items>
16: </ext:FormRow>
17: </Rows>
18: </ext:Form>
19: <ext:Panel ShowBorder="True" ShowHeader="false" BoxFlex="1" Layout="Fit">
20: <Toolbars>
21: <ext:Toolbar ID="Toolbar3">
22: <Items>
23: // 此处省略...
24: </Items>
25: </ext:Toolbar>
26: </Toolbars>
27: <Items>
28: <ext:Grid Title="Grid3" PageSize="3" ShowBorder="false" ShowHeader="False"
29: EnableCheckBoxSelect="True" DataKeyNames="Id,Name" EnableRowNumber="True">
30: <Columns>
31: // 此处省略...
32: </Columns>
33: </ext:Grid>
34: </Items>
35: </ext:Panel>
36: </Items>
37: </ext:Panel>
使用垂直盒子布局避免了锚点布局时引入的常数,同时产生的界面效果和之前的一模一样。
![]()
![]()
![]()
使用水平盒子布局替代列布局示例
还记得我们在讲解列布局时最后一个示例吗?
为了实现各列之间的间隔,我们需要为列容器设置CssClass="columnpanel",其中columnpanel是预先定义的CSS类。
而使用水平盒子布局,ASPX标签将更加简单直观:
1: <ext:Panel Height="350px" Width="750px" Layout="HBox" BoxConfigAlign="Stretch"
2: BoxConfigPosition="Start" BoxConfigPadding="5" BoxConfigChildMargin="0 5 0 0">
3: <Items>
4: <ext:Panel BoxFlex="1" ShowBorder="false" ShowHeader="false">
5: <Items>
6: <ext:Panel Height="150px" CssClass="rowpanel" BodyPadding="5px"></ext:Panel>
7: <ext:Panel Height="100px" BodyPadding="5px"></ext:Panel>
8: </Items>
9: </ext:Panel>
10: <ext:Panel BoxFlex="1" BoxMargin="0" ShowBorder="false" ShowHeader="false">
11: <Items>
12: <ext:Panel Height="100px" CssClass="rowpanel" BodyPadding="5px"></ext:Panel>
13: <ext:Panel Height="150px" BodyPadding="5px"></ext:Panel>
14: </Items>
15: </ext:Panel>
16: </Items>
17: </ext:Panel>
小结
垂直盒子布局和水平盒子布局非常灵活,在实际项目中出镜率也很高,在某些情况甚至可以取代锚点布局、列布局等其他布局,因此需要大家熟练掌握。关于布局就先介绍到这里,剩下的绝对定位布局和表格布局相对简单,大家可以仿照官方示例自己学习。
接下来,我们将学习ExtAspNet的重头戏 - 数据表格控件。




![image_thumb13[3] image_thumb13[3]](https://images.cnblogs.com/cnblogs_com/sanshi/201209/201209180803394536.png)

