ExtAspNet应用技巧(十六) - 菜单管理
界面截图
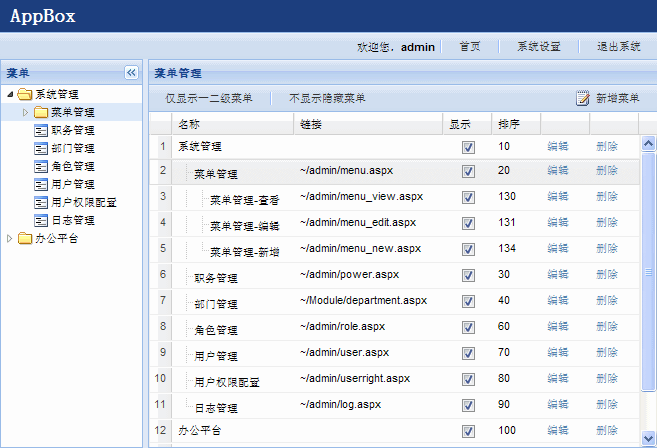
模拟树的Grid,这个是ExtAspNet中Grid控件的一个特色哦,是不是很方便:
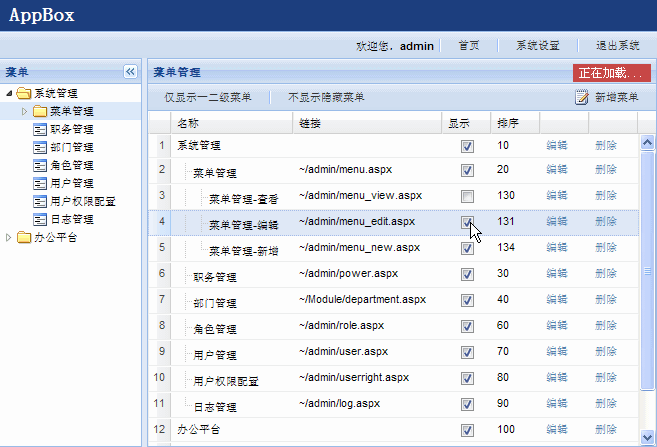
点击CheckBox自动回发,并修改数据库此条数据的状态:
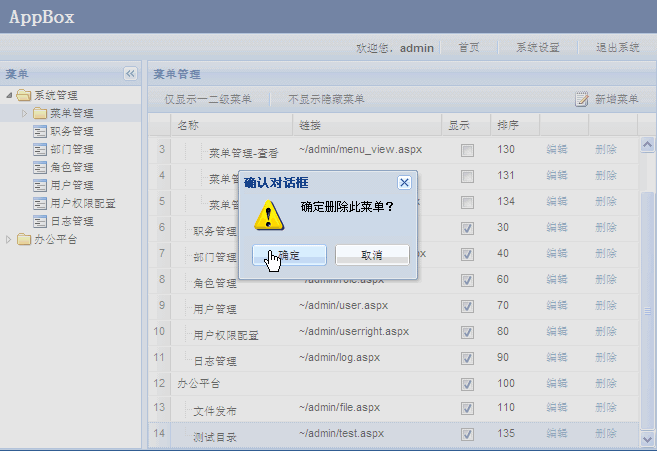
点击删除弹出确认对话框,注意这个对话框是在父页面中弹出的:
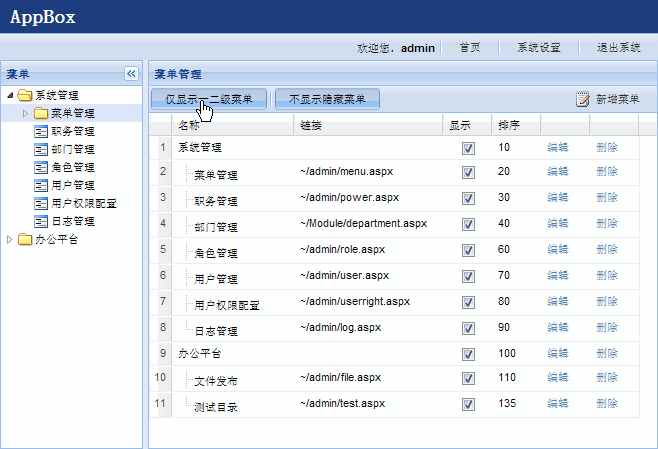
通过可以按下的按钮(EnablePress)来设置简单的过滤条件:
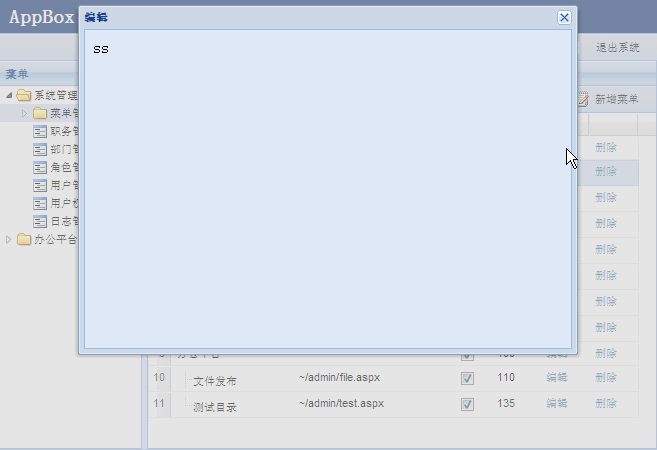
点击编辑弹出窗口(这个窗口是编辑页面IFrame,会在下一章介绍),注意这个弹出窗口也是在父页面弹出的,这也是ExtAspNet的一大特色:
ASPX标签
    <ext:PageManager ID="PageManager1" AutoSizePanelID="Grid1" runat="server" />
    <ext:Grid ID="Grid1" runat="server" ShowBorder="false" EnableCheckBoxSelect="false"
        EnableRowNumber="true" DataKeyNames="Id" OnRowCommand="Grid1_RowCommand" Title="菜单管理">
        <Toolbars>
            <ext:Toolbar ID="Toolbar1" Position="Top" runat="server">
                <Items>
                    <ext:Button ID="btnOnlyTwoLevelMenu" EnablePress="true" OnClick="btnOnlyTwoLevelMenu_Click"
                        runat="server" Text="仅显示一二级菜单">
                    </ext:Button>
                    <ext:ToolbarSeparator ID="ToolbarSeparator1" runat="server">
                    </ext:ToolbarSeparator>
                    <ext:Button ID="btnNoHiddenMenu" EnablePress="true" OnClick="btnNoHiddenMenu_Click"
                        runat="server" Text="不显示隐藏菜单">
                    </ext:Button>
                    <ext:ToolbarFill ID="ToolbarFill1" runat="server">
                    </ext:ToolbarFill>
                    <ext:Button ID="btnNew" runat="server" SystemIcon="New" EnablePostBack="false" Text="新增菜单">
                    </ext:Button>
                </Items>
            </ext:Toolbar>
        </Toolbars>
        <Columns>
            <ext:BoundField DataField="Name" HeaderText="名称" DataSimulateTreeLevelField="TreeLevel"
                Width="120px" />
            <ext:BoundField DataField="NavigateUrl" HeaderText="链接" ExpandUnusedSpace="true" />
            <ext:CheckBoxField ColumnId="cbxShow" DataField="Show" HeaderText="显示" RenderAsStaticField="false"
                AutoPostBack="true" CommandName="Show" Width="50px" />
            <ext:BoundField DataField="SortIndex" HeaderText="排序" Width="50px" />
            <ext:WindowField Text="编辑" WindowID="Window1" Title="编辑" DataIFrameUrlFields="Id"
                DataIFrameUrlFormatString="~/admin/menu_edit.aspx?id={0}" Width="50px" />
            <ext:LinkButtonField Text="删除" ConfirmText="确定删除此菜单?" ConfirmTarget="_parent" CommandName="Delete"
                Width="50px" />
        </Columns>
    </ext:Grid>
    <ext:Window ID="Window1" runat="server" Height="350px" IsModal="true" Popup="false"
        Target="_parent" EnableIFrame="true" IFrameUrl="about:blank" Width="500px">
    </ext:Window>
整体上来看,这个页面包括三个ExtAspNet控件:PageManager, Gird, Window。 在Grid内部,又包含了一些其他ExtAspNet控件:Toolbar, Button, ToolbarFill。
虽然一些应用技巧在前几篇文章中已经出现过,不过有一些新的应用技巧:
- Button的EnablePress="true",则此按钮拥有按下弹出的效果
- ToolbarFill,用来将工具栏分隔成左右两部分
- Button的SystemIcon="New",则此按钮前面会显示预定义的图标(SystemIcon是枚举类型,可用的还有Close, Delete, Save, Search等)
- Grid的DataKeyNames="Id",用来定义行的主键(可以是多个,比如DataKeyNames="Id,Name"),在后台代码中可以通过DataKeys属性获取其值
- 为Grid的每一列设置宽度,剩下的一列应用ExpandUnusedSpace="true"属性,则此列会占据所有剩余的空白空间
- LinkButtonField的ConfirmTarget="_parent",则确认对话框在父页面弹出
- Window的Target="_parent",用来控制此窗口在父页面弹出(这在IFrame框架中非常重要)
- DataSimulateTreeLevelField="TreeLevel"用来实现模拟树的行为
重定义Menu的实体类
因为需要生成模拟树的表格,我们需要重定义从数据库表X_Menu映射过来的实体类,增加public int TreeLevel属性。
    public class MyMenu
    {
        private int id;
        private string name;
        private string imageUrl;
        private string navigateUrl;
        private bool show;
        private int parentMenuId;
        private int sortIndex;
        private int treeLevel;
        private string remark;
        public string Remark
        {
            get { return remark; }
            set { remark = value; }
        }
        public int TreeLevel
        {
            get { return treeLevel; }
            set { treeLevel = value; }
        }
        public int SortIndex
        {
            get { return sortIndex; }
            set { sortIndex = value; }
        }
        public int ParentMenuId
        {
            get { return parentMenuId; }
            set { parentMenuId = value; }
        }
        public bool Show
        {
            get { return show; }
            set { show = value; }
        }
        public string NavigateUrl
        {
            get { return navigateUrl; }
            set { navigateUrl = value; }
        }
        public string ImageUrl
        {
            get { return imageUrl; }
            set { imageUrl = value; }
        }
        public string Name
        {
            get { return name; }
            set { name = value; }
        }
        public int Id
        {
            get { return id; }
            set { id = value; }
        }
    }
页面后台代码
    public partial class menu : PageBase
    {
        private static readonly log4net.ILog logger = log4net.LogManager.GetLogger(System.Reflection.MethodBase.GetCurrentMethod().DeclaringType);
        #region Page_Load
        protected void Page_Load(object sender, EventArgs e)
        {
            if (!IsPostBack)
            {
                LoadData();
            }
        }
        private void LoadData()
        {
            btnNew.OnClientClick = Window1.GetShowReference("~/admin/menu_new.aspx", "新增");
            BindGrid();
        }
        private void BindGrid()
        {
            // TODO BindGrid
        }
        #endregion
        #region Events
        protected void Grid1_RowCommand(object sender, ExtAspNet.GridCommandEventArgs e)
        {
            // TODO Grid1_RowCommand
        }

        protected void btnOnlyTwoLevelMenu_Click(object sender, EventArgs e)
        {
            BindGrid();
        }
        protected void btnNoHiddenMenu_Click(object sender, EventArgs e)
        {
            BindGrid();
        }
        #endregion
    }
在页面第一次加载时,注册点击“新增菜单”按钮的客户端脚本。
Window1.GetShowReference函数的第一个参数是Window中IFrame的页面地址,注意此时Window1必须设置了EnableIFrame="true"属性。
BindGrid函数
这个是本页面的核心函数,首先从数据库查询数据,然后经过一定的转换,最后绑定到Grid控件。
    private void BindGrid()
    {
        SqlQuery q = new Select().From<XMenu>();
        if (btnNoHiddenMenu.Pressed)
        {
            q.Where(XMenu.ShowColumn).IsEqualTo(true);
        }
        q.OrderAsc(XMenu.SortIndexColumn.ColumnName);
        XMenuCollection menus = q.ExecuteAsCollection<XMenuCollection>();

        List<MyMenu> newMenus = null;
        if (btnOnlyTwoLevelMenu.Pressed)
        {
            newMenus = XMenuHelper.GetMyMenuCollection(menus, 1);
        }
        else
        {
            newMenus = XMenuHelper.GetMyMenuCollection(menus);
        }
        Grid1.DataSource = newMenus;
        Grid1.DataBind();
    }
这里引入了另一个静态类,用来将XMenuCollection转换为List<MyMenu>,同时计算每个菜单项的深度(MyMenu中的TreeLevel属性)。
    public class XMenuHelper
    {
        public static List<MyMenu> GetMyMenuCollection(XMenuCollection oldMenus)
        {
            return GetMyMenuCollection(oldMenus, 100);
        }
        public static List<MyMenu> GetMyMenuCollection(XMenuCollection oldMenus, int maxLevel)
        {
            List<MyMenu> newMenus = new List<MyMenu>();
            ResolveMenuCollection(oldMenus, newMenus, 0, 0, maxLevel);
            return newMenus;
        }
        private static void ResolveMenuCollection(XMenuCollection oldMenus, List<MyMenu> newMenus, int parentId, int level, int maxLevel)
        {
            foreach (XMenu menu in oldMenus)
            {
                if (menu.ParentMenuId == parentId)
                {
                    MyMenu myMenu = new MyMenu();
                    newMenus.Add(myMenu);
                    myMenu.TreeLevel = level;
                    myMenu.Id = menu.Id;
                    myMenu.ImageUrl = menu.ImageUrl;
                    myMenu.Name = menu.Name;
                    myMenu.NavigateUrl = menu.NavigateUrl;
                    myMenu.ParentMenuId = menu.ParentMenuId;
                    myMenu.Remark = menu.Remark;
                    myMenu.Show = menu.Show;
                    myMenu.SortIndex = menu.SortIndex;

                    if (level < maxLevel)
                    {
                        level++;
                        ResolveMenuCollection(oldMenus, newMenus, menu.Id, level, maxLevel);
                        level--;
                    }
                }
            }
        }
    }
Grid1_RowCommand事件处理
在Grid1的行事件中,需要处理两种类型的行事件,分别是:
    <ext:CheckBoxField ColumnId="cbxShow" DataField="Show" HeaderText="显示" RenderAsStaticField="false"
        AutoPostBack="true" CommandName="Show" Width="50px" />
和 <ext:LinkButtonField Text="删除" ConfirmText="确定删除此菜单?" ConfirmTarget="_parent" CommandName="Delete"
Width="50px" />
    protected void Grid1_RowCommand(object sender, ExtAspNet.GridCommandEventArgs e)
    {
        int menuId = Convert.ToInt32(Grid1.DataKeys[e.RowIndex][0]);
        if (e.CommandName == "Delete")
        {
            XMenu.Delete(menuId);
            BindGrid();
        }
        else if (e.CommandName == "Show")
        {
            ExtAspNet.CheckBoxField myCheckBoxField = Grid1.Columns.FindColumnById("cbxShow") as ExtAspNet.CheckBoxField;
            bool rowChecked = myCheckBoxField.GetCheckState(e.RowIndex);
            XMenu menu = XMenu.FetchByID(menuId);
            menu.Show = rowChecked;
            menu.Save(User.Identity.Name);
            BindGrid();
        }
    }
至此,整个列表页面完成。
下一章,我们将会介绍如何在弹出的新窗口中添加菜单和编辑菜单。
下载全部源代码


