NIO(三、Channel)
目录
NIO(一、概述)
NIO(二、Buffer)
NIO(三、Channel)
NIO(四、Selector)
Channel
上文说了描述了Buffer的实现机制,那么这个章节就主要描述数据是如何进入缓冲区的,并且又是如何从缓冲区流出的。
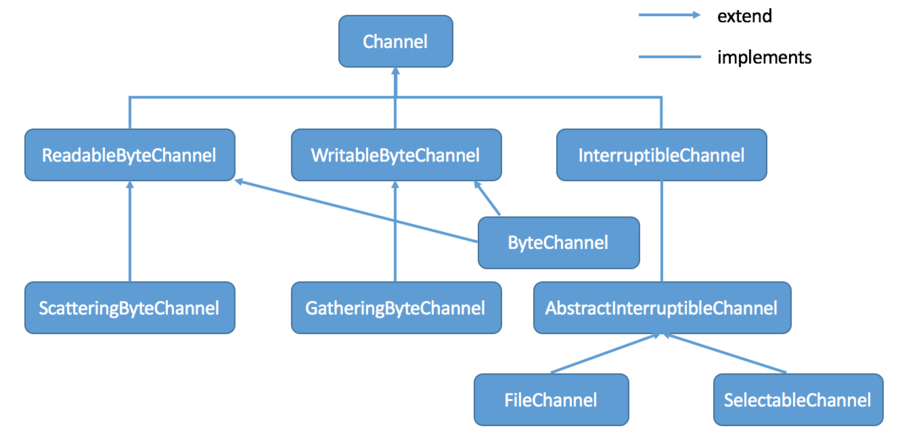
类图纵览及核心类概述

这张图只是简单概括了Channel的类图,当然,Channel的设计远比这个更复杂:例如SelectableChannel还有SocketChannel和ServerSocketChannel的实现,NetworkChannel继承Channel并抽象了更多的方法;例如FileChannel,除了继承AbstractInterruptibleChannel之外,还实现了GatheringByteChannel和ScatteringByteChannel接口。
-
Channel
我们可以看到,Channel接口本身定义了 close() 和 isOpen() 方法,在继承Channel的接口中,又分别抽象了读通道(ReadableByteChannel)、写通道(WritableByteChannel)及可中断的异步通道(InterruptibleChannel)接口。读写通道自然不必说,下文也会有介绍。 -
InterruptibleChannel
这里说下InterruptibleChannel,这是一个可以被中断的异步通道,继承了 close() 方法。当一个线程在I/O被阻塞时,另一个线程执行了close()方法,那么阻塞的线程会抛出 AsynchronousCloseException
异常。当一个线程在I/O被阻塞时,另一个线程调用阻塞的线程中断(interrupt())方法,那么将会抛出ClosedByInterruptException异常。 -
AbstractInterruptibleChannel
AbstractInterruptibleChannel抽象类,这是所有可中断通道实现的基类,我们可以看到,FileChannel正是直接继承自它,后文会介绍的SocketChannel和ServerSocketChannel继承自AbstractSelectableChannel抽象类,而AbstractSelectableChannel又继承自SelectableChannel抽象类,SelectableChannel上图就可以看出,同样继承AbstractInterruptibleChannel。我们不得不想一下,为什么FileChannel直接继承AbstractInterruptibleChannel抽象类,而另一个常用的比如SocketChannel却需要继承自SelectableChannel抽象类?此时我们需要只了解SelectableChannel是什么问题就迎刃而解了。 -
SelectableChannel
第一个章节在概述中提过一个名词“多路复用”,当时也作了简单描述:一个线程通过选择器处理和管理多个通道,利用一个线程的资源去处理多个连接。SelectableChannel正是扮演着其中的一个重要角色。而类似SocketChannel一样实现NetworkChannel接口的通道,这种网络数据的传输尤其在高并发的压力下,让CPU利用率真正体现在处理数据上,而不是频繁上下文切换的开销,使用这种机制能明显提升处理性能,而FileChannel这种对文件操作是绝对不会使用到这种机制的。另外,SelectableChannel在阻塞模型中,每一个I/O操作都会阻塞到它完成为止,在非阻塞模型中,是不会出现阻塞的情况,同样返回的字节数可能少于要求或者干脆没有,是否阻塞我们能通过 isBlocking() 方法查看。
SelectableChannel是通过选择器(Selector)复用的通道,为了配合与选择器一起使用,可使用 register() 方法,这个方法会返回一个SelectionKey对象,表示已经在选择器里注册了,这个通道会一直保持到注销为止,同时也包括已经分配在这个选择器上的这个通道的资源。一般情况下,通道自己不能直接在通道上注销,我们可以调用之前注册时返回的SelectionKey对象的 cancel() 方法,可以显式注销。另外,阅读代码我们发现,几乎所有的实现方法都有同步控制,所以,在多个并发线程下使用是安全的。
Scatter/Gather
Channel,它既是缓冲区数据的入口,也是其数据的出口。
在上面的类图我们可以看到,Channel分别抽象了ReadableByteChannel和WritableByteChannel接口,两个接口各自定义了 read() 和 write() 方法,读取和写入ByteBuffer对象。并在这个基础上又进一步定义了ScatteringByteChannel和GatheringByteChannel接口,同样,这两个接口同样存在继承自ReadableByteChannel和WritableByteChannel接口的read() 和 write() 方法,此外,还分别重载了 read() 和 write() 方法,增加了读取或写入ByteBuffer数组。
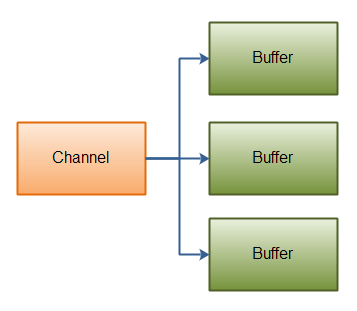
- Scattering Reads
读取数据从一个通道到多个缓冲区,这是简单示意图:

  ByteBuffer   buffer1 = ByteBuffer.allocate(1024);
  ByteBuffer   buffer2 = ByteBuffer.allocate(1024);
  ByteBuffer[] buffers = {buffer1, buffer2};
  channel.read(buffers);
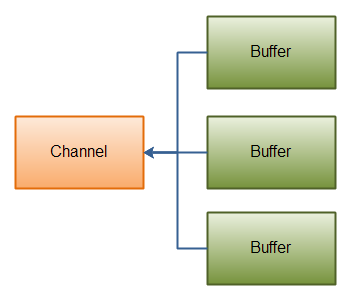
- Gathering Reads
写数据从多个缓冲区到一个通道,这是简单示意图:

  ByteBuffer   buffer1 = ByteBuffer.allocate(1024);
  ByteBuffer   buffer2 = ByteBuffer.allocate(1024);
  ByteBuffer[] buffers = {buffer1, buffer2};
  channel.write(buffers);
Channel之间数据传输
FileChannel的 transferFrom() 和 transferTo() 两个方法实现了通道之间的数据传输,当有一方是FileChannel时,另一方实现了 ReadableByteChannel和WritableByteChannel接口的通道就能够与FileChannel传输数据。目前为止,只有文件通道(FileChannel)能够双向传输。
- transferFrom() & transferTo()
FileChannel fromChannel = fromFile.getChannel();
FileChannel toChannel = toFile.getChannel();
// transferFrom
toChannel.transferFrom(fromChannel, position, count);
// transferTo
fromChannel.transferTo(position,count,toChannel);
我们在讲Buffer的时候就已经说了position,意指读写位置,count指的是数据大小。
Channel重要实现
- FileChannel:操作文件的读写
- SocketChannel:通过TCP读写网络数据
- ServerSocketChannel:监听TCP连接,你能利用它创建一个最简单的Web服务器
- DatagramChannel:通过UDP读写网络数据
SocketChannel & ServerSocketChannel
创建SocketChannel仅需要调用它的 open() 方法:
SocketChannel channel = SocketChannel.open();
事实上,可能在实际使用的时候,我们也会在的句柄对象的处理方法里,使用SelectionKey的 channel() 方法来获取,或者ServerSocketChannel对象的 accept() 方法来获取。
  SelectionKey key = ...
  //接受消息处理
  SocketChannel channel = ((ServerSocketChannel) key.channel()).accept();
  //或者
  SocketChannel channel = (SocketChannel) key.channel();
在我们手动 open() 打开这个socket之后,其实还未连接,这时候我们对这个通道进行I/O操作会抛出NotYetConnectedException
。我们可以使用 connect() 方法来连接通道的socket,与此同时,也可以使用 isConnected()
判断是否已连接。如果这个Socket在非阻塞模型中,就需要 finishConnect()
来确定连接已完成,也可以通过 isConnectionPending()
来测定该通道的连接是否正在进行中。
  // 设置非阻塞
  channel.configureBlocking(false);
  if(channel.isConnected()) {
	channel.connect(new InetSocketAddress(8080));
        while (channel.finishConnect()){
		    //connected -  do something
        }
  }
当然,关于channel的读写操作,在讲Scatter/Gather时已经讲过,这里不再赘述。
每次使用完成之后,都会调用 close() 方法关闭。需要说明的是,这里的 close() 方法支持异步关闭,当一个线程执行 close() 方法同时,另一个线程的在同一个通道上执行读操作时会被阻塞,然后这个读取操作不会返回任何数据,只会返回-1标识。当然,另一个线程如果是写操作的话也同样会被阻塞,不同的是会抛出 AsynchronousCloseException
异常。我们在上文中描述 InterruptibleChannel 这个可中断通道接口的时候也提到这个问题。
channel.close();
创建ServerSocketChannel与SocketChannel类似,不同的是ServerSocketChannel是监听套接字连接。所以在创建它的时候,需要将它绑定,如果没有绑定就执行 accept()
方法,那么会抛出 NotYetBoundException
异常。
  ServerSocketChannel channel = ServerSocketChannel.open();
  channel.socket().bind(new InetSocketAddress(8080));
监听到的连接可以使用 accept()
方法来返回该连接的 SocketChannel。执行 accept() 方法会一直阻塞直到有连接到达。
SocketChannel channel = ((ServerSocketChannel) key.channel()).accept();
Simple Server
下面是一段简单的ServerSocketChannel和SocketChannel应用,可以看到是如何使用这两个类的。当浏览器输入localhost:8080的时候,会在控制台打印出这个连接的请求信息。
   public static void main(String[] args) throws IOException {
		ServerSocketChannel channel = ServerSocketChannel.open();
		channel.socket().bind(new InetSocketAddress(8080));
		//设置非阻塞
		channel.configureBlocking(false);
		//注册
		Selector selector = Selector.open();
		channel.register(selector, SelectionKey.OP_ACCEPT);
		//处理器
		Handler handler = new Handler(1024);
		while (true) {
			//等待请求,每次等待阻塞5s,5s后线程继续向下执行,如果传入0或者不传参数将一直阻塞
			if (selector.select(5000) == 0) {
				continue;
			}
			//获取待处理的SelectionKey
			Iterator<SelectionKey> keyIterator = selector.selectedKeys().iterator();
			while (keyIterator.hasNext()) {
				SelectionKey key = keyIterator.next();
				//当接受到请求
				if (key.isAcceptable()) {
					handler.handleAccept(key);
				}
				try {
					//读数据
					if (key.isReadable()) {
						handler.handleRead(key);
					}
				} catch (IOException e) {
					keyIterator.remove();
					e.printStackTrace();
				}
				keyIterator.remove();
			}
		}
	}

	private static class Handler {
		private int    bufferSize   = 1024;
		private String localCharset = "UTF-8";

		public Handler() {
		}

		public Handler(int bufferSize) {
			this.bufferSize = bufferSize;
		}

		public Handler(String localCharset) {
			this.localCharset = localCharset;
		}

		public Handler(int bufferSize, String localCharset) {
			this.bufferSize = bufferSize;
			this.localCharset = localCharset;
		}

		public void handleAccept(SelectionKey key) {
			try {
				SocketChannel channel = ((ServerSocketChannel) key.channel()).accept();
				channel.configureBlocking(false);
				channel.register(key.selector(), SelectionKey.OP_READ, ByteBuffer.allocate(bufferSize));
			} catch (IOException e) {
				e.printStackTrace();
			}
		}

		public void handleRead(SelectionKey key) throws IOException {
			//获取channel
			SocketChannel channel = (SocketChannel) key.channel();
			//获取buffer 重置
			ByteBuffer buffer = (ByteBuffer) key.attachment();
			buffer.clear();
			if (channel.read(buffer) == -1) {
				channel.close();
			} else {
				//转为读状态
				buffer.flip();
				String receivedString = Charset.forName(localCharset)
						.newDecoder().decode(buffer).toString();

				System.out.printf("接受到客户端数据" + receivedString);

				//返回数据给客户端
				String sendString = "接受数据:" + receivedString;
				buffer = ByteBuffer.wrap(sendString.getBytes(localCharset));
				channel.write(buffer);

				channel.close();
			}
		}
	}


