
HAProxy(三):Keeplived+HAProxy搭建高可用负载均衡动静分离架构基础配置示例
一、安装环境
1.软件版本
HAProxy:1.5.18
Keepalived:1.3.5
Nginx:1.12.2
PHP:7.2
系统版本:CentOS 7.4
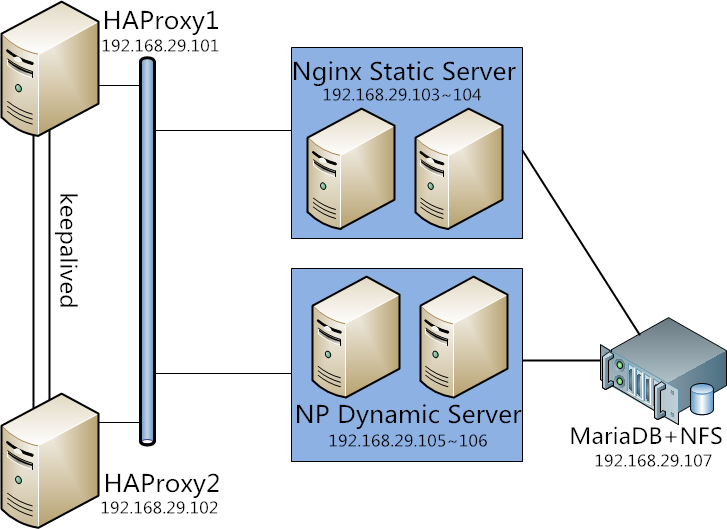
2.IP分配与架构图
3.安装软件
1>关闭所有服务器的firewall与SELinux
~ ]# sed -i 's/=enforcing/=disabled/g' /etc/selinux/config
~ ]# systemctl disable firewalld
~ ]# systemctl stop firewalld
~ ]# reboot
2>在各服务器上安装所需软件,这里都是yum安装,详细安装步骤略过。
4.软件配置
1>HAProxy配置
要实现动静分离需在HAProxy中做ACL规则匹配。具体配置详情如下,两台HAProxy的配置相同:
global
    log         127.0.0.1 local2

    chroot      /var/lib/haproxy
    pidfile     /var/run/haproxy.pid
    maxconn     4000
    user        haproxy
    group       haproxy
    daemon

    stats socket /var/lib/haproxy/stats

defaults
    mode                    http
    log                     global
    option                  httplog
    option                  dontlognull
    option http-server-close
    option forwardfor       except 127.0.0.0/8
    option                  redispatch
    retries                 3
    timeout http-request    10s
    timeout queue           1m
    timeout connect         10s
    timeout client          1m
    timeout server          1m
    timeout http-keep-alive 10s
    timeout check           10s
    maxconn                 3000

frontend myweb
        bind *:80
        compression algo gzip #选择压缩方式,可优化网页访问速度
        compression type text/html text/plain application/x-javascript text/css application/xml #定义要压缩的文件类型
        errorloc 403 http://192.168.29.101:9999/errorloc/403.html #错误页位置
        rspidel ^Server:.* #删除报头文件中以Server开头的项,安全优化项,因为Server开头的一般是私密信息,如后端服务器的Nginx版本等
        acl static path_end .png .jepg .jpg .bmp .html .htm .jsp #ACL规则定义,匹配以.png...结尾的请求并命名为static
        use_backend staticsv if static #如果匹配ACL规则static则交由后端服务器组staticsv处理
        acl dynamic path_end .php #ACL规则定义,匹配以.php结尾的请求并命名为dynamic
        use_backend dynamicsv if dynamic #如果匹配ACL规则dynamic则交由后端服务器组dynamicsv处理
        default_backend dynamicsv #默认后端服务器组

backend staticsv
        balance roundrobin #调度算法
        cookie server insert nocache
        server staticsv1 192.168.29.103:80 check cookie static1
        server staticsv2 192.168.29.104:80 check cookie static2

backend dynamicsv
        balance roundrobin
        cookie server insert nocache
        server dynamicsv1 192.168.29.105:80 check cookie dynamic1
        server dynamicsv2 192.168.29.106:80 check cookie dynamic2

listen stats #定义状态页
        bind *:9099
        acl sta src 192.168.29.1
        block if ! sta
        http-request allow if sta
        stats enable
        stats uri /myhaproxy?admin
        stats realm "Hello World"
        stats auth admin:admin
2>配置Keepalived
在192.168.29.101上的配置如下:
global_defs {
   notification_email {
      root@localhost
   }
   notification_email_from keepalived@localhost
   smtp_server 127.0.0.1
   smtp_connect_timeout 30
   router_id n1
         vrrp_mcast_group4 224.1.101.18
}
vrrp_script chk_hapx {
    script "killall -0 haproxy && exit 0 || exit 1" #这里要指出的是,killall -0 表示检查是否有进程存在,若存在返回值0,若不存在返回1,表示haproxy没有正常工作,并且返回1时往下执行操作。
    weight -5
    interval 1
    fall 1
    rise 1
}

vrrp_instance VI_1 {
    state MASTER
    interface ens33
    virtual_router_id 22
    priority 100
    advert_int 1
    authentication {
        auth_type PASS
        auth_pass 1111
    }
    virtual_ipaddress {
        192.168.29.88/24 dev ens33 label ens33:0
    }
    track_script {
        chk_hapx
        }
}
在192.168.29.102上的配置如下(与101的区别已用黄颜色标注):
global_defs {
   notification_email {
      root@localhost
   }
   notification_email_from keepalived@localhost
   smtp_server 127.0.0.1
   smtp_connect_timeout 30
   router_id n1
         vrrp_mcast_group4 224.1.101.18
}
vrrp_script chk_hapx {
    script "killall -0 haproxy && exit 0 || exit 1"
    weight -5
    interval 1
    fall 1
    rise 1
}

vrrp_instance VI_1 {
    state BACKUP
    interface ens33
    virtual_router_id 22
    priority 95
    advert_int 1
    authentication {
        auth_type PASS
        auth_pass 1111
    }
    virtual_ipaddress {
        192.168.29.88/24 dev ens33 label ens33:0
    }
    track_script {
        chk_hapx
        }
}
关于keepalived的原理与应用可以阅读这篇博客←点击
5.配置静态服务器组与动态服务器组
在192.168.29.103和192.168.29.104上安装nginx服务
在192.168.29.105和192.168.29.106上安装nginx+php服务
6.配置MariaDB与NFS
配置过程在之前的博客已有详细描述了这里不再赘述:
MariaDB配置点击→这里
NFS配置点击→这里
以上都配置完成后一个简易的基于keepalived+HAProxy的动静分离就部署完成了,然后就能所需的网页资源了。
虽然架构很简单,但能帮助我们理解工作逻辑,和熟悉配置详情。
