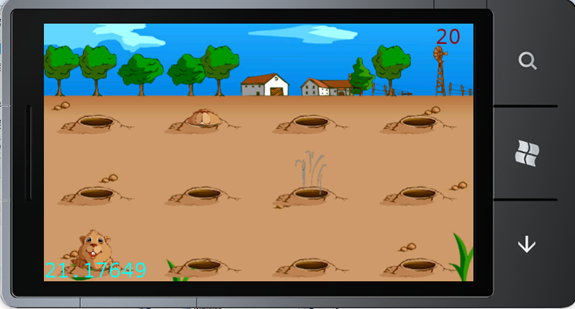
上一篇中简单的实现了打地鼠的游戏雏形,一个好的游戏需要很多次的调试和长时间打磨,才能成为有趣的产品,而不是一段段的代码,前面一篇中使用了最简单的方式生成了静态界面,这次我们将整合动画着重使用CCActionInterval派生出来的各种行为类做出有趣的游戏,那么现在开始吧。
| 行为动画 |
CCActionInterval是Cocos2d中常用的行为类,它的派生类分管各种不同对象,产生不同的结果,这个模式在一些游戏引擎中有的叫做脚本,有的叫做控制器,刚开始用的时候可能有点晕,但是随着使用次数的增加就会越来越熟悉,今天我将使用到如下几个行为来实现游戏的动画效果:
CCDelayTime:延迟行为,它仅仅是一个定时器,设定好时间,行为会在指定的时间后结束
CCAnimate和CCAnimation:动画行为类,它们组合在一起可以控制一个CCSprite的帧动画
CCCallFunc:呼叫行为类,指定一个回调函数,执行的时候就会调用
CCSequence:行为队列类,它可以将几个行为组合起来,这样就不需要定时的去判断逻辑了,比如一个延迟行为加上回调行为,就会达到在延迟指定时间后回调指定函数的效果
除了这些还有很多有用的行为类,但是仅用这些就已经足够了。
例如下面的代码:
CCDelayTime delayTime = CCDelayTime.actionWithDuration(DelaySecond);
delayAction = CCSequence.actionOneTwo(delayTime, CCCallFunc.actionWithTarget(this, showCompled));
this.runAction(delayAction);
这个代码换成图片表示则是这样的
如果仔细看过你会发现CCSequence也是一个CCActionInterval,它的作用就是将多个行为组合起来达到连贯,这是一个很有趣的方法,你能用它做很多有趣的行为,上面代码中为延迟DelaySecond秒之后回调showCompled方法,在最后的代码中你会发现这种方式被用了三次在不同的地方达到不同的效果。
那么,除了延迟,还有动画也可以组合,这样我们可以很准确的知道某个动画结束后的事件,例如:
//钻出动画
CCAnimation marmotShowanimation = CCAnimation.animationWithFrames(frames,0.1f);
CCAnimate action = CCAnimate.actionWithAnimation(marmotShowanimation, false);
showAction = CCSequence.actionOneTwo(action, CCCallFunc.actionWithTarget(this, callback));
body.runAction(showAction);
这个代码的意思是通过frames帧序列创建一个动画行为,然后使用Animate嵌套使其播放,执行的目标是body这个CCSprite,当播放结束之后就会执行callback方法。
行为动画在游戏当中举足轻重,本例中使用的是最简单的单个图片序列的方式播放,其实,使用cocos2d的动画plist更加简便,但是单来说设计工具就比较繁琐,因此我计划在后面篇章专门说动画的制作和代码。
| 文字显示 |
在现在cocos2dxna版本中还不能直接显示文字和其他的平台状况差不多,显示英文和数字可以使用其他版本方法,这方面引擎提供了多个类来解决,其中最简单的是CCLabelTTF,它不需要独立载入文字序列,也不需要指定来源图片,直接在屏幕的位置上显示一行指定的英文和数字的字符,例如:
label_Score = CCLabelTTF.labelWithString("0", "Arial", 24);
label_Score.Color = new ccColor3B(255, 0, 0);
label_Score.anchorPoint = new CCPoint(1, 0.5f);
this.addChild(label_Score);
label_Score.position = new CCPoint(CCDirector.sharedDirector().getWinSize().width - 24, CCDirector.sharedDirector().getWinSize().height - 24);
这行的意思是在屏幕的右上角显示了一个0的字符,更改的时候也很简单,直接:
label_Score.setString(“999”);
我们用这个部分显示打中地鼠时候的积分。
| 声音 |
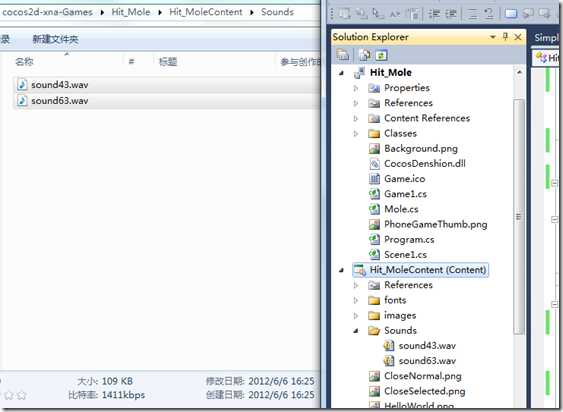
声音系统在cocos2dxna当中是一个独立的类,在命名空间CocosDenshion当中SimpleAudioEngine可以播放音乐、声效等,用法也很简单:
//播放被打击的声音
SimpleAudioEngine.sharedEngine().playEffect(CCFileUtils.fullPathFromRelativePath("Sounds/sound43"));
在这之前需要将声音添加到Hit_MoleContent即可
| 完成 |
代码其实非常的简单,只有两个cs文件,一个Mole一个Scene1,已经加入了注释,期望大家看起来不会那么费劲。
第一个类:Mole
using cocos2d;
using System.Collections.Generic;
using CocosDenshion;

namespace Hit_Mole
{
    public class Mole : CCMenuItemSprite
    {
        CCSprite body;
        CCSprite hideimage;
        CCActionInterval showAction;
        CCActionInterval delayAction;
        //动画序列帧
        static List frames ;
        public Mole(Scene1 root, SEL_MenuHandler selector)
        {
            //读取一张“鼠洞”的图片并添加到菜单项里,它将作为底背景
            CCSprite hole = CCSprite.spriteWithFile("Hole");
            hole.anchorPoint = new CCPoint(0, 0);
            this.addChild(hole);
            //读取一张鼹鼠身体的图片并设置为默认的图像
            body = CCSprite.spriteWithFile("marmot_3");
            NormalImage = body;
            //读取一张鼹鼠被选择(点击)时候显示的图像
            SelectedImage = CCSprite.spriteWithFile("marmot_4");
            //隐蔽时发生出现的图像,在本篇中暂时无用,所以它是不可见的
            hideimage = CCSprite.spriteWithFile("marmot_5");
            hideimage.anchorPoint = new CCPoint(0, 0);
            hideimage.visible = false;
            this.addChild(hideimage);
            //初始化选择器,Hit将发生与被点击时候的状态
            initWithTarget(root, selector);
            //设置内容的大小,用继承类时,contentSize不会被刷新,需要自己指定
            contentSize = body.contentSize;
            body.visible = false;
            //创建静态的帧列表,这样做的目的是防止多次创建无用的CCSpriteFrame
            if (frames == null)
            {
                frames = new List();
                for (int i = 1; i < 4; i++)
                {
                    CCTexture2D texture = CCTextureCache.sharedTextureCache().addImage("marmot_" + i);
                    //这里存在一个引擎的bug,如果不设置的话,就会播放不出来动画
                    texture.Name = (uint)i;
                    var frame = CCSpriteFrame.frameWithTexture(texture, new CCRect(0, 0, texture.ContentSizeInPixels.width, texture.ContentSizeInPixels.height));
                    frames.Add(frame);
                }
            }
            m_bIsEnabled = false;
        }
        //出现方法,调用此方法时,会创建鼹鼠钻出动画并执行
        public void Show()
        {
            IsShow = true;
            body.visible = true;
            //钻出动画
            CCAnimation marmotShowanimation = CCAnimation.animationWithFrames(frames,0.1f);
            CCAnimate action = CCAnimate.actionWithAnimation(marmotShowanimation, false);
            showAction = CCSequence.actionOneTwo(action, CCCallFunc.actionWithTarget(this, callback));
            //让body身体执行钻出动画
            body.runAction(showAction);
            //延迟行为控制钻回去的动作
            CCDelayTime delayTime = CCDelayTime.actionWithDuration(DelaySecond);
            delayAction = CCSequence.actionOneTwo(delayTime, CCCallFunc.actionWithTarget(this, showCompled));
            this.runAction(delayAction);
        }
        //延迟多久会钻回去
        public float DelaySecond = 2;
        //钻回去的方法
        public void Hide()
        {
            //立即停止各种行为
            stopAction(showAction);
            stopAction(delayAction);
            //现在是不可点击
            IsShow = false;
            //执行一个延迟行为,钻回动作完成后将动画重置
            CCDelayTime delayTime = CCDelayTime.actionWithDuration(0.3f);
            var timespan = CCSequence.actionOneTwo(delayTime, CCCallFunc.actionWithTarget(this, hideCompled));
            body.visible = false;
            hideimage.visible = true;
            runAction(timespan);
        }
        private void callback()
        {

        }
        //钻出完成时的回调
        private void showCompled()
        {
            SimpleAudioEngine.sharedEngine().playEffect(CCFileUtils.fullPathFromRelativePath("Sounds/sound63"));
            Hide();
        }
        //钻入完成时的回调
        private void hideCompled()
        {
            hideimage.visible = false;
        }
        //使用一个属性标识现在是否可点击
        public bool IsShow
        {
            set { base.m_bIsEnabled = value; }
            get { return base.m_bIsEnabled; }
        }
        //用此属性判定是否可点击
        public override void selected()
        {
            if (IsShow)
                base.selected();
        }
    }
}
第二个类:Scene1
using cocos2d;
using System.Collections.Generic;
using System;
using CocosDenshion;

namespace Hit_Mole
{
    public class Scene1 : CCScene
    {
        Random _randome = new Random((int)DateTime.Now.Ticks);
        CCLabelTTF label_Score;
        List _molelist = new List();
        public Scene1()
        {
            //初始化
            initialize();
        }
        public bool initialize()
        {
            //L1
            //从Hit_MoleContent里面读取scene.jpg的图像成为游戏当中的一个精灵
            CCSprite background = CCSprite.spriteWithFile("scene");
            //将锚点设置到(0,0)处,单张图片的读取默认锚点在(0.5f,0.5f)处
            background.anchorPoint = new CCPoint(0, 0);
            //将背景添加到场景中
            this.addChild(background);

            //L2
            //取得当前窗口的宽
            var w = CCDirector.sharedDirector().getWinSize().width / 4;
            //取得高,并偏移80像素
            var h =( CCDirector.sharedDirector().getWinSize().height - 80) / 3;
            //声明一个CCMenuItemSprite数组
            Mole[] moles = new Mole[4 * 3];
            for (int i = 0; i < 4; i++)
            {
                for (int j = 0; j < 3; j++)
                {
                    //建立一个地鼠的菜单(按钮),并且按照4*3的方式排列
                    Mole mole = new Mole(this, onClick);
                    mole.position = new CCPoint(i * w + w / 2,j * h + h / 2);
                    moles[j * 4 + i] = mole;
                }
            }
            _molelist.AddRange(moles);
            //创建CCMenu
            var menus = CCMenu.menuWithItems(moles);
            //菜单项目默认position是在父节点容器的中间,所以要把他们移动到0,0处
            menus.position = new CCPoint(0, 0);
            this.addChild(menus);
            //L3
            //显示一段文字
            label_Score = CCLabelTTF.labelWithString("0", "Arial", 24);
            label_Score.Color = new ccColor3B(255, 0, 0);
            label_Score.anchorPoint = new CCPoint(1, 0.5f);
            this.addChild(label_Score);
            label_Score.position = new CCPoint(CCDirector.sharedDirector().getWinSize().width - 24, CCDirector.sharedDirector().getWinSize().height - 24);

            beginTimeSpan(2);

            return base.init();
        }
        void beginTimeSpan(float second)
        {
            //延迟指定的循环回调,用来解决每段时间就会钻出来鼹鼠的逻辑
            CCDelayTime delayTime = CCDelayTime.actionWithDuration(second);
            var action = CCSequence.actionOneTwo(delayTime, CCCallFunc.actionWithTarget(this, loopCallback));
            this.runAction(action);
        }
        //分数
        int _valuescore = 0;
        //分数属性,同时刷新显示的文字
        int valueScore
        {
            get { return _valuescore; }
            set
            {
                _valuescore = value;
                label_Score.setString(value.ToString());
            }
        }
        //被点击的回调
        public void onClick(CCObject sender)
        {
            //分数+1
            valueScore += 1;
            if ((sender as Mole).IsShow)
            {
                (sender as Mole).Hide();
                //播放被打击的声音
                SimpleAudioEngine.sharedEngine().playEffect(CCFileUtils.fullPathFromRelativePath("Sounds/sound43"));
            }
        }
        //循环回调用的方法
        public void loopCallback()
        {
            //这里通过简单计算使得鼹鼠出来的越来越快
            float sub = 1 - (float)valueScore / 20.0f;
            if (sub <= 0)
                sub = 0;
            beginTimeSpan(0.5f + sub);
            SetAllMoleDelaySecond(1.0f + sub);
            var t = getRandomMole();
            if (t != null)
                t.Show();
        }
        //获得一个随机老鼠
        private Mole getRandomMole()
        {
            for (int i = 0; i < _molelist.Count; i++)
            {
                Mole t = _molelist[_randome.Next() % _molelist.Count];
                _molelist.Remove(t);
                _molelist.Add(t);
            }
            foreach (var item in _molelist)
            {
                if (item.IsShow == false)
                    return item;
            }
            return null;
        }
        //重设所有的地鼠钻回去的延迟时间
        private void SetAllMoleDelaySecond(float second)
        {
            foreach (var item in _molelist)
            {
                item.DelaySecond = second;
            }
        }
    }
}
一个好的游戏需要细致的推敲,本例子只是简单的实现了逻辑,具体的规则可以依照自己需要更改,祝愿在游戏的开发之路上风光无限。
推荐WindowsPhone和Silverlight游戏开发博客:深蓝色右手


 上一篇中简单的实现了打地鼠的游戏雏形,一个好的游戏需要很多次的调试和长时间打磨,才能成为有趣的产品,而不是一段段的代码,前面一篇中使用了最简单的方式生成了静态界面,这次我们将使用动画行为、文字、声音的各种cocos2d类做出有趣的游戏,那么现在开始吧。


 浙公网安备 33010602011771号