CriminalIntent项目开发
fragment 的引入
采用fragment而不是activity来管理应用UI,可绕开Android系统activity使用规则的限制。fragment是一种控制器对象,activity可委派它完成一些任务。
这些任务通常就是管理用户界面。受管的用户界面可以是一整屏或是整屏的一部分。管理用户界面的fragment又称为UI fragment。
它自己也有产生于布局文件的视图。fragment视图包含了用户可以交互的可视化UI元素。
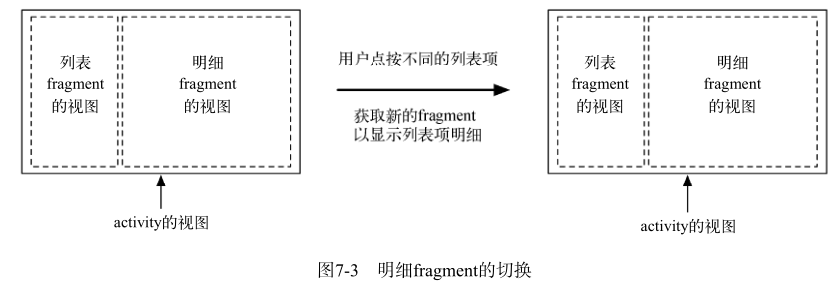
利用fragment,可轻松实现选择不同的列表项就显示对应的明细视图Activity负责以一个明细fragment替换另一个明细fragment,如图所示。这样,视图切换的过程中,就不用销毁activity了。

fragment 与支持库
我们要用到两个重要的支持库类,一个是 Fragment 类( android.support.v4.app.Fragment ),
另一个是 FragmentActivity ( android.support.v4.app.Fragment- Activity )。
使用fragment的前提是,activity知道如何管理fragment。 FragmentActivity 类知道如何管理支持版本的 fragment。
定义容器视图
创建fragment容器布局(activity_crime.xml)
<FrameLayout xmlns:android="http://schemas.android.com/apk/res/android"
android:id="@+id/fragment_container"
android:layout_width="match_parent"
android:layout_height="match_parent"
/>
定义 CrimeFragment 的布局
CrimeFragment 视图将显示包含在 Crime 类实例中的信息。
该布局包括一个垂直 LinearLayout 布局(含有一个 EditText 组件)。 EditText 组件有一块区域,可供用户添加或编辑文字信息。
fragment视图的布局文件(fragment_crime.xml)
<LinearLayout xmlns:android="http://schemas.android.com/apk/res/android"
android:layout_width="match_parent"
android:layout_height="match_parent"
android:orientation="vertical"
>
<EditText android:id="@+id/crime_title"
android:layout_width="match_parent"
android:layout_height="wrap_content"
android:hint="@string/crime_title_hint"
/>
</LinearLayout>
创建 CrimeFragment 类
继承 Fragment 类(CrimeFragment.java)
public class CrimeFragment extends Fragment {
}
修改代码继承 Fragment 类时 ,我们需要选择 Fragment (android.support.v4.app)包
实现fragment生命周期方法
覆盖 Fragment.onCreate(Bundle) 方法(CrimeFragment.java)
public class CrimeFragment extends Fragment {
private Crime mCrime;
@Override
public void onCreate(Bundle savedInstanceState) {
super.onCreate(savedInstanceState);
mCrime = new Crime();
}
}
Fragment.onCreate(Bundle) 是公共方法,而 Activity.onCreate(Bundle) 是保护方法。 Fragment.onCreate(...) 方法及其他 Fragment 生命周期方法必须是公共方法,
因为托管fragment的activity要调用它们。
覆盖 onCreateView(...) 方法(CrimeFragment.java)
@Override
public View onCreateView(LayoutInflater inflater, ViewGroup container,
Bundle savedInstanceState) {
View v = inflater.inflate(R.layout.fragment_crime, container, false);
return v;
}
在 onCreateView(...) 方 法 中 , fragment 的 视 图 是 直 接 通 过 调 用 LayoutInflater.inflate(...) 方法并传入布局的资源ID生成的。
第二个参数是视图的父视图,我们通常需要父视图来正确配置组件。第三个参数告知布局生成器是否将生成的视图添加给父视图。
这里,我们传入了 false 参数,因为我们将以activity代码的方式添加视图。
在fragment中关联组件
生成并使用 EditText 组件(CrimeFragment.java)
public class CrimeFragment extends Fragment {
private Crime mCrime;
private EditText mTitleField;
@Override
public View onCreateView(LayoutInflater inflater, ViewGroup container,
Bundle savedInstanceState) {
  View v = inflater.inflate(R.layout.fragment_crime, container, false);
  mTitleField = (EditText)v.findViewById(R.id.crime_title);
  mTitleField.addTextChangedListener(new TextWatcher() {
  @Override
  public void beforeTextChanged(
  CharSequence s, int start, int count, int after) {
  // This space intentionally left blank
}
@Override
public void onTextChanged(
CharSequence s, int start, int before, int count) {
mCrime.setTitle(s.toString());
}

@Override
public void afterTextChanged(Editable s) {
// This one too
}
});
return v;
}
}
Fragment.onCreateView(...) 方法中的组件引用几乎等同于 Activity.onCreate(...)方法的处理。唯一的区别是我们调用了fragment视图的 View.findViewById(int) 方法。
添加 UI fragment 到 FragmentManager
FragmentManager 类具体管理的是:
fragment队列;
fragment事务回退栈
获取 FragmentManager (CrimeActivity.java)
FragmentManager fm = getSupportFragmentManager();
添加一个 CrimeFragment (CrimeActivity.java)
Fragment fragment = fm.findFragmentById(R.id.fragment_container);
if (fragment == null) {
fragment = new CrimeFragment();
fm.beginTransaction()
.add(R.id.fragment_container, fragment)
.commit();
}
fragment事务被用来添加、移除、附加、分离或替换fragment队列中的fragment。这是使用fragment在运行时组装和重新组装用户界面的关键。
FragmentManager 管理着fragment事务回退栈。
使用布局与组件创建用户界面
打开Crime.java文件,新增两个实例变量。 Date 变量表示crime发生的时间, boolean 变量表示crime是否已得到处理
添加更多变量(Crime.java)
private Date mDate;
private boolean mSolved;
public Crime() {
mId = UUID.randomUUID();
mDate = new Date();
}
添加新组件(fragment_crime.xml)
为 CrimeFragment 的布局添加四个组件:两个 TextView组件、一个 Button 组件以及一个 CheckBox 组件
<TextView
android:layout_width="match_parent"
android:layout_height="wrap_content"
android:text="@string/crime_title_label"
style="?android:listSeparatorTextViewStyle"
/>
<EditText android:id="@+id/crime_title"
android:layout_width="match_parent"
android:layout_height="wrap_content"
android:layout_marginLeft="16dp"
android:layout_marginRight="16dp"
android:hint="@string/crime_title_hint"
/>
<TextView
android:layout_width="match_parent"
android:layout_height="wrap_content"
android:text="@string/crime_details_label"
style="?android:listSeparatorTextViewStyle"
/>
<Button android:id="@+id/crime_date"
android:layout_width="match_parent"
android:layout_height="wrap_content"
android:layout_marginLeft="16dp"
android:layout_marginRight="16dp"
/>
<CheckBox android:id="@+id/crime_solved"
android:layout_width="match_parent"
android:layout_height="wrap_content"
android:layout_marginLeft="16dp"
android:layout_marginRight="16dp"
android:text="@string/crime_solved_label"
/>
添加字符串资源(strings.xml)
<string name="crime_title_label">Title</string>
<string name="crime_details_label">Details</string>
<string name="crime_solved_label">Solved</string>
添加组件实例变量(CrimeFragment.java)
接下来,要让 CheckBox 显示 Crime 是否已得到处理。用户勾选清除 CheckBox 时, Crime 的mSolved 变量的状态值也需得到相应的更新。
private Button mDateButton;
private CheckBox mSolvedCheckBox;
设置 Button 上的文字显示(CrimeFragment.java)
mDateButton = (Button)v.findViewById(R.id.crime_date);
mDateButton.setText(mCrime.getDate().toString());
mDateButton.setEnabled(false);
禁用按钮可以确保它不响应用户的单击事件。禁用后,按钮的外观样式也会发生改变(变为灰色),表明它已处于禁用状态。
侦听 CheckBox 状态的变化(CrimeFragment.java)
mSolvedCheckBox = (CheckBox)v.findViewById(R.id.crime_solved);
mSolvedCheckBox.setOnCheckedChangeListener(new OnCheckedChangeListener() {
@Override
public void onCheckedChanged(CompoundButton buttonView, boolean isChecked) {
// Set the crime's solved property
mCrime.setSolved(isChecked);
}
});
创建 OnCheckedChangeListener 时需要导入android.widget.CompoundButton的包,千万不要导错了
使用 RecyclerView
首先要导入recyclerview-v7支持库
在布局文件中添加 RecyclerView 视图(fragment_crime_list.xml)
<android.support.v7.widget.RecyclerView
xmlns:android="http://schemas.android.com/apk/res/android"
android:id="@+id/crime_recycler_view"
android:layout_width="match_parent"
android:layout_height="match_parent"/>
为 CrimeListFragment 配置视图(CrimeListFragment.java)
private RecyclerView mCrimeRecyclerView;
@Override
public View onCreateView(LayoutInflater inflater, ViewGroup container,
Bundle savedInstanceState) {
View view = inflater.inflate(R.layout.fragment_crime_list, container, false);
mCrimeRecyclerView = (RecyclerView) view
.findViewById(R.id.crime_recycler_view);
mCrimeRecyclerView.setLayoutManager(new LinearLayoutManager(getActivity()));
return view;
}
RecyclerView 类的任务就是回收再利用以及定位屏幕上的 TextView 视图。实际上,定位的任务被委托给了 LayoutManager 。
除了在屏幕上定位列表项, LayoutManager 还负责定义屏幕滚动行为。
因此,没有 LayoutManager , RecyclerView 也就没法正常工作了。
从 fragment 中启动 activity
在 CrimeListFragment 的 CrimeHolder 类里,用启动 CrimeActivity 实例的代码,替换Toast消息处理代码
启动 CrimeActivity (CrimeListFragment.java)
Intent intent = new Intent(getActivity(), CrimeActivity.class);
startActivity(intent);
使用 ViewPager
为UI添加 ViewPager 后,用户可滑动屏幕,切换查看不同列表项的明细页面
创建 ViewPager (CrimePagerActivity.java)
public class CrimePagerActivity extends FragmentActivity {
@Override
protected void onCreate(Bundle savedInstanceState) {
super.onCreate(savedInstanceState);
setContentView(R.layout.activity_crime_pager);
}
}
注意,必须使用 ViewPager 的包名全称(android.support.v4.view.ViewPager)。

CrimePagerActivity 的 ViewPager 布局(activity_crime_pager.xml)
设置pager adapter(CrimePagerActivity.java)
public class CrimePagerActivity extends FragmentActivity {
  private ViewPager mViewPager;
  private List<Crime> mCrimes;
@Override
protected void onCreate(Bundle savedInstanceState) {
  super.onCreate(savedInstanceState);
  setContentView(R.layout.activity_crime_pager);
  mViewPager = (ViewPager) findViewById(R.id.activity_crime_pager_view_pager);
  mCrimes = CrimeLab.get(this).getCrimes();
  FragmentManager fragmentManager = getSupportFragmentManager();
  mViewPager.setAdapter(new FragmentStatePagerAdapter(fragmentManager) {
  @Override
  public Fragment getItem(int position) {
  Crime crime = mCrimes.get(position);
  return CrimeFragment.newInstance(crime.getId());
  }
@Override
  public int getCount() {
return mCrimes.size();
  }
});
}
}
在activity视图中找到 ViewPager 后,我们从 CrimeLab 中(crime的 List )获取数据集,然后获取activity的 FragmentManager 实例
设置adapter为 FragmentStatePagerAdapter 的一个匿名实例。创建 Fragment-StatePagerAdapter 实例需要 FragmentManager 。
创建 newIntent 方法(CrimePagerActivity.java)
private static final String EXTRA_CRIME_ID =
"com.bignerdranch.android.criminalintent.crime_id";
public static Intent newIntent(Context packageContext, UUID crimeId) {
Intent intent = new Intent(packageContext, CrimePagerActivity.class);
intent.putExtra(EXTRA_CRIME_ID, crimeId);
return intent;
}
UUID crimeId = (UUID) getIntent()
.getSerializableExtra(EXTRA_CRIME_ID);
然后需要修改 CrimeListFragment ,使得用户单击某个列表项时, CrimeListFragment 启动的是 CrimePagerActivity 实例。
配置启动 CrimePagerActivity (CrimeListFragment.java)
Intent intent = CrimePagerActivity.newIntent(getActivity(), mCrime.getId());


