新浪微博爬取笔记(2):wap端模拟登陆 python
===================
看了其他人的博客都写的很简洁干净,我这边的排版简直要晕。图和代码一起上,小白每一步都要有讲解。。。
===================
虽然weibo.com的模拟登陆用http://www.cnblogs.com/houkai/p/3487816.html的代码成功了,但是新版微博的标签太复杂,而且爬取一个用户的微博列表的时候,最底端是“正在加载”,不好模拟。因此改爬weibo.cn。
除此之外,weibo.cn比weibo.com更适合爬取的原因还有:
1、weibo.cn的模拟登陆步骤比weibo.com要简单;
2、微博列表是分页显示,目前每页有5条;
3、评论,转发列表都是静态加载。
先进行模拟登陆。模拟登陆有两种方法,在pc端操作:
1、user-agent用UC浏览器,模仿手机端,如http://blog.csdn.net/zhaolina004/article/details/28699095,步骤简单。需要注意的是,虽然在手机端可以采用保存登陆后页面即保存cookie下次直接登陆的方式,pc端则不行。
####15年4月 登陆后地址变为http://weibo.cn/?vt=4 不再显示gsid (事实上显示gsid的网址重定向到weibo.cn/?vt=4,以下截图中会显示,直接访问并不能进入登陆页面,用UC也不行)
####放弃
2、user-agent用Firefox浏览器,如http://qinxuye.me/article/simulate-weibo-login-in-python/,这篇是12年的文章,现在是15年4月,登陆页面地址和请求数据等都发生了改变,需要做一些修改。
=====================================================
试一下方法2, 边做边写:
原始代码来自http://qinxuye.me/article/simulate-weibo-login-in-python/,现粘贴到下方:
 1 import urllib2
 2 import urllib
 3 import cookielib
 4
 5 import lxml.html as HTML
 6
 7 class Fetcher(object):
 8     def __init__(self, username=None, pwd=None, cookie_filename=None):
 9         self.cj = cookielib.LWPCookieJar()
10         if cookie_filename is not None:
11             self.cj.load(cookie_filename)
12         self.cookie_processor = urllib2.HTTPCookieProcessor(self.cj)
13         self.opener = urllib2.build_opener(self.cookie_processor, urllib2.HTTPHandler)
14         urllib2.install_opener(self.opener)
15
16         self.username = username
17         self.pwd = pwd
18         self.headers = {'User-Agent':'Mozilla/5.0 (Windows NT 6.1; rv:14.0) Gecko/20100101 Firefox/14.0.1',
19                         'Referer':'','Content-Type':'application/x-www-form-urlencoded'}
20
21     def get_rand(self, url):
22         headers = {'User-Agent':'Mozilla/5.0 (Windows;U;Windows NT 5.1;zh-CN;rv:1.9.2.9)Gecko/20100824 Firefox/3.6.9',
23                    'Referer':''}
24         req = urllib2.Request(url ,urllib.urlencode({}), headers)
25         resp = urllib2.urlopen(req)
26         login_page = resp.read()
27         rand = HTML.fromstring(login_page).xpath("//form/@action")[0]
28         passwd = HTML.fromstring(login_page).xpath("//input[@type='password']/@name")[0]
29         vk = HTML.fromstring(login_page).xpath("//input[@name='vk']/@value")[0]
30         return rand, passwd, vk
31
32     def login(self, username=None, pwd=None, cookie_filename=None):
33         if self.username is None or self.pwd is None:
34             self.username = username
35             self.pwd = pwd
36         assert self.username is not None and self.pwd is not None
37
38         url = 'http://3g.sina.com.cn/prog/wapsite/sso/login.php?ns=1&revalid=2&backURL=http%3A%2F%2Fweibo.cn%2F&backTitle=%D0%C2%C0%CB%CE%A2%B2%A9&vt='
39         rand, passwd, vk = self.get_rand(url)
40         data = urllib.urlencode({'mobile': self.username,
41                                  passwd: self.pwd,
42                                  'remember': 'on',
43                                  'backURL': 'http://weibo.cn/',
44                                  'backTitle': '新浪微博',
45                                  'vk': vk,
46                                  'submit': '登录',
47                                  'encoding': 'utf-8'})
48         url = 'http://3g.sina.com.cn/prog/wapsite/sso/' + rand
49         req = urllib2.Request(url, data, self.headers)
50         resp = urllib2.urlopen(req)
51         page = resp.read()
52         link = HTML.fromstring(page).xpath("//a/@href")[0]
53         if not link.startswith('http://'): link = 'http://weibo.cn/%s' % link
54         req = urllib2.Request(link, headers=self.headers)
55         urllib2.urlopen(req)
56         if cookie_filename is not None:
57             self.cj.save(filename=cookie_filename)
58         elif self.cj.filename is not None:
59             self.cj.save()
60         print 'login success!'
61
62     def fetch(self, url):
63         print 'fetch url: ', url
64         req = urllib2.Request(url, headers=self.headers)
65         return urllib2.urlopen(req).read()
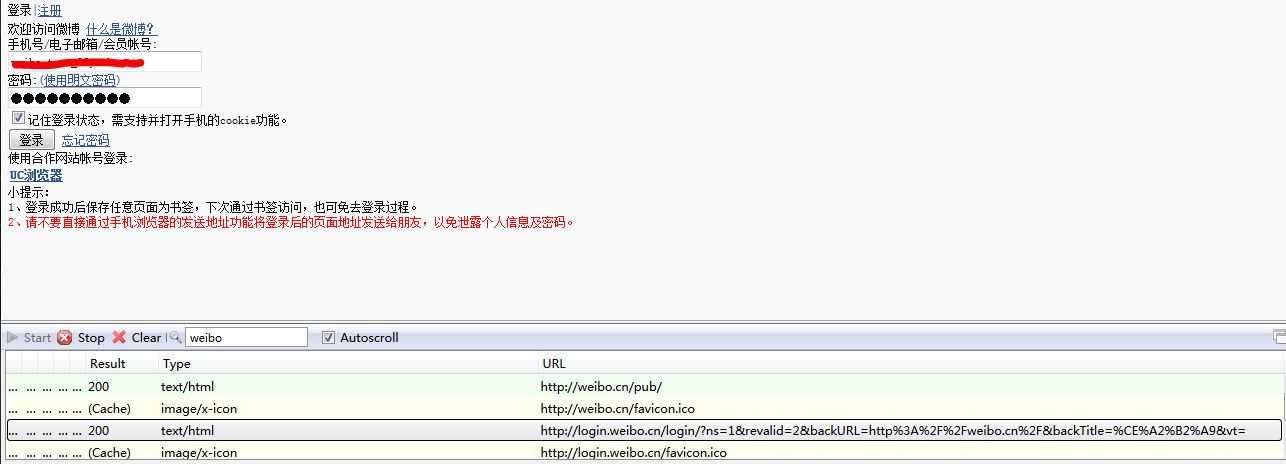
看一下登录过程,用firefox的httpfox工具:
(1)进入登陆页面,得到url

对照代码中38,39行,需要改url为以上页面的url:
38         url = 'http://3g.sina.com.cn/prog/wapsite/sso/login.php?ns=1&revalid=2&backURL=http%3A%2F%2Fweibo.cn%2F&backTitle=%D0%C2%C0%CB%CE%A2%B2%A9&vt='
39         rand, passwd, vk = self.get_rand(url)
再看一下39行用到的get_rand():
*从第7行开始按照代码,查找页面元素,可看到rand, passwd, vk这些值在哪里:
(注意这里的headers又被定义了一遍,而在_init_()中已经给定了self.headers,暂且注释掉,并且根据实际所用的firefox版本(以上页面Request Header中的user-agent项)改掉_init_中的self.headers.)
(这里得到的password不是用户密码,是登陆request需要提交数据项的名称,后面有解释)
 1 def get_rand(self, url):##############get rand, see html page
 2         #headers = {'User-Agent':'Mozilla/5.0 (Windows;U;Windows NT 5.1;zh-CN;rv:1.9.2.9)Gecko/20100824 Firefox/3.6.9',
 3         #           'Referer':''}  #####why different?
 4         req = urllib2.Request(url ,urllib.urlencode({}), self.headers)
 5         resp = urllib2.urlopen(req)
 6         login_page = resp.read()
 7         rand = HTML.fromstring(login_page).xpath("//form/@action")[0]
 8         passwd = HTML.fromstring(login_page).xpath("//input[@type='password']/@name")[0]
 9         vk = HTML.fromstring(login_page).xpath("//input[@name='vk']/@value")[0]
10         return rand, passwd, vk
输入用户名和密码:
输入用户名和密码之后,没有新的响应,说明新浪没有对这两个字段做加密处理,这是和微博pc端weibo.com不同的地方。
(2)提交post
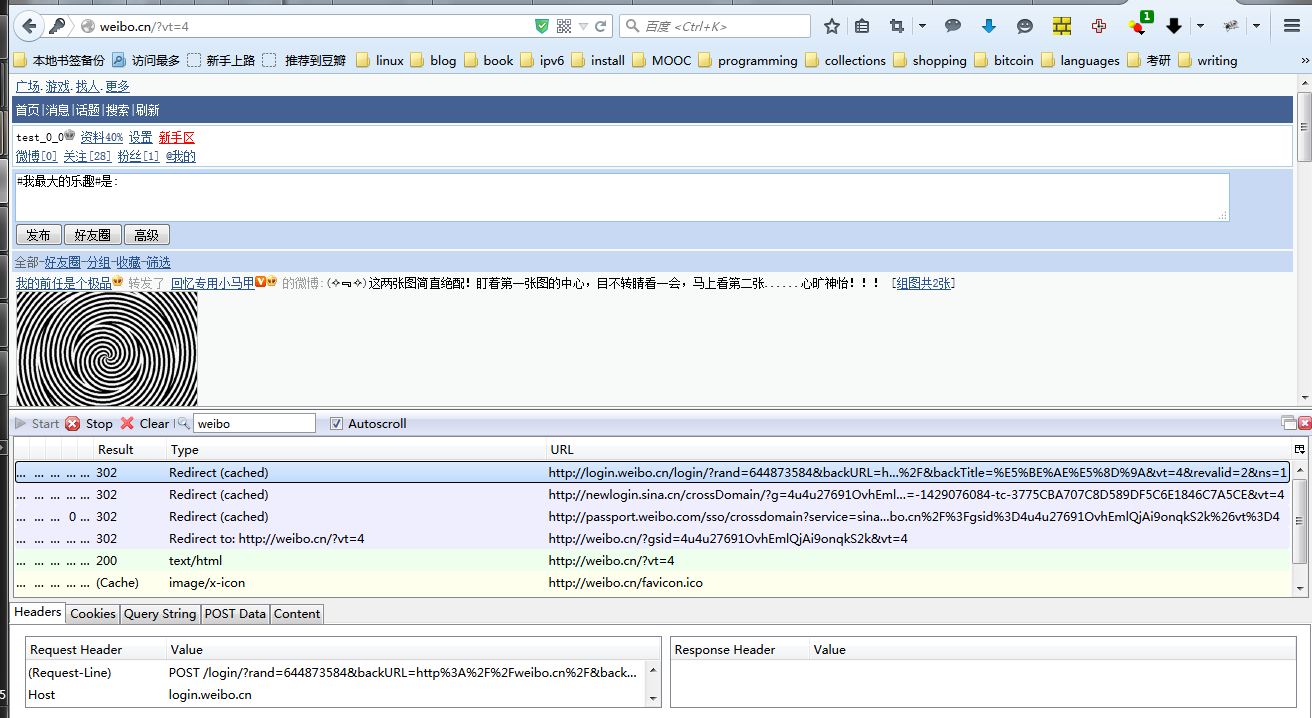
可看到有4个重定向,和一个200的最终url。 其中第一个重定向是POST方法,其余的都是GET。
先看POST的重定向:
看一下原始代码的login()部分40到49行,
40         data = urllib.urlencode({'mobile': self.username,
41                                  passwd: self.pwd,
42                                  'remember': 'on',
43                                  'backURL': 'http://weibo.cn/',
44                                  'backTitle': '新浪微博',
45                                  'vk': vk,
46                                  'submit': '登录',
47                                  'encoding': 'utf-8'})
48         url = 'http://3g.sina.com.cn/prog/wapsite/sso/' + rand
49         req = urllib2.Request(url, data, self.headers)
(其中password的“:”前的部分是一个变量,原因在下一张截图中)
rand, password, vk字段都是在get_rand()时已经得到。看一下登陆request中需要的具体数据项data:
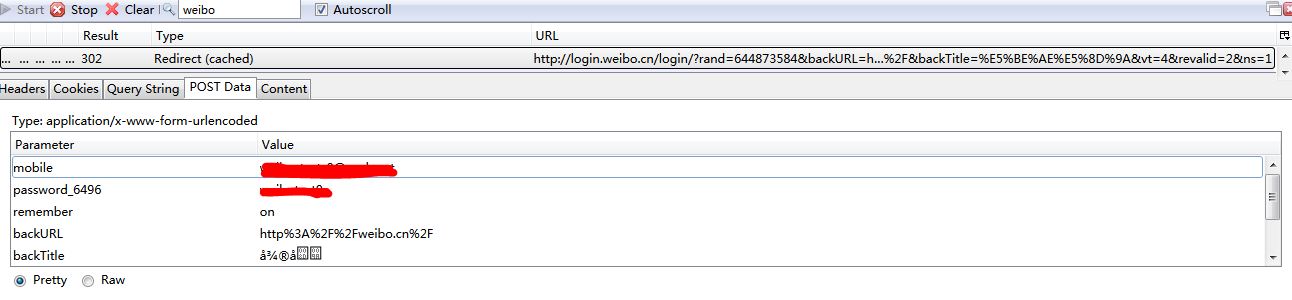
password后是一个“_”另加四位数字。这个数字不是固定的,这是我第二次访问,和第一次访问的数字已经不同了。所以在get_rand()中用变量存储password;
value部分有一些乱码。页面是utf-8编码的,把最下面的Pretty改成Raw显示得到utf-8编码的形式,整理一下:
1 mobile=******2 password_2854=*******  ##这是上一次登陆的password名称3 remember=on
4 backURL=http%253A%252F%252Fweibo.cn
5 backTitle=%E6%89%8B%E6%9C%BA%E6%96%B0%E6%B5%AA%E7%BD%91
6 tryCount=
7 vk=2854_cfe0_1714426041
8 submit=%E7%99%BB%E5%BD%95
这些value值段的是utf-8编码后的形式。用网上的在线utf-8转换,得到的是和上图一样的乱码。。Anyway,那就直接用utf-8编码后的结果。
#############update 4.21############
说错了,这里不是utf-8编码,而是HTML转义序列的unicode解码, HTML转义序列参见http://www.zhihu.com/question/21390312的最高票回答;
%8B%E6%9C%BA%E6%96%用unicode编码之后成为“&#, &#”格式的HTML转义序列,character reference, "从 HTML 4 开始,NCR 以 Unicode 为准,与文档编码无关"。
网页编码是utf-8而不是报文编码。 我的火狐浏览器设置的编码也是utf-8,所以解析出来是乱码
#################################
用本地看到的POST data改一下原始代码中的data部分,同样也改一下POST请求的url:
1 data = urllib.urlencode({'mobile':self.username, 2 passwd :self.pwd, 3 'remember':'on', 4 'backURL':'http://weibo.cn/', 5 #'backTitle':u''.decode('utf-8').encode('utf-8'), 6 #'backTitle':'新浪微博', 7 'backTitle':'%E6%89%8B%E6%9C%BA%E6%96%B0%E6%B5%AA%E7%BD%91', 8 'tryCount':'', 9 'vk':vk, 10 #'submit':u''.decode('utf-8').encode('utf-8'), 11 #'submit':'登陆', 12 'submit':'%E7%99%BB%E5%BD%95'}) 13 url = 'http://login.weibo.cn/login/?' + rand + '&backURL=http%3A%2F%2Fweibo.cn%2F&backTitle=%E5%BE%AE%E5%8D%9A&vt=4&revalid=2&ns=1'
(原始代码定位元素用了lxml这个包。另一个方案是用BeautifulSoup。虽然lxml的速度据说比BeautifulSoup快10倍。。但是lxml安装比较麻烦。。所以先改为BeautifulSoup实现。)
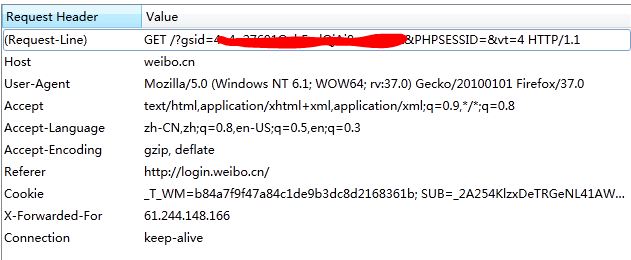
(3)通过GET得到gsid,得到登陆url,重定向到最终url "weibo.cn/&vt=4"
再看GET带gsid的url的重定向到主页,看一下GET报文:
代码中这部分无法理解,新浪应该已经改了:
48         url = 'http://login.weibo.cn/' + rand
49         req = urllib2.Request(url, data, self.headers)
50         resp = urllib2.urlopen(req)
51         page = resp.read()
52         link = HTML.fromstring(page).xpath("//a/@href")[0]
53         if not link.startswith('http://'): link = 'http://weibo.cn/%s' % link
54         req = urllib2.Request(link, headers=self.headers)
如上上图,需要GET weibo.cn/ + gsid,gsid的值在cookie中,如图:

cookie中的gsid_CTandWT字段的值即是。是由weibo.cn存储的。
看一下四个重定向:

第一个login.weibo.cn里面没有这个cookie;第三个passport.weibo.com是weibo.com的,没有gsid;第二个和第四个里面有。但是gsid_CTandWM不是由第二个get产生的,因为第二个的报文中的cookie行里已经用了gsid。
那只能认为第一个的POST就得到了gsid值,虽然response报文里什么都没有(估计是对用户隐蔽吧)。
参考这篇文章http://blog.csdn.net/xiexieni057/article/details/16698787里处理cookie的方法:
 1         #get an important cookie value gsid from cookiejar
 2         try:
 3             beginPos = str(self.cookie).index('gsid_CTandWM')
 4             endPos = str(self.cookie).index('for', beginPos)
 5         except Exception as e:
 6             print e
 7         if beginPos >= endPos:
 8             print "cookie was changed by sina"
 9         else:
10             cookie_value = str(self.cookie)[beginPos: endPos]
11         self.headers2 = {'User-Agent': 'Mozilla/5.0 (Windows NT 6.1; WOW64; rv:37.0) Gecko/20100101 Firefox/37.0',
12                          'cookie': cookie_value}
13         #use gsid to login
14         req = urllib2.Request(url="http://weibo.cn",
15                                   data=urllib.urlencode({}),
16                                   headers=self.headers2)
17         urllib2.urlopen(req)
贴一下改完后的代码:
 1 # -*- coding : utf-8 -*-
 2 import re
 3 import urllib2
 4 import random
 5 import urllib
 6 import cookielib
 7 import socket
 8
 9 #import lxml.html as HTML
10 from bs4 import BeautifulSoup
11
12 class Fetcher(object):
13     def __init__(self, iplist=[], username=None, pwd=None, cookie_filename=None):
14         if iplist != []:
15             self.iplist = iplist
16             proxy_ip = random.choice(self.iplist)
17             self.proxy_handler = urllib2.ProxyHandler({'http': 'http://' + proxy_ip})
18         else:
19             self.proxy_handler = urllib2.ProxyHandler()
20
21         self.cj = cookielib.LWPCookieJar()
22         ##cookie jar, use self.cj to restore the cookies generated in the process
23         if cookie_filename is not None:
24             self.cj.load(cookie_filename)
25         self.cookie_processor = urllib2.HTTPCookieProcessor(self.cj)
26         self.opener = urllib2.build_opener(self.cookie_processor, urllib2.HTTPHandler, self.proxy_handler)
27         urllib2.install_opener(self.opener)
28         #urllib2 set environment(?)
29
30         self.username = username #
31         self.pwd = pwd #
32         self.headers = {'User-Agent':'Mozilla/5.0 (Windows NT 6.1; WOW64; rv:37.0) Gecko/20100101 Firefox/37.0',
33                         'Referer':'', 'Content-Type':'application/x-www-form-urlencoded'}
34
35     def get_rand(self, url):##############get rand, see html page
36         req = urllib2.Request(url ,urllib.urlencode({}), self.headers)
37         resp = urllib2.urlopen(req, timeout = 10)
38         login_page = resp.read()
39         soup = BeautifulSoup(login_page)  ####need fix?
40         rand = soup.form['action'][6:15]
41         passwd =  soup.find_all('input', attrs = {"type":"password"})[0]['name']
42         vk = soup.find_all('input', attrs = {"name":"vk"})[0]['value']
43         print rand, passwd, vk
44         return rand, passwd, vk
45
46     def login(self, username=None, pwd=None, cookie_filename=None):
47         if self.username is None or self.pwd is None:
48             self.username = username
49             self.pwd = pwd
50         assert self.username is not None and self.pwd is not None
51         print self.pwd, self.username
52
53         url = 'http://login.weibo.cn/login/?ns=1&revalid=2&backURL=http%3A%2F%2Fweibo.cn%2F&backTitle=%CE%A2%B2%A9&vt=' #use this url to get rand
54         rand, passwd, vk = self.get_rand(url)  ###sucess
55         data = urllib.urlencode({'mobile':self.username,
56                                   passwd :self.pwd,
57                                  'remember':'on',
58                                  'backURL':'http://weibo.cn/',
59                                  'backTitle':'%E6%89%8B%E6%9C%BA%E6%96%B0%E6%B5%AA%E7%BD%91',
60                                  'tryCount':'',
61                                  'vk':vk,
62                                  'submit':'%E7%99%BB%E5%BD%95'})
63         url = 'http://login.weibo.cn/login/?' + rand + '&backURL=http%3A%2F%2Fweibo.cn%2F&backTitle=%E5%BE%AE%E5%8D%9A&vt=4&revalid=2&ns=1'
64         resp = urllib2.urlopen(req, timeout = 10)
65
66         #get gsid from cookie
67         beginPos = str(self.cj).index('gsid_CTandWM')
68         endPos = str(self.cj).index('for', beginPos)
69         if beginPos >= endPos:
70             print "cookie was changed by sina"
71         else:
72             self.cookie_value = str(self.cj)[beginPos: endPos]
73         self.headers2 = {'User-Agent': 'Mozilla/5.0 (Windows NT 6.1; WOW64; rv:37.0) Gecko/20100101 Firefox/37.0',
74                      'cookie': self.cookie_value}
75
76         req = urllib2.Request(url="http://weibo.cn",
77                               data=urllib.urlencode({}),
78                               headers=self.headers2)
79         urllib2.urlopen(req, timeout = 10)
80
81         #save cookie
82         if cookie_filename is not None:
83             self.cj.save(filename=cookie_filename)
84         elif self.cj.filename is not None:
85             self.cj.save()
86         print 'login success!'
87
88     def fetch(self, url):
89         print 'fetch url: ', url
90         req = urllib2.Request(url, headers=self.headers)  #specify the headers parameter
91         return urllib2.urlopen(req, timeout = 10).read()
92
============================================================================
需要改的部分基本就完成了。现在测试:
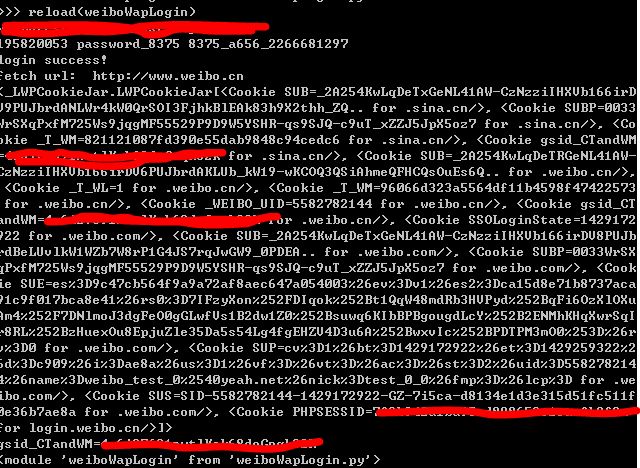
加了两个print语句,分别打印最终得到的cookie和gsid值。能看到成功了!访问weibo.cn,并将网页内容打印到文件,也是主页的状态。
总结:
1、POST要求的data部分,没有写中文(因为是乱码),而是按照raw格式显示的内容原样粘贴上去。
2、最后测试出现问题的都是细节,比如GET要求的语句格式啊,data格式啊,要对自己有信心。。
