登陆整合实现-QQ互联认证(ASP.NET版本)
首先 我们创建一个qq.ashx的页面,这个页面会跳转到QQ的请求界面
代码如下:
        QQSettingConfig qqSettingConfig = MySiteConfig.GetConfig<QQSettingConfig>();//配置对象 配置QQ的 app id appkey 回调地址
        public void ProcessRequest(HttpContext context)
        {
            context.Response.ContentType = "text/plain";
            string state = new Random(100000).Next(99, 99999).ToString();//随机数
            context.Session["state"] = state;
            string callback = System.Web.HttpUtility.UrlEncode(qqSettingConfig.CallBackAddress + "/QQCallBack.aspx", Encoding.UTF8);//回调处理地址
            string url = string.Format("https://graph.qq.com/oauth2.0/authorize?client_id={0}&response_type=code&redirect_uri={1}&state={2}", qqSettingConfig.APPID, callback, state);//互联地址
            context.Response.Redirect(url);
        }
代码比较简单,就是进行一个跳转的操作,其中qqSettingConfig是读取配置文件 里面定义了appid 和appkey 这个需要先到腾讯互联的网站申请
state 是一个随机数,这个随机数我这里写入到session中,腾讯请求后会返回来一个callback的页面 这个页面也是我们自己填写的 ,在c腾讯在返回来请求我们的地址的时候会将这个state传回来 然后外面和我们的session的state进行对比 防止中途被黑客拦截了
我这里的回调处理地址就是qqSettingConfig.CallBackAddress + "/QQCallBack.aspx 前面的配置 你可以写死也可以读取配置文件 就是你申请的时候的回调地址
然后外面看我们的回调地址
回调地址,首先我们也需要配置文件
QQSettingConfig qqSettingConfig = MySiteConfig.GetConfig<QQSettingConfig>();//配置对象 配置QQ的 app id appkey 回调地址
然后在pageload事件里面
protected void Page_Load(object sender, EventArgs e)
        {
            if (!IsPostBack)
            {
                try
                {
                    string code = HttpContext.Current.QueryString["code"];
                    string state = HttpContext.Current.QueryString["state"];
                    ValidCodeState(code, state);
                    QQOauthInfo qqOauthInfo = GetOauthInfo(code);
                    string openID = GetOpenID(qqOauthInfo);
                    string nickName = GetUserInfo(qqOauthInfo, openID);
                    if (string.IsNullOrEmpty(nickName))
                    {
                        WriteErrMsg("获取不到昵称");
                    }

                    #region 开始进行注册或者登录
                    OauthUserModel oauthUserModel = BLL.OauthUserBll.GetInfoByOpenId("qq", openID);
                    if (!oauthUserModel.IsNull)
                    {
                        //已经绑定过则登录
                        DealLogin(oauthUserModel);
                    }
                    else
                    {
                        //进行绑定
                        this.TxtRegUserName.Text = nickName;
                        this.hidenNiName.Value = nickName;
                        this.hidenOpenID.Value = openID;
                        this.LabelNiName.Text = nickName;
                        this.LabelOpenID.Text = openID;
                    }
                    #endregion
                }
                catch (Exception ex)
                {
                    //ShowError("出错了:"+ ex.Message);
                }

            }
        }
腾讯在跳转到我们指定的回调地址的时候 会传回来code 和state 我们首先来验证这两个是否合法
/// <summary>
        /// 验证code和state
        /// </summary>
        /// <param name="code"></param>
        /// <param name="state"></param>
        private void ValidCodeState(string code, string state)
        {
            if (string.IsNullOrEmpty(code) || string.IsNullOrEmpty(state))
            {
                ShowError("CODE或者STATE为空");
            }
            if (Session["state"] == null || Session["state"].ToString() != state)
            {
                ShowError("STATE不正确");
            }
        }
1 主要就是验证非空 state和session里面的state进行验证 防止被中途拦截了
然后外面在调用另外的地址 获取token
QQOauthInfo qqOauthInfo = GetOauthInfo(code);
方法如下
 /// <summary>
        /// 获取oauth信息
        /// </summary>
        /// <param name="code"></param>
        /// <returns></returns>
        private QQOauthInfo GetOauthInfo(string code)
        {
            string callback = System.Web.HttpUtility.UrlEncode(qqSettingConfig.CallBackAddress + "/QQCallBack.aspx", Encoding.UTF8);
            string url = string.Format("https://graph.qq.com/oauth2.0/token?grant_type={0}&client_id={1}&client_secret={2}&code={3}&redirect_uri={4}", "authorization_code", qqSettingConfig.APPID, qqSettingConfig.APPKEY, code, callback);
            string res = LoadHtmlUserGetType(url, Encoding.UTF8);
            if (!res.Contains("access_token="))
            {
                ShowError("出错了:空access_token");
            }
            QQOauthInfo qqOauthInfo = new QQOauthInfo();
            qqOauthInfo.AccessToken = CutString(res, "access_token=", "&expires_in=");
            qqOauthInfo.ExpiresIn = CutString(res, "&expires_in=", "&refresh_token=");
            qqOauthInfo.RefreshToken = res.Split(new string[] { "&refresh_token=" }, StringSplitOptions.None)[1];
            if (string.IsNullOrEmpty(qqOauthInfo.AccessToken) || string.IsNullOrEmpty(qqOauthInfo.ExpiresIn) || string.IsNullOrEmpty(qqOauthInfo.RefreshToken))
            {
                ShowError("获取access_token等信息为空");
            }
            return qqOauthInfo;
        }
        /// <summary>
        /// 截取字符串中两个字符串中的字符串
        /// </summary>
        /// <param name="str">字符串</param>
        /// <param name="startStr">开始字符串</param>
        /// <param name="endStr">结束字符串</param>
        /// <returns></returns>
        public string CutString(string str, string startStr, string endStr)
        {
            int begin, end;
            begin = str.IndexOf(startStr, 0) + startStr.Length; //开始位置
            end = str.IndexOf(endStr, begin);            //结束位置
            return str.Substring(begin, end - begin);   //取搜索的条数,用结束的位置-开始的位置,并返回
        }

        /// <summary>
        /// 通过GET方式获取页面的方法
        /// </summary>
        /// <param name="urlString">请求的URL</param>
        /// <param name="encoding">页面编码</param>
        /// <returns></returns>
        public string LoadHtmlUserGetType(string urlString, Encoding encoding)
        {
            HttpWebRequest httpWebRequest = null;
            HttpWebResponse httpWebRespones = null;
            Stream stream = null;
            string htmlString = string.Empty;
            try
            {
                httpWebRequest = WebRequest.Create(urlString) as HttpWebRequest;
            }
            catch (Exception ex)
            {
                throw new Exception("建立页面请求时发生错误!", ex);
            }
            httpWebRequest.UserAgent = "Mozilla/4.0 (compatible; MSIE 7.0; Windows NT 5.1; .NET CLR 2.0.50727; Maxthon 2.0)";
            try
            {
                httpWebRespones = (HttpWebResponse)httpWebRequest.GetResponse();
                stream = httpWebRespones.GetResponseStream();
            }
            catch (Exception ex)
            {
                throw new Exception("接受服务器返回页面时发生错误!", ex);
            }
            StreamReader streamReader = new StreamReader(stream, encoding);
            try
            {
                htmlString = streamReader.ReadToEnd();
            }
            catch (Exception ex)
            {
                throw new Exception("读取页面数据时发生错误!", ex);
            }
            streamReader.Close();
            stream.Close();
            return htmlString;
        }
返回来 我封装了一个实体对象
public class QQOauthInfo
    {
        public string AccessToken { get; set; }
        public string ExpiresIn { get; set; }
        public string RefreshToken { get; set; }
    }
代码没什么 就是获取返回来的token 和有效期expresein等
2 这里我用了本方法 就是截取字符串,其实他是一个json对象的, 同学们可以使用json解析工具,对他进行解析
获得了这三个之后 我们再来获得openid
string openID = GetOpenID(qqOauthInfo);
方法如下
        /// <summary>
        /// 获取QQ账号的OpenID
        /// </summary>
        /// <param name="qqOauthInfo"></param>
        /// <returns></returns>
        private string GetOpenID(QQOauthInfo qqOauthInfo)
        {
            string res = LoadHtmlUserGetType("https://graph.qq.com/oauth2.0/me?access_token=" + qqOauthInfo.AccessToken, Encoding.UTF8);
            if (!res.Contains("openid"))
            {
                WriteErrMsg("出错了:获取用户的openid出错");
            }
            return CutString(res, @"openid"":""", @"""}");
        }
很简单 就是继续请求一个地址 然后再截取出openid
有了openid后,我们继续获取用户名
string nickName = GetUserInfo(qqOauthInfo, openID);

方法如下
        /// <summary>
        /// 获取QQ昵称
        /// </summary>
        /// <param name="qqOauthInfo"></param>
        /// <param name="openID"></param>
        /// <returns></returns>
        private string GetUserInfo(QQOauthInfo qqOauthInfo, string openID)
        {
            string urlGetInfo = string.Format(@"https://graph.qq.com/user/get_user_info?access_token={0}&oauth_consumer_key={1}&openid={2}", qqOauthInfo.AccessToken, qqSettingConfig.APPID, openID);
            string resUserInfo = LoadHtmlUserGetType(urlGetInfo, Encoding.UTF8);
            if (!resUserInfo.Contains("\"msg\": \"\""))
            {
                WriteErrMsg("出错了:获取用户信息出错");
            }
            return CutString(resUserInfo, @"""nickname"": """, @""",");
        }
也是一样 请求一个地址 然后截取出nickname
有了这个nickname后 我们就可以 进行下一步操作了
if (string.IsNullOrEmpty(nickName))
                    {
                        ShowError("获取不到昵称");
                    }
                    #region 开始进行注册或者登录
                    OauthUserModel oauthUserModel = BLL.OauthUserBll.GetInfoByOpenId("qq", openID);
                    if (!oauthUserModel.IsNull)
                    {
                        //已经绑定过则登录
                        DealLogin(oauthUserModel);
                    }
                    else
                    {
                        //进行绑定
                        this.TxtRegUserName.Text = nickName;
                        this.hidenNiName.Value = nickName;
                        this.hidenOpenID.Value = openID;
                        this.LabelNiName.Text = nickName;
                        this.LabelOpenID.Text = openID;
                    }
                    #endregion
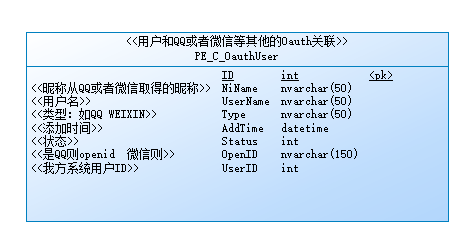
比如 我们先检查我们的数据库 改账号是否已经绑定过了,注意 我们要保存openid 来判断 因为openid是唯一标记这个QQ账号的 用户名是不能标记的
BLL.OauthUserBll.GetInfoByOpenId("qq", openID);
为了统一一张表,方便以后扩展其他的登录整合 这里加了个“qq”的标志字段
这张表的sql语句如下:
if exists(
   select 1 from sys.systable
   where table_name='PE_C_OauthUser'
     and table_type in ('BASE', 'GBL TEMP')
) then
    drop table PE_C_OauthUser
end if;

/*==============================================================*/
/* Table: PE_C_OauthUser                                        */
/*==============================================================*/
create table PE_C_OauthUser
(
   ID                   int                            not null,
   NiName               nvarchar(50)                   null,
   UserName             nvarchar(50)                   null,
   Type                 nvarchar(50)                   null,
   AddTime              datetime                       null,
   Status               int                            null,
   OpenID               nvarchar(150)                  null,
   UserID               int                            null,
   constraint PK_PE_C_OAUTHUSER primary key clustered (ID)
);

comment on table PE_C_OauthUser is
'用户和QQ或者微信等其他的Oauth关联';

comment on column PE_C_OauthUser.ID is
'主键ID';

comment on column PE_C_OauthUser.NiName is
'昵称从QQ或者微信取得的昵称';

comment on column PE_C_OauthUser.UserName is
'我方系统用户名';

comment on column PE_C_OauthUser.Type is
'类型:如QQ WEIXIN';

comment on column PE_C_OauthUser.AddTime is
'添加时间';

comment on column PE_C_OauthUser.Status is
'状态';

comment on column PE_C_OauthUser.OpenID is
'是QQ则openid  微信则';

comment on column PE_C_OauthUser.UserID is
'我方系统用户ID';

if exists(
   select 1 from sys.systable
   where table_name='PE_C_OauthUser'
     and table_type in ('BASE', 'GBL TEMP')
) then
    drop table PE_C_OauthUser
end if;

/*==============================================================*/
/* Table: PE_C_OauthUser                                        */
/*==============================================================*/
create table PE_C_OauthUser
(
   ID                   int                            not null,
   NiName               nvarchar(50)                   null,
   UserName             nvarchar(50)                   null,
   Type                 nvarchar(50)                   null,
   AddTime              datetime                       null,
   Status               int                            null,
   OpenID               nvarchar(150)                  null,
   UserID               int                            null,
   constraint PK_PE_C_OAUTHUSER primary key clustered (ID)
);

comment on table PE_C_OauthUser is
'用户和QQ或者微信等其他的Oauth关联';

comment on column PE_C_OauthUser.ID is
'主键ID';

comment on column PE_C_OauthUser.NiName is
'昵称从QQ或者微信取得的昵称';

comment on column PE_C_OauthUser.UserName is
'我方系统用户名';

comment on column PE_C_OauthUser.Type is
'类型:如QQ WEIXIN';

comment on column PE_C_OauthUser.AddTime is
'添加时间';

comment on column PE_C_OauthUser.Status is
'状态';

comment on column PE_C_OauthUser.OpenID is
'是QQ则openid  微信则';

comment on column PE_C_OauthUser.UserID is
'我方系统用户ID';

如果发现已经绑定了 则直接登录就可以了
if (!oauthUserModel.IsNull)
                    {
                        //已经绑定过则登录
                        DealLogin(oauthUserModel);
                    }
登录的方法 根据你自己系他来实现
否则的话 就将这些nickname 等信息 写到textbox hidden等控件中 让用户来进行操作
 //进行绑定
                        this.TxtRegUserName.Text = nickName;
                        this.hidenNiName.Value = nickName;
                        this.hidenOpenID.Value = openID;
                        this.LabelNiName.Text = nickName;

                        this.LabelOpenID.Text = openID;
用户可以选择两种方式 进行
一种是注册新的账号,然后绑定 ,另外一种是绑定已经注册的账号

这两种方式 都需要输入密码 第一种要输入两次 需要实现 同时注册 同时添加到绑定表 就是上面的表 另外一种就是直接插入绑定表就可以了
这里面的代码 就不贴出来了,用户根据自己的办法来实现
绑定新账号 的方式 就是先注册一个 然后插入绑定表 然后登录
绑定已有账号的方式 就先判断密码是否正确 正确就插入绑定表 然后登录
//添加到绑定表
            OauthUserModel oauthUserModelNew = new OauthUserModel();
            oauthUserModelNew.AddTime = DateTime.Now;
            oauthUserModelNew.NiName = this.hidenNiName.Value;
            oauthUserModelNew.OpenID = this.hidenOpenID.Value;
            oauthUserModelNew.Status = 1;
            oauthUserModelNew.Type = "qq";
            oauthUserModelNew.UserID = usersInfo.UserId;
            oauthUserModelNew.UserName = usersInfo.UserName;
            if (!BLL.OauthUserBll.Add(oauthUserModelNew))
            {
                ShowError("绑定失败");
            }
感谢阅读,希望对你有帮助,更多资料 可以加群讨论的....


