SVG图形引用、裁切、蒙版
SVG图形引用、裁切、蒙版,使用三个标签:
1. <use>标签创建图形引用
2. <clipPath>标签裁切图形
3. <mask>标签创建蒙版
<use>标签
<use>标签使用URI引用一个<g>,<svg>或其他具有一个唯一的ID属性和重复的图形元素。复制的是原始的元素,因此文件中的原始存在只是一个参考,原始影响到所有副本的任何改变。
<use>标签,使用xlink:href属性引用图形,xlink:href="#id" 。
例子:
<!DOCTYPE html>
<html>
     <head>
          <meta charset="UTF-8">
          <meta http-equiv="X-UA-Compatible" content="IE=edge,chrome=1">
          <meta name="viewport" content="width=device-width, initial-scale=1.0">
          <title>SVG-demo</title>
          <style>
               html,body{
                    width:100%;
                    height:100%;
                    margin:0;
                    padding:0;
               }
          </style>
     </head>
<body>
<svg width="100%" height="100%" version="1.1" xmlns="http://www.w3.org/2000/svg">
     <rect id="rU" x="0" y="0" width="100" height="100" fill="red" />
     <text x="50" y="50" text-anchor="middle" fill="white">原型</text>
     <use xlink:href="#rU" y="120"/>
     <text x="50" y="180" text-anchor="middle" fill="white">简单引用</text>
     <use xlink:href="#rU" y="240" fill="green"/>
     <text x="50" y="300" text-anchor="middle" fill="white">改fill绿色</text>
     <use xlink:href="#rU" x="120" y="0" width="50" height="50"/>
     <text x="170" y="50" text-anchor="middle" fill="white">设小宽高</text>
     <use xlink:href="#rU" x="120" y="120" width="200" height="200"/>
     <text x="170" y="180" text-anchor="middle" fill="white">设大宽高</text>
     <use xlink:href="#rU" x="120" y="240" style="background:green;"/>
     <text x="170" y="300" text-anchor="middle" fill="white">设置样式</text>
     <use xlink:href="#rU" x="240" y="0" stroke="blue" stroke-width="2" />
     <text x="290" y="50" text-anchor="middle" fill="white">额外边框</text>
</svg>
</body>
</html>
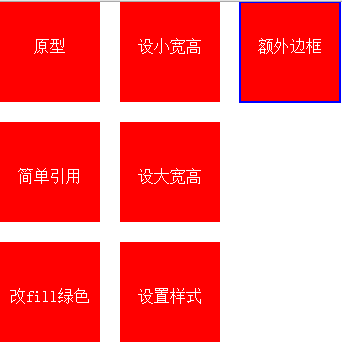
效果:

结论:
从上面代码可以得出,原型已经设置的属性,引用会继承,并且不能覆盖,除了x、y。所以想引用能够设某个属性,那原型就不能设置。
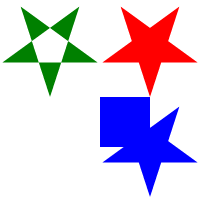
这个属性用于确定哪些点是属于裁剪路劲内部的点。对于简单的封闭图形,这个很好判定,但是对于复杂的内部有洞的图形,就有区别了。这个属性的取值与fill-rule的取值含义是一样的。
<svg width="100%" height="100%" version="1.1" xmlns="http://www.w3.org/2000/svg">
     <defs>
          <clipPath id="c-star">
               <polygon points="150 100 179.389 9.54915 102.447 65.4509
             197.533 65.4509 120.611 9.54915"/>
          </clipPath>
          <clipPath id="c-star-rule">
               <polygon points="150 100 179.389 9.54915 102.447 65.4509 197.533
                   65.4509 120.611 9.54915" transform="translate(-100)" clip-rule="evenodd"/>
          </clipPath>
          <clipPath id="c-two-grap">
               <polygon points="150 100 179.389 9.54915 102.447 65.4509
             197.533 65.4509 120.611 9.54915" transform="translate(0, 100)" />
               <rect x="100" y="100" width="50" height="50" />
          </clipPath>
     </defs>
     <rect x="100" y="0" fill="red" width="100" height="100" clip-path="url(#c-star)"/>
     <rect x="0" y="0" fill="green" width="100" height="100" clip-path="url(#c-star-rule)"/>
     <rect x="100" y="100" fill="blue" width="100" height="100" clip-path="url(#c-two-grap)"/>
</svg>

<mask>标签
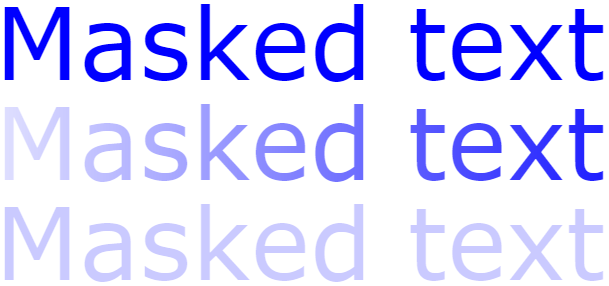
蒙板(mask)是一种容器,它定义了一组图形并将它们作为半透明的媒介,可以用来组合前景对象和背景。
裁剪路径和其他的蒙板一个重要的区别就是:裁剪路径是1位蒙板,也就是说裁剪路径覆盖的对象要么就是全透明(可见的,位于裁剪路径内部),要么就是全不透明(不可见,位于裁剪路径外部)。而蒙板可以指定不同位置的透明度。
例子:
<svg width="100%" height="100%" version="1.1" xmlns="http://www.w3.org/2000/svg">
     <defs>
          <linearGradient id="Gradient" gradientUnits="userSpaceOnUse"
        x1="0" y1="0" x2="800" y2="0">
               <stop offset="0" stop-color="white" stop-opacity="0" />
               <stop offset="1" stop-color="white" stop-opacity="1" />
          </linearGradient>
          <mask id="Mask" maskUnits="userSpaceOnUse" x="0" y="0" width="800" height="300">
               <rect x="0" y="0" width="800" height="300" fill="url(#Gradient)" />
          </mask>
          <mask id="Mask2" maskUnits="userSpaceOnUse" x="0" y="0" width="800" height="300">
               <rect x="0" y="0" width="800" height="300" fill="red" />
          </mask>
          <text id="Text" x="400" y="200" font-family="Verdana" font-size="100"
        text-anchor="middle" >
               Masked text
          </text>
     </defs>
     <rect x="0" y="0" width="800" height="300" fill="none" />
     <use xlink:href="#Text" fill="blue" y="-100" />
     <use xlink:href="#Text" fill="blue" mask="url(#Mask)" />
     <use xlink:href="#Text" fill="blue" mask="url(#Mask2)" y="100" />
</svg>
效果:

结论:
蒙板的效果,基本就是根据蒙板中每个点的颜色和透明度计算出一个最终的透明度,然后在渲染对象的时候,在对象上面罩上这个带有不同透明度的蒙板层,体现出蒙板的遮挡效果。
总结
关于蒙板的,我还是有个疑问,就是这个计算透明度的具体方式。这个问题牵涉出每个点的颜色跟最终的透明度的关系,是否存在某些颜色算出的最终的透明度是一样的(我在尝试蒙板代码时,发现Mask2只要不是设置黑白,其他颜色的效果都一样)。
参考文献
1. http://www.jb51.net/html5/72268.html
2. http://blog.csdn.net/cuixiping/article/details/7848369
本文为原创文章,转载请保留原出处,方便溯源,如有错误地方,谢谢指正。


