
Java开发微信公号-----第一步:开发接入
一、工具准备
1、端口映射工具或者外网服务器
端口映射工具:ngrok(推荐,免费简单高效,能看请求状态,虽然有时不稳定,可以花个一年100的钱弄个香港vip,也比sae一天一块钱便宜)、花生壳(新建80端口现在要花生棒了,不过可以在不开客户端前提下新建80端口,然后再开客户端将端口映射,需要花6块钱弄个域名)、nat123(不推荐,别人说可以用,我用过不好用,不花钱弄域名,数字开头的域名几乎不能用,花钱比花生壳还多)。
外网服务器:新浪的sae,百度的bae。我用过新浪的sae,一天几乎一块钱,还算不错,能看日志。
2、注册公众平台订阅号(个人),服务号不面向个人。
推荐用测试号(https://mp.weixin.qq.com/debug/cgi-bin/sandbox?t=sandbox/login)进行服务号开发。
订阅号就是阉割版的服务号,用测试号开发就不会受到影响。
3、maven项目(spring+springmvc+mybatis ssm框架),也可以用其他框架做或者用servlet(servlet重写doGet方法注意下去掉super.doGet,防止能进入代码,却返回405状态码)
二、开发对接
进入测试号页面:
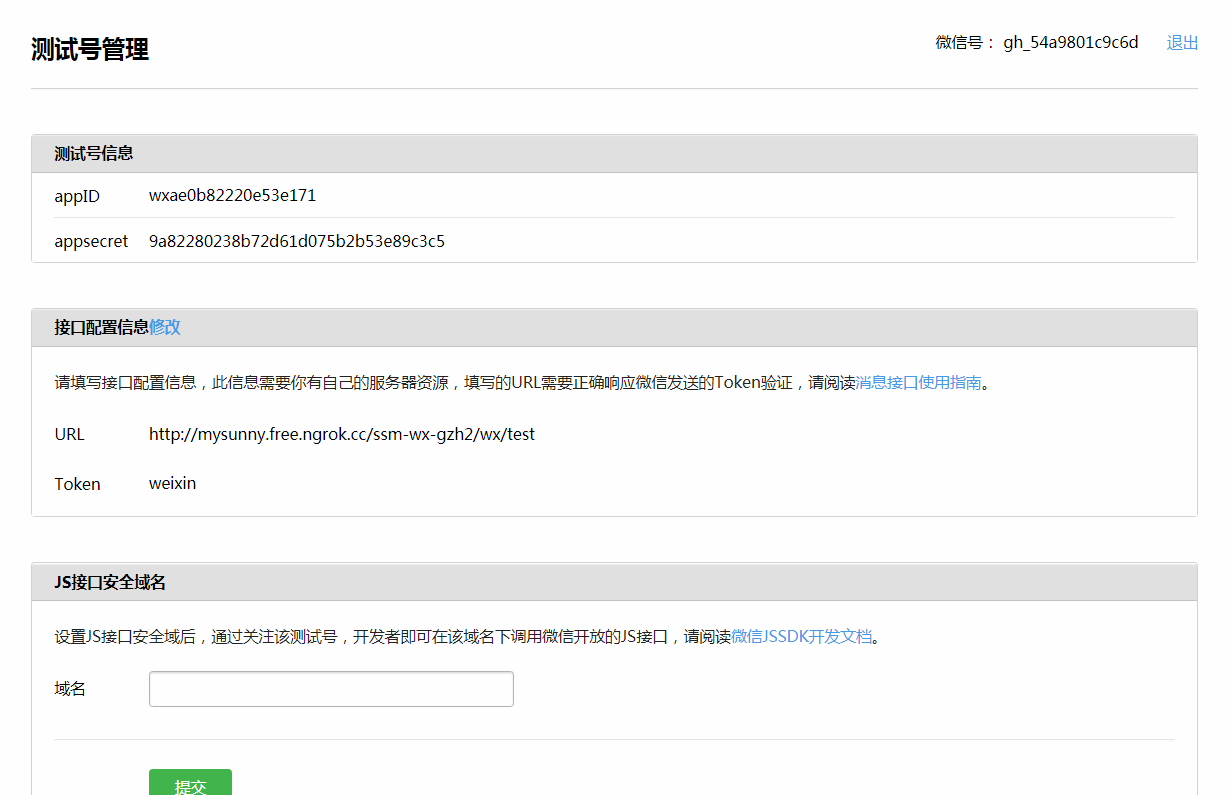
先填写

url:对应controller
token:自己随意填,只要保证java端的token也是跟这边的一样就好了。
接下来是java端代码:
先看微信规定
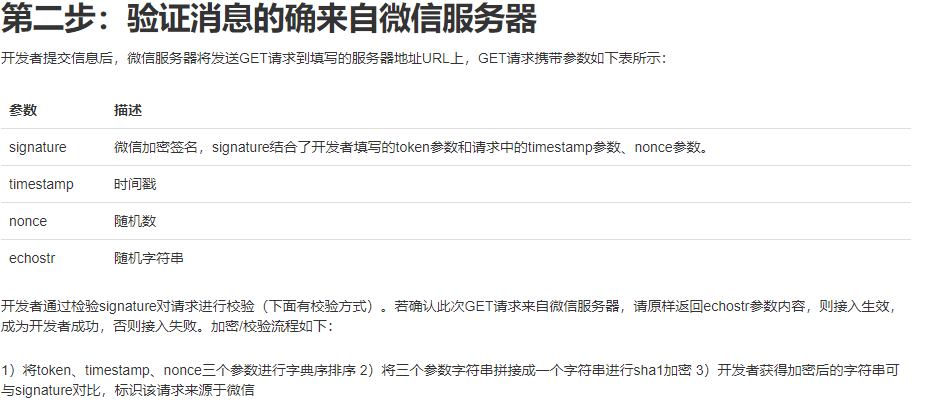
1、所以controller层需要接收4个参数,并且定义一个String类型常量token(要与页面上填写的一致)
2、将token、timestamp、nonce存入数组,用Arrays.sort的默认排序进行排序,Arrays.sort的默认排序就是字典序排序
3、然后用循环遍历数组将他们三个拼接成字符串,用这个字符串进行sha1加密
4、最后将加密后的结果和signature进行对比返回true或者false,true就是成功,原封不动返回echostr
明确了步骤接下来进行代码编写:
controller层(post请求则是消息回复,get请求是验证能不能通):
@RequestMapping(value = "test", method = { RequestMethod.GET, RequestMethod.POST })
	public void validWXURl(HttpServletRequest request, HttpServletResponse response) {
		PrintWriter out = null;
		try {
			request.setCharacterEncoding("utf-8");
			response.setCharacterEncoding("utf-8");
			out = response.getWriter();
			Boolean isGet = request.getMethod().toLowerCase().equals("get");
			if (isGet) {// get请求
				//开发接入调试
				InterfaceMethod.testWXUrlIsValid(request, response);
			} else {
				String respMessage = "异常消息";
				respMessage=InterfaceMethod.replyMessage(request,respMessage);
				System.out.println(respMessage);
				out.write(respMessage);
				out.close();
			}
		} catch (IOException e) {
			e.printStackTrace();
		}
	}
InterfaceMethod代码(执行第一步和最后一步):
public class InterfaceMethod {
	private static Logger log=Logger.getLogger(InterfaceMethod.class);

	public static void testWXUrlIsValid(HttpServletRequest request, HttpServletResponse response)
			throws UnsupportedEncodingException, IOException {
		String token="weixin";
		response.setContentType("html/text;charset=utf-8");
		String signature = request.getParameter("signature");
        String timestamp = request.getParameter("timestamp");
        String nonce = request.getParameter("nonce");
        String echostr = request.getParameter("echostr");

        PrintWriter out = response.getWriter();
        try {
        	Boolean isCorrect=CheckUtil.checkSignature(signature, token, timestamp, nonce);
			if (isCorrect) {
				System.out.println(echostr);
			    out.append(echostr);
			    out.flush();
			    out.close();
			}
		} catch (Exception e) {
			e.printStackTrace();
		}
	}
}
CheckUtil方法(执行第二步和第三步):
public class CheckUtil {
    public static boolean checkSignature(String signature,String token, String timestamp, String nonce) {
        //1.定义数组存放tooken,timestamp,nonce
        String[] arr = {token, timestamp, nonce};
        //2.对数组进行排序
        Arrays.sort(arr);
        //3.生成字符串
        StringBuffer sb = new StringBuffer();
        for (String s : arr) {
            sb.append(s);
        }
        //4.sha1加密,网上均有现成代码
        String temp = getSha1(sb.toString());
        //5.将加密后的字符串,与微信传来的加密签名比较,返回结果
        return temp.equals(signature);
    }

    public static String getSha1(String str) {
        if (str == null || str.length() == 0) {
            return null;
        }
        char hexDigits[] = {'0', '1', '2', '3', '4', '5', '6', '7', '8', '9',
            'a', 'b', 'c', 'd', 'e', 'f'};
        try {
            MessageDigest mdTemp = MessageDigest.getInstance("SHA1");
            mdTemp.update(str.getBytes("UTF-8"));
            byte[] md = mdTemp.digest();
            int j = md.length;
            char buf[] = new char[j * 2];
            int k = 0;
            for (int i = 0; i < j; i++) {
                byte byte0 = md[i];
                buf[k++] = hexDigits[byte0 >>> 4 & 0xf];
                buf[k++] = hexDigits[byte0 & 0xf];
            }
            return new String(buf);
        } catch (Exception e) {
            return null;
        }
    }
}
然后以本地端口为80运行项目,同时开启ngrok端口映射,就可以接入。
点击提交之后,看浏览器F12里面network请求结果

还有ngrok控制台请求结果

说明成功了。
刚开始我用serlvet写demo,分享下我在学习过程中遇到的错误:
http://www.cnblogs.com/longLifeFrog/p/8916903.html
ps:项目的github
https://github.com/617355557/ssm-wx-gzh2.git
如有不足欢迎指出,欢迎转载!

