

linux安装nginx
可部署集群 静态页面
下载Nginx地址
https://nginx.org/en/download.html
http://nginx.org/download/nginx-1.15.2.tar.gz
pcre:https://sourceforge.net/projects/pcre/files/pcre/
安装gcc
要用 apt-get install 来装,说明是 ubuntu/debian之类的linux发行版
apt-get install build-essential
gcc –v 打印出gcc的版本信息
使用:gcc -o test test.c 就会编译test.c,生成可执行文件 test
然后 ./test 就会运行test
把你的源文件先保存在linux机器上,比方说放到了 /home/yourname/aaa
那你要先 cd /home/yourname/aaa
然后再 gcc -o test test.c
ububtu平台编译环境可以使用以下指令
apt-get install build-essential
apt-get install libtool
centos平台编译环境使用如下指令
安装make:
yum -y install gcc automake autoconf libtool make
yum -y install make zlib zlib-devel gcc-c++ libtool openssl openssl-devel
测试1:
Installed:
libtool.x86_64 0:2.4.2-22.el7_3
测试2:
Total download size: 564 k
Installed size: 1.9 M
Downloading Packages:
libtool-2.2.6-15.5.el6.x86_64.rpm | 564 kB 00:00
Running rpm_check_debug
Running Transaction Test
Transaction Test Succeeded
Running Transaction
Installing : libtool-2.2.6-15.5.el6.x86_64 1/1
Verifying : libtool-2.2.6-15.5.el6.x86_64 1/1
Installed:
libtool.x86_64 0:2.2.6-15.5.el6
Complete!
安装g++:
yum install gcc gcc-c++
[root@192-168-6-42 tools]# yum install gcc gcc-c++
Loaded plugins: fastestmirror
Loading mirror speeds from cached hostfile
* base: mirrors.aliyun.com
* extras: mirrors.aliyun.com
* updates: mirrors.aliyun.com
Package gcc-4.8.5-28.el7_5.1.x86_64 already installed and latest version
Package gcc-c++-4.8.5-28.el7_5.1.x86_64 already installed and latest version
Nothing to do
(测试1,测试2)
一、选定安装文件目录
可以选择任何目录,本文选择 cd /usr/local/src cd /data/tools
cd /data/tools
二、安装PCRE库
ftp://ftp.csx.cam.ac.uk/pub/software/programming/pcre/ 下载最新的 PCRE 源码包,使用下面命令下载编译和安装 PCRE 包:(本文参照下载文件版本:pcre-8.39.tar.gz 经过验证未发现这个版本,若想下载最新版本请打开上面网址。本文选择pcre-8.42.tar.gz)
cd /data/tools
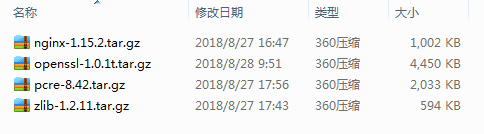
wget ftp://ftp.csx.cam.ac.uk/pub/software/programming/pcre/pcre-8.42.tar.gz
tar -zxvf pcre-8.42.tar.gz
换目录:mv /data/tools/pcre-8.42 /data/env
cd pcre-8.42
./configure
make
make install
make结果:
make[1]: Leaving directory `/data/env/pcre-8.42'
[root@iz2zedcpa52dllcphh40o7z pcre-8.42]# pcre-config --version
8.42
三、安装zlib库
http://zlib.net/zlib-1.2.11.tar.gz 下载最新的 zlib 源码包,使用下面命令下载编译和安装 zlib包:(本文参照下载文件版本:zlib-1.2.8.tar.gz 经过验证未发现这个版本,若想下载最新版本请打开上面网址。本文选择zlib-1.2.11.tar.gz )
cd /data/tools
wget http://zlib.net/zlib-1.2.11.tar.gz
tar -zxvf zlib-1.2.11.tar.gz
换目录:mv /data/tools/zlib-1.2.11 /data/env/
cd zlib-1.2.11
./configure
make
make install
rm -f /usr/local/lib/libz.a
cp libz.a /usr/local/lib
chmod 644 /usr/local/lib/libz.a
cp libz.so.1.2.11 /usr/local/lib
chmod 755 /usr/local/lib/libz.so.1.2.11
rm -f /usr/local/share/man/man3/zlib.3
cp zlib.3 /usr/local/share/man/man3
chmod 644 /usr/local/share/man/man3/zlib.3
rm -f /usr/local/lib/pkgconfig/zlib.pc
cp zlib.pc /usr/local/lib/pkgconfig
chmod 644 /usr/local/lib/pkgconfig/zlib.pc
rm -f /usr/local/include/zlib.h /usr/local/include/zconf.h
cp zlib.h zconf.h /usr/local/include
chmod 644 /usr/local/include/zlib.h /usr/local/include/zconf.h
四、安装openssl(某些vps默认没装ssl)
cd /data/tools
wget https://www.openssl.org/source/openssl-1.0.1t.tar.gz
tar -zxvf openssl-1.0.1t.tar.gz
( openssl-1.1.1-pre9.tar.gz )
五、安装nginx
Nginx 一般有两个版本,分别是稳定版和开发版,您可以根据您的目的来选择这两个版本的其中一个,下面是把 Nginx 安装到 /usr/local/nginx 目录下的详细步骤:
重点:nginx 必须安装在/usr/local/nginx 下 ,就算不安装在这,默认也会这。
cd /usr/local/nginx
wget http://nginx.org/download/nginx-1.15.2.tar.gz
tar -zxvf nginx-1.15.2.tar.gz
cd nginx-1.15.2

./configure

make  make[1]: Leaving directory `/data/env/nginx-1.15.2'

make install  make[1]: Leaving directory `/usr/local/nginx/nginx-1.15.2'
make[1]: Leaving directory `/data/env/nginx'
注:这里可能会出现报错

ubuntu下
apt-get install openssl
apt-get install libssl-dev
centos下
yum -y install openssl openssl-devel
下面是把 Nginx 安装到 /data/evn/nginx 目录下的详细步骤:
cd /data/tools/
wget http://nginx.org/download/nginx-1.4.2.tar.gz
tar -zxvf nginx-1.4.2.tar.gz
cd nginx-1.4.2
./configure --sbin-path=/data/env/nginx/nginx \
--conf-path=/data/env/nginx/nginx.conf \
--pid-path=/data/env/nginx/nginx.pid \
--with-http_ssl_module \
--with-pcre=/data/tools/pcre-8.21 \
--with-zlib=/data/tools/zlib-1.2.8 \
--with-openssl=/data/tools/openssl-1.0.1c
./configure --sbin-path=/home/nginx/nginx \
--conf-path=/home/nginx/nginx.conf \
--pid-path=/home/nginx/nginx.pid \
--with-http_ssl_module \
--with-pcre=/home/tools/pcre-8.42 \
--with-zlib=/home/tools/zlib-1.2.11 \
--with-openssl=/home/tools/openssl-1.0.1t
make
make install
--with-pcre=/data/tools/pcre-8.21 指的是pcre-8.21 的源码路径。
--with-zlib=/data/tools/zlib-1.2.7 指的是zlib-1.2.7 的源码路径。
安装成功后 /data/env/nginx 目录下如下
fastcgi.conf koi-win nginx.conf.default
fastcgi.conf.default logs scgi_params
fastcgi_params mime.types scgi_params.default
fastcgi_params.default mime.types.default uwsgi_params
html nginx uwsgi_params.default
koi-utf nginx.conf win-utf
六、启动nginx
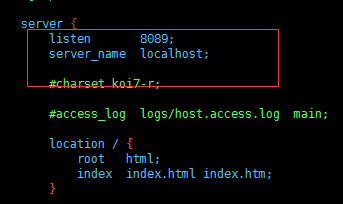
因为可能apeache占用80端口,apeache端口尽量不要修改,我们选择修改nginx端口。
linux 修改路径/usr/local/nginx/conf/nginx.conf,Windows 下 安装目录\conf\nginx.conf。
修改端口为8090,localhost修改为你服务器ip地址。(成功就在眼前!!)172.28.20.156
启动nginx
netstat -ano|grep 80
启动nginx服务
[root@localhost ~]# nginx安装目录 -c nginx.conf配置文件目录
安装目录: /usr/local/nginx/sbin/nginx
配置文件目录: /data/env/nginx/conf/nginx.conf
参数 “-c” 指定了配置文件的路径,如果不加 “-c” 参数,Nginx 会默认加载其安装目录的 conf 子目录中的 nginx.conf 文件
测试1:
/usr/local/nginx/sbin/nginx -c /data/env/nginx/conf/nginx.conf
测试2: 启动 ./nginx
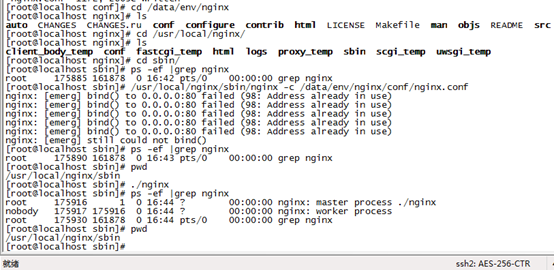
[root@192-168-6-42 ~]# ps -ef | grep nginx
root 16400 1 0 02:32 ? 00:00:00 nginx: master process /usr/local/nginx/sbin/nginx -c /data/env/nginx/conf/nginx.conf
nobody 16401 16400 0 02:32 ? 00:00:00 nginx: worker process
root 16403 13660 0 02:33 pts/1 00:00:00 grep --color=auto nginx
[root@192-168-6-42 nginx]# netstat -ano|grep 80
unix 3 [ ] STREAM CONNECTED 23680 /var/run/dbus/system_bus_socket
unix 3 [ ] STREAM CONNECTED 28070 /run/systemd/journal/stdout
unix 3 [ ] DGRAM 26804
unix 3 [ ] DGRAM 26803
unix 3 [ ] STREAM CONNECTED 19801 /run/systemd/journal/stdout
[root@192-168-6-42 nginx]#
如果查不到执行结果,则忽略上一步(ubuntu下必须用sudo启动,不然只能在前台运行)
sudo /usr/local/nginx/nginx
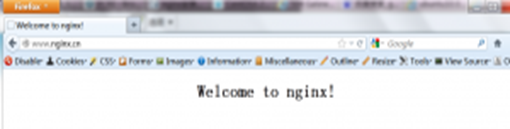
打开浏览器访问此机器的 IP,如果浏览器出现 Welcome to nginx! 则表示 Nginx 已经安装并运行成功。
-----------------------------------------------------
到这里nginx就安装完成了,如果只是处理静态html就不用继续安装了!!!
七、nginx重启、关闭、启动
启动
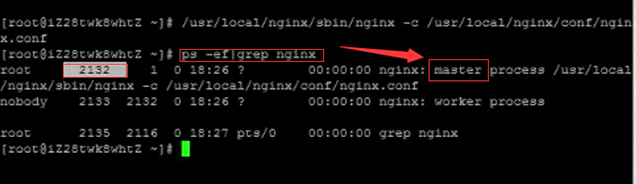
启动代码格式:nginx安装目录地址 -c nginx配置文件地址
例如:
[root@LinuxServer sbin]# /usr/local/nginx/sbin/nginx -c /usr/local/nginx/conf/nginx.conf
/usr/local/nginx/sbin/nginx -c /data/env/nginx/conf/nginx.conf
停止
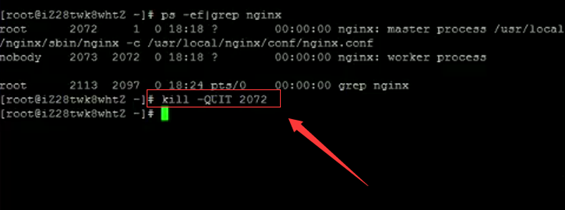
nginx的停止有三种方式:
· 从容停止
1、查看进程号
[root@LinuxServer ~]# ps -ef|grep nginx

2、杀死进程
[root@LinuxServer ~]# kill -QUIT 2072
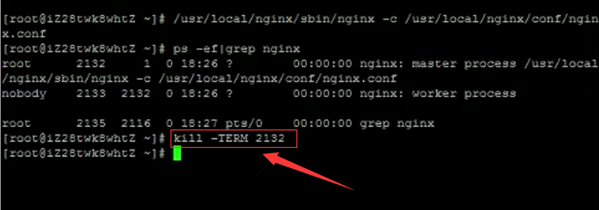
· 快速停止
1、查看进程号
[root@LinuxServer ~]# ps -ef|grep nginx
2、杀死进程
[root@LinuxServer ~]# kill -TERM 2132
或 [root@LinuxServer ~]# kill -INT 2132
· 强制停止
[root@LinuxServer ~]# pkill -9 nginx
重启
1、验证nginx配置文件是否正确
方法一:进入nginx安装目录sbin下,输入命令./nginx -t
看到如下显示nginx.conf syntax is ok
nginx.conf test is successful
说明配置文件正确!

方法二:在启动命令-c前加-t

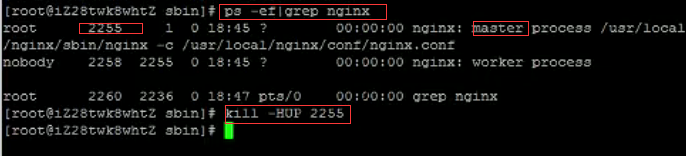
2、重启Nginx服务
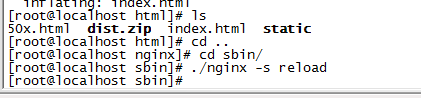
方法一:进入nginx可执行目录sbin下,输入命令 ./nginx -s reload 即可

方法二:查找当前nginx进程号,然后输入命令:kill -HUP 进程号 实现重启nginx服务
八、最终结果:

九、项目文件存放路径
放到这个文件下,创建文件夹放入就好。

错误分析:
测试2 端口占用问题:
[root@localhost conf]# netstat -nat |grep 80
tcp 0 0 :::80 :::* LISTEN
[root@localhost conf]# netstat -nat |grep 5030
tcp 0 0 :::5030 :::* LISTEN
[root@localhost conf]# netstat -nat |grep 5040
[root@localhost conf]# netstat -nat |grep 5020
[root@localhost conf]# netstat -nat |grep 22
tcp 0 0 192.168.122.1:53 0.0.0.0:* LISTEN
tcp 0 0 0.0.0.0:22 0.0.0.0:* LISTEN
tcp 0 0 10.49.1.28:22 10.60.253.253:38159 ESTABLISHED
tcp 0 52 10.49.1.28:22 10.60.253.253:40030 ESTABLISHED
tcp 0 0 :::22
yum install -y pcre pcre-devel
yum install -y zlib zlib-devel
yum install -y openssl openssl-devel
[root@192-168-6-42 nginx]# cd html/
[root@192-168-6-42 html]# ls
50x.html index.html
[root@192-168-6-42 html]# cat index.html
<!DOCTYPE html>
<html>
<head>
<title>Welcome to nginx!</title>
<style>
body {
width: 35em;
margin: 0 auto;
font-family: Tahoma, Verdana, Arial, sans-serif;
}
</style>
</head>
<body>
<h1>Welcome to nginx!</h1>
<p>If you see this page, the nginx web server is successfully installed and
working. Further configuration is required.</p>
<p>For online documentation and support please refer to
<a href="http://nginx.org/">nginx.org</a>.<br/>
Commercial support is available at
<a href="http://nginx.com/">nginx.com</a>.</p>
<p><em>Thank you for using nginx.</em></p>
</body>
</html>
[root@192-168-6-42 html]#
[root@192-168-6-42 html]# ls
50x.html index.html
[root@192-168-6-42 html]# cat 50x.html
<!DOCTYPE html>
<html>
<head>
<title>Error</title>
<style>
body {
width: 35em;
margin: 0 auto;
font-family: Tahoma, Verdana, Arial, sans-serif;
}
</style>
</head>
<body>
<h1>An error occurred.</h1>
<p>Sorry, the page you are looking for is currently unavailable.<br/>
Please try again later.</p>
<p>If you are the system administrator of this resource then you should check
the <a href="http://nginx.org/r/error_log">error log</a> for details.</p>
<p><em>Faithfully yours, nginx.</em></p>
</body>
</html>
[root@192-168-6-42 html]#
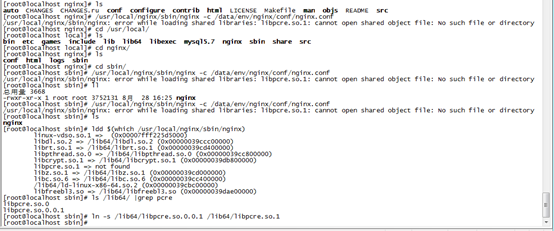
Nginx启动错误:error while loading shared libraries: libpcre.so.1
|
|
|
|
|
|
|
|
从错误提示信息可以得知是因为缺少lib文件导致,进一步查看具体内容:
|
|
|
|
|
|
|
|
|
|
|
|
|
|
|
|
|
|
|
|
|
|
|
|
|
|
|
|
|
|
|
|
|
|
|
查看结果显示 : libpcre.so.1 => not found ,同时注意lib库的路径,有/lib/* 和 /lib64/* 之分。
比如上面的是 /lib64/*,这个和下面解决问题时创建的软连接有关系
解决办法:
1、首先确认已经安装好pcre 软件(nginx 依赖该软件)
2、创建软连接
对于/lib/* 32位系统来说:
|
|
|
|
|
|
|
|
|
|
|
|
|
|
|
|
|
|
|
|
|
|
|
|
ps: 也有可能 pcre lib文件在目录:/usr/local/lib/
对于/lib64/* 64位系统来说:
|
|
|
|
|
|
|
|
|
|
|
|
|
|
|
|
|
|
|
|
|
|
|
|
