

android快捷开发之Retrofit网络加载框架的简单使用
大家都知道,安卓最大的特点就是开源化,这自然会产生很多十分好用的第三方API,而基本每一个APP都会与网络操作和缓存处理机制打交道,当然,你可以自己通过HttpUrlConnection再通过返回数据进行解析解决,而我们自己学的东西大多数情况下都没有针对网络很糟糕的情况进行优化。下面就给大家带来Square Inc这家有创新精神的公司留下的Retrofit网络加载库的使用!
项目已经同步至github:https://github.com/nanchen2251/retrofitDemo
Retrofit封装了从Web API下载数据,解析成一个普通的java对象(POJO),这里我们就去天狗网使用他们的一个菜谱的API做简单演示,供大家一起学习思考。在天狗网的API文档网站http://www.tngou.net/doc/cook的菜谱API接口:http://www.tngou.net/api/cook/list
详细使用:
1)首先得添加支持包
1 | compile 'com.squareup.retrofit2:retrofit:2.1.0' |
2)然后每一次使用都需要定义一个接口,用于下载网络数据,注意其中的{category}是为了之后更好的扩展性,我们定义一个未知的子目录,通过参数中指定可以访问固定的子目录,这个方式非常棒。
1 2 3 4 5 6 7 8 9 10 11 12 13 14 15 16 17 18 19 | package com.example.nanchen.retrofitdemo;import com.example.nanchen.retrofitdemo.json.Tngou;import retrofit2.Call;import retrofit2.http.GET;import retrofit2.http.Path;import retrofit2.http.Query;/** * Created by 南尘 on 16-7-15. */public interface Service { @GET("/")//网址下面的子目录 Call<String> getBaidu(); @GET("/api/{category}/list")//网址下面的子目录 category表示分类,因为子目录只有一点不一样 Call<Tngou> getList(@Path("category") String path,@Query("id") int id, @Query("page") int page, @Query("rows") int rows);} |
3)由于我们返回的数据为Json数据,所以我们可以用它本身自带的Gson解析方式进行返回数据的解析,同样先导入支持包
1 | compile 'com.squareup.retrofit2:converter-gson:2.1.0' |
4)我们写一个DataBean用于存放返回的数据
1 2 3 4 5 6 7 8 9 10 11 12 13 14 15 16 17 18 19 20 21 22 23 24 25 26 27 28 29 30 31 32 33 34 35 36 37 38 39 40 41 42 | package com.example.nanchen.retrofitdemo.json;import com.google.gson.annotations.SerializedName;import java.util.List;/** * Created by 南尘 on 16-7-15. */public class Tngou { //加上注解 @SerializedName("status") private boolean status; @SerializedName("total") private int total; @SerializedName("tngou") private List<Cook> list; public boolean isStatus() { return status; } public void setStatus(boolean status) { this.status = status; } public int getTotal() { return total; } public void setTotal(int total) { this.total = total; } public List<Cook> getList() { return list; } public void setList(List<Cook> list) { this.list = list; }} |
里面要放List, 是一个类,所以要新建一个类。
1 2 3 4 5 6 7 8 9 10 11 12 13 14 15 16 17 18 19 20 21 22 23 24 25 26 27 28 29 30 31 32 33 34 35 36 37 38 39 40 41 42 43 44 45 46 47 48 49 50 51 52 53 54 55 56 57 58 59 60 61 62 63 64 65 66 67 68 69 70 71 72 73 74 75 76 77 78 79 80 81 82 83 84 85 86 87 88 89 90 91 92 93 94 95 96 97 98 99 100 101 102 103 104 105 106 107 108 109 110 111 112 113 114 115 116 117 118 119 120 | package com.example.nanchen.retrofitdemo.json;import com.google.gson.annotations.SerializedName;/** * 菜谱 * Created by 南尘 on 16-7-15. */public class Cook { @SerializedName("id") private int id; @SerializedName("name") private String name;//名称 @SerializedName("food") private String food;//食物 @SerializedName("img") private String img;//图片 @SerializedName("images") private String images;//图片, @SerializedName("description") private String description;//描述 @SerializedName("keywords") private String keywords;//关键字 @SerializedName("message") private String message;//资讯内容 @SerializedName("count") private int count;//访问次数 @SerializedName("fcount") private int fcount;//收藏数 @SerializedName("rcount") private int rcount;//评论读数 public int getId() { return id; } public void setId(int id) { this.id = id; } public String getName() { return name; } public void setName(String name) { this.name = name; } public String getFood() { return food; } public void setFood(String food) { this.food = food; } public String getImg() { return img; } public void setImg(String img) { this.img = img; } public String getImages() { return images; } public void setImages(String images) { this.images = images; } public String getDescription() { return description; } public void setDescription(String description) { this.description = description; } public String getKeywords() { return keywords; } public void setKeywords(String keywords) { this.keywords = keywords; } public String getMessage() { return message; } public void setMessage(String message) { this.message = message; } public int getCount() { return count; } public void setCount(int count) { this.count = count; } public int getFcount() { return fcount; } public void setFcount(int fcount) { this.fcount = fcount; } public int getRcount() { return rcount; } public void setRcount(int rcount) { this.rcount = rcount; }} |
5)我们做一个简单演示,把返回并解析的数据放在ListView里面显示,所以自定义一个显示Item的Xml文件
1 2 3 4 5 6 7 8 9 10 11 12 13 14 15 16 17 18 19 20 21 22 23 24 25 26 27 28 29 30 31 32 33 34 35 | <?xml version="1.0" encoding="utf-8"?><LinearLayout xmlns:android="http://schemas.android.com/apk/res/android" android:orientation="horizontal" android:layout_width="match_parent" android:layout_height="wrap_content"> <ImageView android:layout_width="70dp" android:layout_height="70dp" android:src="@mipmap/ic_launcher" android:id="@+id/item_iv"/> <LinearLayout android:layout_gravity="center_vertical" android:orientation="vertical" android:layout_weight="1" android:layout_width="0dp" android:layout_height="wrap_content"> <TextView android:layout_width="match_parent" android:layout_height="wrap_content" android:text="标题" android:textAppearance="@android:style/TextAppearance.Large" android:id="@+id/item_title"/> <TextView android:layout_width="match_parent" android:layout_height="wrap_content" android:maxLines="2" android:text="abcabcacbacbacbacbacbacacacacacasdadasd" android:ellipsize="end" android:id="@+id/item_info"/> </LinearLayout></LinearLayout> |
6)主布局
1 2 3 4 5 6 7 8 9 10 11 12 13 14 15 | <?xml version="1.0" encoding="utf-8"?><RelativeLayout xmlns:android="http://schemas.android.com/apk/res/android" xmlns:tools="http://schemas.android.com/tools" android:layout_width="match_parent" android:layout_height="match_parent" tools:context="com.example.nanchen.retrofitdemo.RetrofitJsonActivity"> <ListView android:id="@+id/json_lv" android:layout_width="match_parent" android:layout_height="match_parent"> </ListView></RelativeLayout> |
7)自定义适配器,其中又用到了他们的图片加载框架picasso,我们在一个项目中最好都用一个团队的框架,这样才会让出错的几率大大降低。
当然别忘了添加支持包
1 | compile 'com.squareup.picasso:picasso:2.3.2' |
再是Adapter

 1 package com.example.nanchen.retrofitdemo.json;
 2
 3 import android.content.Context;
 4 import android.view.LayoutInflater;
 5 import android.view.View;
 6 import android.view.ViewGroup;
 7 import android.widget.BaseAdapter;
 8 import android.widget.ImageView;
 9 import android.widget.TextView;
10
11 import com.example.nanchen.retrofitdemo.R;
12 import com.squareup.picasso.Picasso;
13
14 import java.util.Collection;
15 import java.util.List;
16
17 /**
18  * Created by 南尘 on 16-7-15.
19  */
20 public class MyAdapter extends BaseAdapter {
21
22     private Context context;
23     private List<Cook> list;
24
25     public MyAdapter(Context context, List<Cook> list) {
26         this.context = context;
27         this.list = list;
28     }
29
30     @Override
31     public int getCount() {
32         if (list != null){
33             return list.size();
34         }
35         return 0;
36     }
37
38     @Override
39     public Object getItem(int position) {
40         return list.get(position);
41     }
42
43     @Override
44     public long getItemId(int position) {
45         return position;
46     }
47
48     @Override
49     public View getView(int position, View convertView, ViewGroup parent) {
50         if (convertView == null){
51             convertView = LayoutInflater.from(context).inflate(R.layout.list_item,parent,false);
52             convertView.setTag(new ViewHolder(convertView));
53         }
54         ViewHolder holder = (ViewHolder) convertView.getTag();
55         Cook cook = list.get(position);
56         holder.tv_title.setText(cook.getName());
57         holder.tv_info.setText(cook.getDescription());
58         //使用同样开发团队的Picasso支持包进行图片加载,由于接口中返回的img路径不是全的,所以需要加上网站前缀
59         Picasso.with(context).load("http://tnfs.tngou.net/img"+cook.getImg()).into(holder.iv);
60         return convertView;
61     }
62
63     public void addAll(Collection<? extends Cook> collection){
64         list.addAll(collection);
65         notifyDataSetChanged();
66     }
67
68     public static class ViewHolder{
69         private final ImageView iv;
70         private final TextView tv_title;
71         private final TextView tv_info;
72
73         public ViewHolder(View item){
74             iv = ((ImageView) item.findViewById(R.id.item_iv));
75             tv_title = ((TextView) item.findViewById(R.id.item_title));
76             tv_info = ((TextView) item.findViewById(R.id.item_info));
77         }
78     }
79 }
8)再看看Activity的代码
 1 package com.example.nanchen.retrofitdemo;
 2
 3 import android.os.Bundle;
 4 import android.support.v7.app.AppCompatActivity;
 5 import android.widget.ListView;
 6
 7 import com.example.nanchen.retrofitdemo.json.Cook;
 8 import com.example.nanchen.retrofitdemo.json.MyAdapter;
 9 import com.example.nanchen.retrofitdemo.json.Tngou;
10
11 import java.util.List;
12
13 import retrofit2.Call;
14 import retrofit2.Callback;
15 import retrofit2.Response;
16 import retrofit2.Retrofit;
17 import retrofit2.converter.gson.GsonConverterFactory;
18
19 public class RetrofitJsonActivity extends AppCompatActivity implements Callback<Tngou> {
20
21
22     private ListView lv;
23
24     @Override
25     protected void onCreate(Bundle savedInstanceState) {
26         super.onCreate(savedInstanceState);
27         setContentView(R.layout.activity_retrofit_json);
28
29         Retrofit retrofit = new Retrofit.Builder().baseUrl("http://www.tngou.net")
30                 .addConverterFactory(GsonConverterFactory.create()).build();
31         Service service = retrofit.create(Service.class);
32         Call<Tngou> call = service.getList("cook",0, 1, 20);
33         call.enqueue(this);
34         lv = (ListView) findViewById(R.id.json_lv);
35
36     }
37
38     @Override
39     public void onResponse(Call<Tngou> call, Response<Tngou> response) {
40         List<Cook> list = response.body().getList();
41         lv.setAdapter(new MyAdapter(this,list));
42     }
43
44     @Override
45     public void onFailure(Call<Tngou> call, Throwable t) {
46
47     }
48 }
最后上一波运行图

2016年8月1日补充
————————————————————————————————————————————————
下面带来一些2.0版本后需要注意的问题。
1)Retrofit 2.0版本后趋向于在baseUrl中以“/”结尾,@Url不要以“/”开头,这样更专业。额,其实你还可以把整个地址放在接口中去,这样baseUrl就忽略了。
1 Retrofit retrofit = new Retrofit.Builder().baseUrl("http://www.tngou.net/")
2                 .addConverterFactory(GsonConverterFactory.create()).build();
2)Retrofit的事务可以在之后立即取消,只需要调用call.cancel()即可,好简单哈哈。
3)官方提供了好几种ConverterFactory,适合你的才是最好的,自己去选择吧~
Gson: com.squareup.retrofit:converter-gson
Jackson: com.squareup.retrofit:converter-jackson
Moshi: com.squareup.retrofit:converter-moshi
Protobuf: com.squareup.retrofit:converter-protobuf
Wire: com.squareup.retrofit:converter-wire
Simple XML: com.squareup.retrofit:converter-simplexml
4)额,你还可以选择实现Converter.Factory接口来自定义一个converter,啦啦啦。
5)oh,no,遇到服务器返回的时间格式很奇葩怎么办?哈哈,其实你完全可以通过GsonBuilder().create()创建一个gson对象作为Converter的参数来实现自定义Gson对象呀。
1  //需要使用的时候放到GsonConverterFactory.create(gson)中作为参数即可。
2         Gson gson = new GsonBuilder().setDateFormat("yyyy-MM-dd  HH:mm:ss").create();
3
4
5
6         Retrofit retrofit = new Retrofit.Builder().baseUrl("http://www.tngou.net/")
7                 .addConverterFactory(GsonConverterFactory.create(gson)).build();
6)之前有的小伙伴会问为什么我们在Demo中用call.enqueue而没有用execute,这是因为我们一般都选择用enqueue,这样会默认在异步线程中执行,少写一个线程,何乐而不为呢?
7)额,之前Demo没有对Retrofit 2.0 的注解方式进行完善的整理,这里给大家带来一些更详细的东西。
8)首先带来http的请求方法:
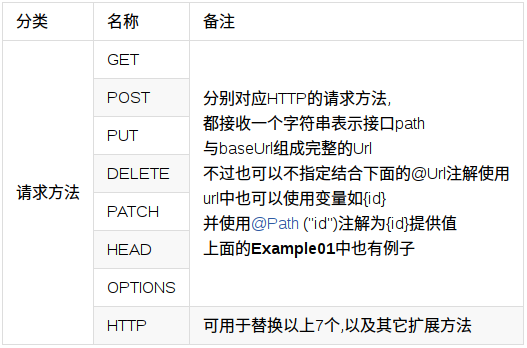
我们一般常用的就是GET请求和POST请求,当然你或许会用到http的其他注解方式,值得注意的是HTTP注解方式可以涵盖上面的任意一种注解。
而它有三个属性:method,path,hasBody。
9)再带来标记类
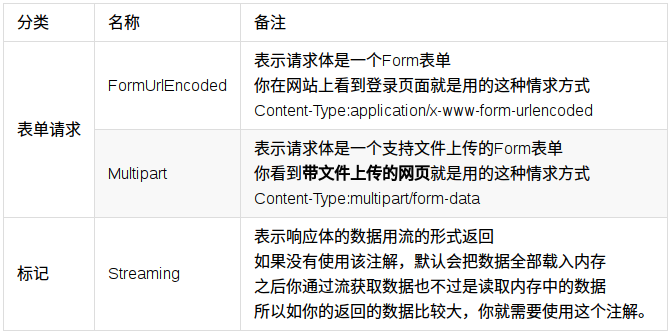
额,上面的这个表单请求,我相信在post请求中用的不少吧,你值得尝试。
10)当然就少不了我们的参数类咯,图片来源于网络。
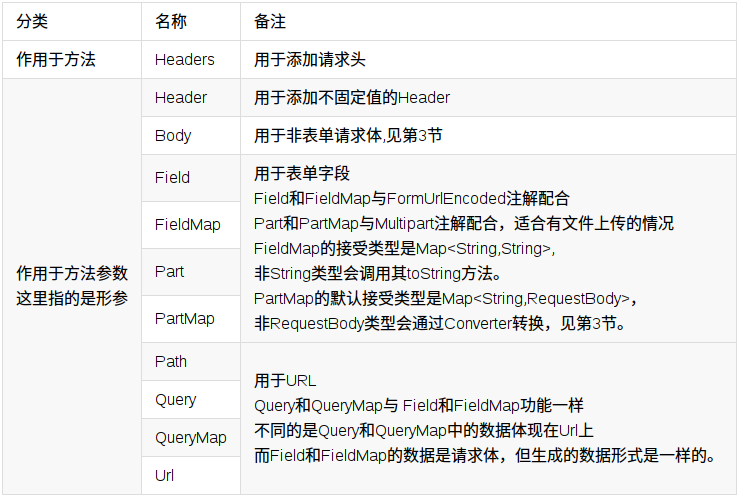
这里值得注意的是:
{占位符}和path都尽量出现在Url的path部分,url中的参数使用Query和QueryMap代替,保证接口定义的简洁。
另外,Query,Field和Part都支持数组和实现了Iterable接口的类型,如List,Set等,方便向后台传递数组。
好了,这个强大的Retrofit就补充到这里了,大家可以自行补充。
作 者:
南 尘
出 处: http://www.cnblogs.com/liushilin/
关于作者:专注于移动前端的项目开发。如有问题或建议,请多多赐教!欢迎加入Android交流群:118116509
版权声明:本文版权归作者和博客园共有,欢迎转载,但未经作者同意必须保留此段声明,且在文章页面明显位置给出原文链接。
特此声明:所有评论和私信都会在第一时间回复。也欢迎园子的大大们指正错误,共同进步。或者直接私信我
声援博主:如果您觉得文章对您有帮助,可以点击文章下部【推荐】或侧边【关注】。您的鼓励是作者坚持原创和持续写作的最大动力!
欢迎关注我的公众号,精讲面试、算法、Andrid、Java、Python,旨在打造全网最比心的公众号。


【推荐】国内首个AI IDE,深度理解中文开发场景,立即下载体验Trae
【推荐】编程新体验,更懂你的AI,立即体验豆包MarsCode编程助手
【推荐】抖音旗下AI助手豆包,你的智能百科全书,全免费不限次数
【推荐】轻量又高性能的 SSH 工具 IShell:AI 加持,快人一步
· 如何编写易于单元测试的代码
· 10年+ .NET Coder 心语,封装的思维:从隐藏、稳定开始理解其本质意义
· .NET Core 中如何实现缓存的预热?
· 从 HTTP 原因短语缺失研究 HTTP/2 和 HTTP/3 的设计差异
· AI与.NET技术实操系列:向量存储与相似性搜索在 .NET 中的实现
· 周边上新:园子的第一款马克杯温暖上架
· Open-Sora 2.0 重磅开源!
· 分享 3 个 .NET 开源的文件压缩处理库,助力快速实现文件压缩解压功能!
· Ollama——大语言模型本地部署的极速利器
· [AI/GPT/综述] AI Agent的设计模式综述