mtools-你可能没用过的mongodb神器
前言
接触 mongodb 已经有一段时间了,从一开始的不了解,到现在已慢慢适应这个nosql领域的佼佼者,还是经历了不少波折。
在进行数据库选型的时候,许多人总是喜欢拿 mongodb和mysql、oracle做比较,并总结出一套非常详尽的分析结果。
但是这种分析往往改变不了管理者(或是架构师)的决策。因为往往在决定使用某种技术之前,管理者可能已经有了答案,而分析对比则是为了让决策更加笃定,更有依据。
尽管这个说法有些令人沮丧,但现实中确实如此。
众所周知的是,mongodb不是关系型数据库,不遵循经典的"三个范式",也没有表关联、事务(直到最新的4.0版本才实现)等传统数据库的特性。
然而mongodb自带的无schema、副本集、自动分片等能力获得了大量的青睐,而更值得一提的是数据库本身提供了大量的监控、分析工具命令,对运维管理提供了很大的便利性。
既然谈到了工具,本文要介绍的是一款叫mtools的工具。在此段期间,笔者一直在组织线上数据库日志的收集分析,由于没有较好的工具支撑,每次的分析工作总需要投入大量的人力。
在这种情况下,mtools 便可以帮助于大幅度提升效率,下面的篇幅开始介绍这个工具。
mtools是什么
mtools 是由MongoDB 官方工程师实现的一套工具集,可以很快速的日志查询分析、统计功能,此外还支持本地集群部署管理,非常便于新手学习。
github地址,该套工具非官方公司维护,仅由作者做开源维护,目前项目的更新频度并不高,但已经有大量的使用者。
mtools使用python编写完成,可通过pipy网站 获取;
该工具包含了以下几个关键组件
mlaunch
支持快速搭建本地测试环境,可以是单机、副本集、分片集群。
mlogfilter
日志过滤组件,支持按时间检索慢查询、全表扫描操作,支持通过多个属性进行信息过滤,支持输出为JSON格式。
mplotqueries
支持将日志分析结果转换为图表形式,依赖于tkinter(python图形模块)、和matplotlib模块。
mlogvis
支持将日志分析结果转换为一个独立的HTML页面,实现与mplotqueries同样的功能。
网上关于mtools的资料已经不少,包括其官方文档的说明都比较详细,这里仅对工具的使用场景做简单介绍
可以做什么
1. 简易集群管理
执行以下命令,可以启动一个单节点的mongod进程。
# mlaunch init --single
launching: "mongod" on port 27017
可对比单节点手工搭建
再执行另外一个稍复杂点的命令:
# mlaunch init --sharded 2 --replicaset --nodes 3 --config 3 --csrs --mongos 3 --port 27050 --auth --username admin --password admin@2016 --auth-db admin
launching: "mongod" on port 27053
launching: "mongod" on port 27054
launching: "mongod" on port 27055
launching: "mongod" on port 27056
launching: "mongod" on port 27057
launching: "mongod" on port 27058
launching: config server on port 27059
launching: config server on port 27060
launching: config server on port 27061
replica set 'configRepl' initialized.
replica set 'shard01' initialized.
replica set 'shard02' initialized.
launching: mongos on port 27050
launching: mongos on port 27051
launching: mongos on port 27052
adding shards. can take up to 30 seconds...
Username "admin", password "admin@2016"
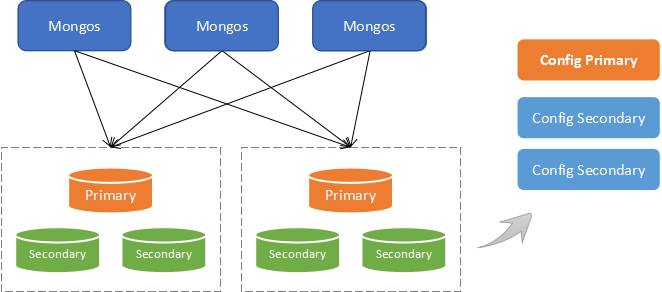
什么?已经完成了一个双副本集分片集群的搭建!27050是起始端口,--sharded 2 表示有两个分片,--replicaset 表示启用副本集,
--config 3 --csrs 表示config 使用CSRS结构的3节点副本集,--auth 表示启用鉴权, --username --password 为初始化的用户,默认该用户将拥有所有库的管理权限。
整个集群的架构如下图所示:
可以通过以下命令进行管理
]# mlaunch list
PROCESS PORT STATUS PID
()
mongos 27050 running 13017
mongos 27051 running 13059
mongos 27052 running 13093
()
config server 27059 running 12134
config server 27060 running 12217
config server 27061 running 12261
()
shard01
    primary 27053 running 12404
    secondary 27055 running 12559
    mongod 27054 running 12509
()
shard02
    secondary 27057 running 12793
    secondary 27058 running 12845
    mongod 27056 running 12697
()
()
 auth: "admin:admin@2016"
启动停止
# mlaunch stop
sent signal 15 to 12 processes.
# mlaunch start
launching: config server on port 27059
...
这是相当方便的,可以对比分布式集群搭建手记 这篇文章所描述的流程,相比手工搭建,该工具可缩减几十倍时间。
2. 日志统计
mloginfo 是一个用于做日志信息统计的工具,输入以下命令:
# mloginfo mongo.log
     source: mongo.log
       host: MongoDB_1:10001
        start: 2018 May 18 16:33:11.692
        end: 2018 May 19 01:13:08.290
date format: iso8601-local
     length: 144480
     binary: mongod
    version: 3.4.10
    storage: wiredTiger
可以看到日志的起止时间范围、主机端口、版本、数据库引擎等概要信息。
连接数
当我们希望检查客户端的连接数情况时,可以执行以下命令:
# mloginfo mongo.log --connections
CONNECTIONS
     total opened: 14282
     total closed: 14358
    no unique IPs: 4
socket exceptions: 0
127.0.0.1 opened: 12886 closed: 12889
172.21.0.29 opened: 658 closed: 716
172.21.0.28 opened: 461 closed: 490
172.21.0.27 opened: 277 closed: 263
通过这样的信息,进一步判断是否存在连接过载等异常情况。
事件统计
又或者,你希望统计出当前某些事件的发生频次。
# mloginfo mongo.log --distinct
DISTINCT
   14358 end connection ... ( ... now open)
   14281 connection accepted from ... # ... ( ... now open)
   13075 received client metadata from ... :
    5340 Successfully authenticated as principal ... on
    1194 Use of the aggregate command without the 'cursor'
     338 build index on: ... properties:
     244 building index using bulk method; build may temporarily use up to ... megabytes of RAM
     234 ns: ... key: ... name:
     219 Refreshing chunks for collection ... based on version
     218 Refresh for collection ... took ... ms and found version
     179 Index ... :
慢查询
在业务问题分析中,慢查询是最常见的问题。
# mloginfo mongo.log --queries --sort count
QUERIES
namespace                  operation      pattern                              count      min (ms)    max (ms)  mean (ms)    95%-ile (ms) sum (ms)
nsspace.StatisticsHour   find             {"$and": [{"recordTime": 1}]..}     22331      276       747          345          414.0            7720736
nsspace.StatisticsHour   getmore       {"aggregate": 1, "cursor": ...}]}    231          200      304          227          272.0             52587
dmspace.DeviceInfo      remove          {"_id": 1}                              109        205      1786          420          771.0            45860
cmspace.DeviceData     update          {"appId": 1, "deviceId": 1}          95          201      1802          431          824.5            40966
dmspace.TaskHistory    update          {"_id": 1}                                54          268      2643          692          2019.0          37413
nsspace.StatisticsDay     find              {"$and": [{"recordTime": 1}], ..}   31          201      348            241          345.0            7472
如上面的命令,将显示所有慢查询,并按出现次数排序。
重启信息
# mloginfo mongo.log --restart
RESTARTS
   May 18 21:37:51 version 3.4.10
   May 18 21:48:33 version 3.4.10
通过检测重启信息,对系统潜在的故障进行评估分析。
副本集切换
同样,主备切换可能导致一定的业务失败,需要定期监测。
# mloginfo mongo.log --rsstate
RSSTATE
date host state/message
()
May 18 21:48:53 172.21.0.29:10001 ARBITER
May 18 21:49:26 172.21.0.28:10001 SECONDARY
3. 日志过滤
mlogfilter是一个强大的日志过滤模块,相比linux 的grep/egrep的文本过滤,该组件可以对日志内容进行解析,并按我们想要的结果进行过滤。
查看超过10s的慢操作
# mlogfilter mongo.log --slow 10000 --shorten 200
2018-05-18T21:49:04.069+0800 I REPL [ReplicationExecutor] Starting an election, since we've seen no PRIMARY in the past 10000ms
2018-05-18T21:50:22.988+0800 I COMMAND [conn31] command dmspace.fs.chunks appName: "Mong...quireCount: { w: 46 } }, oplog: { acquireCount: { w: 46 } } } protocol:op_command 10804ms
2018-05-18T21:50:22.988+0800 I COMMAND [conn44] command dmspace.DeviceInfo command: inse...quireCount: { w: 16 } }, oplog: { acquireCount: { w: 16 } } } protocol:op_command 10931ms
2018-05-18T21:50:22.988+0800 I COMMAND [conn157] command dmspace.Lwm2mDevice command...quireCount: { w: 16 } }, oplog: { acquireCount: { w: 16 } } } protocol:op_command 10762ms
2018-05-18T21:50:22.988+0800 I COMMAND [conn156] command dmspace.TaskHistory command: in...quireCount: { w: 16 } }, oplog: { acquireCount: { w: 16 } } } protocol:op_command 10927ms
2018-05-18T21:50:50.104+0800 I COMMAND [conn31] command dmspace.DeviceInfo appName: "Mon...quireCount: { w: 16 } }, oplog: { acquireCount: { w: 16 } } } protocol:op_command 10020ms
2018-05-18T21:50:51.203+0800 I COMMAND [conn156] command dmspace.fs.chunks command: inse...quireCount: { w: 51 } }, oplog: { acquireCount: { w: 51 } } } protocol:op_command 10823ms
查看慢扫描操作
慢扫描是指该操作需要扫描过多的记录(超过1w行),且返回数量不足扫描数量的1/100,这样的操作通常对CPU消耗很高,也比较低效,
# mlogfilter mongo.log --scan --shorten 200
2018-05-18T21:57:09.123+0800 I COMMAND [conn683] command cmspace.USER_LOGIN_HISTORY command: find ...e: { acquireCount: { r: 95 } }, Collection: { acquireCount: { r: 95 } } } protocol:op_command 556ms
2018-05-18T21:57:17.381+0800 I COMMAND [conn784] getmore nsspace.StatisticsDay query: { aggre...nt: { r: 10 }, timeAcquiringMicros: { r: 1667 } }, Collection: { acquireCount: { r: 890 } } } 214ms
2018-05-18T22:06:16.148+0800 I COMMAND [conn764] getmore nsspace.StatisticsHour query: { aggr...} }, Database: { acquireCount: { r: 69128 } }, Collection: { acquireCount: { r: 69128 } } } 12053ms
2018-05-18T22:06:24.962+0800 I COMMAND [conn764] getmore nsspace.StatisticsHour query: { aggr... } }, Database: { acquireCount: { r: 69106 } }, Collection: { acquireCount: { r: 69106 } } } 8782ms
2018-05-18T22:06:33.787+0800 I COMMAND [conn764] getmore nsspace.StatisticsHour query: { aggr... } }, Database: { acquireCount: { r: 69111 } }, Collection: { acquireCount: { r: 69111 } } } 8822ms
根据名称空间过滤
# mlogfilter mongo.log --namespace dmspace.DeviceInfo
2018-05-18T21:50:58.105+0800 I COMMAND [conn31] command dmspace.DeviceInfo appName: "MongoDB Shell...adata: { acquireCount: { w: 16 } }, oplog: { acquireCount: { w: 16 } } } protocol:op_command 2963ms
2018-05-18T21:50:59.195+0800 I COMMAND [conn31] command dmspace.DeviceInfo appName: "MongoDB Shell...tadata: { acquireCount: { w: 16 } }, oplog: { acquireCount: { w: 16 } } } protocol:op_command 936ms
2018-05-18T21:51:00.173+0800 I COMMAND [conn44] command dmspace.DeviceInfo command: insert { inser...tadata: { acquireCount: { w: 16 } }, oplog: { acquireCount: { w: 16 } } } protocol:op_command 745ms
2018-05-18T21:51:00.433+0800 I COMMAND [conn44] command dmspace.DeviceInfo command: insert { inser...tadata: { acquireCount: { w: 16 } }, oplog: { acquireCount: { w: 16 } } } protocol:op_command 252ms
根据操作类型过滤
# mlogfilter mongo.log --operation update
2018-05-18T21:56:25.114+0800 I WRITE [conn156] update dmspace.PolicyTask query: { _id: "###" } pla...Count: { w: 2 } }, Metadata: { acquireCount: { w: 1 } }, oplog: { acquireCount: { w: 1 } } } 2630ms
2018-05-18T21:56:25.114+0800 I WRITE [conn92] update nsspace.TimerTask query: { _id: "###" } planS...Count: { w: 2 } }, Metadata: { acquireCount: { w: 1 } }, oplog: { acquireCount: { w: 1 } } } 1264ms
2018-05-18T21:56:25.125+0800 I WRITE [conn43] update dmspace.TaskHistory query: { _id: "###" } pla...Count: { w: 2 } }, Metadata: { acquireCount: { w: 1 } }, oplog: { acquireCount: { w: 1 } } } 2643ms
2018-05-18T21:56:30.027+0800 I WRITE [conn532] update dmspace.TaskHistory query: { _id: "###" } pl...eCount: { w: 2 } }, Metadata: { acquireCount: { w: 1 } }, oplog: { acquireCount: { w: 1 } } } 868ms
2018-05-18T21:56:32.115+0800 I WRITE [conn517] update dmspace.TaskHistory query: { _id: "###" } pl...eCount: { w: 2 } }, Metadata: { acquireCount: { w: 1 } }, oplog: { acquireCount: { w: 1 } } } 497ms
获取某时间点之后1小时的日志
# mlogfilter mongo.log --from Apr 6 0:00 --to "+1h" | tail -n3
2018-05-19T00:59:59.876+0800 I COMMAND [conn16386] command nsspace.StatisticsHour command: find { find: "###", filter: { user: "###", region: "###", appKey: "###", recordTime: { $lte: "###" }, $and: [ { recordTime: { $gte: "###" } } ] }, shardVersion: [ "###", "###" ] } planSummary: ### keysExamined:249767 docsExamined:249767 cursorExhausted:1 numYields:1952 nreturned:84 reslen:29748 locks:{ Global: { acquireCount: { r: 3906 } }, Database: { acquireCount: { r: 1953 } }, Collection: { acquireCount: { r: 1953 } } } protocol:op_command 319ms
2018-05-19T00:59:59.879+0800 I COMMAND [conn15998] command nsspace.StatisticsHour command: find { find: "###", filter: { user: "###", region: "###", appKey: "###", recordTime: { $lte: "###" }, $and: [ { recordTime: { $gte: "###" } } ] }, shardVersion: [ "###", "###" ] } planSummary: ### keysExamined:249767 docsExamined:249767 cursorExhausted:1 numYields:1954 nreturned:84 reslen:29833 locks:{ Global: { acquireCount: { r: 3910 } }, Database: { acquireCount: { r: 1955 } }, Collection: { acquireCount: { r: 1955 } } } protocol:op_command 321ms
mlogfilter提供了非常灵活的日期条件设置,除了可以指定起始、结束时间之外,还能通过偏移量划分范围。
时区转换
# mlogfilter mongo.log --tiemzone 2 > mongo-correct.log
以上命令将日期调大2个时区,输出到mongo-correct.log,这在处理国际化系统的场景中非常有用。
4. 图表呈现
mplotqueries 是基于tkinter实现的图表组件,可以将日志中扁平的文字信息转换为图表形式。
输入以下命令:
mplotqueries mongo.log --group operations --output-file operations.png
你可以得到一个按操作分组输出的散点图,如下图:
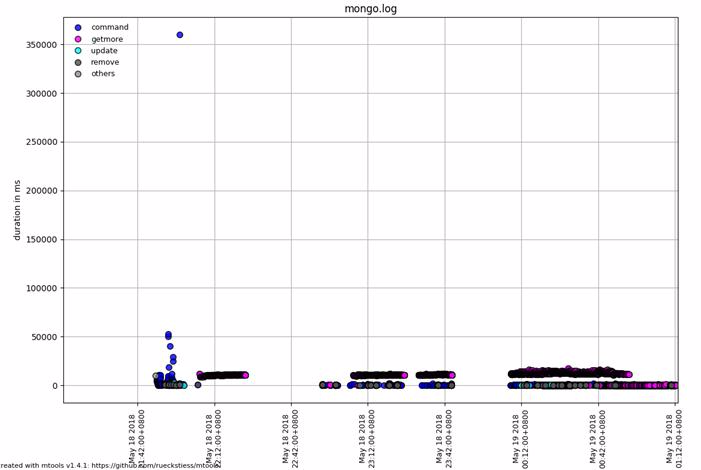
左侧的Y轴是duration,即操作的执行时长,下边的X轴是时间。每个操作在图中都会有一个描点,因此散点图会存在许多重叠。
当然,你也可以通过集合名称进行分组输出,如下面的命令:
mplotqueries mongo.log --group namespace --group-limit 20 --type scatter --yaxis nscanned --output-file namespace_nscan.png
输出的图表将按名称空间进行分组(限显示20个),y轴为nscanned值,即扫描记录数量。
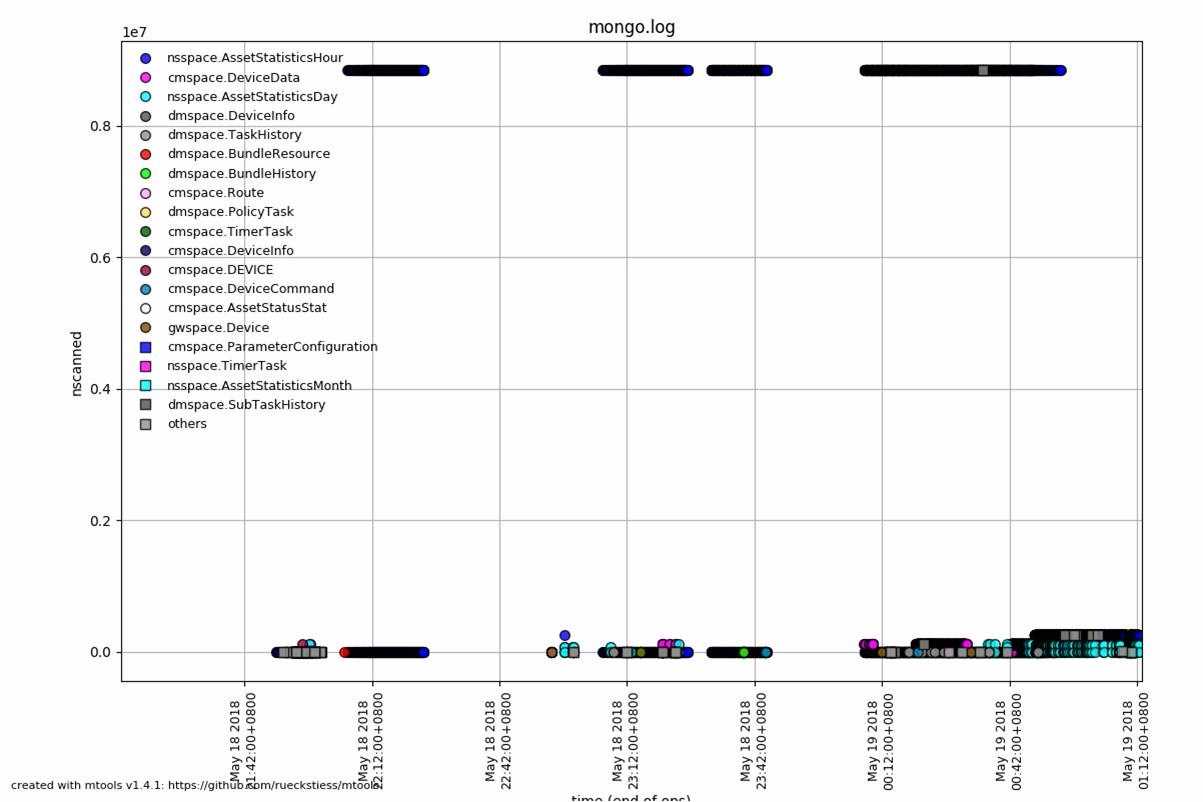
默认情况下,y轴的呈现为时长(during),可指定为其他指标:
| 指标名称 | 说明 |
|---|---|
| nscanned | 扫描数 |
| nupdated | 更新数 |
| ninserted | 插入数 |
| ntoreturn | 返回数 |
| numYields | 让步次数 |
| r | 读锁 |
| w | 写锁 |
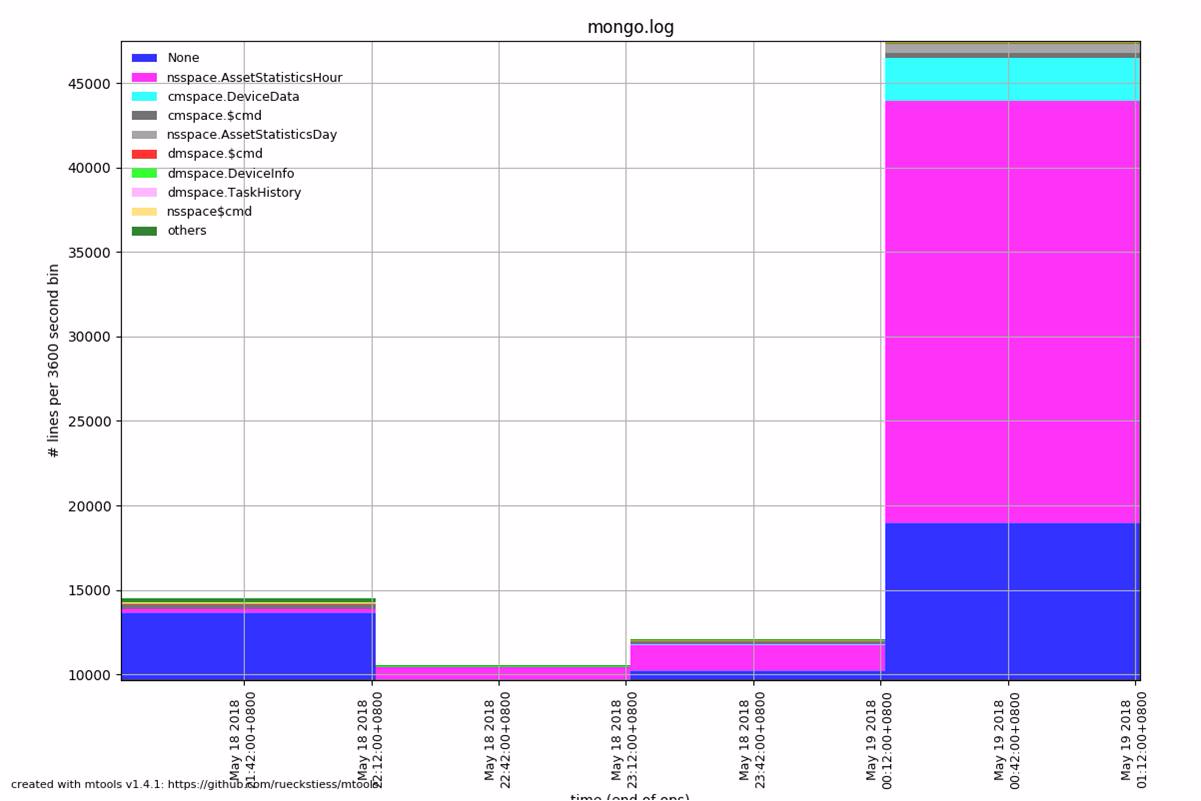
有时候你并不关系具体的某个操作,而是希望看到某个时间段,某类操作或某个集合的操作占比。
比如每小时,每个集合的操作比例分布,此时可以采用直方图
mplotqueries mongo.log --group namespace --bucketsize 3600 --group-limit 10 --type histogram --output-file namespaces_perhour.png
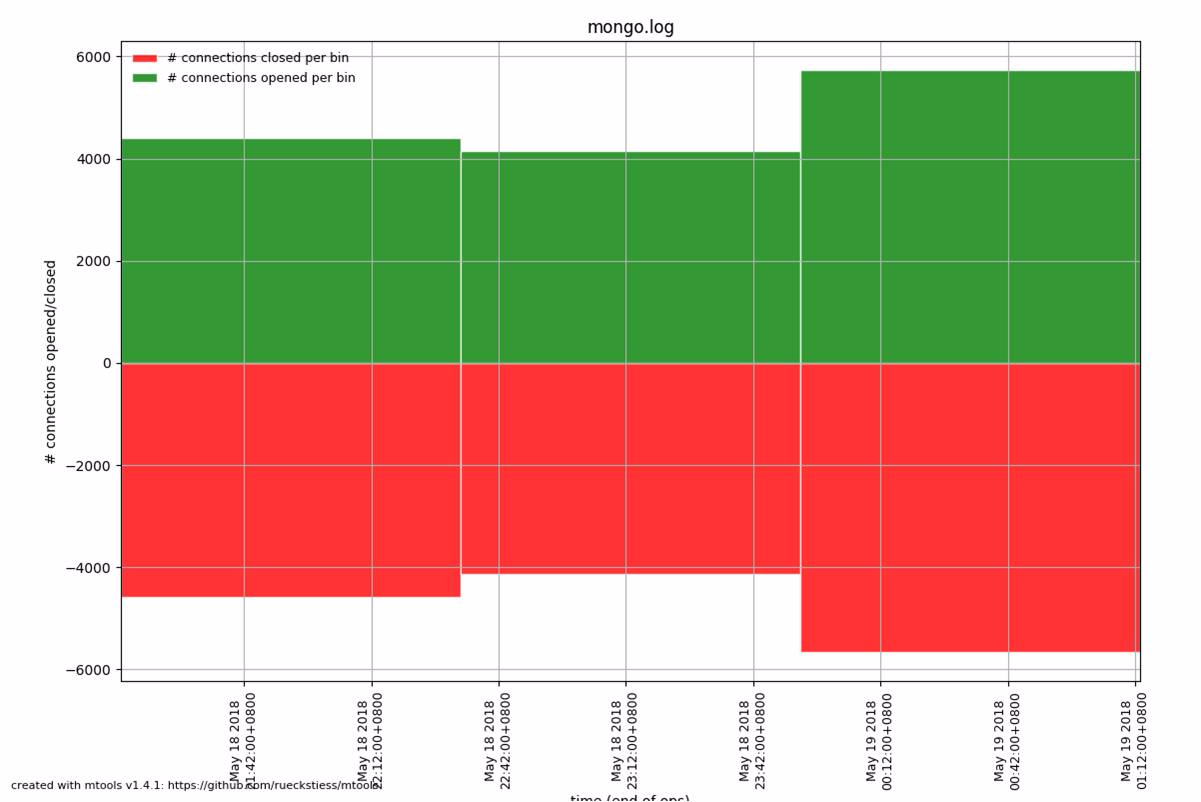
在前面已经讲过,连接数的监测工作非常重要,mplotqueries也提供了连接变更统计类型
mplotqueries mongo.log --type connchurn --bucketsize 3600 --output-file connchurn_perhour.png
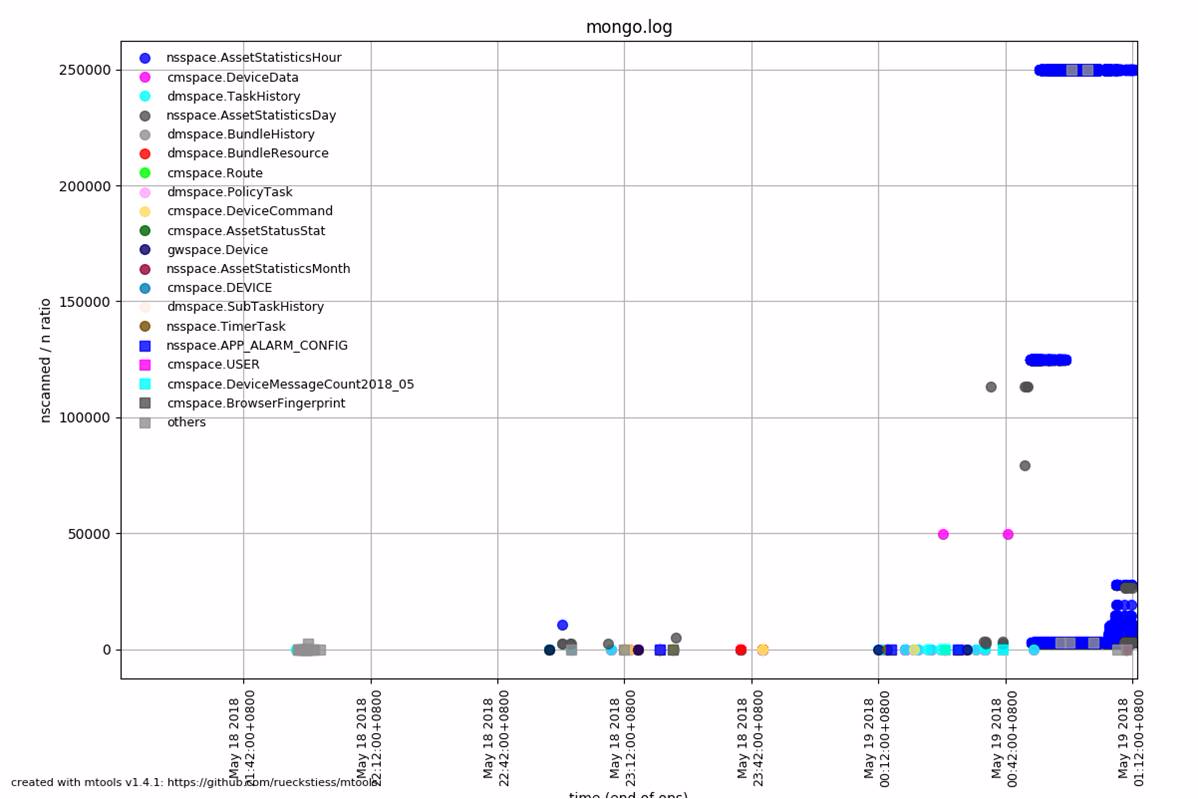
在大部分情况下,低效的操作往往来自大量的scan扫描,尤其当return数远小于scan时会更加低效。
可以通过指定 nscanned/n 参数输出该维度的图表,即扫描数/返回数
mplotqueries mongo.log --type nscanned/n --group-limit 20 --output-file nscan.png
输出事件持续图
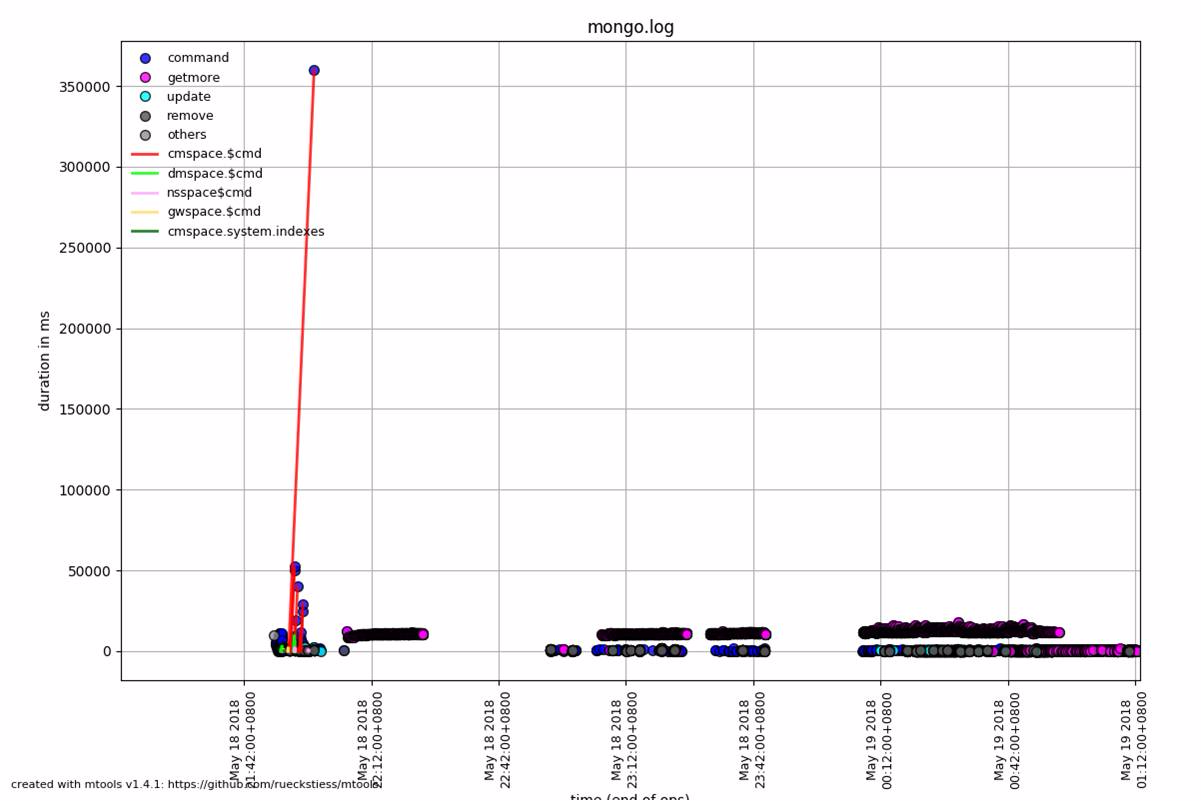
往往在跟踪某一类耗时操作或事件时需要用到,比如oplog的同步、创建索引等,我们希望看到事件的执行时段。
同时还需要伴随一些操作统计,用于配合做资源监控分析。具体一点就是,你执行了一个耗时操作,在某些情况下对业务访问可能
产生了影响,如业务访问超时并伴随DB服务器资源的告警,如CPU飙高,在后续的分析中希望通过耗时操作、以及同时段业务访问的分布进行综合分析。
以下的命令展示了一个典型用法
# 创建一个overlay
grep "index" mongo.log | mplotqueries --type durline --overlay
# 叠加overlay输出图表
mplotqueries mongo.log --group operation --output-file duration.png
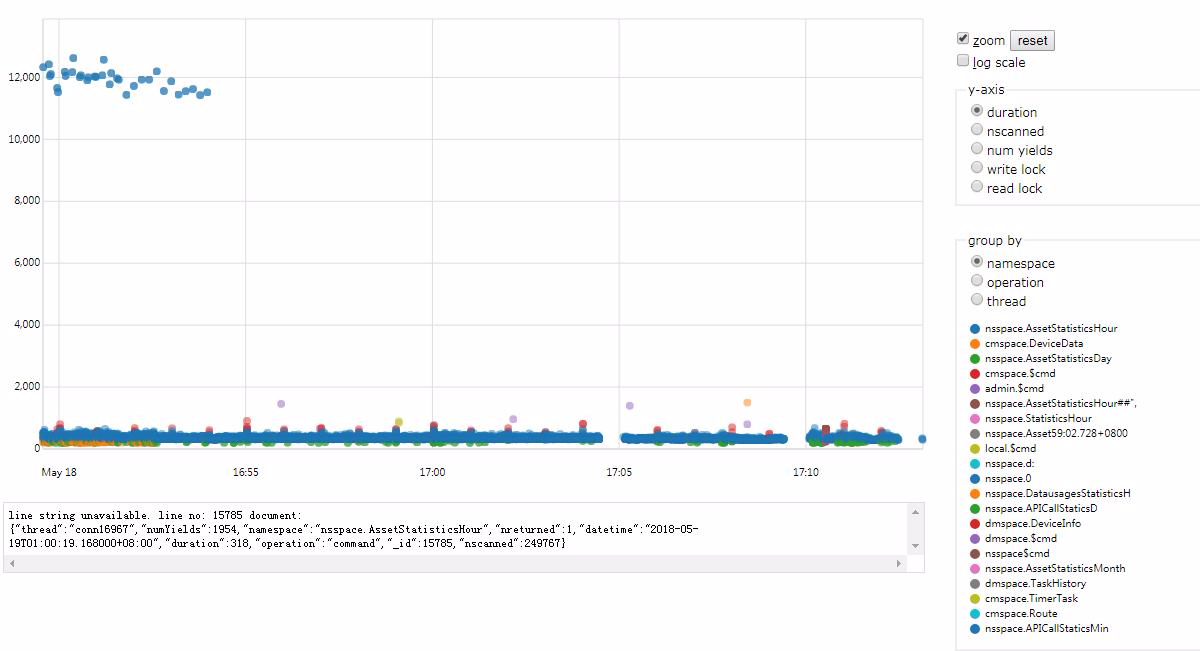
By the way,如果不希望生成那么多的图表,mtools还提供了一个偷懒的工具 mlogvis。可以直接生成html页面,内置强大的脚本
基本上覆盖了mplotqueries的绝大多数图表功能。
# mlogvis mongo.log
希望你已经开始喜欢mtools,并已经跃跃欲试。下面提供了简单的安装方法
如何安装
由于篇幅所限,这里仅提供Centos下的安装方式
-
准备Python的环境(2.7或3.5),目前大多数发行版本的linux都包含了python。
如果没有Python,执行yum install python python-devel 完成安装
确保pip已经安装,执行pip进行检测,如果没有安装可参考官方说明进行安装。 -
安装python-tk
执行命令如下:
yum install python-tools
其他linux系统(如ubuntu/opensuse)则需要安装python-tk软件包
- 安装依赖模块
pip install psutil
pip install pymongo
pip install matplotlib
pip install numpy
说明
每个模块的作用可以参考下表:
| 模块名称 | 作用 |
|---|---|
| psutil | 用于管理进程的工具 |
| pymongo | mongodb python驱动 |
| matplotlib | python的2D图表渲染模块 |
| numpy | 支持科学计算的工具 |
- 安装mtools
pip install mtools
至此,你应该获得了一个已安装好的mtools环境,如果希望安装最新的非稳定版本,可以通过源码安装
参考文档

作者: 美码师(zale)
出处: http://www.cnblogs.com/littleatp/, 如果喜欢我的文章,请关注我的公众号
本文版权归作者和博客园共有,欢迎转载,但未经作者同意必须保留此段声明,且在文章页面明显位置给出 原文链接 如有问题, 可留言咨询.


【推荐】国内首个AI IDE,深度理解中文开发场景,立即下载体验Trae
【推荐】编程新体验,更懂你的AI,立即体验豆包MarsCode编程助手
【推荐】抖音旗下AI助手豆包,你的智能百科全书,全免费不限次数
【推荐】轻量又高性能的 SSH 工具 IShell:AI 加持,快人一步
· 如何编写易于单元测试的代码
· 10年+ .NET Coder 心语,封装的思维:从隐藏、稳定开始理解其本质意义
· .NET Core 中如何实现缓存的预热?
· 从 HTTP 原因短语缺失研究 HTTP/2 和 HTTP/3 的设计差异
· AI与.NET技术实操系列:向量存储与相似性搜索在 .NET 中的实现
· 周边上新:园子的第一款马克杯温暖上架
· Open-Sora 2.0 重磅开源!
· 分享 3 个 .NET 开源的文件压缩处理库,助力快速实现文件压缩解压功能!
· Ollama——大语言模型本地部署的极速利器
· DeepSeek如何颠覆传统软件测试?测试工程师会被淘汰吗?