七、常用模块
目录
一、re模块
二、time时间模块
三、datetime时间模块
四、random模块
五、OS模块
六、sys模块
七、shutil模块
八、json &pickle模块
九、shelve模块
十、xml模块
十一、configparse
十二、hashlib模块
十三、subprocess子进程模块
一、re模块
正则表达式参考url:https://blog.csdn.net/yufenghyc/article/details/51078107
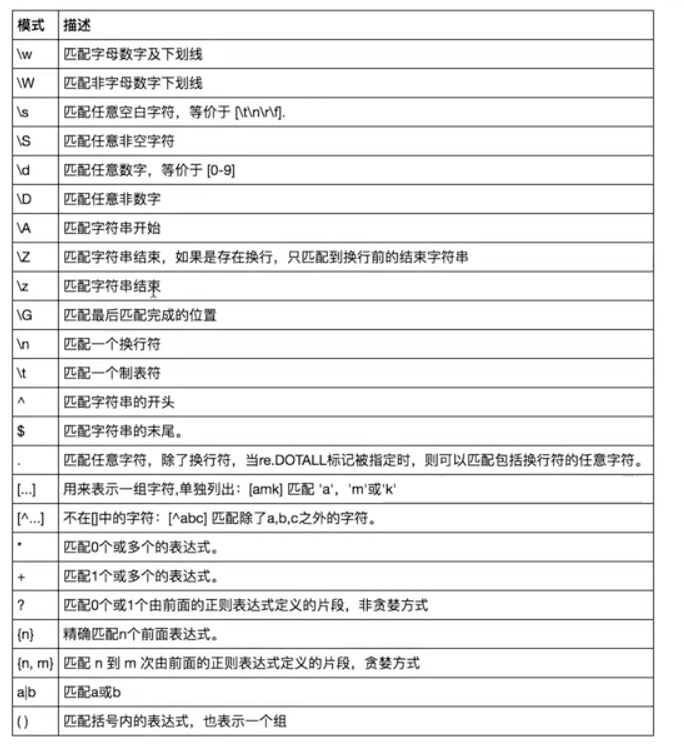
常用匹配模式,如下表

#重复:.|?|*|+|{m,n}|.*|.*?

#.代表任意一个字符,\n除外
print (re.findall('a.b','a b a1b a\nb a-b aaaaab',re.DOTALL))   #re.DOTALL参数可以让*匹配到换行符\n
['a b', 'a1b', 'a\nb', 'a-b', 'aab']

#?:代表?号左边的字符出现0次或者1次
print (re.findall('ab?','a ab abb aba abbb a1b'))
['a', 'ab', 'ab', 'ab', 'a', 'ab', 'a']

#*:代表*号左边的字符出现0次或者无穷次
print (re.findall('ab*','a ab abb aba abbb a1b'))
['a', 'ab', 'abb', 'ab', 'a', 'abbb', 'a']

#+:代表+号左边的字符出现1次或者无穷次
print (re.findall('ab+','a ab abb aba abbb a1b'))
['ab', 'abb', 'ab', 'abbb']

#{m,n}:代表{m,n}左边的字符出现m次或者n次
print (re.findall('ab{2,3}','a ab abb aba abbb a1b'))
['abb', 'abbb']

print (re.findall('ab{0,}','a ab abb aba abbb a1b'))   #0到无穷次
['a', 'ab', 'abb', 'ab', 'a', 'abbb', 'a']

#.*代表0到无穷的任意字符,贪婪匹配
print (re.findall('a.*b','xxxy123a1234b5678b')) #会匹配到最后一个b
['a1234b5678b']

#.*?代表非贪婪匹配(经常使用),固定搭配
print (re.findall('a.*b','xxxy123a1234b5678b'))
['a1234b']


# |:或者
print (re.findall('she|he','she is girl,he is boy!'))
['she', 'he']

# ():代表分组,re.findall()默认返回分组里内容
print (re.findall('compan(y|iess)','too many companiess have gone bankrupt,and the next one is my company'))
['iess', 'y']
print (re.findall('href="(.*?)"','<a href="http://www.baidu.com">点击我</a>')) #只取链接
['http://www.baidu.com']

#(?:y|iess)得到整体,即包含分组外部分,固定写法,注:re.search()和re.match(),以及re.sub()不写?:,得到的也是整体,而re.findall()与re.split()都需要写?:才可以得到整体
print (re.findall('compan(?:y|iess)','too many companiess have gone bankrupt,and the next one is my company'))
['companiess', 'company']

#rawstring:不转义\,,首先交给python语法不能转义r,在交给C语言re模块转义一次,得到结果a\c
print (re.findall(r'a\\c','a\c alc aBc'))
['a\\c']  #答案无错
#[]: 取中括号内任意的一个
print (re.findall('a[a-z]b','axb azb aAb a1b a+b a-b'))     #取中间小写字母
['axb', 'azb']
print (re.findall('a[a-zA-Z]b','axb azb aAb a1b a+b a-b'))  #取中间所有字母,不管大小写
['axb', 'azb', 'aAb']
print (re.findall('a[-+*/]b','axb azb aAb a1b a+b a-b'))    #取加减乘除,减号-要在首位或者尾部,除非出现取反^
['a+b', 'a-b']
print (re.findall('a[^-+*/]b','axb azb aAb a1b a+b a-b'))   #非加减乘除
['axb', 'azb', 'aAb', 'a1b']

#re模块的其他方法
#re.search()只匹配一个符合的,有结果返回对象,没结果返回None
print (re.search('a[^-+*/]b','axb azb aAb a1b a+b a-b'))
<_sre.SRE_Match object; span=(0, 3), match='axb'>
#查看结果
print (re.search('a[^-+*/]b','axb azb aAb a1b a+b a-b').group())
axb


#re.match():从开头取1个符合的,相当于re.search('^a[^-+*/]b'),有结果返回对象,没结果返回None,记住re.search()就行
print(re.match('a[^-+*/]b', 'a2b axb azb aAb a1b a+b a-b'))
<_sre.SRE_Match object; span=(0, 3), match='a2b'>
#查看结果
print (re.match('a[^-+*/]b','a2b axb azb aAb a1b a+b a-b').group())
a2b
print (re.search('^a[^-+*/]b','a2b axb azb aAb a1b a+b a-b').group())
a2b


#re.split()类似字符串的str.split(),就是此处可以用正则表达式进行分隔
print (re.split(':','root:x:0:0::/root:/bin/bash'))
['root', 'x', '0', '0', '', '/root', '/bin/bash']
#maxsplit=1,只切1次
print (re.split(':','root:x:0:0::/root:/bin/bash',maxsplit=1))
['root', 'x:0:0::/root:/bin/bash']


#re.sub():替换
print (re.sub('root','lisl','root:x:0:0::/root:/bin/bash'))
lisl:x:0:0::/lisl:/bin/bash
#只替换1个
print (re.sub('root','lisl','root:x:0:0::/root:/bin/bash',1))
lisl:x:0:0::/root:/bin/bash
#(了解)将第一个单词和最后一个单词对调,()分组,\n代表第n个分组
#^:开头;([a-z]+)任意个字母;([^a-z]+)任意个非字母;(.*)任意个字符,贪婪匹配;$结尾
print (re.sub('^([a-z]+)([^a-z]+)(.*)([^a-z]+)([a-z]+)$',r'\5\2\3\4\1','root:x:0:0::/root:/bin/bash'))
bash:x:0:0::/root:/bin/root


#re.compile(),写一个正则表达式,好处:可以任意调用
obj=re.compile('a\d{2}b')   #a与b之间至少俩个数字,只能首位a,末尾b
print (obj.findall('aa22bb 2a1b a221b aAba12b'))
['a22b', 'a12b']
print (obj.search('aa22bb 2a1b a221b aAba12b').group())
a22b
re需要注意的以下几点
1.re模块里符号^和$,代表只匹配一行,行结束的标志\n。
>>>re.findall('^a(\d+)b',"a213b\na2345b\na789\n")
['213']

^已经决定从每一行开始匹配,即\n之后的字符就不在匹配

#如果想要匹配多行里的内容,即无视\n的换行效果,可使用re.M
>>>re.findall('^a(\d+)b',"a213b\na2345b\na789\n" , re.M)
['213' , '2345' , '789']

#如果没有^和$,默认就是可以匹配多行模式,无需使用re.M
>>>re.findall('a(\d+)b',"a213b\na2345b\na789\n" , re.M)
['213' , '2345' , '789']
2.re.S(re.DOTALL):点任意匹配模式,元字符"."带白哦匹配任意字符,如果也想匹配包含到"\n",则参加参数re.S或者re.DOTALL
>>>import re
>>>re.findall('.' , '\n' , re.S)      #或者将re.S换成re.DOTALL
['\n']

>>>re.findall('.' ,'\n')
[]

#默认.字符不匹配\n,不匹配是否意味着\n被无视,答案是错误的,不会\n
>>>re.findall('\d.\d', '1.\n2.3.4')
['2.3']

#匹配字符.
>>>re.findall('\.' , '192.168.1.1')
['.' , '.' , '.']
3.常见匹配

#匹配IP地址
"^(\d{1,2}|1\d\d|2[0-4]\d|25[0-5])\.(\d{1,2}|1\d\d|2[0-4]\d|25[0-5])\.(\d{1,2}|1\d\d|2[0-4]\d|25[0-5])\.(\d{1,2}|1\d\d|2[0-4]\d|25[0-5])$"

注意:^开头匹配与$结尾不可缺少,不然A.B.C.D中的A与D都可以大于3位数,如1111.2.3.4,或者1.2.3.4444。关于一段文本里可能IP不在开头与结尾,则可以先过滤出数字组合,在判断数字是否符合IP地址标准,如下案例:

import re
#在该内容里查找符合的ip地址
content="fsdah0112.2.3.4dfj\nla192.168.22.3kcun\ndjq"
#符合A.B.C.D格式的数字
num_filter_pattern = '\d+\.\d+\.\d+\.\d+'
#符合IP地址段格式,开头^和结尾$必不可少
ip_filter_pattern = "^(\d{1,2}|1\d\d|2[0-4]\d|25[0-5])\.(\d{1,2}|1\d\d|2[0-4]\d|25[0-5])\.(\d{1,2}|1\d\d|2[0-4]\d|25[0-5])\.(\d{1,2}|1\d\d|2[0-4]\d|25[0-5])$"

#结果:num_list = ['0112.2.3.4','192.168.22.3']
num_list = re.findall(num_filter_pattern,content)


for num in num_list:
    #结果1:[]
    #结果2:[('192','168','22','3')]
    ip_list = re.findall(ip_filter_pattern,num)
    if ip_list:
        #元祖元素根据.拼凑成字符串,结果:"192.168.22.3"
        ip = '.'.join(ip_list[0])
        print (ip)

#匹配手机号码
import re
pattern = "^1[3-8][0-9]\d{8}"
re.findall(pattern,'13808522838')

import re
pattern = "[a-zA-A0-9_-]+@[a-zA-A0-9_-]+(?:\.[a-zA-Z0-9_-]+)+"
re.findall(pattern , 'a kuqi@qq.com.cn')

pattern ='(\S*) (\S*) \[(.*)\] (\S*) (\S*) (\S*) (\S*) (\S*) \"(.*?)\" (\S*) (\S*) (\S*) (\S*) (\S*) (\S*) \"(.*?)\" \"(.*?)\" (\S*) (\S*) (\S*) (\S*) \"(.*?)\"'

content='0ce41fef1b80f2580fdfa123bb4b40 ss_test [29/Sep/2021:06:17:30 +0000] 192.168.1.1 Anonymous 0000017C3fsdfsfasf558AB7577CE06 REST.GET.BUCKET.API.VERSION - "HEAD /ss_test/?apiversion HTTP/1.1" 200 - - - 2 2 "-" "obs-sdk-java/3.21.4" - - - - "-"'

contentTuple=re.findall(pattern,content)[0]

resolvDic ={
    '桶ID':contentTuple[0],
    '桶名':contentTuple[1],
    '请求时间':contentTuple[2],
    '请求IP':contentTuple[3],
    '请求者身份':contentTuple[4],
    "请求ID":contentTuple[5],
    "操作名称":contentTuple[6],
    "对象名":contentTuple[7],
    "请求URI":contentTuple[8],
    "返回码":contentTuple[9],
    "错误码":contentTuple[10],
    "响应的字节大小":contentTuple[11],
    "对象大小Byte":contentTuple[12],
    "服务端处理时间(ms)":contentTuple[13],
    "总请求时间(ms)":contentTuple[14],
    "请求的referrer头域":contentTuple[15],
    "请求的user-agent头域":contentTuple[16],
    "请求中带的versionId":contentTuple[17],
    "联邦认证及委托授权信息":contentTuple[18],
    "当前的对象存储类型":contentTuple[19],
    "通过转换后的对象存储类型":contentTuple[20],
    "xx":contentTuple[21]
}
resolvList.append(resolvDic)
二、time时间模块
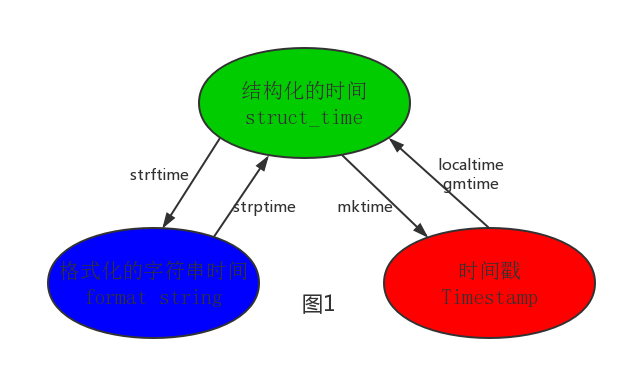
三种时间格式:
import time
#1.时间戳:time.time()从1970年到此时此刻经历的秒数时间戳
print (time.time())
1523526203.575413

#2.结构化时间:返回当前本地时间对象
print (time.localtime())
time.struct_time(tm_year=2018, tm_mon=4, tm_mday=12, tm_hour=17, tm_min=43, tm_sec=23, tm_wday=3, tm_yday=102, tm_isdst=0)

#可通过.方法得到具体的年月日,如当前小时
print (time.localtime().tm_hour)
17


#2.结构化时间:返回标准时间对象,跟东八区差8个小时,中国在东八区
print (time.gmtime())
time.struct_time(tm_year=2018, tm_mon=4, tm_mday=12, tm_hour=9, tm_min=43, tm_sec=23, tm_wday=3, tm_yday=102, tm_isdst=0)

#可通过.方法得到具体的年月日,如当前小时
print (time.gmtime().tm_hour)
9

#3.格式化时间,format自定义
print (time.strftime('%Y-%m-%d %H-%M-%S'))
2018-04-12 17-43-23
print (time.strftime('%Y-%m-%d %X'))    #X表示时分秒
2018-04-12 17-43-23
三个时间格式转化(了解):

#转化方向:时间戳--->结构化时间--->格式化的字符串时间
print (time.strftime('%Y-%m-%d %X',time.localtime(time.time())))

#转化方向:格式化字符串时间--结构化时间---时间戳
print (time.mktime(time.strptime('2018-04-12 17:43:23','%Y-%m-%d %X')))
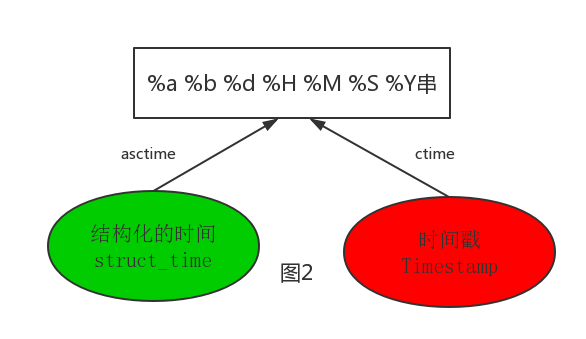
结构化时间,时间戳与默认时间格式的转化:

print (time.asctime())
Thu Apr 12 18:24:52 2018
#将结构化时间转化成默认时间格式
print (time.asctime(time.localtime()))
Thu Apr 12 18:24:52 2018

print (time.ctime())
Thu Apr 12 18:24:52 2018
#将时间戳转化成默认格式
print (time.ctime(1111))
Thu Jan  1 08:18:31 1970
三、datetime时间模块
datetime:主要用于时间运算,如设置2天后时间,或2小时之前的时间等等。。。
import datetime
#取当前时间-相当于time模块里的格式化时间
print (datetime.datetime.now())
2018-04-12 18:36:11.412602

#将当前时间的年份换成1991年
print (datetime.datetime.now().replace(year=1991))
1991-04-12 18:36:11.412602

#将时间戳转化成格式化时间
print (datetime.datetime.fromtimestamp(111111111))
1973-07-10 08:11:51

#取三天以后的时间,
print (datetime.datetime.now()+datetime.timedelta(days=3))
2018-04-15 18:36:11.412602

#取三天前的时间
print (datetime.datetime.now()+datetime.timedelta(days=-3))
2018-04-09 18:36:11.412602

#现在日期+时间,返回结果是类
datetime.date.today()
2019-03-26 14:54:32.524124

#只显示现在是属于那一年,返回结果是整型
datetime.date.today().year
2019


#格式化时间,返回结果是时间类,可与datetime.timedelta(参数)加减
f = datetime.date(2019,12,2)
2019-12-02

#将时间类型转化成结构化时间
c = datetime.date(2019,2,1)
c.timetuple()
time.struct_time(tm_year=2019, tm_mon=2, tm_mday=1, tm_hour=0, tm_min=0, tm_sec=0, tm_wday=4, tm_yday=32, tm_isdst=-1)


#将结构化时间转化为时间戳时间
c = datetime.date(2019,2,1)
d = c.timetuple()     #结构化时间
e = time.mktime(d)   #结构化--》时间戳,返回结果是浮点型
print(e)
1548950400.0              # <class 'float'>
获取上个月第一天以及最后一天
import datetime,time
def getLastMonthData():
    # 获取上个月的第一天和最后一天
    ts_first = int(time.mktime(datetime.date(datetime.date.today().year,datetime.date.today().month-1,1).timetuple()))
    lst_last = datetime.date(datetime.date.today().year, datetime.date.today().month, 1) - datetime.timedelta(1)
    ts_last = int(time.mktime(lst_last.timetuple()))

    print(ts_first,ts_last)     #上个月第一天与上个月最后一天的时间戳
    print(time.strftime('%Y-%m-%d %X',time.localtime(ts_first)))   #将上个月第一天时间戳转化为格式化时间
    print(time.strftime('%Y-%m-%d %X',time.localtime(ts_last)))    #将上个月最后一天的时间戳转化为格式化时间

if __name__ == '__main__':
    getLastMonthData()
其他格式化时间转换成默认格式化时间(年-月-日 时:分:秒)
from _datetime import datetime
dd ='Fri Aug 27 14:24:36 CST 2021'
GMT_FORMAT = '%a %b %d %H:%M:%S CST %Y'
a = datetime.strptime(dd,GMT_FORMAT)
print(a)
print(type(a))
print(str(a))    #字符串化
其他格式化时间转换成自定义格式化时间
from datetime import datetime

#识别旧的格式化时间
DATA_TIME ='Fri Aug 27 14:24:36 CST 2021'
OLD_FORMAT = '%a %b %d %H:%M:%S CST %Y'
init_time = datetime.strptime(DATA_TIME,OLD_FORMAT)


#自定义格式化时间
NEW_FORMAT = '%Y-%m-%d %H:%M:%S'
new_time = init_time.strftime(NEW_FORMAT)

#显示星期几
week_day_dict = {
        0: '星期一',
        1: '星期二',
        2: '星期三',
        3: '星期四',
        4: '星期五',
        5: '星期六',
        6: '星期日',
    }
week_day = week_day_dict[init_time.weekday()]

print(str(new_time),week_day)
时间格式化符号参考
%y 两位数的年份表示(00-99)
%Y 四位数的年份表示(000-9999)
%m 月份(01-12)
%d 月内中的一天(0-31)
%H 24小时制小时数(0-23)
%I 12小时制小时数(01-12)
%M 分钟数(00=59)
%S 秒(00-59)
%a 本地简化星期名称
%A 本地完整星期名称
%b 本地简化的月份名称
%B 本地完整的月份名称
%c 本地相应的日期表示和时间表示
%j 年内的一天(001-366)
%p 本地A.M.或P.M.的等价符
%U 一年中的星期数(00-53)星期天为星期的开始
%w 星期(0-6),星期天为星期的开始
%W 一年中的星期数(00-53)星期一为星期的开始
%x 本地相应的日期表示
%X 本地相应的时间表示
%Z 当前时区的名称
%% %号本身
四、random模块
import random

print (random.random()) #(0,1)--float类型 随机生成大于0且小于1的小数

print (random.randint(1,3))#[1,3]--int类型,1<=x<=3

print (random.randrange(1,3)) #[1,3)--int类型,1<=x<3,顾头不顾尾

print (random.choice([1,'aa',['一筒','一万']])) #任意取一个列表里的元素

print (random.sample([1,'aa',['一筒','一万']] , 2))#任意取2个列表里的元素,以列表形式返回,取的个数超过会报错

print (random.uniform(1,3))#(1,3)--float类型 ,1<x<3

l=[1,2,3,4,5]
res=random.shuffle(l)   #打乱列表l里元素顺序,无返回值
print (res)             #None,
print (l)               #[2, 5, 3, 1, 4]
实现验证码功能:
#实现随机验证码功能
def make_code(n):
    res=''
    for i in range(n):
        #0-9随机数字,将int转化成str,用于下面字符串拼接
        s1 = str(random.randint(0,9))
        #A-Z随机字母,chr(65)将一个数字转化成对应的ascii码
        s2 = chr(random.randint(65,90))
        res +=random.choice([s1,s2])
    return res

#传入验证码个数,并打印
print (make_code(4))
五、OS模块
os模块是与操作系统交互的一个接口
import os
print (os.walk('.'))  #遍历当前目录下所有的文件(包含子文件夹里的文件)和子文件夹,返回的元组(['目录',['子目录1','子目录2'],['文件1','文件2'])
print (os.getcwd()) #获取当前工作目录,即当前python脚本工作的目录路径,结果E:\python3_file\Pycharm3\day06
print (os.chdir("E:\python3_file\Pycharm3")) #改变当前脚本工作目录;相当于shell下cd,返回值为None
print (os.getcwd()) #E:\python3_file\Pycharm3
print (os.curdir)  #返回当前目录,结果.,几乎无用
print (os.pardir) #获取当前目录的父目录字符串名,结果..,几乎无用
print (os.makedirs('dirname1/dirname2'))#可生成多层递归目录,已存在目录则报错
print (os.removedirs('dirname1/dirname2'))#若目录为空,则删除,并递归到上一级目录,如若也为空,则删除,依次类推
print (os.mkdir('dirname')) #生成单级目录;相当于shell中mkdir dirname
print (os.rmdir('dirname')) #删除单级空目录,若目录部位空则无法删除,报错;相当于shell中rmdir dirname
print (os.listdir('dirname'))   #列出指定目录下的所有文件和子目录,包括隐藏文件,并以列表方式打印
print (os.remove('filename')) #删除一个文件
print (os.rename('oldname','newname'))  #重命名文件
print (os.stat('path/filename'))    #获取文件/目录信息
print (os.sep)  #输出操作系统特定的路径分隔符,win下为'\\',Linux下为'/'
print (os.linesep) #输出当前平台使用的行终止符,win下为'\r\n',Linux下为'\n'
print (os.pathsep) #输出用于分割文件路径的字符串,win下为;,Linux下为:
print (os.name) #输出字符串指示当前使用平台。win-->'nt';Linu-->'posix'
print (os.system('dir')) #运行shell命令,直接显示,无返回值
print (os.environ)  #获取系统环境变量
print (os.path.abspath(path))   #返回path规范的绝对路径,此时的参数path可以是相对路径
print (os.path.split(path)) #将path分割成目录和文件名二元组返回
print (os.path.dirname(path))  #返回path的目录。其实就是os.path.split(path)的第一个元素
print (os.path.basename(path)) #返回path最后的文件名。如果path以/或\结尾,那么久返回空值。即os.path.split(path)的第二个元素
print (os.path.exists(path)) #如果path存在,返回True;如果path不存在,返回False
print (os.path.isfile(path))    #如果path是一个存在的文件,返回True,否则返回False
print (os.path.isabs(path))     #如果path是绝对路径,返回True
print (os.path.isdir(path))     #如果path是一个存在的目录,则返回True。否则返回False
print (os.path.join(path1[,path2[, ...]])) #将多个路径组合后返回,第一个绝对路径之前的参数将被忽略,如:
print (os.path.join('C:','D:','/temp/','hello.py')) #'D:/TEMP/HELLO.py'
print (os.path.getatime(path)) #返回path所指向的文件或者目录的最后存取时间
print (os.path.getmtime(path)) #返回path所指向的文件或者目录的最后修改时间
print (os.path.getsize(path)) #返回path的大小
#在Linux和Mac平台上,该函数会原样返回path,在windows平台上会将路径中所有字符转换为小写,并将所有斜杠转换成反斜杠
>>> os.path.normcase('c://windows\System32\\\drivers/test.py')
'c:\\\\windows\\system32\\\\drivers\\test.py'


os.path.normcase(path)方法无法在windows下也无法转换.和..
#os.path.normpath(path)方法可以解决(推荐使用)
>>> os.path.normpath('c://windows\System32\\\drivers/test.py')
'c:\\windows\\System32\\drivers\\test.py'    #可自动过滤多余反斜杠

>>>os.path.normpath('/Users/lisl/test1/\\\a1/\\\\aa.py/../..')
'\\Users\\lisl\\test1'   #可自动识别..返回上一级

注:在linux下也能使用os.path.normpath()方法,但是这个方法不能将反斜杠转成斜杠
如何找到主程序根目录:
#方法一:
import os
BASE_DIR=os.path.dirname(
os.path.dirname(os.path.abspath(__file__)))

#方法二:
import os
BASE_DIR = os.path.normpath(os.path.join(
    os.path.abspath(__file__),    #主程序绝对路径
    os.pardir,    #'..'
    os.pardir
))
#删除home/test2目录(包含test2下的所有子目录和文件)
def rm_rf(dir_path):
    '''
    删除目录下所有子目录和文件
    :return:
    '''
    for i in os.walk(dir_path):
        for per_file in i[2]:
            per_file_path = os.path.join(i[0], per_file)
            os.remove(per_file_path)

    for i in os.walk(dir_path):
        for per_dir in i[1]:
            per_dir_path = os.path.join(i[0], per_dir)
            os.rmdir(per_dir_path)
    os.rmdir(dir_path)


rm_rf('home/test2')
六、sys模块
import sys
sys.argv    #命令行参数list,第一个元素程序本身路径

sys.exit(n)    #退出程序,正常退出时exit(0)

sys.version    #获取python解释程序的版本信息

sys.maxint     #在linux下,最大支持的Int值,
sys.maxsize    #在windows下,最大支持的Int值

sys.path        #返回模块的搜索路径,初始化时使用PYTHONPATH环境变量的值

sys.platform     #返回操作系统平台名称,如:'win32'
打印进度条:
#进度条学习--基础知识理解
print ('[%5s]'%'*')   #宽度5,-为行首打印字符,结果[    *]
print ('[%-5s]'%'*')    #宽度5,字符在行首,结果[*    ]
print ('[%s%%]'%20)     #%%为打印一个%,结果[20%]
print ('[%%-%ds]'%5)   #结果[%-5s]
print (('[%%-%ds]'%5)%'*') #由print ('[%-5s]'%'*')==>[*    ]


#进度条思路
  #1.打印出可变宽度的进度条格式:[*    ]
  #2.进度不换行覆盖打印:print ('\r%s'%show_str,end='') \r为每次打印回行首位置,end=''为不换行

#代码:
import time
def process_tar(percent,width=50):
    #接收大小每次都是1024接收,最后可能大于文件总大小,百分比会比1大,则赋值为1
    if percent>1:
        percent=1
    #进度条格式,(重点)
    show_str = ('[%%-%ds]'%width)%('#'*int(width*percent))
    #打印进度条,\r每次打印回行首,end=''不换行
    print ('\r %s %d%%'%(show_str,int(percent*100)),end='')

def download_file(total_size):
    #初始化接收大小变量
    recv_size=0
    #当接收的量小于文件总大小,执行循环体
    while recv_size < total_size:
        #沉睡0.2s,模拟网络延迟
        time.sleep(0.2)
        recv_size +=1024
        #调用进度条函数,出入当前接收的百分比
        process_tar(recv_size/total_size)

if __name__ == '__main__':
    #调用下载文件函数,传入要下载文件总大小
    download_file(10241)
七、shutil模块
此模块为高级的文件、文件夹、压缩包处理模块
#将文件内容拷贝到另一个文件中,源文件不存在,报错
shutil.copyfileobj(open('old.xml','r'),open('new.xml','w'))

#拷贝文件
shutil.copyfile('old.xml','new_2.xml')

#仅拷贝权限。内容、组、用户均不变
shutil.copymode('old.xml','new_2.xml') #目标文件必须存在

#仅拷贝状态的信息,包括:mode bits,atime,mtime,flags,除了ctime不一样
shutil.copystat('old.xml','new_2.xml') #目标文件必须存在

#拷贝文件和权限
shutil.copy('old.xml','new_3.xml')

#拷贝文件和状态信息,目标文件可以不存在
shutil.copy2('old.xml','new_4.xml')

#递归的去拷贝文件夹
    #目标目录不能存在,注意对ccc目录父级目录要有可写权限,ignore参数是排除,包含所有递归内符合的文件
shutil.copytree(r'E:\python3_file\Pycharm3\bbb','ccc',ignore=shutil.ignore_patterns('*.py'))

#递归的去删除目录,无法删除文件
shutil.rmtree('ccc')

#递归的去移动文件,它类似mv命令,其实就是重命名
shutil.move('new.xml','new_5.xml')
压缩、解压缩:
#shutil.make_archive(base_name.format,...)
创建压缩包并返回文件路径,例如:zip、tar
#base_name:压缩包的文件名,也可以是压缩包的路径。只是文件名时,则保存至当前目录,否则保存至指定路径,
如 data_bak =>保存至当前路径
如:/tmp/data_bak =》保存至/tmp/
#format:压缩包种类,'zip','tar','bztar','gztar'
#root_dir:要压缩的文件夹路径(默认当前目录)
#owner:用户,默认当前用户
#group:组,默认当前组
#logger:用于记录日志,通常是logging.Logger对象
#压缩文件1
ret = shutil.make_archive('bbb_bak','gztar',root_dir=r'E:\python3_file\Pycharm3\bbb')
print(ret)  #返回文件压缩包的绝对路径

#压缩文件2
ret = shutil.make_archive(r'E:\python3_file\Pycharm3\day06\bbb_bak','gztar',root_dir=r'E:\python3_file\Pycharm3\bbb')
print(ret)  #返回文件压缩包的绝对路径
shutil 对压缩包的处理是调用ZipFile 和TarFile 两个模块来进行的,详细:
import zipfile
#压缩
z = zipfile.ZipFile('test.zip','w') #压缩命名test.zip,w代表压缩
z.write('new_2.xml')        #要压缩的文件
z.write('bbb_bak.tar.gz')   #要压缩的文件夹
z.close()

#解压
z = zipfile.ZipFile('test.zip','r') #解压文件test.zip,r代表解压
z.extractall(path='.')  #解压到当前目录,解压所有文件
z.close()
import tarfile
#压缩
t = tarfile.open('test.tar','w')
t.add('new_2.xml',arcname='new_2.bak')  #压缩文件new_2.xml,arcname参数为重命名
t.add('bbb_bak.tar.gz',arcname='bbb_bak.tar.gz.bak')
t.close()

#解压
t = tarfile.open('test.tar','r')    #解压
t.extractall('dirname1')    #解压到当前目录下的dirname1目录下
t.close()
八、json &pickle模块
eval()内置方法可以将一个字符串转成python对象,不过,eval方法是有局限性的(只能用在python平台之间,不能跨平台)。对于普通的数据类型,json.loads和eval都能用,单遇到特殊类型的时候,eval就不管用了,如下所示。所以eval的重点还是通常用来执行一个字符串表达式,并返回表达式的值。
import json
x="[null,true,false,1]"
print (eval(x))    #报错,无法解析null类型,而json可以
print (json.loads(x))
什么是序列化?
#我们把对象(变量)从内存中变成可存储或传输的过程称之为序列化,在Python中叫pickling,在其他语言中也被称为serialization,marshalling,flattening等等,都是一个意思。
为什么要序列化?
#1,持久保存状态
需知一个软件/程序的执行就在处理一系列状态的变化,在编程语言中,‘状态’会以各种各样有结构的数据类型(也可简单的理解为变量)的形式 被保存在内存中。

内存是无法永久保存数据的,当程序运行了一段时间,我们断电或者重启程序,内存中关于这个程序的之前一段时间的数据(有结构)都被清空了。

在断电或重启程序之前将程序当前内存中所有的数据都保存下来(保存到文件中),以便于下次程序执行能够从文件中载入之前的数据,然后继续执行,这就是序列化。

具体的来说,你玩游戏,你保存游戏状态,装备状态,下次在登录时,还能从上次离开的位置开始,装备等级什么的都依然在等

#2.跨平台数据交互
序列化之后,不仅可以把序列化后的内容写入磁盘,还可以通过网络传输到别的机器上,如果收发的双方约定好实用一种序列化的格式,那么便打破了平台/语言差异化带来的限制,实现了跨平台数据交互。

反过来,把变量内容从序列化的对象重新读到内存里称之为反序列化,即unpickling
如何序列化之json和pickle:
如果我们要在不同的编程语言之间传递对象,就必须把对象序列化为标准格式,比如XML,但更好的方法是序列化为JSON,因为JSON表示出来就是一个字符串,可以被所有语言读取,也可以方便地存储到磁盘或者通过网络传输。JSON不仅是标准格式,并且比XML更快,而且可以直接在Web页面中读取,非常方便。
JSON表示的对象就是标准的JavaScript语言的对象,JSON和Python内置的数据类型对应如下:


import json

dic = {
    'name':'lisl',
    'age':18,
    'sex':'male'

       }
print (type(dic))   #<class 'dict'>
#
# #序列化
j=json.dumps(dic) #{"name": "lisl", "age": 18, "sex": "male"}
print (type(j)) #<class 'str'>
print (j)

#序列化
f=open('student.json','w')
f.write(j)  #等价于json.dump(j,f)
f.close()

#反序列化
import json
f=open('student.json','r')
data = json.loads(f.read())  #等价于data = json.load(f) f为文件句柄,不用使用f.read()
print (data)
f.close()
import json
dic = "{'1':111}"   #模拟文件中的json格式,模拟不认单引号
dic_str = str({"1":111})
print (dic_str)
dic = {'1':111}
print (json.dump(dic,open('test.json','w')))

dic = '{"1":1111}'
print (json.loads(dic))

#小结:无论数据是怎么创建的,只要满足json格式(字典或者列表内元素为字符串就需要使用双引号),就可以json.loads出来,不一定非要dumps的数据才能loads
注:json虽然能够跨语言跨平台识别,但是有些python数据类型不支持,如集合;pickle优点是可以识别python所有数据类型,缺点是不能跨平台
import pickle , json
s={1,2,3,4} #集合
print (json.dumps(s))   #报错,因为json无法序列化集合,函数等等
print (pickle.sumps(s)) #pickle可以序列化一切python类型,即=等号后的值皆可序列化,以bytes类型存储数据
pickle序列化:
s={1,2,3,4} #集合
with open('s.pkl','wb') as f:
    f.write(pickle.dumps(s))

#方式二:
s={1,2,3,4} #集合
pickle.dump(s,open('s.pkl','wb'))
pickle反序列化:
#方式一:
import pickle
with open('s.pkl','rb') as f:
    s=pickle.loads(f.read())
    print (s,type(s))

#方式二:
import pickle
s = pickle.load(open('s.pkl','rb'))
print (s,type(s))
九、shelve模块
shelve模块比pickle模块简单,只是一个open函数,返回类似字典的对象,可读可写;key必须为字符串,而指可以是python所支持的数据类型
#存储数据
import shelve
f = shelve.open('db.shl')
f['stu1']={'name':'lichen','age':10}
f['stu2']={'name':'wangdong','age':20}
f.close()

#读取数据
import shelve
f = shelve.open('db.shl')
print (f['stu1']['name'])
# print (f) #内存地址,而并非一个字典
f.close()

注:不推荐使用,因为需要记住存的key,不然无法取出
十、xml模块
xml是实现不同语言或程序之间进行数据交换的协议,跟json差不多,但json使用起来更简单,不过,在以前json还没有诞生的时候,大家只能用xml,至今很多传统公司如金融行业的很多系统接口还主要是xml
xml的格式如下,就是通过<>节点来区别数据结构的:

<?xml version="1.0"?>
<data>
    <country name="Liechtenstein">
        <rank updated="yes">2</rank>
        <year>2008</year>
        <gdppc>141100</gdppc>
        <neighbor name="Austria" direction="E"/>
        <neighbor name="Switzerland" direction="W"/>
    </country>
    <country name="Singapore">
        <rank updated="yes">5</rank>
        <year>2011</year>
        <gdppc>59900</gdppc>
        <neighbor name="Malaysia" direction="N"/>
    </country>
    <country name="Panama">
        <rank updated="yes">69</rank>
        <year>2011</year>
        <gdppc>13600</gdppc>
        <neighbor name="Costa Rica" direction="W"/>
        <neighbor name="Colombia" direction="E"/>
    </country>
</data>

xml数据
需要掌握以下三个常用的xml在python中的方法:
from xml.etree import ElementTree
tree = ElementTree.parse('a.xml')   #解析a.xml文件

root = tree.getroot()   #获得根节点

print (tree.tag)    #打印根标签名
print (tree.attrib) #打印根标签的属性
print (tree.text)   #打印根标签里文本
xml协议在各个语言里都是支持的,在python中可以用以下三种查找方式查询xml:
#1.从子节点中找find(),只在孩子节点找,不再孙子节点找
sub = root.find('country')    #查找后的结果可以使用上面的三种方法
print (sub.tag)
print (sub.attrib)
print (sub.text)

#2.从子节点中找findall(),只在孩子节点找,不再孙子节点找
subs = root.findall('country')    #返回列表格式,元素可使用上面三种方法
print (sub[0].tag)
print (sub[0].attrib)
print (sub[0].text)

#3.从正树型结构中查找,,能在孩子节点找,也能在孙子节点找
subs = root.iter('rank')    #rank为孙子标签,返回迭代器,先深度在广度
element_list =list(sub)    #返回所有迭代器结果放入列表
for i in element_list:
    print (i.tag,i.attrib,i.text)
遍历整篇文档:
for country in root:
    print ('======>',country.attrib['name'])
    for item in country:
        print (item.tag,iter.attrib,item.text)
例子:
#需求:找到xml里所有标签year的值

from xml.etree import ElementTree

tree = ElementTree.parse('a.xml')    #解析a.xml

root = tree.getroot()    #获得根目录

for year in root.iter('year'):    #root.iter('year')结果为迭代器,取出元素
    print (year.tag,year.text)    #打印出year标签和文本
修改数据:
#修改xml数据
from xml.etree import ElementTree
tree = ElementTree.parse('a.xml')
root = tree.getroot()
for year in root.iter('year'):
    #print (year.tag,year.text)
    year.set('updated','yes')   #添加标签属性,不存在则添加,存在则覆盖,'yes'只能字符串,不能数字
    year.text=2009  #所有year标签的文本设置成2009
    #year.text = str(int(year.text)+1)   #每个year标签在原来年份基础上加1年
tree.write('a.xml') #将数据从内存保存到硬盘中
增加node(即增加标签):
#创建标签
from xml.etree import  ElementTree
tree = ElementTree.parse('a.xml')
root = tree.getroot()
for country in root:
    obj = ElementTree.Element('lisl')   #创建标签<lisl></lisl>
    obj.attrib={'name':'lisl','age':'18'}   #创建<lisl>标签属性
    obj.text='hello world!' #创建<lisl>标签文本
    country.append(obj)     #将创建的标签放入country标签下,<lisl>标签是<country>标签的孩子标签
tree.write('b.xml')     #保存到硬盘
十一、configparse
11.1.简介
#ConfigParser模块在python3中修改为configparser.这个模块定义了一个ConfigParser类,该类的作用是使用配置文件生效,配置文件的格式和windows的.ini文件的格式相同
#作用:使用模块中的RawConfigParser(),ConfigParser(),SafeConfigParser()这三个方法(三择其一),创建一个对象使用对象的方法对指定的配置文件做增删改查操作
11.2 配置文件如下格式:
#注释1
;注释2

[section1]
k1 =v1
k2:v2
user=lisl
age=10
is_admin=true
salary=30

[section2]
k1=v1
11.3读取:
import configparser
config = configparser.ConfigParser()
config.read('my.ini')   #读取配置文件

print (config.sections())   #获取配置文件里的标题
print (config.options('section1'))  #查看标题section1下所有的key=value中的key

#查看section1下key为user,对应的值,没有报错
res=config.get('section1','user')
print (res)

if config.has_option('section1','aaa'): #判断section1下key为user,对应的值存在的话
    print (config.get('section1','user'))   #打印值

#取到的value值转换成布尔值
res = config.getboolean('section1','is_admin')
print (res,type(res))

#取到的value值转换成int
res = config.getint('section1','salary')
print (res,type(res))

#取到的value值转换成float
res = config.getfloat('section1','salary')
print (res,type(res))
11.4 修改:
#config.add_section('title3')    #增加标题titile3,存在则报错
config.set('title3','name','lisl')  #在titile3标题下,增加name=lisl
config.set('title3','age','18')
config.set('section1','age','100')  #将原本存在的标题section1下的age=100
config.write(open('my.ini','w',encoding='utf-8'))   #保存到硬盘文件里
11.5 删除:
config.remove_section('title1')    #删除某个标题下所有
config.remove_option('title2','age')    #删除标题下的key为age的
11.6实例

#创建ini文档
import configparser

config = configparser.ConfigParser()
#增加数据方法一:
config['DEFAULT'] ={
    'ServerAliveInterval':'45',
    'Compression':'yes',
    'CompressionLevel':'9',
}

# 增加数据方法二:
config['bitbucket.org']={}  #设置标题bitbucket.org的key=value为字典
config['bitbucket.org']['user']='hg'

config['topsecret.server.com']={}
topsecret=config['topsecret.server.com']
topsecret['Host Port']='50022'
topsecret['ForwardX11']='yes'

#增加数据方法三:
config.add_section('custom_section1')
config.set('custom_section1','name','lisl')
config.set('custom_section1','age','18')
#保存
with open('example.ini','w') as configfile:
    config.write(configfile)
十二、hashlib模块
12.1 什么是hash
#hash是一种算法(3.x里代替了md5模块和sha模块,主要提供SHA1,SHA224,SHA256,SHA384,SHA512,MD5算法)
#该算法接收传入的内容,经过运算得到一串hash值
12.2 hash值的特点
#1.只要传入的内容一样,得到的hash值必然一样===》文件完整性校验
#2.不能由hash值返解成内容===》密码传输安全
#3.只要使用的hash算法不变,无论校验的内容有多大,得到的hash值长度是固定的
#对于特点1的举例说明,hello world分俩次或一次传入,最终得到的结果一样
import hashlib
m=hashlib.md5()
m.update('hello'.encode('utf-8'))    #分俩次传入加密
m.update('world'.encode('utf-8'))
print (m.hexdigest())

m=hashlib.md5()
m.update('helloworld'.encode('utf-8'))    #一次传入加密
print (m.hexdigest())
12.3

import hashlib
def make_dic(pwds): #传入明文密码库
    dic = {}    #创建存放明文:密文的字典
    for pwd in pwds:
        m=hashlib.md5(pwd.encode('utf-8'))
        dic[pwd]=m.hexdigest()
    return dic  #返回字典

cryt_pwd='fc5e038d38a57032085441e7fe7010b0'
pwds=['123456789','hello123','lsl1122','helloworld']
pwd_dic=make_dic(pwds)
for key in pwd_dic:
    if pwd_dic[key]== cryt_pwd:
        print (key)
12.4 提高撞库难度
#在加密算法里添加自定义key再来加密
import hashlib

hash = hashlib.sha256('*@H!&HAQJR&'.encode('utf-8'))  #定义key加密
hash.update('lisl123456'.encode('utf-8'))
print (hash.hexdigest())
12.5 hashlib里的MD5,SHA1,SHA224,SHA256,SHA384,SHA512用法都一样
hmac模块的new也是一样,如:
import hmac
m=hmac.new('自定义key'.encode('utf-8'))
m.update('lisl123456'.encode('utf-8'))
print (m.hexdigest())
十三、subprocess子进程模块
13.1 subprocess简单理解:
import subprocess
import time

#参数shell=True是调用系统终端来执行命令tasklist
subprocess.Popen('tasklist',shell=True)
time.sleep(1)

'''
为什么要加time.sleep(1),才能看到结果?
因为subprocess是另外开一个子进程去打开终端,执行命令。
主程序可能存在执行完毕,而子进程的结果还没返回的情况,
所以需要主程序沉睡1秒
'''
13.2 subprocess.Popen()如何接收返回结果:
import subprocess

obj=subprocess.Popen('tasklist',shell=True,
                 stdout=subprocess.PIPE,    #输出信息输出到一个管道
                 stderr=subprocess.PIPE     #错误信息输出到另外一个管道
                 )
# print ('第一次:',obj.stdout.read())   #从管道中取走输出结果
# print ('第二次:',obj.stdout.read())   #为空
print ('编码问题:',obj.stdout.read().decode('gbk')) #调用windowsshell执行的命令,默认以GBK编码,需要用GBK解码成unicode
print (obj.stderr.read())


#接收错误信息
import subprocess
obj = subprocess.Popen('testtest',shell=True,
                       stdout=subprocess.PIPE,
                       stderr=subprocess.PIPE)
print ('错误信息:',obj.stderr.read().decode('gbk'))
13.3 了解知识
#了解
#在windows下的进程任务里过滤出python程序,tasklist | findstr python
#方法一:
import subprocess
obj = subprocess.Popen('tasklist | findstr python',shell=True,
                       stdout=subprocess.PIPE,
                       stderr=subprocess.PIPE)
print (obj.stdout.read().decode('gbk'))


#方法二:
obj1 = subprocess.Popen('tasklist',shell=True,
                        stdout=subprocess.PIPE,
                        stderr=subprocess.PIPE)
obj2 = subprocess.Popen('findstr python',shell=True,
                        stdin=obj1.stdout,  #stdin是将上面的obj1中的stdout数据作为输入数据,在执行findstr python命令
                        stdout=subprocess.PIPE,
                        stderr=subprocess.PIPE)
print (obj2.stdout.read().decode('gbk'))


