工具篇-Java中一些utils

下边是整理的一些Java开发的utils,顺便吐槽下新浪博客的编辑器排版跟我写的博客一样 烂,所以改用博客园
一、字符串
1. Java中String与其他类型之间的转换
-
String与日期对象
1 public static SimpleDateFormat df1 = new SimpleDateFormat("dd/MMM/yyyy:HH:mm:ss", Locale.US);
2 public static SimpleDateFormat df2 = new SimpleDateFormat("yyyy-MM-dd HH:mm:ss", Locale.US);
3 df2.format(df1.parse(time_local));
-
String与八种基本类型(以int为例)
1 try {
2     int i = Integer.parseInt(str);
3 } catch (NumberFormatException e) { //str中可能有非数字
4     e.printStackTrace();
5 }
2. 去掉字符串前面的0
- 使用replaceAll(正则或者目标字符串,要替换上的字符串)
1 String str = "000000001234034120";
2 String newStr = str.replaceAll("^(0+)", "");
3 System.out.println(newStr);
这里说明下replace和replaceAll的区别:replace的参数是char和CharSequence,即可以支持字符的替换,也支持字符串的替换;replaceAll的参数是regex,即基于正则表达式的替换。
- 使用replaceFirst(正则或者目标字符串,要替换上的字符串)
1 String str = "000000001234034120";
2 String newStr = str.replaceFirst("^(0+)", "");
3 System.out.println(newStr);
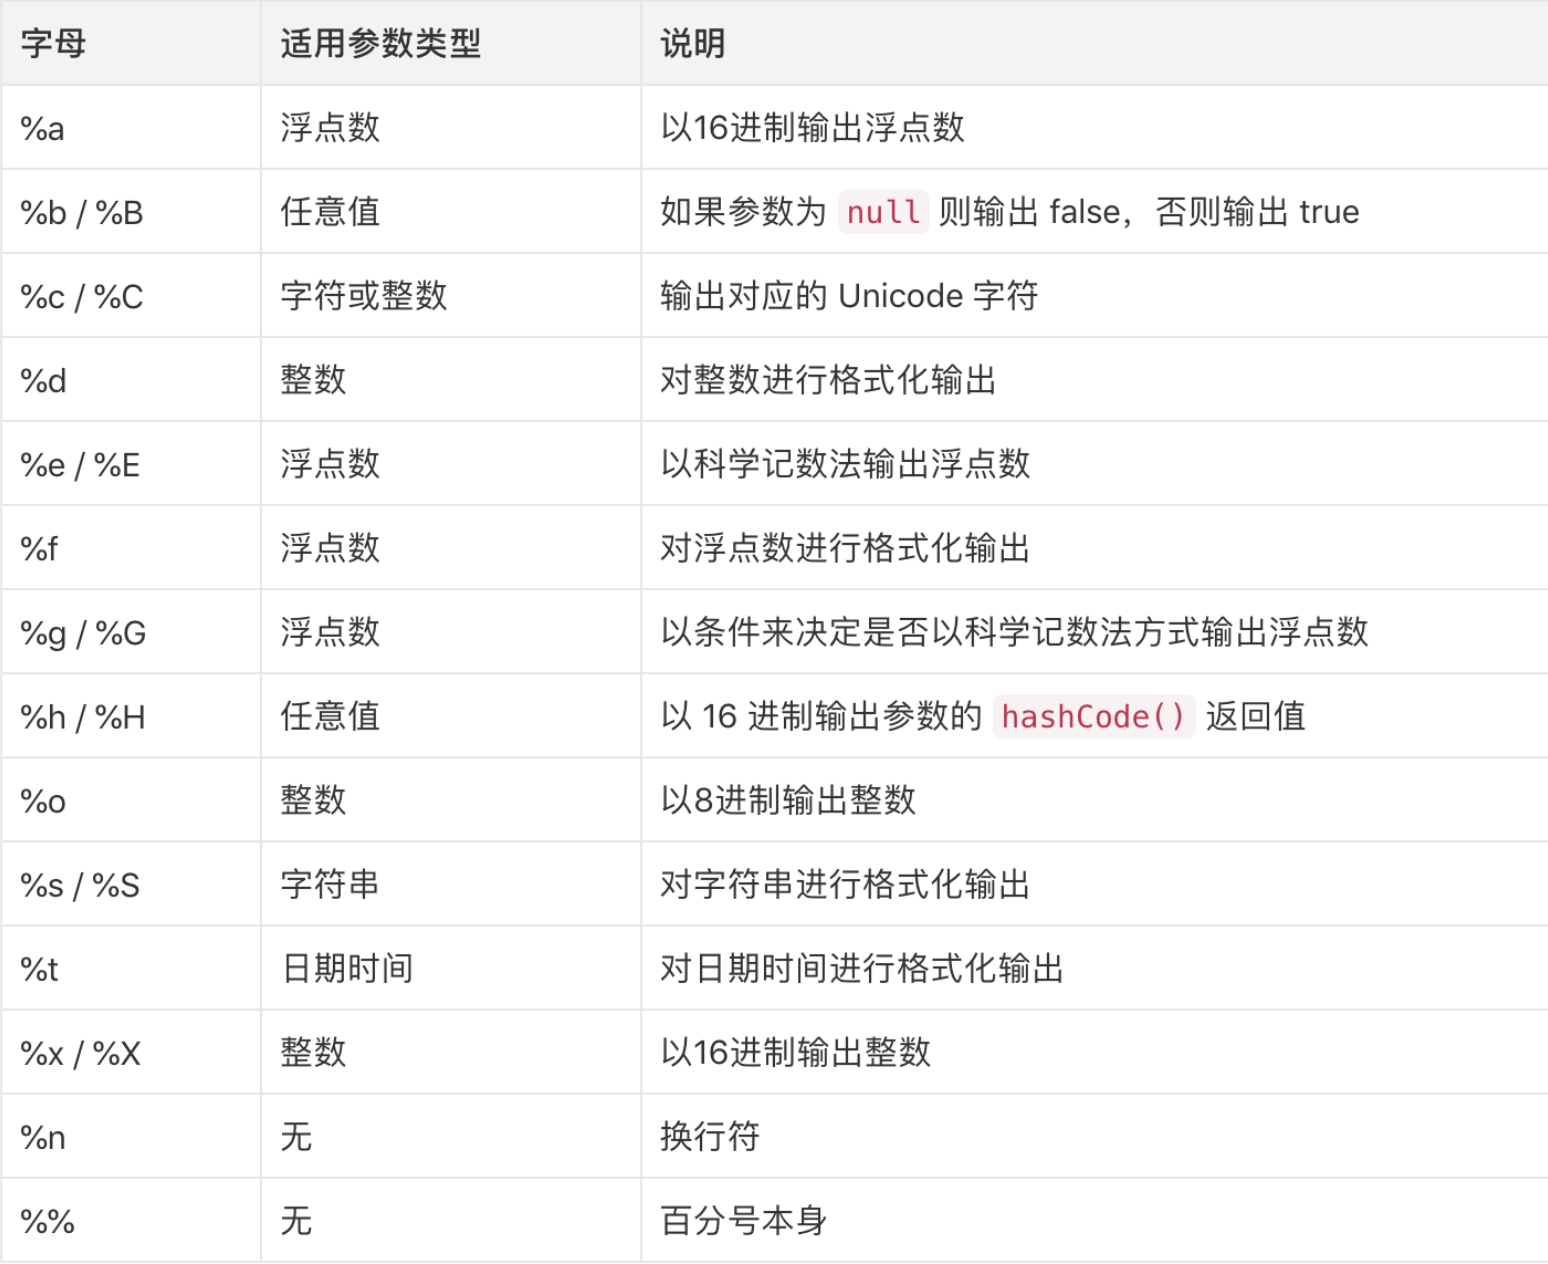
3. String.format方法
1 String formatted = String.format("%s今年%d岁。", "我", 25); // 打印结果:"我今年25岁。"
3. String == 和equals方法
-
“==”判断的是地址值,equals()方法判断的是内容
1 str1.equals(str2)
2 str1.hashCode()==str2.hashCode()
-
hashCode是一样的,hashCode相同可能是同一个对象,也可能是不同的对象,但是hashCode不同就肯定是不同的对象。
如果两个对象equals相等,那么这两个对象的HashCode一定也相同
如果两个对象的HashCode相同,不代表两个对象就相同,只能说明这两个对象在散列存储结构中,存放于同一个位置 - equals和equalsIgnoreCase方法对比
equals方法来自于Object类,默认比较两个对象的内存地址,equals在把对象放入HashMap中会被掉用;
equalsIgnoreCase是String特有的方法,比较的是两个String对象是否相等(并且忽略大小写)
4. StringUtils的join方法
-
包路径:org.apache.commons.lang3.StringUtils;
- 用法:将数组元素用特殊连接符连接
StringUtils.join(array, "-")
- 源码:


    /**
     * <p>Joins the elements of the provided array into a single String
     * containing the provided list of elements.</p>
     *
     * <p>No delimiter is added before or after the list.
     * Null objects or empty strings within the array are represented by
     * empty strings.</p>
     *
     * <pre>
     * StringUtils.join(null, *)               = null
     * StringUtils.join([], *)                 = ""
     * StringUtils.join([null], *)             = ""
     * StringUtils.join(["a", "b", "c"], ';')  = "a;b;c"
     * StringUtils.join(["a", "b", "c"], null) = "abc"
     * StringUtils.join([null, "", "a"], ';')  = ";;a"
     * </pre>
     *
     * @param array  the array of values to join together, may be null
     * @param separator  the separator character to use
     * @return the joined String, {@code null} if null array input
     * @since 2.0
     */
    public static String join(final Object[] array, final char separator) {
        if (array == null) {
            return null;
        }
        return join(array, separator, 0, array.length);
    }
5. URLEncode编码 与 URLDecode解码
String mytext = java.net.URLEncoder.encode("中国", "utf-8");
String mytext2 = java.net.URLDecoder.decode(mytext, "utf-8");
这两条语句在同一个页面中的话,得到的结果是:
mytext: %E4%B8%AD%E5%9B%BD
mytex2: 中国
5. 字符编码和字符串所占字节数
二、Spring
1. JSONField 注解
-
指定字段的名称
1 @JSONField(name="role_name")
2 private String roleName;
-
使用format制定日期格式
public class A {
     // 配置date序列化和反序列使用yyyyMMdd日期格式
     @JSONField(format="yyyyMMdd")
     public Date date;
}
-
指定字段的顺序
1 public static class VO {
2    @JSONField(ordinal = 3)
3    private int f0;
4
5    @JSONField(ordinal = 2)
6    private int f1;
7
8    @JSONField(ordinal = 1)
9    private int f2;
-
使用serialize/deserialize指定字段不序列化
1 public class A {
2       @JSONField(serialize=false)
3       public Date date;
4  }
三、随机数
- 使用Random类
Random类可以产生 boolean、int、long、float, byte 数组以及 double 类型的随机数,这是它与 random()方法最大的不同之处,random()方法只能产生double类型的 0~1的随机数。
Random 类位于 java.util 包中,该类常用的有如下两个构造方法。
Random():该构造方法使用一个和当前系统时间对应的数字作为种子数,然后使用这个种子数构造 Random 对象。
Random(long seed):使用单个 long 类型的参数创建一个新的随机数生成器。例如:
 1 public static void main(String[] args)
 2 {
 3         Random r=new Random();
 4         double d1=r.nextDouble();    //生成[0,1.0]区间的小数
 5         double d2=r.nextDouble()*7;    //生成[0,7.0]区间的小数
 6         int i1=r.nextInt(10);    //生成[0,10]区间的整数
 7         int i2=r.nextInt(18)-3;    //生成[-3,15]区间的整数
 8         long l1=r.nextLong();    //生成一个随机长整型值
 9         boolean b1=r.nextBoolean();    //生成一个随机布尔型值True或者False
10         float f1=r.nextFloat{);    //生成一个随机浮点型值
11 }
- Math类的random()方法
该方法没有参数,它默认会返回大于等于0.0、小于1.0的double类型随机数。如下:
1 public static void main(String[] args)
2 {
3         int min=0;    //定义随机数的最小值
4         int max=100;    //定义随机数的最大值
5         //产生一个1~100的数
6         int s=(int)min+(int)(Math.random()*(max-min));
7 }
- 当前日期和时间
- 时钟序列
- 全局唯一的IEEE机器识别号,如果有网卡,从网卡MAC地址获得,没有网卡以其他方式获得。
 1      //获得指定数目的UUID
 2     public static String[] getUUID(int number){
 3         if(number < 1){
 4             return null;
 5         }
 6         String[] retArray = new String[number];
 7         for(int i=0;i){
 8             retArray[i] = getUUID();
 9         }
10         return retArray;
11     }
12        //获得一个UUID
13     public static String getUUID(){
14         String uuid = UUID.randomUUID().toString();
15         //去掉“-”符号
16         return uuid.replaceAll("-", "");
17     }
四、文件
1. FileUtils
具有封装的读写文件、复制文件等功能。例如:
1 import org.apache.commons.io.FileUtils;
2 List lines = new ArrayList();
3 ...
4 FileUtils.writeLines(new File("/Users/admin/1.txt"), lines, true);
5 String result = FileUtils.readFileToString(new File("/Users/admin/1.txt"), "UTF-8");
2. 配置文件读取
一般情况下,我们用到的资源文件(各种xml,properites,xsd文件等)都放在src/main/resources下面,利用maven打包时,maven能把这些资源文件打包到相应的jar或者war里。在程序中就可以直接读取了,例如:
-
properties文件
1 InputStream input =Thread.currentThread().getContextClassLoader().getResourceAsStream("abc.properties");
2 Properties prop = new Properties();
3 prop.load(input);
-
yaml文件
1 InputStream inputStream = Thread.currentThread().getContextClassLoader().getResourceAsStream(yamlPath);
2 Yaml yaml = new Yaml();
3 HashMap map = yaml.loadAs(inputStream, HashMap.class);
五、Java反射
1. 反射取私有方法
- 在调用私有方法时必须用getDeclaredMethod,getDeclaredMethod和getMethod区别如下:
getMethod:Returns a object that reflects the specified public member method of the class or interface represented by this object.(只能获取public的方法)
getDeclaredMethod:Returns a object that reflects the specified declared method of the class or interface represented by this object. (能获取类中所有方法)
- 调用私有方法时除了在调用之前需要设置setAccessible(true)
2. Java Agent(JDK 1.5及以上)
3. Java Assist
六、网络
1. 主机名转IP
1 String ip = InetAddress.getByName(hostName).getHostAddress();
2. HttpClient
HttpClient httpclient = new DefaultHttpClient();
httpclient.getParams().setParameter(CoreConnectionPNames.CONNECTION_TIMEOUT, Config.20000);//连接时间20s
httpclient.getParams().setParameter(CoreConnectionPNames.SO_TIMEOUT, 60000);//数据传输时间60s
不设置的话如果服务器无响应,可能返回(404 50x),如果没有返回则java线程会一直等待。
七、缓存
1. Guava Cache
注:通过RemovalNotification.getCause()可以知道该对象被移除的原因1 public enum RemovalCause { 2 //用户手动移除 3 EXPLICIT, 4 //用户手动替换 5 REPLACED, 6 //被垃圾回收 7 COLLECTED, 8 //超时过期 9 EXPIRED, 10 //由于缓存大小限制 11 SIZE; 12 }
八、日期
1. TimeUnit
TimeUnit提供了各种时间方法,比如常用的toMillis、toNaNos、sleep(Long timeout)等等,可读性极高,使用方便且性能也不错,具体使用方法参考:Java-TimeUnit类常用方法详解,对比一下:
1 // TimeUnit
2 TimeUnit.MILLISECONDS.sleep(10);
3 TimeUnit.SECONDS.sleep(10);
4 TimeUnit.MINUTES.sleep(10);
5
6 // 原生Thread方法
7 Thread.sleep(10);
8 Thread.sleep(10*1000);
9 Thread.sleep(10*60*1000);
2. Java8只取年月日的java.util.Date(时分秒清零)对象
1 // set current date
2 date = new Date();
3 Calendar cal1 = Calendar.getInstance();
4 cal1.setTime(date);
5 // clear minute second milliSecond
6 cal1.set(Calendar.MINUTE, 0);
7 cal1.set(Calendar.SECOND, 0);
8 cal1.set(Calendar.MILLISECOND, 0);
9 date = cal1.getTime();
3. java.util.Date转java.sql.Date
 1 Date utilDate = new Date();//uilt.Date
 2 System.out.println("utilDate : " + utilDate);
 3 SimpleDateFormat format = new SimpleDateFormat("yyyy-MM-dd HH:mm:ss");
 4 System.out.println("format : " + format.format(utilDate));
 5
 6 System.out.println("**********************************************");
 7
 8 Timestamp sqlDate = new Timestamp(utilDate.getTime());//uilt.Date转sql.Date
 9 System.out.println("sqlDate : " + sqlDate);
10 System.out.println("format : " + format.format(sqlDate));

九、代码规范
1. HashMap初始容量设置
-
根据阿里巴巴Java开发手册上建议HashMap初始化时设置已知的大小,如果不超过16个,那么设置成默认大小16:
集合初始化时, 指定集合初始值大小。
说明: HashMap使用HashMap(int initialCapacity)初始化,
正例:initialCapacity = (需要存储的元素个数 / 负载因子) + 1。注意负载因子(即loader factor)默认为0.75, 如果暂时无法确定初始值大小,请设置为16(即默认值)。
反例:HashMap需要放置1024个元素,由于没有设置容量初始大小,随着元素不断增加,容量7次被迫扩大,resize需要重建hash表,严重影响性能
2. 减少if/else书写(一般嵌套不超过三层为好)
- 提前return
1 if (condition) {
2     // do something
3 } else {
4     return xxx;
5 }
这种情况条件取反,干掉else
1 if (!condition) {
2   return xxx;
3 }
4
5 // do something
- 策略模式
有种情况是根据不同的参数走不同的逻辑,先看一般写法:
1 if (strategy.equals("fast")) {
2     // 快速执行
3 } else if ("strategy.equals("normal")) {
4     // 正常执行
5 } else if ("strategy.equals("smooth")) {
6     // 平滑执行
7 } else if ("strategy.equals("slow"))  {
8     // 慢慢执行
9 }
其实可以用枚举
 1 public enum Stategy {
 2   FAST{
 3     @Override
 4     public void run() {
 5       System.out.println("fast---");
 6     }
 7   },
 8   NORMAL{
 9     @Override
10     public void run() {
11       System.out.println("normal---");
12     }
13   },
14   SMOOTH{
15     @Override
16     public void run() {
17       System.out.println("smooth---");
18     }
19   },
20   SLOW {
21     @Override
22     public void run() {
23       System.out.println("slow---");
24     }
25   };
26
27   public abstract void run();
28 }
最后,可以通过param执行不同逻辑
1 Strategy strategy = Strategy.valueOf(param);
2 Strategy.run();
- 用Optional
1 if (user == null) {
2     // do action 1
3 } else {
4     // do action2
5 }
可以改为
1 Optional<User> userOptional =  Optional.ofNullable(user);
2 userOptional.map(action1).orElse(action2);
十、thrift
1. thrift文件的使用
最近看别人的老项目用到了thrift文件,以前没用过,挺好玩的,记录一下。刚开始从gitlab上clone下来以后,会发现有些包会爆红:

同时src目录下有thrift文件

问了下同事说是要compile一下,还得先安装0.9.3的thrift(还有一些插件,一定要FQ,如果没有全局设置的话,需要在shell里边重新设置下)
1 export http_proxy=http://127.0.0.1:1087; export https_proxy=http://127.0.0.1:1087
工程里修改pom文件
 1 <build>
 2         <plugins>
 3             <plugin>
 4                 <artifactId>maven-assembly-plugin</artifactId>
 5                 <configuration>
 6                     <descriptorRefs>
 7                         <descriptorRef>jar-with-dependencies</descriptorRef>
 8                     </descriptorRefs>
 9                 </configuration>
10             </plugin>
11             <plugin>
12                 <groupId>org.apache.maven.plugins</groupId>
13                 <artifactId>maven-shade-plugin</artifactId>
14                 <executions>
15                     <execution>
16                         <phase>package</phase>
17                         <goals>
18                             <goal>shade</goal>
19                         </goals>
20                     </execution>
21                 </executions>
22             </plugin>
23             <plugin>
24                 <groupId>org.apache.thrift.tools</groupId>
25                 <artifactId>maven-thrift-plugin</artifactId>
26                 <version>0.1.11</version>
27                 <configuration>
28                     <thriftSourceRoot>src/main/if</thriftSourceRoot>
29                 </configuration>
30                 <executions>
31                     <execution>
32                         <id>thrift-sources</id>
33                         <phase>generate-sources</phase>
34                         <goals>
35                             <goal>compile</goal>
36                         </goals>
37                     </execution>
38                 </executions>
39             </plugin>
40             <plugin>
41                 <groupId>org.apache.maven.plugins</groupId>
42                 <artifactId>maven-compiler-plugin</artifactId>
43                 <configuration>
44                     <source>1.8</source>
45                     <target>1.8</target>
46                     <encoding>UTF-8</encoding>
47                 </configuration>
48             </plugin>
49         </plugins>
50     </build>
和
1  <!--thrift-->
2 <dependency>
3     <groupId>org.apache.thrift</groupId>
4     <artifactId>libthrift</artifactId>
5     <version>0.11.0</version>
6 </dependency>
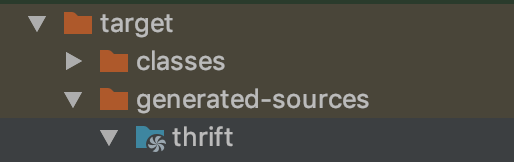
最后maven编译即可
最后可以从target目录下看到编译好的java文件:
注:IDEA编译的话,也需要安装thrift插件(参见:https://www.cnblogs.com/lcmichelle/p/10743081.html)
十一、反编译代码
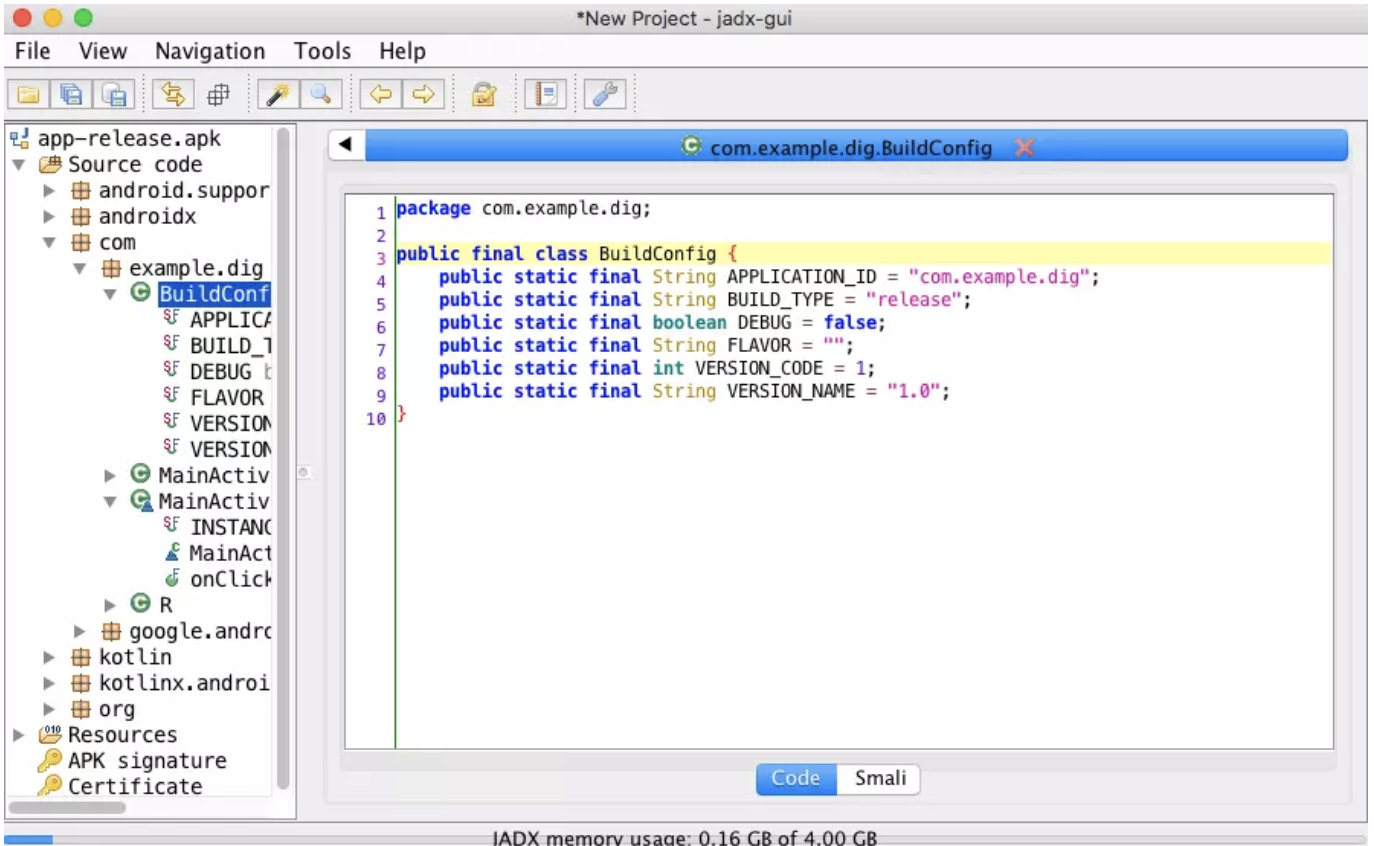
1. 反编译工具Jadx
安装好之后找到编译好的jadx-gui可执行文件运行
比如目录下:/Users/admin/jadx/build/jadx/bin/jadx-gui
十二、集合
1. 迭代器的使用
使用迭代器可以边访问集合边删除元素
Iterator<String> iterator = all.iterator();//实例化迭代器

while(iterator.hasNext()){
    String str=iterator.next();//读取当前集合数据元素
    if("b".equals(str)){
        //all.remove(str);//使用集合当中的remove方法对当前迭代器当中的数据元素值进行删除操作(注:此操作将会破坏整个迭代器结构)使得迭代器在接下来将不会起作用
        iterator.remove();
    }else{
        System.out.println( str+" ");
    }
}
十三、单元测试
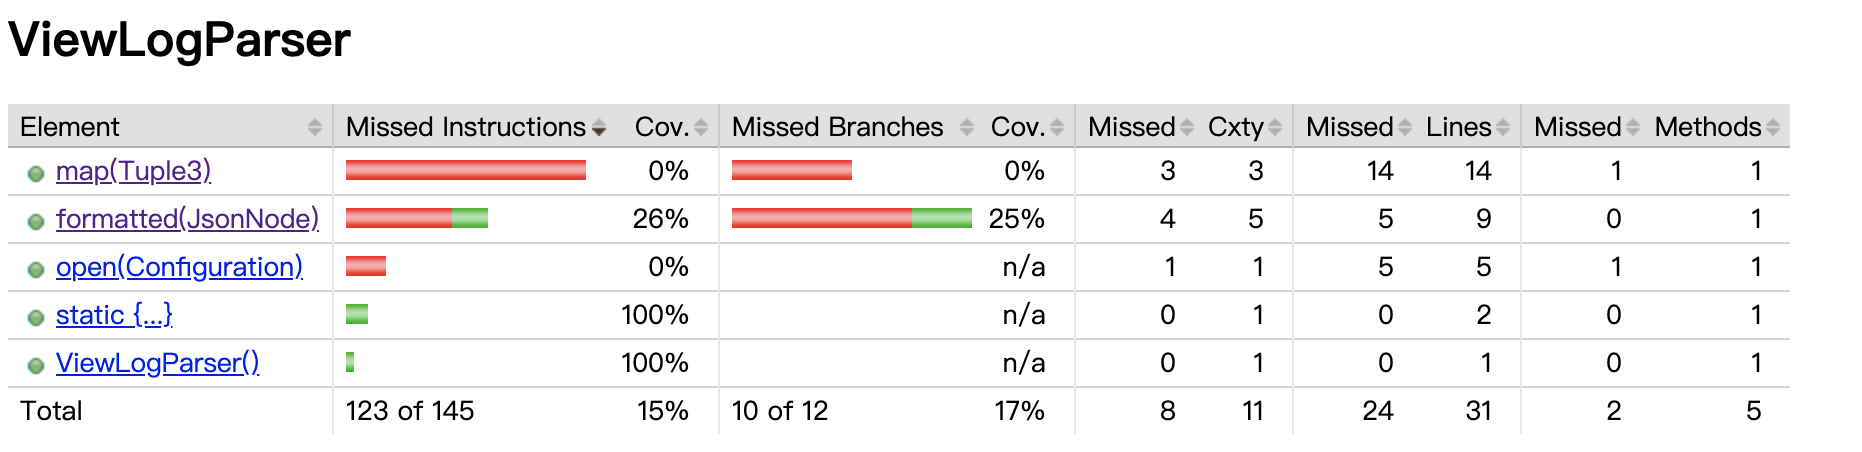
1. jacoco工具
最近用了jacoco工具,感觉挺好使的,单元测试当然也可以使用IDE自带的run with coverag。Jacoco有命令行和Pom配置两种方式,命令行方式就是在工程根目录下执行以下命令,如果多个模块可以到子模块下执行:
1 mvn clean test org.jacoco:jacoco-maven-plugin:0.7.4.201502262128:prepare-agent install -Dmaven.test.failure.ignore=true
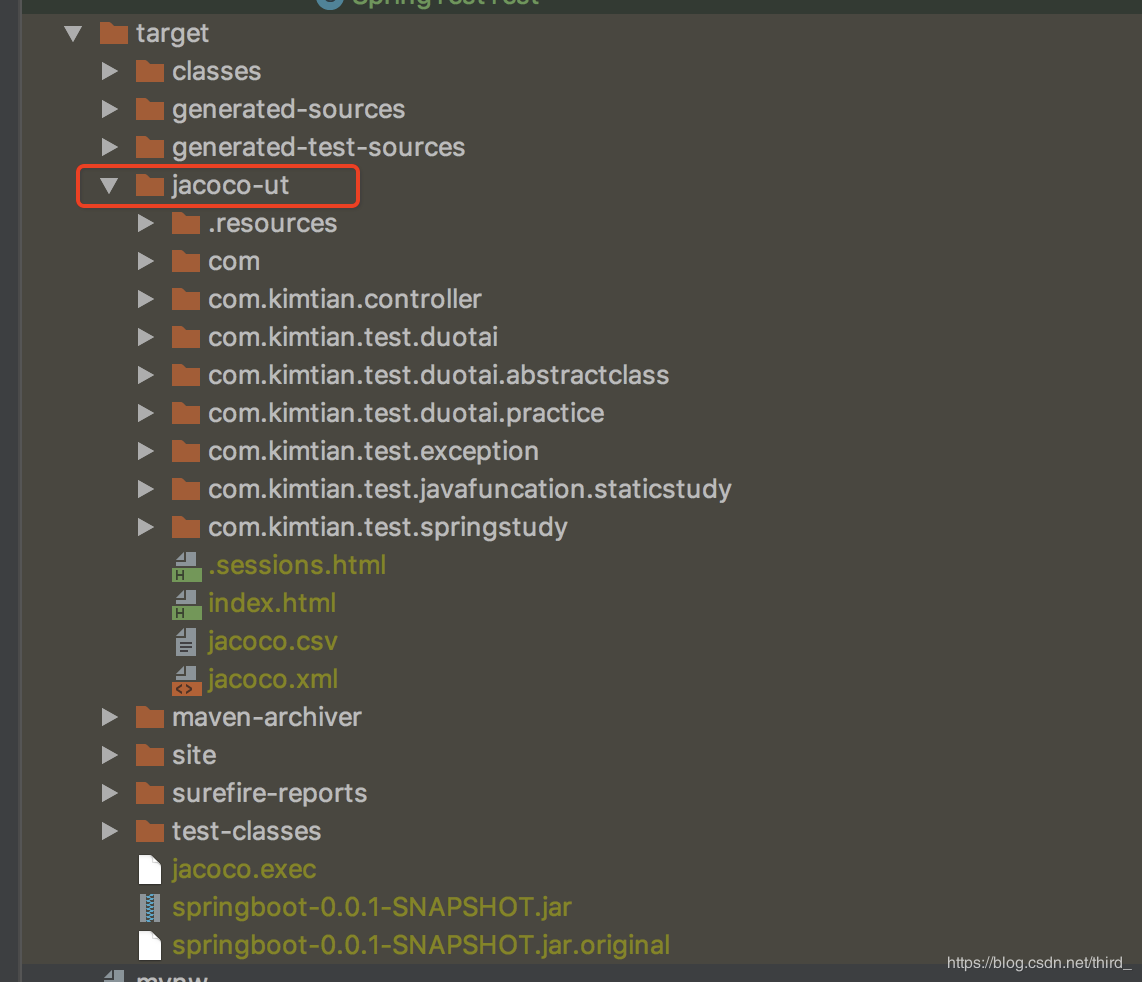
然后在target文件下生成jacoco-ut文件夹,文件夹下可以看到index.html文件,用浏览器打开就是单元覆盖率报告。
另一种方式就是Pom配置文件的方式,注意dataFile和outputDirectory一定要写清楚,另外一定要有test/java这个目录
 1             <dependency>
 2                 <groupId>org.testng</groupId>
 3                 <artifactId>testng</artifactId>
 4                 <version>6.9.6</version>
 5                 <scope>test</scope>
 6                 <optional>true</optional>
 7             </dependency>
 8             <dependency>
 9                 <groupId>org.jacoco</groupId>
10                 <artifactId>jacoco-maven-plugin</artifactId>
11                 <version>0.7.4.201502262128</version>
12                 <scope>test</scope>
13             </dependency>
14             <dependency>
15                 <groupId>junit</groupId>
16                 <artifactId>junit</artifactId>
17                 <version>4.12</version>
18                 <scope>test</scope>
19             </dependency>
  1         <plugin>
  2                 <groupId>org.apache.maven.plugins</groupId>
  3                 <artifactId>maven-shade-plugin</artifactId>
  4                 <version>2.4.1</version>
  5                 <executions>
  6                     <!-- Run shade goal on package phase -->
  7                     <execution>
  8                         <phase>package</phase>
  9                         <goals>
 10                             <goal>shade</goal>
 11                         </goals>
 12                         <configuration>
 13                             <!--<relocations>-->
 14                             <!--<relocation>-->
 15                             <!--<pattern>com.google.protobuf</pattern>-->
 16                             <!--<shadedPattern>shaded.com.google.protobuf</shadedPattern>-->
 17                             <!--</relocation>-->
 18                             <!--</relocations>-->
 19                             <filters>
 20                                 <filter>
 21                                     <artifact>org.apache.flink:*</artifact>
 22                                     <excludes>
 23                                         <!-- exclude shaded google but include shaded curator -->
 24                                         <exclude>org/apache/flink/shaded/com/**</exclude>
 25                                         <exclude>web-docs/**</exclude>
 26                                     </excludes>
 27                                 </filter>
 28                                 <filter>
 29                                     <!-- Do not copy the signatures in the META-INF folder.
 30                                     Otherwise, this might cause SecurityExceptions when using the JAR. -->
 31                                     <artifact>*:*</artifact>
 32                                     <excludes>
 33                                         <exclude>META-INF/*.SF</exclude>
 34                                         <exclude>META-INF/*.DSA</exclude>
 35                                         <exclude>META-INF/*.RSA</exclude>
 36                                     </excludes>
 37                                 </filter>
 38                             </filters>
 39                             <createDependencyReducedPom>false</createDependencyReducedPom>
 40                         </configuration>
 41                     </execution>
 42                 </executions>
 43             </plugin>
 44
 45             <plugin>
 46                 <groupId>org.apache.maven.plugins</groupId>
 47                 <artifactId>maven-compiler-plugin</artifactId>
 48                 <version>3.1</version>
 49                 <configuration>
 50                     <source>1.8</source> <!-- If you want to use Java 8, change this to "1.8" -->
 51                     <target>1.8</target> <!-- If you want to use Java 8, change this to "1.8" -->
 52                 </configuration>
 53             </plugin>
 54             <plugin>
 55                 <groupId>org.apache.maven.plugins</groupId>
 56                 <artifactId>maven-surefire-plugin</artifactId>
 57                 <version>2.19</version>
 58                 <configuration>
 59                     <!--<argLine>-Xmx256M ${jacocoArgLine}</argLine>         -->
 60                     <!--<skip>false</skip>       -->
 61                     <!--<testFailureIgnore>false</testFailureIgnore>     -->
 62                     <!--<includes></includes>-->
 63                     <!--<includes>-->
 64                     <!--<include>**/*Test.java</include>-->
 65                     <!--</includes>-->
 66                     <!--<argLine>-XX:-UseSplitVerifier</argLine>-->
 67                 </configuration>
 68             </plugin>
 69
 70             <plugin>
 71                 <groupId>org.jacoco</groupId>
 72                 <artifactId>jacoco-maven-plugin</artifactId>
 73                 <version>0.7.4.201502262128</version>
 74                 <configuration>
 75                     <!--<includes>-->
 76                     <!--<include>com/src/**/*</include>-->
 77                     <!--</includes>-->
 78                 </configuration>
 79                 <executions>
 80                     <execution>
 81                         <id>pre-test</id>
 82                         <goals>
 83                             <goal>prepare-agent</goal>
 84                         </goals>
 85                         <configuration>
 86                             <propertyName>jacocoArgLine</propertyName>
 87                         </configuration>
 88                     </execution>
 89                     <execution>
 90                         <id>post-test</id>
 91                         <phase>test</phase>
 92                         <goals>
 93                             <goal>report</goal>
 94                         </goals>
 95                     </execution>
 96                     <execution>
 97                         <id>post-unit-test</id>
 98                         <phase>test</phase>
 99                         <goals>
100                             <goal>report</goal>
101                         </goals>
102                         <configuration>
103                             <dataFile>/Users/admin/Desktop/test/target/jacoco.exec</dataFile>
104                             <outputDirectory>/Users/admin/Desktop/test/target/target/jacoco-u</outputDirectory>
105                         </configuration>
106                     </execution>
107                 </executions>
108             </plugin>
十四、Protobuf
1. Protobuf里的数组
Protobuf文件中使用repeated定义数组类型元素,Java设置的时候使用addEntitites而不是set
十五、Maven
1. -DskipTests和-Dmaven.test.skip=true跳过单元测试
mvn clean package -DskipTests,不执行测试用例,但编译测试用例类生成相应的class文件至target/test-classes下。
mvn clean package -Dmaven.test.skip=true,不执行测试用例,也不编译测试用例类
2. 本地仓库导入官方仓库没有的jar包
用到Maven如下命令:
mvn install:install-file
-DgroupId=包名
-DartifactId=项目名
-Dversion=版本号
-Dpackaging=jar
-Dfile=jar文件所在路径
比如执行以下命令:
mvn install:install-file -Dfile=D:\lib\jnotify-0.94.jar -DgroupId=net.contentobjects -DartifactId=jnotify -Dversion=0.94 -Dpackaging=jar -DgeneratePom=true -DcreateChecksum=true
工程中使用时在pom.xml中添加如下内容:
<dependency>
            <groupId>net.contentobjects</groupId>
            <artifactId>jnotify</artifactId>
            <version>0.94</version>
            <<type>jar</type>

</dependency>
十六、日志打印
1. 异常打印
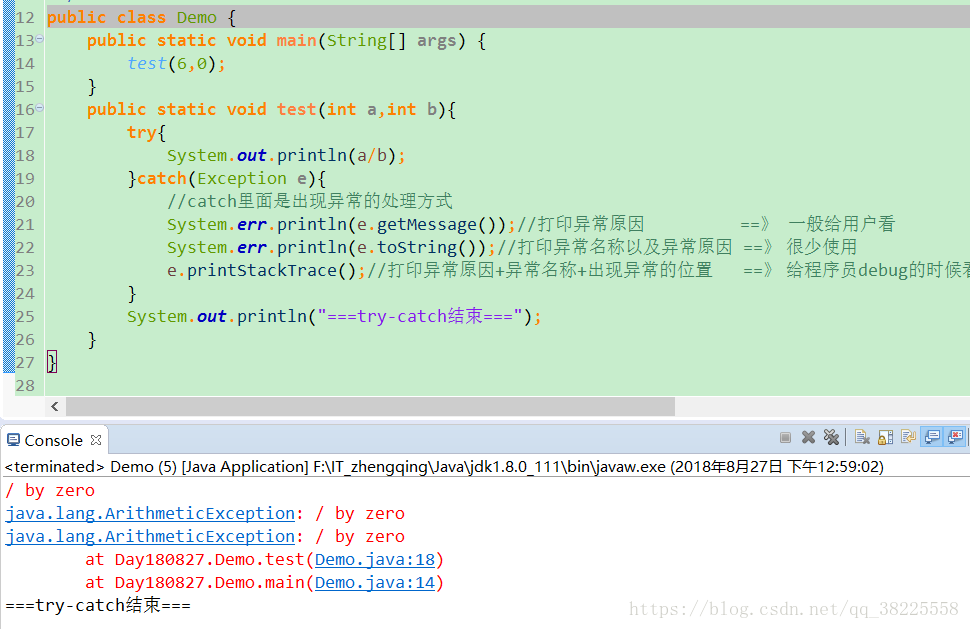
/**
 * String getMessage() :返回此 throwable 的详细消息字符串。
 * String toString() : 返回此 throwable 的简短描述。
 * void printStackTrace():将此 throwable 及其追踪输出至标准错误流。 (即 调用此方法会把完整的异常信息打印到控制台)
 * @author 郑清
 */
public class Demo {
	public static void main(String[] args) {
		test(6,0);
	}
	public static void test(int a,int b){
		try{
			System.out.println(a/b);
		}catch(Exception e){
			//catch里面是出现异常的处理方式    下面err是以红色打印信息
			System.err.println(e.getMessage());//打印异常原因                   ==》  一般给用户看
			System.err.println(e.toString());//打印异常名称以及异常原因  ==》 很少使用
			e.printStackTrace();//打印异常原因+异常名称+出现异常的位置      ==》 给程序员debug的时候看
		}
		System.out.println("===try-catch结束===");
	}
}