


Django的CBV与FBV
FBV
FBV(function base views) 就是在视图里使用函数处理请求。
在之前django的学习中,我们一直使用的是这种方式。
CBV


                views.py
                from django.views import View

                class View:
                    http_method_names = ['get', 'post', 'put', 'patch', 'delete', 'head', 'options', 'trace']
                    @classmethod
                    def as_view(cls, **initkwargs):
                        def view(request, *args, **kwargs):
                            # 实例化一个对象,对象名称为self,self是cls的对象,谁调用了cls
                            # cls就是谁(当前调用cls的是BookView),
                            # 所以,此时的self就是BookView的实例化对象
                            self = cls(**initkwargs)
                            if hasattr(self, 'get') and not hasattr(self, 'head'):
                                self.head = self.get
                            # 此时的request对象指向原始的request对象
                            # 给self这个实例化对象赋值:原始的request
                            self.request = request
                            self.args = args
                            self.kwargs = kwargs
                            # 开始执行self.dispatch()
                            return self.dispatch(request, *args, **kwargs)

                        return view

                    def dispatch(self, request, *args, **kwargs):
                        if request.method.lower() in self.http_method_names:
                            # 通过getattr找到的属性,已经和对象绑定了,访问的时候不需要在指明对象了
                            # 不需要再:self.handler
                            # 直接handler()
                            handler = getattr(self, request.method.lower(), self.http_method_not_allowed)
                        else:
                            handler = self.http_method_not_allowed
                        return handler(request, *args, **kwargs)


                class BookView(View):
                    def get(self, request):
                        pass

                    def post(self, request):
                        pass

                urls.py
                from django.urls import path, include, re_path
                from classbasedview import views

                urlpatterns = [
                    re_path('books/$', views.BookView.as_view()),
                ]

                1. 启动django:python manage.py runserver 127.0.0.1:8000
                2. 加载settings
                    2.1 读取models.py
                    2.2 views.py
                    2.3 urls.py
                        2.3.1 开始执行as_views(): views.LoginView.as_view(), 返回view函数
                        2.3.2 此时url对应具体的某一个函数
                    2.4 开始等待用户请求(127.0.0.1:8000/books/)
                    2.5 开始执行view函数:view(request)
CBV(class base views) 就是在视图里使用类处理请求。
Python是一个面向对象的编程语言,如果只用函数来开发,有很多面向对象的优点就错失了(继承、封装、多态)。所以Django在后来加入了Class-Based-View。可以让我们用类写View。这样做的优点主要下面两种:
- 提高了代码的复用性,可以使用面向对象的技术,比如Mixin(多继承)
- 可以用不同的函数针对不同的HTTP方法处理,而不是通过很多if判断,提高代码可读性
使用class-based views
如果我们要写一个处理GET方法的view,用函数写的话是下面这样。
from django.http import HttpResponse

def my_view(request):
     if request.method == 'GET':
            return HttpResponse('OK')
如果用class-based view写的话,就是下面这样
from django.http import HttpResponse
from django.views import View

class MyView(View):

      def get(self, request):
            return HttpResponse('OK')
Django的url是将一个请求分配给可调用的函数的,而不是一个class。针对这个问题,class-based view提供了一个as_view()静态方法(也就是类方法),调用这个方法,会创建一个类的实例,然后通过实例调用dispatch()方法,dispatch()方法会根据request的method的不同调用相应的方法来处理request(如get() , post()等)。到这里,这些方法和function-based view差不多了,要接收request,得到一个response返回。如果方法没有定义,会抛出HttpResponseNotAllowed异常。
在url中,就这么写:
# urls.py
from django.conf.urls import url
from myapp.views import MyView

urlpatterns = [
     url(r'^index/$', MyView.as_view()),
]
类的属性可以通过两种方法设置,第一种是常见的Python的方法,可以被子类覆盖。
from django.http import HttpResponse
from django.views import View

class GreetingView(View):
    name = "yuan"
    def get(self, request):
         return HttpResponse(self.name)

# You can override that in a subclass

class MorningGreetingView(GreetingView):
    name= "alex"
第二种方法,你也可以在url中指定类的属性:
在url中设置类的属性Python
urlpatterns = [
   url(r'^index/$', GreetingView.as_view(name="egon")),
]
使用Mixin
我觉得要理解django的class-based-view(以下简称cbv),首先要明白django引入cbv的目的是什么。在django1.3之前,generic view也就是所谓的通用视图,使用的是function-based-view(fbv),亦即基于函数的视图。有人认为fbv比cbv更pythonic,窃以为不然。python的一大重要的特性就是面向对象。而cbv更能体现python的面向对象。cbv是通过class的方式来实现视图方法的。class相对于function,更能利用多态的特定,因此更容易从宏观层面上将项目内的比较通用的功能抽象出来。关于多态,不多解释,有兴趣的同学自己Google。总之可以理解为一个东西具有多种形态(的特性)。cbv的实现原理通过看django的源码就很容易明白,大体就是由url路由到这个cbv之后,通过cbv内部的dispatch方法进行分发,将get请求分发给cbv.get方法处理,将post请求分发给cbv.post方法处理,其他方法类似。怎么利用多态呢?cbv里引入了mixin的概念。Mixin就是写好了的一些基础类,然后通过不同的Mixin组合成为最终想要的类。
所以,理解cbv的基础是,理解Mixin。Django中使用Mixin来重用代码,一个View Class可以继承多个Mixin,但是只能继承一个View(包括View的子类),推荐把View写在最右边,多个Mixin写在左边
CBV使用配置
路径url的配置
cbv 顾名知义就是通过类的方法来调用,我们在url中配置为如下路径
url(r'^cbv.html/', views.Cbv.as_view()),这里的Cbv是一个class 类,要想使用cbv方法,这个路径后面还得必须有一个as_view()这个是必须的固定格式
views里面函数的格式
在views里面配置类,需要导入一个模块
from django.views.generic import View #这个是导入的模块,原来的django版本从django.views 里面可以直接导入View,但是现在需要加一个generic才可以
class Cbv(View): #这里必须要继承View这个类,只有继承了这个url那里的as_view()才会有这个方法
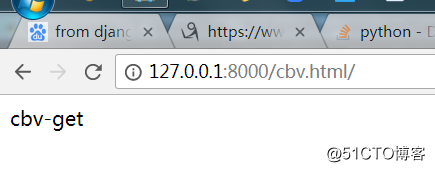
def get(self,request):
return HttpResponse('cbv-get')
def post(self,request):
return HttpResponse('cbv-post')浏览器get方式访问
创建一个login登陆页面测试post方法
views配置
from django.views.generic import View
class Cbv(View):
    def get(self,request):
        # return HttpResponse('cbv-get')
        return render(request,'login.html') #发送到login.html
    def post(self,request):
        return HttpResponse('cbv-post')
login的页面配置代码
<!DOCTYPE html>
<html lang="en">
<head>
    <meta charset="UTF-8">
    <title>cbv学习</title>
</head>
<body>
<form action="/cbv.html/" method="post">
    <input type="text" name="username">
    <input type="submit" value="提交">
</form>

</body>
</html>
浏览器访问查看点击提交后的结果

点击提交
这里通过查看View的源码,可以看到里面会有很多种提交方法
http_method_names = ['get', 'post', 'put', 'patch', 'delete', 'head', 'options', 'trace']
使用ajax的时候这些方法都是可以使用的。
另外继承类不光有View,还有很多的,查看源码就可以看到的
我的django版本号是
C:\Users\Tony>python3 -m django --version
1.9.13
cbv匹配原理
这种更具url来匹配方法的是通过反射方法(getattr)来做的。请求过来后先走dispatch这个方法,这个方法存在View类中。
    def dispatch(self, request, *args, **kwargs):
        # Try to dispatch to the right method; if a method doesn't exist,
        # defer to the error handler. Also defer to the error handler if the
        # request method isn't on the approved list.
        if request.method.lower() in self.http_method_names:
            handler = getattr(self, request.method.lower(), self.http_method_not_allowed)
        else:
            handler = self.http_method_not_allowed
        return handler(request, *args, **kwargs)
定制dispatch
如果需要批量对方法,例如get,post等方法做一些操作的时候,这里我们可以手动写一个dispatch,这个dispatch就和装饰器的效果一样。因为请求来的时候总是先走的dispatch。
from django.views.generic import View
class Cbv(View):
    def dispatch(self, request, *args, **kwargs):
        print('操作前的操作')
        obj = super(Cbv,self).dispatch(request, *args, **kwargs)
        print('操作后的操作代码')
        return obj

    def get(self,request):
        # return HttpResponse('cbv-get')
        return render(request,'login.html')
    def post(self,request):
        return HttpResponse('cbv-post')
这次我们在通过浏览器访问的时候,发现不管get或者post方法,都会走print代码,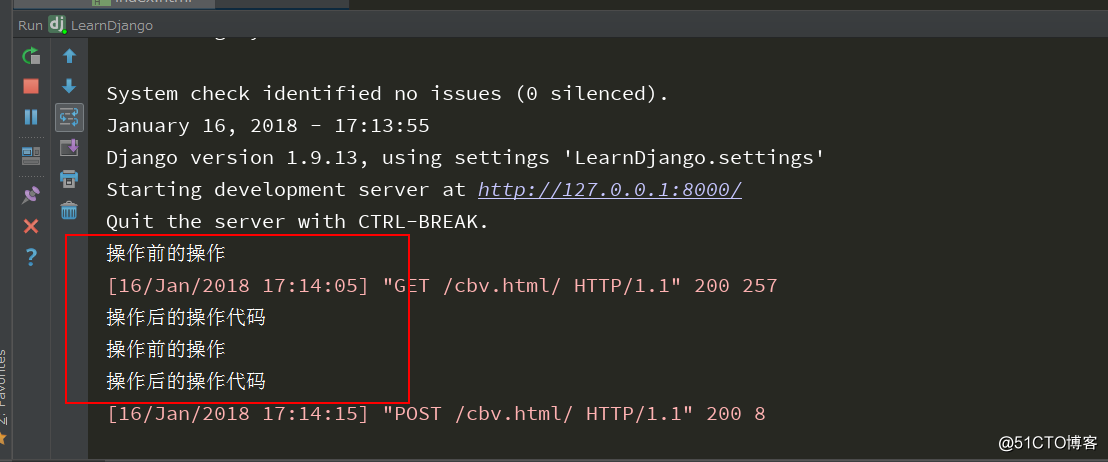
使用cbv实现视图
 1 from django.views import View
 2 from django.utils.decorators import method_decorator
 3
 4
 5 class LoginView(View):
 6
 7     def get(self, request):
 8         return render(request, "login.html")
 9
10     def post(self, request):
11         user = request.POST.get("name")
12         pwd = request.POST.get("pwd")
13         if user == "safly" and pwd == "123":
14             # 登陆成功
15             # 写session
16             request.session["user2"] = user
17             request.session.set_expiry(5)
18             return redirect("/index/")
19
20 def index(request):
21     return render(request,"index.html")
CBV结合装饰器
直接加在视图类上,但method_decorator必须传 name 关键字参数
 1 from django.views import View
 2 from django.utils.decorators import method_decorator
 3
 4
 5 def wrapper(func):
 6     @wraps(func)
 7     def inner(request, *args, **kwargs):
 8         # 登录校验
 9         cookie_k = request.session.get("user01", None)
10         if cookie_k:
11             # 表示已经登录的用户
12             ret = func(request, *args, **kwargs)
13             return ret
14         else:
15             # 滚去登录
16             return redirect("/login/")
17
18     return inner
19
20
21 class LoginView(View):
22
23     def get(self, request):
24         return render(request, "login.html")
25
26     def post(self, request):
27         user = request.POST.get("name")
28         pwd = request.POST.get("pwd")
29         if user == "safly" and pwd == "123":
30             # 登陆成功
31             # 写session
32             request.session["user01"] = user
33             # request.session.set_expiry(5)
34             return redirect("/index/")
35
36
37 @method_decorator(wrapper, name="get")
38 class IndexView(View):
39     def get(self, request):
40         user = request.session.get("user01", "游客")
41         return render(request, "index.html", {"user": user})
* 加在CBV视图的get或post方法上*
# @method_decorator(wrapper, name="get")
class IndexView(View):
    @method_decorator(wrapper)
    def get(self, request):
        user = request.session.get("user02", "游客")
        return render(request, "index.html", {"user": user})
* 加在dispatch方法上*
 1 # @method_decorator(wrapper, name="get")
 2 class IndexView(View):
 3     ## 这么写所有的请求方法都要做登录校验
 4     @method_decorator(wrapper)
 5     def dispatch(self, request, *args, **kwargs):
 6         return super(IndexView,self).dispatch(request,*args,**kwargs)
 7
 8     # @method_decorator(wrapper)
 9     def get(self, request):
10         user = request.session.get("user04", "游客")
11         return render(request, "index.html", {"user": user})
CSRF Token
CSRF Token相关装饰器在CBV只能加到dispatch方法上
备注:
csrf_protect,为当前函数强制设置防跨站请求伪造功能,即便settings中没有设置全局中间件。
csrf_exempt,取消当前函数防跨站请求伪造功能,即便settings中设置了全局中间件
 1 from django.views.decorators.csrf import csrf_exempt, csrf_protect
 2
 3
 4 class HomeView(View):
 5
 6     @method_decorator(csrf_exempt)
 7     def dispatch(self, request, *args, **kwargs):
 8         return super(HomeView, self).dispatch(request, *args, **kwargs)
 9
10     def get(self, request):
11         return render(request, "home.html")
12
13     def post(self, request):
14         print("Home View POST method...")
15         return redirect("/index/")
