Direct3D轮回:游戏特效之全屏泛光(Bloom)
2011-08-25 20:40 风色年代 阅读(10004) 评论(16) 收藏 举报Bloom,又称“全屏泛光”,是大名鼎鼎的虚幻3游戏引擎中最通用的后期特效技术~
Bloom特效的实现主要依赖于PostProcess框架,即实时绘制当前场景到一后台渲染表面,而后针对其对应贴图进行像素级渲染~
大家还记得我们之前实现的水面效果中的反射和折射贴图吗?此即为PostProcess的典型应用,与Bloom特效有异曲同工之妙。
下面,我们就来揭秘这个Bloom特效的实现流程~
本节我们实现的Bloom特效,在流程上总共分为4步:
1.提取原场景贴图中的亮色;
2.针对提取贴图进行横向模糊;
3.在横向模糊基础上进行纵向模糊;
4.所得贴图与原场景贴图叠加得最终效果图。
所用到的Shader主要有三个,分别对应如上4个步骤中的第1步、第2、3步和第4步。我们来看源代码:
 BloomExtract.fx
代码清单:BloomExtract.fx
来自:http://create.msdn.com/en-US/ (AppHub)
-------------------------------------*/
// 提取原始场景贴图中明亮的部分
// 这是应用全屏泛光效果的第一步
sampler TextureSampler : register(s0);
float BloomThreshold;
float4 ThePixelShader(float2 texCoord : TEXCOORD0) : COLOR0
{
// 提取原有像素颜色
float4 c = tex2D(TextureSampler, texCoord);
// 在BloomThreshold参数基础上筛选较明亮的像素
return saturate((c - BloomThreshold) / (1 - BloomThreshold));
}
technique BloomExtract
{
pass Pass1
{
PixelShader = compile ps_2_0 ThePixelShader();
}
}
 GaussianBlur.fx
代码清单:GaussianBlur.fx
来自:http://create.msdn.com/en-US/ (AppHub)
-------------------------------------*/
// 高斯模糊过滤
// 这个特效要应用两次,一次为横向模糊,另一次为横向模糊基础上的纵向模糊,以减少算法上的时间复杂度
// 这是应用Bloom特效的中间步骤
sampler TextureSampler : register(s0);
#define SAMPLE_COUNT 15
// 偏移数组
float2 SampleOffsets[SAMPLE_COUNT];
// 权重数组
float SampleWeights[SAMPLE_COUNT];
float4 ThePixelShader(float2 texCoord : TEXCOORD0) : COLOR0
{
float4 c = 0;
// 按偏移及权重数组叠加周围颜色值到该像素
// 相对原理,即可理解为该像素颜色按特定权重发散到周围偏移像素
for (int i = 0; i < SAMPLE_COUNT; i++)
{
c += tex2D(TextureSampler, texCoord + SampleOffsets[i]) * SampleWeights[i];
}
return c;
}
technique GaussianBlur
{
pass Pass1
{
PixelShader = compile ps_2_0 ThePixelShader();
}
}
 BloomCombine.fx
代码清单:BloomCombine.fx
来自:http://create.msdn.com/en-US/ (AppHub)
-------------------------------------*/
// 按照特定比例混合原始场景贴图及高斯模糊贴图,产生泛光效果
// 这是全屏泛光特效的最后一步
// 模糊场景纹理采样器
sampler BloomSampler : register(s0);
// 原始场景纹理及采样器定义
texture BaseTexture;
sampler BaseSampler = sampler_state
{
Texture = (BaseTexture);
MinFilter = Linear;
MagFilter = Linear;
MipFilter = Point;
AddressU = Clamp;
AddressV = Clamp;
};
float BloomIntensity;
float BaseIntensity;
float BloomSaturation;
float BaseSaturation;
// 减缓颜色的饱和度
float4 AdjustSaturation(float4 color, float saturation)
{
// 人眼更喜欢绿光,因此选取0.3, 0.59, 0.11三个值
float grey = dot(color, float3(0.3, 0.59, 0.11));
return lerp(grey, color, saturation);
}
float4 ThePixelShader(float2 texCoord : TEXCOORD0) : COLOR0
{
// 提取原始场景贴图及模糊场景贴图的像素颜色
float4 bloom = tex2D(BloomSampler, texCoord);
float4 base = tex2D(BaseSampler, texCoord);
// 柔化原有像素颜色
bloom = AdjustSaturation(bloom, BloomSaturation) * BloomIntensity;
base = AdjustSaturation(base, BaseSaturation) * BaseIntensity;
// 结合模糊像素值微调原始像素值
base *= (1 - saturate(bloom));
// 叠加原始场景贴图及模糊场景贴图,即在原有像素基础上叠加模糊后的像素,实现发光效果
return base + bloom;
}
technique BloomCombine
{
pass Pass1
{
PixelShader = compile ps_2_0 ThePixelShader();
}
}
三个Shader均来自于微软WP7开发者俱乐部,如有引用,敬请标明AppHub字样及其站点网址:http://create.msdn.com/en-US/,以示对作者原创版权的尊重!
具备相应的Shader之后,下面我们来看如何运用他们来实现Bloom特效的四个关键步骤~
因为最终的效果贴图本质上是一张与屏幕大小相同的纹理,因此,我们使用原来构建的CSpriteBatch进行绘制。而CSpriteBatch提供的接口是针对于CTexture2D的,所以我们首先要增强并完善CTexture2D类的功能~
以下提供两个函数,使得CTexture2D可以直接产生渲染贴图,并允许获取其后台渲染表面:
{
// 创建渲染贴图
HRESULT hr;
hr = D3DXCreateTexture(g_pD3DDevice, SizeX, SizeY, 1,
D3DUSAGE_RENDERTARGET, D3DFMT_A8R8G8B8, D3DPOOL_DEFAULT, &m_pTexture);
if(FAILED(hr))
return false;
m_Width = SizeX;
m_Height = SizeY;
m_SurRect.top = 0;
m_SurRect.left = 0;
m_SurRect.right = m_Width;
m_SurRect.bottom = m_Height;
return true;
}
bool CTexture2D::GetRenderSurface(IDirect3DSurface9** pOutSurface)
{
// 获得贴图的渲染表面
HRESULT hr;
hr = m_pTexture->GetSurfaceLevel(0, pOutSurface);
if(FAILED(hr))
return false;
else
return true;
}
之后,就可以着手构建我们的CBloomEffect效果类了:
代码清单:BloomEffect.h
来自:http://www.cnblogs.com/kenkao
-------------------------------------*/
#include "D3DEffect.h"
#include "Texture2D.h"
#pragma once
// Bloom参数体
typedef struct _BloomParam
{
char* _Name; // Bloom特效名称
float _BloomThreshold; // 饱和度
float _BlurAmount; // 模糊程度
float _BloomIntensity; // 模糊剧烈度
float _BaseIntensity; // 原始剧烈度
float _BloomSaturation; // 模糊饱和度
float _BaseSaturation; // 原始饱和度
_BloomParam(){}
_BloomParam(char* name, float bloomThreshold, float blurAmount,
float bloomIntensity, float baseIntensity,
float bloomSaturation, float baseSaturation)
{
_Name = name; _BloomThreshold = bloomThreshold; _BlurAmount = blurAmount;
_BloomIntensity = bloomIntensity; _BaseIntensity = baseIntensity;
_BloomSaturation = bloomSaturation; _BaseSaturation = baseSaturation;
}
}BloomParam;
class CBloomEffect
{
public:
CBloomEffect(void);
~CBloomEffect(void);
public:
void Create(); // 创建Bloom特效
void Release(); // 释放Bloom特效
void DrawScene(); // 场景绘制
void Begin(); // 开启Bloom
void End(); // 关闭Bloom
public:
void SetParam(BloomParam* pParam){m_pParam = pParam;} // 参数体设置
BloomParam* GetParam() {return m_pParam;} // 参数体获取
private:
void PostScene(); // Bloom场景投递
void PostSurface( // 应用特效投递贴图到特定缓存表面,本质就是将一个贴图应用Shader之后的效果写入另一个贴图
CTexture2D* pTexture, // 后台纹理
IDirect3DSurface9* pSurface, // 渲染表面
CD3DEffect* pEffect); // 目标特效
bool LoadContent(); // 加载内容
bool GetSurfaces(); // 获取渲染表面
private:
float ComputeGaussian(float n); // 计算高斯模糊参数
void SetBlurEffectParam(float dx, float dy); // 计算偏移数组及权重数组
private:
CD3DEffect* m_pBloomExtractEffect; // Bloom依次用到的三个特效
CD3DEffect* m_pGaussianBlurEffect;
CD3DEffect* m_pBloomCombineEffect;
private:
CTexture2D* m_pResolveTarget; // 原始贴图
CTexture2D* m_pTexture1; // 模糊贴图
CTexture2D* m_pTexture2; // 临时模糊贴图
IDirect3DSurface9* m_pResolveSurface; // 原始贴图渲染表面
IDirect3DSurface9* m_pSurface1; // 模糊贴图渲染表面
IDirect3DSurface9* m_pSurface2; // 临时贴图渲染表面
IDirect3DSurface9* m_pOriSurface; // 初始渲染表面
private:
BloomParam* m_pParam; // Bloom参数体
};
 BloomEffect.cpp
代码清单:BloomEffect.cpp
来自:http://www.cnblogs.com/kenkao
-------------------------------------*/
#include "StdAfx.h"
#include "BloomEffect.h"
#include "D3DGame.h"
#include "SpriteBatch.h"
#include <math.h>
extern IDirect3DDevice9* g_pD3DDevice;
extern CSpriteBatch* g_pSpriteBatch;
extern D3DPRESENT_PARAMETERS g_D3DPP;
CBloomEffect::CBloomEffect(void)
{
}
CBloomEffect::~CBloomEffect(void)
{
}
void CBloomEffect::Release()
{
ReleaseCOM(m_pBloomExtractEffect);
ReleaseCOM(m_pBloomCombineEffect);
ReleaseCOM(m_pGaussianBlurEffect);
ReleaseCOM(m_pTexture1);
ReleaseCOM(m_pTexture2);
ReleaseCOM(m_pSurface1);
ReleaseCOM(m_pSurface2);
}
void CBloomEffect::Create()
{
if(!LoadContent())
Release();
}
bool CBloomEffect::LoadContent()
{
// 初始化并加载特效
m_pBloomExtractEffect = new CD3DEffect;
m_pBloomCombineEffect = new CD3DEffect;
m_pGaussianBlurEffect = new CD3DEffect;
if( !m_pBloomExtractEffect->LoadEffect("BloomExtract.fx")||
!m_pBloomCombineEffect->LoadEffect("BloomCombine.fx")||
!m_pGaussianBlurEffect->LoadEffect("GaussianBlur.fx"))
{
return false;
}
// 获得渲染表面
if(!GetSurfaces())
{
return false;
}
return true;
}
bool CBloomEffect::GetSurfaces()
{
// 初始化纹理并获得渲染表面
m_pResolveTarget = new CTexture2D;
m_pTexture1 = new CTexture2D;
m_pTexture2 = new CTexture2D;
if( !m_pResolveTarget->CreateRenderTarget(g_D3DPP.BackBufferWidth,g_D3DPP.BackBufferHeight)||
!m_pResolveTarget->GetRenderSurface(&m_pResolveSurface))
{
return false;
}
if( !m_pTexture1->CreateRenderTarget(g_D3DPP.BackBufferWidth,g_D3DPP.BackBufferHeight)||
!m_pTexture1->GetRenderSurface(&m_pSurface1))
{
return false;
}
if( !m_pTexture2->CreateRenderTarget(g_D3DPP.BackBufferWidth,g_D3DPP.BackBufferHeight)||
!m_pTexture2->GetRenderSurface(&m_pSurface2))
{
return false;
}
return true;
}
void CBloomEffect::Begin()
{
// 暂存原始渲染表面
g_pD3DDevice->GetRenderTarget(0, &m_pOriSurface);
// 设定后台渲染表面
g_pD3DDevice->SetRenderTarget(0, m_pResolveSurface);
g_pD3DDevice->Clear(0, NULL, D3DCLEAR_TARGET | D3DCLEAR_ZBUFFER, D3DCOLOR_RGBA(100,149,237,255), 1.0f, 0);
}
// Begin及End之间绘制原始场景,则得到原始场景贴图m_pResolveTarget
void CBloomEffect::End()
{
// 绘制后台场景
PostScene();
// 还原渲染表面
g_pD3DDevice->SetRenderTarget(0, m_pOriSurface);
}
void CBloomEffect::PostSurface(CTexture2D* pTexture, IDirect3DSurface9* pSurface, CD3DEffect* pEffect)
{
// 设定后台渲染表面
g_pD3DDevice->SetRenderTarget(0, pSurface);
g_pD3DDevice->Clear(0, NULL, D3DCLEAR_TARGET | D3DCLEAR_ZBUFFER, D3DCOLOR_RGBA(100,149,237,255), 1.0f, 0);
// 应用特效绘制纹理到后台渲染表面
g_pSpriteBatch->Begin(SPRITEBLENDMODE_NONE, pEffect);
g_pSpriteBatch->Draw(pTexture, D3DXVECTOR2_ZERO);
g_pSpriteBatch->End();
}
void CBloomEffect::PostScene()
{
// Bloom第1步:
m_pBloomExtractEffect->GetEffect()->SetFloat("BloomThreshold",m_pParam->_BloomThreshold);
PostSurface(m_pResolveTarget,m_pSurface1,m_pBloomExtractEffect);
// Bloom第2步:
SetBlurEffectParam(1.0f / (float)g_D3DPP.BackBufferWidth, 0);
PostSurface(m_pTexture1,m_pSurface2,m_pGaussianBlurEffect);
// Bloom第3步:
SetBlurEffectParam(0, 1.0f / (float)g_D3DPP.BackBufferHeight);
PostSurface(m_pTexture2,m_pSurface1,m_pGaussianBlurEffect);
}
void CBloomEffect::DrawScene()
{
// 设定BloomCombine特效参数,控制原始场景m_pResolveTarget及模糊场景m_pTexture1的混合比例
m_pBloomCombineEffect->GetEffect()->SetFloat("BloomIntensity",m_pParam->_BloomIntensity);
m_pBloomCombineEffect->GetEffect()->SetFloat("BaseIntensity",m_pParam->_BaseIntensity);
m_pBloomCombineEffect->GetEffect()->SetFloat("BloomSaturation",m_pParam->_BloomSaturation);
m_pBloomCombineEffect->GetEffect()->SetFloat("BaseSaturation",m_pParam->_BaseSaturation);
m_pBloomCombineEffect->GetEffect()->SetTexture("BaseTexture",m_pResolveTarget->GetTexture());
// Bloom第4步:
g_pSpriteBatch->Begin(SPRITEBLENDMODE_NONE, m_pBloomCombineEffect);
g_pSpriteBatch->Draw(m_pTexture1, D3DXVECTOR2_ZERO);
g_pSpriteBatch->End();
}
void CBloomEffect::SetBlurEffectParam(float dx, float dy)
{
// 按场景尺寸计算偏移数组及权重数组(高斯模糊固定计算公式)
D3DXHANDLE weightsParameter, offsetsParameter;
int sampleCount = 15;
weightsParameter = m_pGaussianBlurEffect->GetEffect()->GetParameterByName(0,"SampleWeights");
offsetsParameter = m_pGaussianBlurEffect->GetEffect()->GetParameterByName(0,"SampleOffsets");
float sampleWeights[15];
float sampleOffsets[30];
sampleWeights[0] = ComputeGaussian(0);
sampleOffsets[0] = 0.0f;
sampleOffsets[1] = 0.0f;
float totalWeights = sampleWeights[0];
for (int i = 0; i < sampleCount / 2; i++)
{
float weight = ComputeGaussian(i + 1);
sampleWeights[i * 2 + 1] = weight;
sampleWeights[i * 2 + 2] = weight;
totalWeights += weight * 2;
float sampleOffset = i * 2 + 1.5f;
D3DXVECTOR2 delta = D3DXVECTOR2(dx, dy) * sampleOffset;
sampleOffsets[i * 4 + 1] = delta.x;
sampleOffsets[i * 4 + 2] = delta.y;
sampleOffsets[i * 4 + 3] = -delta.x;
sampleOffsets[i * 4 + 4] = -delta.y;
}
for (int i = 0; i < sampleCount; i++)
{
sampleWeights[i] /= totalWeights;
}
// 将计算结果传递到GaussianBlur特效
m_pGaussianBlurEffect->GetEffect()->SetFloatArray(weightsParameter,sampleWeights,sampleCount);
m_pGaussianBlurEffect->GetEffect()->SetFloatArray(offsetsParameter,sampleOffsets,sampleCount*2);
}
float CBloomEffect::ComputeGaussian(float n)
{
// 高斯参数计算公式
float theta = m_pParam->_BlurAmount;
return (float)((1.0 / sqrt(2 * MATH_PI * theta)) *
exp(-(n * n) / (2 * theta * theta)));
}
该类共产生了3个渲染表面,并在渲染过程中发生了相互叠加,嗯…有点混乱…
我们不妨来看一看每个步骤所得到的渲染效果,而后再针对4个步骤进行分析。如下是我在渲染过程中提取的效果图:
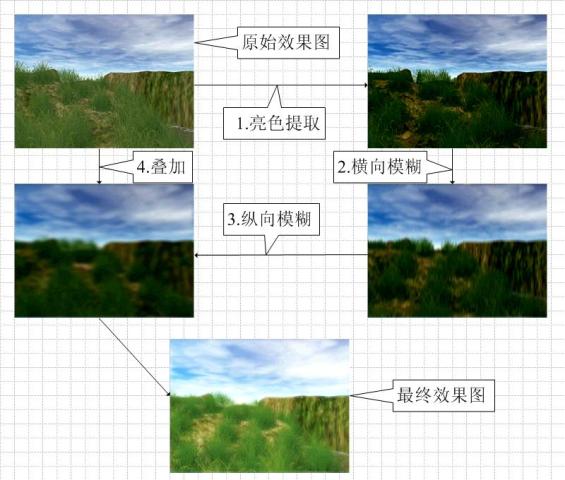
有了这个流程图,大家的思路是不是清晰了一些呢?下面,大家结合这个流程图来分析各个步骤:
第一步:
应用BloomExtract特效提取原始场景贴图m_pResolveTarget中较明亮的颜色绘制到m_pTexture1贴图中(m_pResolveTarget--->m_pTexture1)
第二步:
应用GaussianBlur特效,在m_pTexture1贴图基础上进行横向高斯模糊到m_pTexture2贴图(m_pTexture1--->m_pTexture2)
第三步:
再次应用GaussianBlur特效,在横向模糊之后的m_pTexture2贴图基础上进行纵向高斯模糊,得到最终的模糊贴图m_pTexture1(m_pTexture2--->m_pTexture1)
注意:此时,m_pTexture1贴图即为最终的模糊效果贴图
如果大家不明白高斯模糊的内部原理,可以参看老师为大家翻译的这篇文章:http://shiba.hpe.sh.cn/jiaoyanzu/WULI/showArticle.aspx?articleId=518&classId=4
第四步:
应用BloomCombine特效,叠加原始场景贴图m_pResolveTarget及两次模糊之后的场景贴图m_pTexture1,从而实现发光效果(m_pResolveTarget+m_pTexture1)
怎么样?大家明白了吗?呵呵~
我们来看主体代码:
 D3DGame.cpp
代码清单:D3DGame.cpp
来自:http://www.cnblogs.com/kenkao
-------------------------------------*/
#include "StdAfx.h"
#include "D3DGame.h"
#include "D3DCamera.h"
#include "D3DEffect.h"
#include "CoordCross.h"
#include "SimpleXMesh.h"
#include "Texture2D.h"
#include "Skybox.h"
#include "SpriteBatch.h"
#include "BaseTerrain.h"
#include "Water.h"
#include "PlantCollect.h"
#include "LensFlare.h"
#include "D3DFog.h"
#include "BloomEffect.h"
#include <stdio.h>
#include <time.h>
//---通用全局变量
HINSTANCE g_hInst;
HWND g_hWnd;
D3DXMATRIX g_matWorld;
D3DXMATRIX g_matProjection;
D3DPRESENT_PARAMETERS g_D3DPP;
//---D3D全局变量
IDirect3D9 *g_pD3D = NULL;
IDirect3DDevice9 *g_pD3DDevice = NULL;
CMouseInput *g_pMouseInput = NULL;
CKeyboardInput *g_pKeyboardInput = NULL;
CD3DCamera *g_pD3DCamera = NULL;
CSpriteBatch *g_pSpriteBatch = NULL;
CSkybox *g_pSkybox = NULL;
CBaseTerrain *g_pBaseTerrain = NULL;
CWater *g_pWater = NULL;
CPlantCollect *g_pPlant = NULL;
CSimpleXMesh *g_pMesh = NULL;
CLensFlare *g_pFlare = NULL;
CBloomEffect *g_pBloom = NULL;
// Bloom参数体数组及全局索引
int g_bloomParamIndex = 0;
BloomParam g_BloomParams[6]={
BloomParam("Default", 0.25f, 4, 1.25f, 1, 1, 1),
BloomParam("Soft", 0, 3, 1, 1, 1, 1),
BloomParam("Desaturated", 0.5f, 8, 2, 1, 0, 1),
BloomParam("Saturated", 0.25f, 4, 2, 1, 2, 0),
BloomParam("Blurry", 0, 2, 1, 0.1f, 1, 1),
BloomParam("Subtle", 0.5f, 2, 1, 1, 1, 1)
};
// 场景绘制
void DrawScene(bool isReflect,bool isRefract);
void Initialize(HINSTANCE hInst, HWND hWnd)
{
g_hInst = hInst;
g_hWnd = hWnd;
InitD3D(&g_pD3D, &g_pD3DDevice, g_D3DPP, g_matProjection, hWnd);
g_pMouseInput = new CMouseInput;
g_pMouseInput->Initialize(hInst,hWnd);
g_pKeyboardInput = new CKeyboardInput;
g_pKeyboardInput->Initialize(hInst,hWnd);
g_pD3DCamera = new CD3DCamera;
g_pSpriteBatch = new CSpriteBatch(g_pD3DDevice);
srand(time(0));
}
CTexture2D* debugTexture = NULL;
void LoadContent()
{
g_pD3DCamera->SetCameraPos(D3DXVECTOR3(600.0f,0.0f,600.0f));
g_pSkybox = new CSkybox;
g_pSkybox->Create("Skybox_0.JPG","Skybox_1.JPG","Skybox_2.JPG"
,"Skybox_3.JPG","Skybox_4.JPG","Skybox_5.JPG");
g_pBaseTerrain = new CBaseTerrain;
g_pBaseTerrain->Create(128,128,10,"HeightData_128x128.raw","Grass.dds");
g_pWater = new CWater;
g_pWater->Create(1280,1280,0.0f,0.0f,40.0f);
g_pPlant = new CPlantCollect;
g_pPlant->Create(60,90,15);
g_pMesh = new CSimpleXMesh;
g_pMesh->LoadXMesh("WindMill.x");
g_pFlare = new CLensFlare;
g_pFlare->Create(D3DXVECTOR3(-1600,700,600),D3DXVECTOR2(800,600));
//ResetFog(D3DFOGTYPE_PIXEL,D3DFOG_EXP2,D3DXCOLOR_WHITE,0.001f);
// 创建并初始化Bloom特效
g_pBloom = new CBloomEffect;
g_pBloom->Create();
}
void Update(float gameTick)
{
g_pMouseInput->GetState();
g_pKeyboardInput->GetState();
// 更新摄影机高度
D3DXVECTOR3 CameraPos = g_pD3DCamera->GetCameraPos();
float roleHeight = 25.0f;
float Ty = g_pBaseTerrain->GetExactHeightAt(CameraPos.x,CameraPos.z) + roleHeight;
g_pD3DCamera->SetCameraPos(D3DXVECTOR3(
CameraPos.x,
Ty,
CameraPos.z));
g_pD3DCamera->Update();
if(g_pKeyboardInput->IsJustKeyDown(DIK_SPACE))
{
g_bloomParamIndex++;
if(g_bloomParamIndex>=6)
g_bloomParamIndex = 0;
}
g_pBloom->SetParam(&g_BloomParams[g_bloomParamIndex]);
}
void Draw(float gameTick)
{
g_pD3DDevice->GetTransform(D3DTS_WORLD, &g_matWorld);
g_pD3DDevice->SetTransform(D3DTS_VIEW, &g_pD3DCamera->GetViewMatrix());
g_pD3DDevice->Clear(0, NULL, D3DCLEAR_TARGET | D3DCLEAR_ZBUFFER, D3DCOLOR_RGBA(100,149,237,255), 1.0f, 0);
if(SUCCEEDED(g_pD3DDevice->BeginScene()))
{
//BeginFog(g_pD3DDevice);
g_pWater->BeginReflect();
DrawScene(true,false);
g_pWater->EndReflect();
g_pWater->BeginRefract();
DrawScene(false,true);
g_pWater->EndRefract();
// 开启Bloom
g_pBloom->Begin();
// 绘制实时场景到Bloom原始后台表面
DrawScene(false,false);
g_pWater->Draw(gameTick);
g_pPlant->Draw(gameTick);
// 结束Bloom,并触发Bloom前三个步骤
g_pBloom->End();
// 触发Bloom第四个步骤,而后进行Bloom渲染
g_pBloom->DrawScene();
g_pFlare->Draw();
//EndFog(g_pD3DDevice);
g_pD3DDevice->EndScene();
}
g_pD3DDevice->Present(NULL, NULL, NULL, NULL);
}
void DrawScene(bool isReflect,bool isRefract)
{
g_pSkybox->Draw(isReflect,isRefract);
g_pBaseTerrain->Draw();
D3DXMATRIX scalTrans;
D3DXMatrixScaling(&scalTrans,5.0f,5.0f,5.0f);
D3DXMATRIX movTrans;
D3DXMatrixTranslation(&movTrans,366,g_pBaseTerrain->GetExactHeightAt(366,190)-5.0f,190);
g_pMesh->DrawXMesh(scalTrans * movTrans);
}
void UnloadContent()
{
ReleaseCOM(g_pBloom);
ReleaseCOM(g_pMesh);
ReleaseCOM(g_pFlare);
ReleaseCOM(g_pPlant);
ReleaseCOM(g_pWater);
ReleaseCOM(g_pBaseTerrain);
ReleaseCOM(g_pSkybox);
}
void Dispose()
{
ReleaseCOM(g_pSpriteBatch);
ReleaseCOM(g_pD3DCamera);
ReleaseCOM(g_pKeyboardInput);
ReleaseCOM(g_pMouseInput);
ReleaseCOM(g_pD3DDevice);
ReleaseCOM(g_pD3D);
}
对Bloom参数体各个成员变量数值进行交叉组合,则我们可以得到一系列不同的Bloom效果:
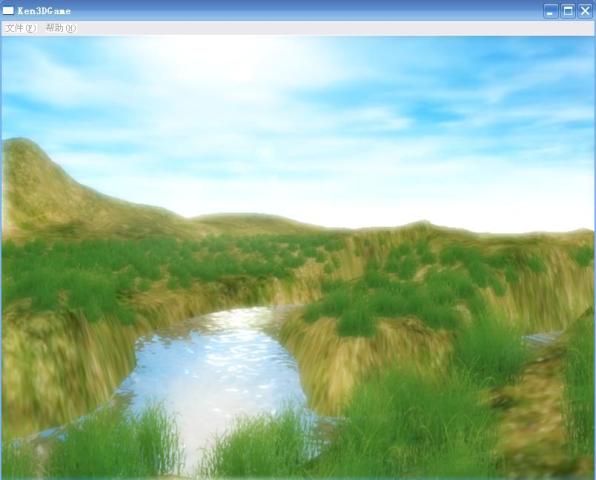
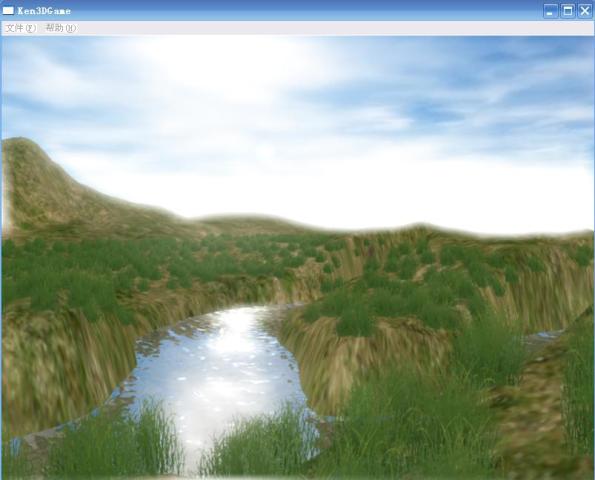
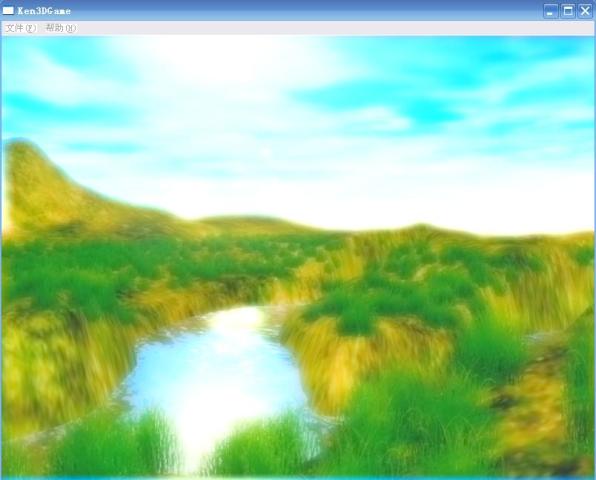
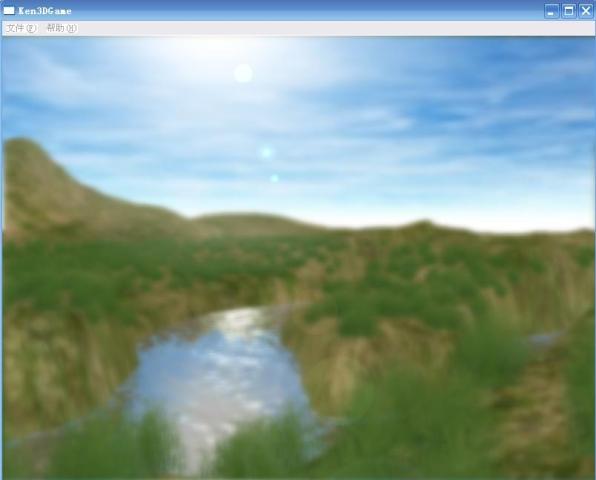
还在羡慕那些专业游戏中美轮美奂的后期特效吗?现在我们也有能力实现了~ 大家赶快动手尝试一下吧 ^ ^
以上,谢谢~


 Bloom又称“全屏泛光”,是大名鼎鼎的虚幻3游戏引擎中最通用的后期特效技术~
Bloom特效的实现主要依赖于PostProcess框架,即实时绘制当前场景到一后台渲染表面,而后针对其对应贴图进行像素级渲染~
大家还记得我们之前实现的水面效果中的反射和折射贴图吗?此即为PostProcess的典型应用,与Bloom特效有异曲同工之妙。
本篇,我们就来揭秘这个Bloom特效的实现流程~


 浙公网安备 33010602011771号