

SpringMVC 学习笔记(一) Hello World
springMVC概述:
Spring MVC 是目前最主流的MVC 框架之一
Spring MVC 通过一套 MVC 注解,让 POJO 成为处理请
求的控制器,而无须实现任何接口。
支持 REST 风格的 URL 请求
采用了松散耦合可插拔组件结构,比其他 MVC 框架更具
扩展性和灵活性

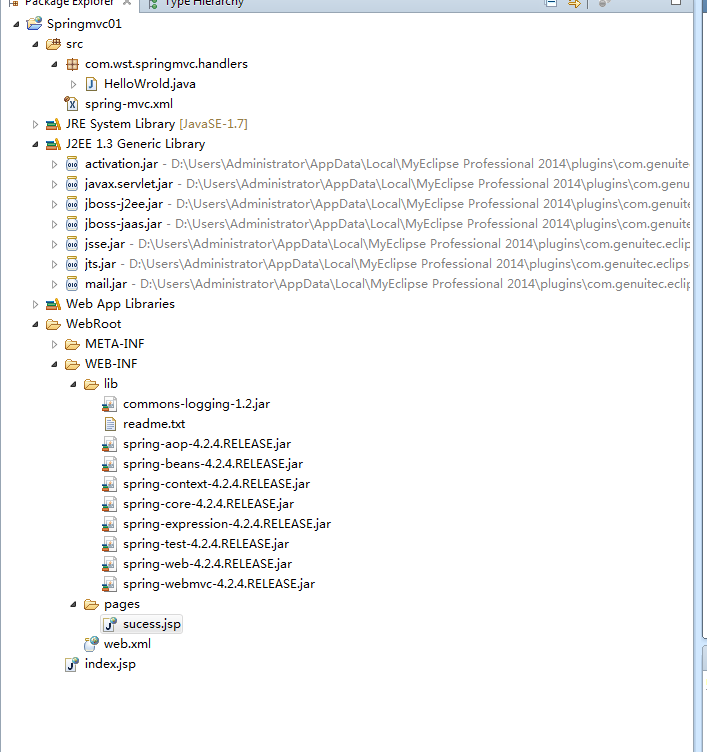
第一步:先建立一个javaweb动态项目的工程

工程名称为springmvc01
2、整个项目的工程如下所示,添加所需的jar包,这里下载的spring 4.2
3、接下来在web.xml中配置springmvc启动加载的DispatcherServlet,配置拦截客户端的所有请求,但是这里会访问不到静态资源文件后面会讲解
web.xml
<?xml version="1.0" encoding="UTF-8"?>
<web-app xmlns:xsi="http://www.w3.org/2001/XMLSchema-instance"
    xmlns="http://java.sun.com/xml/ns/javaee"
    xsi:schemaLocation="http://java.sun.com/xml/ns/javaee http://java.sun.com/xml/ns/javaee/web-app_3_0.xsd"
    version="3.0" >
    <!-- The front controller of this Spring Web application, responsible for handling all application requests -->
    <servlet>
        <servlet-name>springDispatcherServlet</servlet-name>
    <servlet-class>org.springframework.web.servlet.DispatcherServlet</servlet-class>
        <!-- 加载spirng配置文件 -->
        <init-param>
            <param-name>contextConfigLocation</param-name>
            <param-value>classpath:spring-mvc.xml</param-value>
        </init-param>
        <!-- 启动就加载 -->
        <load-on-startup>1</load-on-startup>
    </servlet>

    <!-- 拦截所有请求 -->
    <servlet-mapping>
        <servlet-name>springDispatcherServlet</servlet-name>
        <url-pattern>/</url-pattern>
    </servlet-mapping>
</web-app>
其中:
 <param-value>classpath:spring-mvc.xml</param-value>指定自己创建的spring-mvc的配置文件,配置文件我们放在src目录下类路径下
第二步:创建
spring-mvc.xml这个文件
<?xml version="1.0" encoding="UTF-8"?>
<beans xmlns="http://www.springframework.org/schema/beans"
    xmlns:xsi="http://www.w3.org/2001/XMLSchema-instance"
    xmlns:context="http://www.springframework.org/schema/context"
    xmlns:mvc="http://www.springframework.org/schema/mvc"
    xsi:schemaLocation="http://www.springframework.org/schema/mvc http://www.springframework.org/schema/mvc/spring-mvc-4.1.xsd
        http://www.springframework.org/schema/beans http://www.springframework.org/schema/beans/spring-beans.xsd
        http://www.springframework.org/schema/context http://www.springframework.org/schema/context/spring-context-4.1.xsd">
    <!-- 配置自动扫描包  扫描com.ibigsea.springmvc 包下的类,后期会使用spring进行管理 -->
    <context:component-scan base-package="com.wst.springmvc.handlers"/>
<!-- 配置视图解析器 如返回helloworld
                         为 [/WEB-INF/pages/helloworld.jsp] -->
    <bean class="org.springframework.web.servlet.view.InternalResourceViewResolver">
     <!-- 前缀 -->
        <property name="prefix" value="/WEB-INF/pages/"/>
         <!-- 后缀 -->
        <property name="suffix" value=".jsp"/>
    </bean>
</beans>
这里我们要使用@control这个注解,我们配置自己扫描功能<context:component-scan base-package="com.wst.springmvc.handlers"/>,描述com.wst.springmvc.handlers这个包下面的所有control类文件
InternalResourceViewResolver这个是配置视图解析器,解析/WEB-INF/pages/这个目录下的所有的jsp页面返回给客户端

4、编写handler文件,这个类文件处理客户端转发过来的请求
package com.wst.springmvc.handlers;

import org.springframework.stereotype.Controller;
import org.springframework.web.bind.annotation.RequestMapping;

@Controller
public class HelloWrold {

    /***
     * 使用@RequestMapping来注册映射的请求
     * value="/helloworld"中的值必须和 <a href="helloworld">Hello world </a>一一对应
     * */
    @RequestMapping(value="/helloworld")
    public String helloworld(){
        System.out.println("helloworld is called");
        return "sucess";
    }
}
这里第一个类必须使用@control进行注解,表示该类是springmvc的handler处理器,第二需要使用RequestMapping对文件进行映射
我们来看index.jsp中的href对应的helloworld就必须和@RequestMapping(value="/helloworld")一一对应起来。当业务处理完成之后,返回sucess字符串,表示的意思就是返回到/WEB-INF/pages/sucess.jsp页面
<%@ page language="java" import="java.util.*" pageEncoding="ISO-8859-1"%>
<%
String path = request.getContextPath();
String basePath = request.getScheme()+"://"+request.getServerName()+":"+request.getServerPort()+path+"/";
%>

<!DOCTYPE HTML PUBLIC "-//W3C//DTD HTML 4.01 Transitional//EN">
<html>
  <head>
    <base href="<%=basePath%>">

    <title>My JSP 'index.jsp' starting page</title>
    <meta http-equiv="pragma" content="no-cache">
    <meta http-equiv="cache-control" content="no-cache">
    <meta http-equiv="expires" content="0">
    <meta http-equiv="keywords" content="keyword1,keyword2,keyword3">
    <meta http-equiv="description" content="This is my page">
    <!--
    <link rel="stylesheet" type="text/css" href="styles.css">
    -->
  </head>

  <body>
    <a href="helloworld">Hello world </a>
  </body>
</html>
sucess.jsp的页面内容如下
<%@ page language="java" import="java.util.*" pageEncoding="utf-8"%>
<%
String path = request.getContextPath();
String basePath = request.getScheme()+"://"+request.getServerName()+":"+request.getServerPort()+path+"/";
%>

<!DOCTYPE HTML PUBLIC "-//W3C//DTD HTML 4.01 Transitional//EN">
<html>
  <head>
    <base href="<%=basePath%>">

    <title>My JSP 'index.jsp' starting page</title>
    <meta http-equiv="pragma" content="no-cache">
    <meta http-equiv="cache-control" content="no-cache">
    <meta http-equiv="expires" content="0">
    <meta http-equiv="keywords" content="keyword1,keyword2,keyword3">
    <meta http-equiv="description" content="This is my page">
    <!--
    <link rel="stylesheet" type="text/css" href="styles.css">
    -->
  </head>

  <body>
     页面跳转成功
  </body>
</html>
我们来梳理下流程
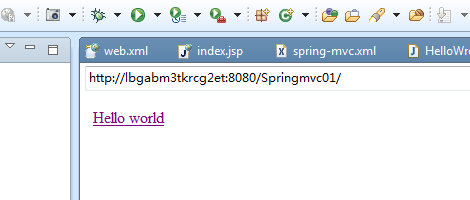
当用户点击index.jsp页面上的Hello world的时候,将请求转发给handler中的helloworld函数处理,处理完成后跳转到web-inf/pages/sucess.jsp页面

3. 尚硅谷_佟刚_SpringMVC_RequestMapping_修饰类.avi

1.我们来看@requestMapping修饰类
package com.wst.springmvc.handlers;

import org.springframework.stereotype.Controller;
import org.springframework.web.bind.annotation.RequestMapping;

@Controller
@RequestMapping("/springmvc")
public class SpringMvcTest {

    @RequestMapping("/testRequestMapping")
    public String testRequestMapping(){
        return "sucess";
    }
}
其中:@RequestMapping("/springmvc")当@RequestMapping(value="/springmvc")中只有一个参数的时候,value可以省去
这个时候在类上使用了@RequestMapping("/springmvc")修饰类,这个时候要访问handler中的testRequestMapping方法,对应的客户端的url需要改变为下面的访问形式
http://localhost:8080/Springmvc01/springmvc/testRequestMapping

对应的index.jsp页面修改为:
<%@ page language="java" import="java.util.*" pageEncoding="ISO-8859-1"%>
<%
String path = request.getContextPath();
String basePath = request.getScheme()+"://"+request.getServerName()+":"+request.getServerPort()+path+"/";
%>

<!DOCTYPE HTML PUBLIC "-//W3C//DTD HTML 4.01 Transitional//EN">
<html>
  <head>
    <base href="<%=basePath%>">

    <title>My JSP 'index.jsp' starting page</title>
    <meta http-equiv="pragma" content="no-cache">
    <meta http-equiv="cache-control" content="no-cache">
    <meta http-equiv="expires" content="0">
    <meta http-equiv="keywords" content="keyword1,keyword2,keyword3">
    <meta http-equiv="description" content="This is my page">
    <!--
    <link rel="stylesheet" type="text/css" href="styles.css">
    -->
  </head>

  <body>
    <a href="springmvc/testRequestMapping">Hello world </a>
  </body>
</html>
对应的视频目录为

4. 尚硅谷_佟刚_SpringMVC_RequestMapping_请求方式.avi
我们编写一个函数,该函数指定客户端请求的方式必须是post的方式
package com.wst.springmvc.handlers;

import org.springframework.stereotype.Controller;
import org.springframework.web.bind.annotation.RequestMapping;
import org.springframework.web.bind.annotation.RequestMethod;

@Controller
@RequestMapping("/springmvc")
public class SpringMvcTest {

    //指定客户端访问该testMethod函数的方式必须是post方式
    @RequestMapping(value="/testMethod",method=RequestMethod.POST)
    public String testMethod(){
        return "sucess";
    }

    @RequestMapping("/testRequestMapping")
    public String testRequestMapping(){
        return "sucess";
    }
}
index.jsp页面修改为
<%@ page language="java" import="java.util.*" pageEncoding="utf-8"%> <% String path = request.getContextPath(); String basePath = request.getScheme()+"://"+request.getServerName()+":"+request.getServerPort()+path+"/"; %> <!DOCTYPE HTML PUBLIC "-//W3C//DTD HTML 4.01 Transitional//EN"> <html> <head> <base href="<%=basePath%>"> <title>My JSP 'index.jsp' starting page</title> <meta http-equiv="pragma" content="no-cache"> <meta http-equiv="cache-control" content="no-cache"> <meta http-equiv="expires" content="0"> <meta http-equiv="keywords" content="keyword1,keyword2,keyword3"> <meta http-equiv="description" content="This is my page"> <!-- <link rel="stylesheet" type="text/css" href="styles.css"> --> </head> <body> <form action="springmvc/testMethod" method="post"> <input type="submit" value="提交"/> </form> <a href="springmvc/testRequestMapping">Hello world </a> </body> </html>
5. 尚硅谷_佟刚_SpringMVC_RequestMapping_请求参数&请求头.avi
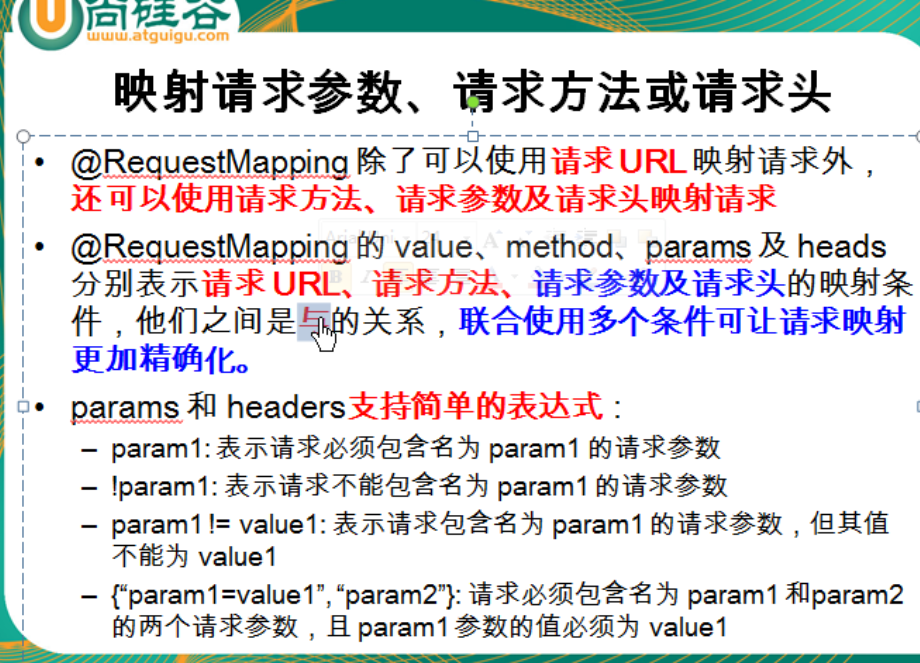
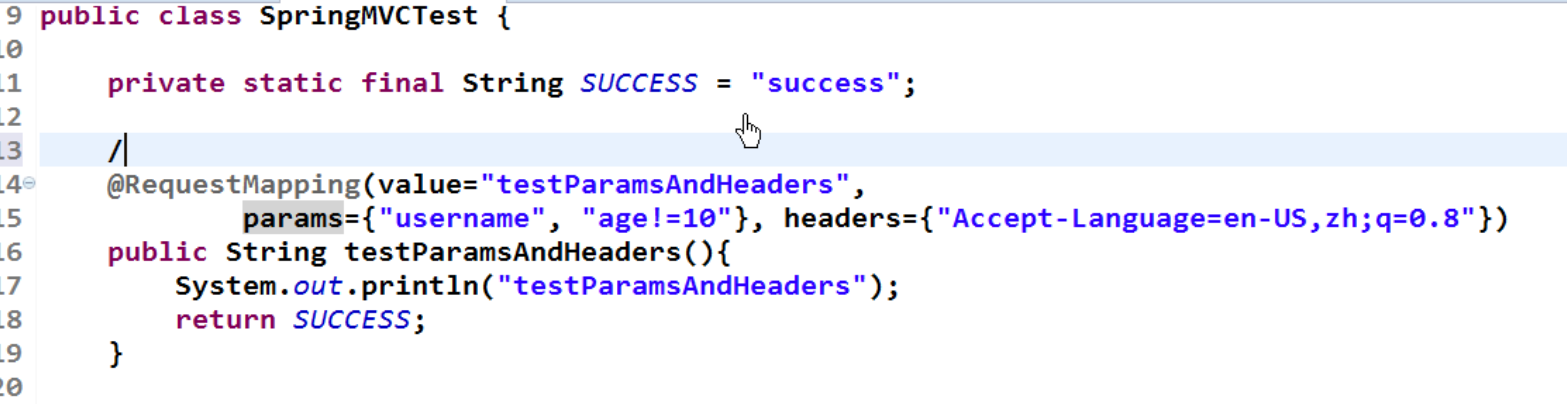
上面我们讲了可以在requestMapping中使用method指定请求的方式,我们也可以使用params指定客户端访问的方式
package com.wst.springmvc.handlers;

import org.springframework.stereotype.Controller;
import org.springframework.web.bind.annotation.RequestMapping;
import org.springframework.web.bind.annotation.RequestMethod;

@Controller
@RequestMapping("/springmvc")
public class SpringMvcTest {

    //指定客户端访问该testMethod函数的方式必须是post方式
    @RequestMapping(value="/testMethod",method=RequestMethod.POST)
    public String testMethod(){
        return "sucess";
    }

    //指定客户端访问该testMethod函数的方式必须是post方式
    @RequestMapping(value="/testparams",params={"username","age!=10"})
    public String testparams(){
        return "sucess";
    }

    @RequestMapping("/testRequestMapping")
    public String testRequestMapping(){
        return "sucess";
    }
}
指定客户端访问的时候必须携带username参数和age属性,并且age属性的值不为10
客户端访问的访问如下
   <a href="springmvc/testparams?username=35535&age=11">testparams </a>

 也客户通过Header属性指定客户端http请求的head参数
6. 尚硅谷_佟刚_SpringMVC_RequestMapping_Ant 路径.avi

7. 尚硅谷_佟刚_SpringMVC_RequestMapping_PathVariable注解.avi
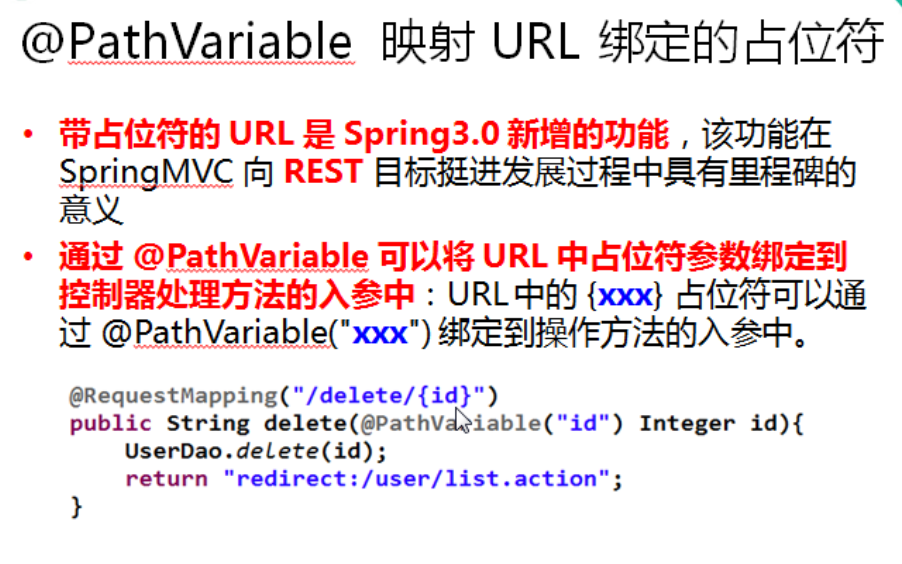
我们来看下面的一个例子
package com.wst.springmvc.handlers;

import org.springframework.stereotype.Controller;
import org.springframework.web.bind.annotation.PathVariable;
import org.springframework.web.bind.annotation.RequestMapping;
import org.springframework.web.bind.annotation.RequestMethod;

@Controller
@RequestMapping("/springmvc")
public class SpringMvcTest {

    //指定客户端访问该testMethod函数的方式必须是post方式
        @RequestMapping(value="/testPathVariable/{id}")
        public String testPathVariable(@PathVariable Integer id){
            System.out.println("id = "+id);
            return "sucess";
        }

    //指定客户端访问该testMethod函数的方式必须是post方式
    @RequestMapping(value="/testMethod",method=RequestMethod.POST)
    public String testMethod(){
        return "sucess";
    }

    //指定客户端访问该testMethod函数的方式必须是post方式
    @RequestMapping(value="/testparams",params={"username","age!=10"})
    public String testparams(){
        return "sucess";
    }

    @RequestMapping("/testRequestMapping")
    public String testRequestMapping(){
        return "sucess";
    }
}
当客户端输入:
        <a href="springmvc/testPathVariable/12">testPathVariable</a>
我们就可以在函数testPathVariable获得客户端传递过来的值是12,关键点
@PathVariable Integer id 指定参数的类型和名字,名字必须和
@RequestMapping(value="/testPathVariable/{id}")中{}中的一一对应
8.+尚硅谷_佟刚_SpringMVC_HiddenHttpMethodFilter+过滤器
restful风格
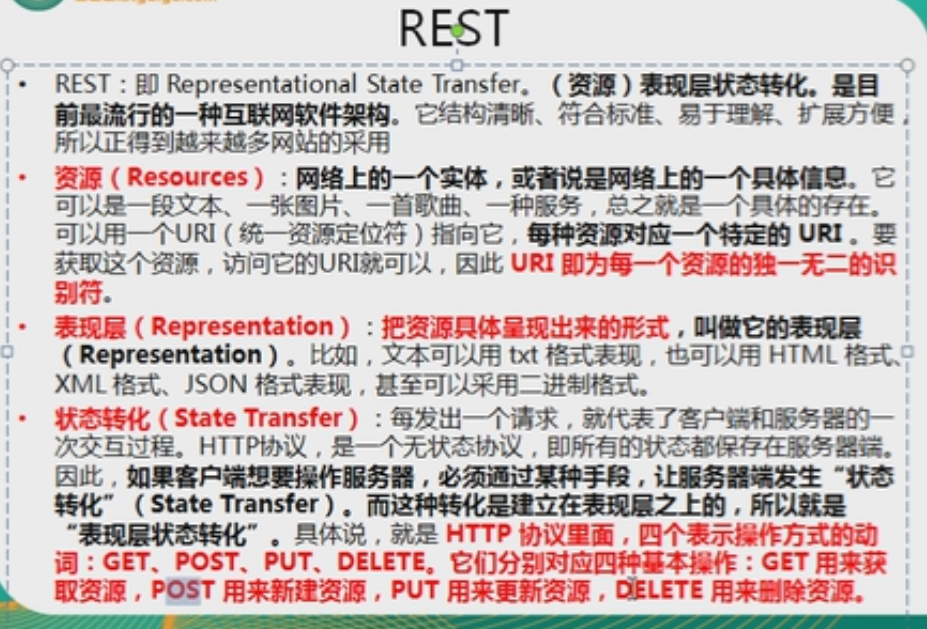
上面如果/order/1方式请求的时候,如何客户端指定的方式是get请求,表示得到id=1的数据,如何是put表示更新id=1的数据,delete表示删除id=1的数据,我们xml中只有get和post两种方式,如何实现put和delete方式了
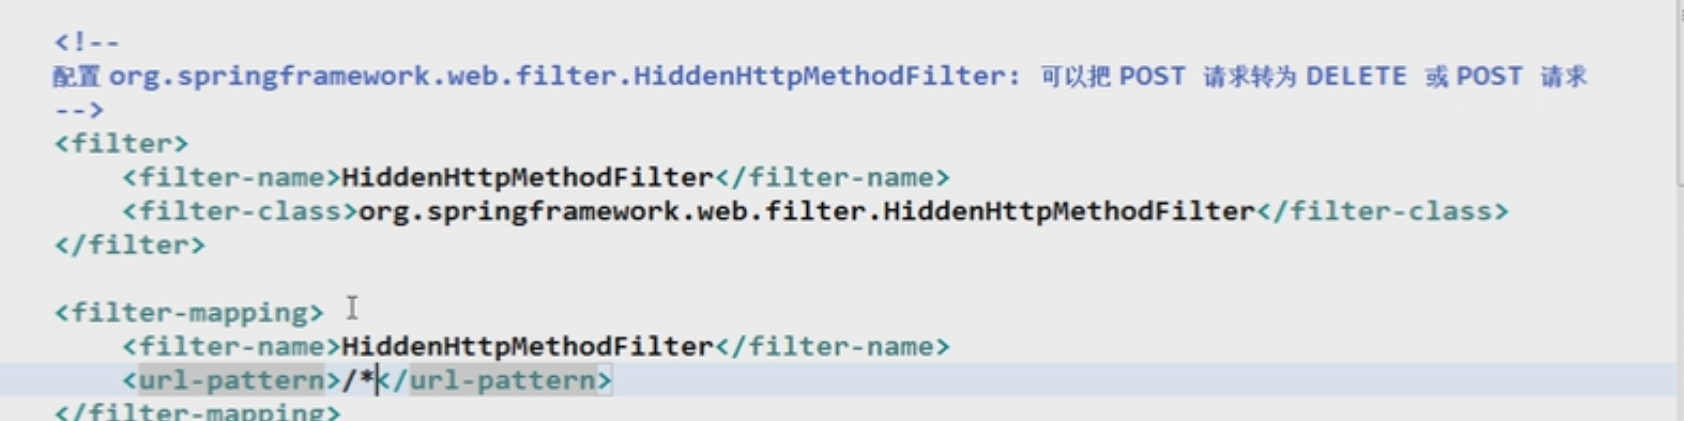

HiddenHttpMethodFilter进行请求过滤,实现Rest风格的url
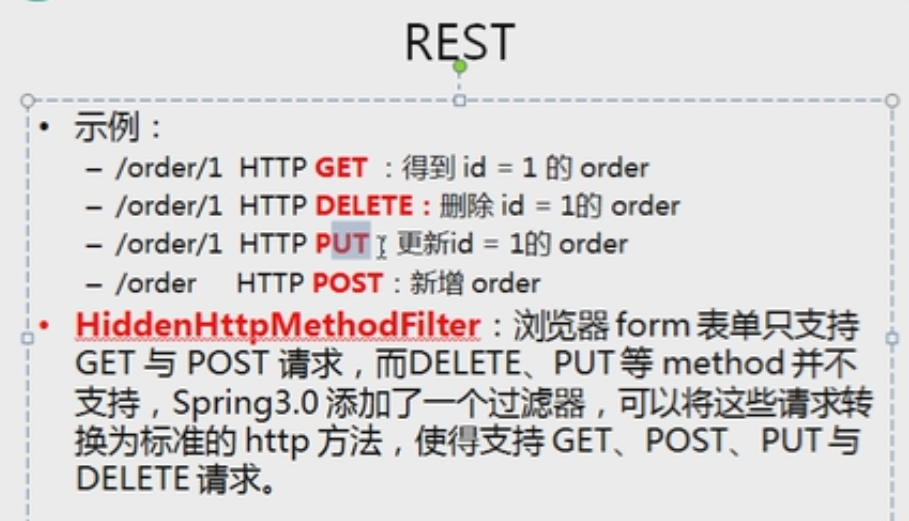
Rest 风格的 URL.
以 CRUD 为例:
新增: /order POST
修改: /order/1 PUT update?id=1
获取:/order/1 GET get?id=1
删除: /order/1 DELETE delete?id=1、
浏览器只支持Post和get的方式,想要实现delete和put的方式,需要使用过滤器HiddenHttpMethodFilter
需要在web.xml进行配置
2,在客户端发起请求
过滤器使用_method的这个参数来决定过滤成是什么类型的,因此,需要在前端的提交表单里面加上_method的隐藏域,注意要使用post方法进行提交
<%@ page language="java" import="java.util.*" pageEncoding="utf-8"%>
<%
String path = request.getContextPath();
String basePath = request.getScheme()+"://"+request.getServerName()+":"+request.getServerPort()+path+"/";
%>

<!DOCTYPE HTML PUBLIC "-//W3C//DTD HTML 4.01 Transitional//EN">
<html>
  <head>
    <base href="<%=basePath%>">

    <title>My JSP 'index.jsp' starting page</title>
    <meta http-equiv="pragma" content="no-cache">
    <meta http-equiv="cache-control" content="no-cache">
    <meta http-equiv="expires" content="0">
    <meta http-equiv="keywords" content="keyword1,keyword2,keyword3">
    <meta http-equiv="description" content="This is my page">
    <!--
    <link rel="stylesheet" type="text/css" href="styles.css">
    -->
  </head>

  <body>

   <form action="springmvc/testMethod" method="post">
    <input type="submit" value="提交"/>
   </form>

    <a href="springmvc/testRequestMapping">Hello world </a></br>

       <a href="springmvc/testparams?username=35535&age=11">testparams </a>

        <a href="springmvc/testPathVariable/12">testPathVariable</a>

        <form action="springmvc/rest/12" method="post">
    <input type="hidden" name="_method" value="DELETE">
    <input type="submit" value="delete">
  </form>
  <form action="springmvc/rest/12" method="post">
    <input type="hidden" name="_method" value="PUT">
    <input type="submit" value="put">
  </form>
  <form action="springmvc/rest/12" method="post">
    <input type="submit" value="post">
  </form>
  <form action="springmvc/rest/12" method="get">
    <input type="submit" value="get">
  </form>
  </body>
</html>
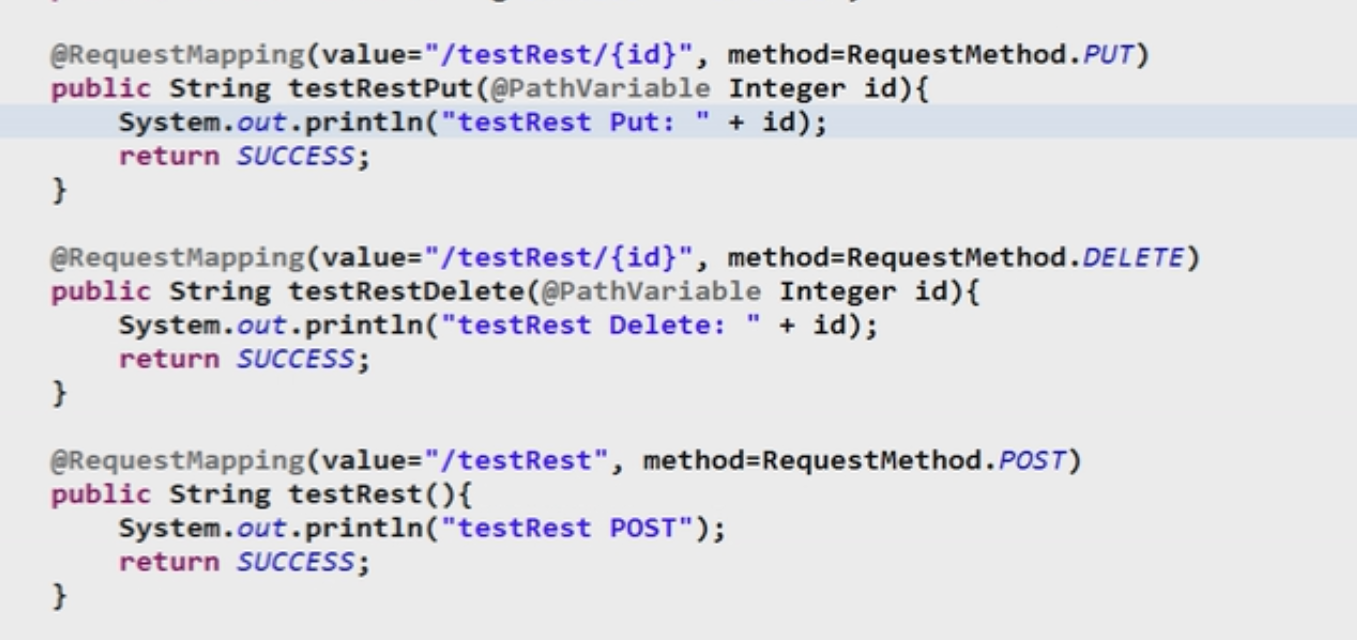
3,后端控制器的编写
控制器直接使用RequestMapping来指定方法就可以了
package com.wst.springmvc.handlers;

import org.springframework.stereotype.Controller;
import org.springframework.web.bind.annotation.PathVariable;
import org.springframework.web.bind.annotation.RequestMapping;
import org.springframework.web.bind.annotation.RequestMethod;

@Controller
@RequestMapping("/springmvc")
public class SpringMvcTest {

    @RequestMapping(value = "/rest/{id}",method = RequestMethod.DELETE)
    public String testrestDELETE(@PathVariable int id){
        return "sucess";
    }
    @RequestMapping(value = "/rest/{id}",method = RequestMethod.PUT)
    public String testrestPUT(@PathVariable int id){
        return "sucess";
    }
    @RequestMapping(value = "/rest/{id}",method = RequestMethod.POST)
    public String testrestPOST(@PathVariable int id){
        return "sucess";

    }


    //指定客户端访问该testMethod函数的方式必须是post方式
        @RequestMapping(value="/testPathVariable/{id}")
        public String testPathVariable(@PathVariable Integer id){
            System.out.println("id = "+id);
            return "sucess";
        }

    //指定客户端访问该testMethod函数的方式必须是post方式
    @RequestMapping(value="/testMethod",method=RequestMethod.POST)
    public String testMethod(){
        return "sucess";
    }

    //指定客户端访问该testMethod函数的方式必须是post方式
    @RequestMapping(value="/testparams",params={"username","age!=10"})
    public String testparams(){
        return "sucess";
    }

    @RequestMapping("/testRequestMapping")
    public String testRequestMapping(){
        return "sucess";
    }
}
总结:使用HiddenHttpMethodFilter进行请求过滤,handler使用@@PathVariable,配合使用实现Restful风格的url,在后面的增删改查中会详细的介绍
9. 尚硅谷_佟刚_SpringMVC_RequestParam 注解.avi
使用requestParam来获得客户端传递过来的请求的值
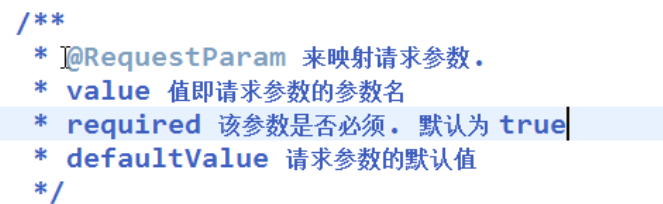
在springMVC中使用RequestParam注解映射请求参数,@RequestParam有三个属性,分别如下:
(1) value 请求参数的参数名,作为参数映射名称;
(2) required 该参数是否必填,默认为true(必填),当设置成必填时,如果没有传入参数,报错;
(3) defaultValue 设置请求参数的默认值;
访问地址:
<a href="springmvc/testRP/testRequestParam?username=35535&age=11">testparams </a>
我们来获得对应的传递的参数username和age的值我们来看handle的代码
package com.wst.springmvc.handlers;

import org.springframework.stereotype.Controller;
import org.springframework.web.bind.annotation.PathVariable;
import org.springframework.web.bind.annotation.RequestMapping;
import org.springframework.web.bind.annotation.RequestMethod;
import org.springframework.web.bind.annotation.RequestParam;

@Controller
@RequestMapping("/springmvc")
public class SpringMvcTest {
    //http://localhost:9000/SpringMVC/testRP/testRequestParam?username=test&age=1
    @RequestMapping(value = "testRP/testRequestParam")
    public String testRequestParam(@RequestParam(value="username" ) String username,
              @RequestParam(value="age",required=false) Integer age){
        System.out.println("username:"+username);
        System.out.println("age:"+age);
        return "sucess";
    }

    @RequestMapping(value = "/rest/{id}",method = RequestMethod.DELETE)
    public String testrestDELETE(@PathVariable int id){
        return "sucess";
    }
    @RequestMapping(value = "/rest/{id}",method = RequestMethod.PUT)
    public String testrestPUT(@PathVariable int id){
        return "sucess";
    }
    @RequestMapping(value = "/rest/{id}",method = RequestMethod.POST)
    public String testrestPOST(@PathVariable int id){
        return "sucess";

    }


    //指定客户端访问该testMethod函数的方式必须是post方式
        @RequestMapping(value="/testPathVariable/{id}")
        public String testPathVariable(@PathVariable Integer id){
            System.out.println("id = "+id);
            return "sucess";
        }

    //指定客户端访问该testMethod函数的方式必须是post方式
    @RequestMapping(value="/testMethod",method=RequestMethod.POST)
    public String testMethod(){
        return "sucess";
    }

    //指定客户端访问该testMethod函数的方式必须是post方式
    @RequestMapping(value="/testparams",params={"username","age!=10"})
    public String testparams(){
        return "sucess";
    }

    @RequestMapping("/testRequestMapping")
    public String testRequestMapping(){
        return "sucess";
    }
}
10. 尚硅谷_佟刚_SpringMVC_RequestHeader 注解.avi
@RequestHeader同@RequestParam可以获得客户端中对应的http传输协议中的信息
//@RequestHeader:获取浏览器头信息:限制请求头中必须有User-Agent
    //User-Agent:封装了浏览器的信息
    //helloMozilla/5.0 (Windows NT 10.0; Win64; x64) AppleWebKit/537.36 (KHTML, like Gecko) Chrome/61.0.3163.100 Safari/537.36
    @RequestMapping("show22")
    public String show22(@RequestHeader("User-Agent")String browser){
        System.out.println("hello"+browser);
        return "/index.jsp";
    }
11. 尚硅谷_佟刚_SpringMVC_CookieValue 注解.avi
@CookieValue的作用
用来获取Cookie中的值
@CookieValue参数
1、value:参数名称
2、required:是否必须
3、defaultValue:默认值
@CookieValue使用案例
1、我们在index.jsp页面中创建cookie值
<%@ page language="java" import="java.util.*" pageEncoding="utf-8"%>

<!DOCTYPE HTML PUBLIC "-//W3C//DTD HTML 4.01 Transitional//EN">
<html>
  <head>
      <script type="text/javascript">
          document.cookie="name=caoyc;path=/"
          document.cookie="age=18;path=/"
          // 时间可以不要,但路径(path)必须要填写,因为JS的默认路径是当前页,如果不填,此cookie只在当前页面生效!~
      </script>

  </head>

  <body>
    <a href="testCookie">查看Cookie</a>

  </body>
</html>
2、在控制器中
@RequestMapping("/testCookie")
2 public String testCookie(@CookieValue(value="name",required=false) String name,
3         @CookieValue(value="age",required=false) Integer age){
4     System.out.println(name+","+age);
5     return "hello";
6 }
测试代码
测试1:
我们直接访问http://localhost:8080/springmvc-1/testCookie
输出结果为:null,null
测试2:
我们现在访问http://localhost:8080/springmvc-1 这里路径直接对应index.jsp页面
进入页面后通过开发者工具,我们查看到到cookie信息

然后再次访问http://localhost:8080/springmvc-1/testCookie
结果输12.+尚硅谷_佟刚_SpringMVC_使用POJO作为参数
前面我们学习了@RequestParam注解,可以获得请求的参数,但是如果前台传来的是一个表单,表单中有很多参数,那么这个时候使用@RequestParam注解一个一个去映射的话,方法中就会有N多个注解在里面,显然这种方式获取参数是不可取的。这个时候我们可以使用一个Java对象来获得请求参数。
Spring MVC 会按请求参数名和 POJO 属性名进行自动匹配,自动为该对象填充属性值。而且支持级联属性,如:user.roleId、user.role.roleName等。
♦新建一个表单
   <form action="springmvc/testPojo" method="post">
        用户名: <input type="text" name="userName"/><br>
        密码: <input type="password" name="password"/><br>
        邮箱: <input type="text" name="email"/><br>
        角色: <input type="text" name="role.roleName"/><br>
        <input type="submit" value="提交"/>
    </form>
建立两个实体类
package com.wst.springmvc.handlers;
public class User {
    private String userName;
    private String password;
    private String email;
    private Role role;

    public String getUserName() {
        return userName;
    }

    public void setUserName(String userName) {
        this.userName = userName;
    }

    public String getPassword() {
        return password;
    }

    public void setPassword(String password) {
        this.password = password;
    }

    public String getEmail() {
        return email;
    }

    public void setEmail(String email) {
        this.email = email;
    }

    public Role getRole() {
        return role;
    }

    public void setRole(Role role) {
        this.role = role;
    }

    @Override
    public String toString() {
        return "User [userName=" + userName + ", password=" + password
                + ", email=" + email + ", role=" + role + "]";
    }

}
package com.wst.springmvc.handlers;
public class Role {
    private String roleId;
    private String roleName;

    public String getRoleId() {
        return roleId;
    }

    public void setRoleId(String roleId) {
        this.roleId = roleId;
    }

    public String getRoleName() {
        return roleName;
    }

    public void setRoleName(String roleName) {
        this.roleName = roleName;
    }

    @Override
    public String toString() {
        return "Role [roleId=" + roleId + ", roleName=" + roleName + "]";
    }

}
handle处理类
@Controller
@RequestMapping("/springmvc")
public class SpringMvcTest {
    @RequestMapping(value = "/testPojo", method = RequestMethod.POST)
    public String testPojo(User user) {
        System.out.println("testPojo: " + user);
        return "sucess";
    }
特别需要注意的是 表单中的属性value值必须和类中的一一对应
用户名: <input type="text" name="userName"/><br>
密码: <input type="password" name="password"/><br>
邮箱: <input type="text" name="email"/><br>
角色: <input type="text" name="role.roleName"/><br>
<input type="submit" value="提交"/>
和User类中的
private String userName;
private String password;
private String email;
private Role role;
一一对应
13. 尚硅谷_佟刚_SpringMVC_使用Servlet原生API作为参数.avi
只需要在控制器的方法里添加相应的Servlet 参数即可!
支持以下参数:
新建一个controller类,部分代码如下:(省略xml配置文件)
@RequestMapping("servletapi")
    public void ServletApi(HttpServletRequest request,HttpServletResponse response) throws IOException{
        String un = request.getParameter("username");
        String age = request.getParameter("age");
        PrintWriter out = response.getWriter();
        out.println(un + " " + age);
    }
表单代码:
运行结果:


案例二:当客户端访问的时候使用原生的out对象返回一个字符串给客户端
@RequestMapping(value="/testServletApi")
    public void testServletApi(HttpServletRequest request,
            HttpServletResponse response ,Writer write) throws IOException{
        //返回一个字符串给客户端
        write.write("iioioio");

    }
表单访问
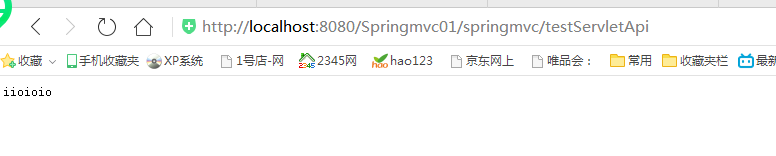
如果返回中文存在乱码问题,在后面会解决
14. 尚硅谷_佟刚_SpringMVC_处理模型数据之ModelAndView.avi
这篇文章写怎么从后端往前端传入数据,比如从数据库查到了数据,这样传递到前端显示了
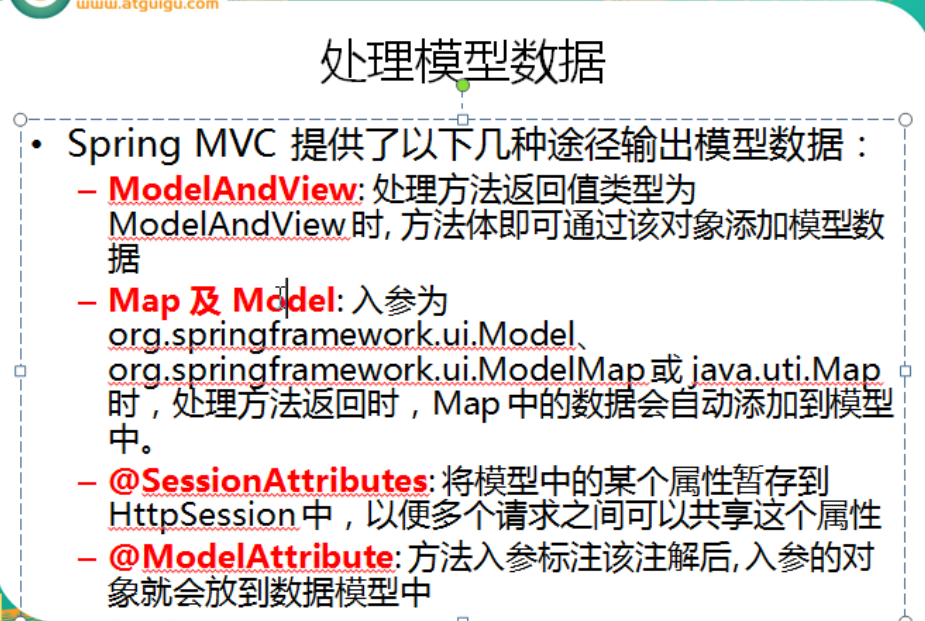
SpringMVC 提供了以下几种途径输出模型数据:
– ModelAndView: 处理方法返回值类型为 ModelAndView时, 方法体即可通过该对象添加模型数据
– Map及Model:入参为org.springframework.ui.Model、org.springframework.ui.ModelMap 或 Java.uti.Map 时,处理方法返回时,Map中的数据会自动添加到模型中。
– @SessionAttributes: 将模型中的某个属性暂存到HttpSession 中,以便多个请求之间可以共享这个属性
– @ModelAttribute: 方法入参标注该注解后, 入参的对象就会放到数据模型中。
目标方法的返回值可以是ModelAndView类型,其中可以包含视图和模型信息
springmvc会把ModelAndView的model中数据放在request域对象中
@RequestMapping("/springmvc")
  @Controller
  public class SpringMVCTest {
      private static final String SUCCESS = "success";
  /**
   * 目标方法的返回值可以是ModelAndView类型
   * 其中可以包含视图和模型信息
   * springmvc会把ModelAndView的model中数据放在request域对象中
   * @return*/
     @RequestMapping("/testModelAndView")
     public ModelAndView testModelAndView(){
         String viewName=SUCCESS;
         //添加模型视图
         ModelAndView modelAndView=new ModelAndView(viewName);
         //添加模型数据到ModelAndView中
         modelAndView.addObject("time", new Date());
         return modelAndView;
     }
index.jsp
<a href="springmvc/testModelAndView">Test ModelAndView<a>
success.jsp
<html>
      <h4>Success Page</h4>
     time:${requestScope.time}
 </html>
当视图解释器解析ModelAndVIew是,其中model本生就是一个Map的实现类的子类。视图解析器将model中的每个元素都通过request.setAttribute(name, value);添加request请求域中。这样就可以在JSP页面中通过EL表达式来获取对应的值
15 尚硅谷_佟刚_SpringMVC_处理模型数据之Map.avi
除了使用ModelAndView方式外。还可以使用Map、Model和ModelMap来向前台页面创造
使用后面3种方式,都是在方法参数中,指定一个该类型的参数。例如:
@RequestMapping("/test")
public String test(Map<String,Object> map,Model model,ModelMap modelMap){

    map.put("names", Arrays.asList("caoyc","zhh","cjx"));
    model.addAttribute("time", new Date());
    modelMap.addAttribute("city", "ChengDu");
    modelMap.put("gender", "male");
    return "hello";
}
JSP页面
1 1、time:${requestScope.time}
2 <br/>2、names:${requestScope.names }
3 <br/>3、city:${requestScope.city }
4 <br/>4、gender:${requestScope.gender }
结果:

16. 尚硅谷_佟刚_SpringMVC_处理模型数据之 SessionAttributes 注解.avi
默认情况下Spring MVC将模型中的数据存储到request域中。当一个请求结束后,数据就失效了。如果要跨页面使用。那么需要使用到session。而@SessionAttributes注解就可以使得模型中的数据存储一份到session域中。
1、names:这是一个字符串数组。里面应写需要存储到session中数据的名称。
2、types:根据指定参数的类型,将模型中对应类型的参数存储到session中
3、value:其实和n
1 @RequestMapping("/test")
2 public String test(Map<String,Object> map){
3     map.put("names", Arrays.asList("caoyc","zhh","cjx"));
4     map.put("age", 18);
5     return "hello";
6 }
Jsp页面
1 1、request中names:${requestScope.names}<br/>
2 2、request中age:${requestScope.age}<br/>
3 <hr/>
4 3、session中names:${sessionScope.names }<br/>
5 4、session中age:${sessionScope.age }<br/>
显示结果:
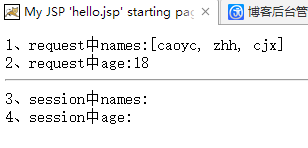
【总结】:上面代码没有指定@SessionAttributes,所有在session域总无法获取到对应的数据。
下面我们加上@SessionAttributes注解
@SessionAttributes(value={"names"},types={Integer.class})
@Controller
public class Test {

    @RequestMapping("/test")
    public String test(Map<String,Object> map){
        map.put("names", Arrays.asList("caoyc","zhh","cjx"));
        map.put("age", 18);
        return "hello";
    }
}
再次访问页面:
可以看到session域中值已存在
【注意】:@SessionAttributes注解只能在类上使用,不能在方法上使用
如果希望在多个请求之间共用某个模型属性数据,则可以在控制器类标注一个 @SessionAttributes,SpringMVC 会将模型中对应的属性暂存到 HTTPSession 中。
@SessionAttributes 除了可以通过属性名指定需要放到会话中的属性外,还可以通过模型属性的对象类型指定哪些模型属性需要放到会话中。
1. @SessionAttributes(types=User.class)会将隐含模型中所有类型为 User 的属性添加到会话中
2. @SessionAttributes(value={"user1", "user2"})将名为 user1 和 user2 的模型属性添加到会话中
3. @SessionAttributes(types={"User.class", "Dept.class"})将模型中所有类型为 User 及 Dept 的属性添加到会话中
4. @SessionAtributes(value={"user1", "user2"}, types={Dept.class})将名为 user1 和 user2 的模型属性添加到会话中,同时将所有类型为 Dept 的模型属性添加到会话中
17. 尚硅谷_佟刚_SpringMVC_ModelAttribute注解之使用场景.avi
@ModelAttribute放置的位置不同也有不同的功能。那么@ModelAttribute可以放置在哪些位置呢?如下:
可以在方法入参上使用@ModelAttribute注解
还可以在方法定义中使用@ModelAttribute注解
@ModelAttribute("user")
public User getUser(){          <---1//访问UserController中的任何一个请求处理方法前,
    User user = new User();         //SpringMVC先执行该方法,并将返回值以user为键添加到模型中
    user.setUserId("1001");
    return user;
}
@RequestMapping(value="/model")
public String handleModel(@ModelAttribute("user") User user){     <---2 //在此,模型数据会赋给User的入参,
    user.setUserName("tom");                                           //然后再根据HTTP请求消息进一步填充覆盖user对象
    return "/user/showUser";
}
package com.wst.springmvc.handlers;
public class User {
    private Integer id ;
    private String userName;
    private String password;
    private String email;
    private Role role;


    public Integer getId() {
        return id;
    }

    public void setId(Integer id) {
        this.id = id;
    }

    public String getUserName() {
        return userName;
    }

    public void setUserName(String userName) {
        this.userName = userName;
    }

    public String getPassword() {
        return password;
    }

    public void setPassword(String password) {
        this.password = password;
    }

    public String getEmail() {
        return email;
    }

    public void setEmail(String email) {
        this.email = email;
    }

    public Role getRole() {
        return role;
    }

    public void setRole(Role role) {
        this.role = role;
    }

    @Override
    public String toString() {
        return "User [userName=" + userName + ", password=" + password
                + ", email=" + email + ", role=" + role + "]";
    }

}
第二步建立一个修改页面,该修改页面提交需要修改的数据
   <form action="springmvc/testModelAttribute" method="post">
       <input  type="hidden" name="id" value="1"/>
        用户名: <input type="text" name="userName"/><br>
        邮箱: <input type="text" name="email"/><br>
        <input type="submit" value="提交修改"/>
    </form>
@ModelAttribute
    public void  getUsrById(@RequestParam(value="id",required = false) String id,Map<String, Object> map){
        int user_id = Integer.parseInt(id);
        //模拟依据id从数据库中得到该用户的所有信息
        User user = new User();
        user.setId(Integer.parseInt(id));
        user.setUserName("Tom");
        user.setPassword("123456");
        user.setEmail("555@qq.com");
        //将user对象存储在map域中
        map.put("user", user);
        }

    @RequestMapping(value="/testModelAttribute",method=RequestMethod.POST)
     public String  testModelAttribute(User user){
         System.out.println("user is :"+ user.toString());
         return "sucess";

     }
我们来说下业务流程

当用户提交修改提交的时候,使用@ModelAttribute修饰的方式会在调用的 testModelAttribute之前被调用,当访问Controller中的任何一个请求处理方法前,都会事先执行标注了@ModelAttribute的方法,在改方法中我们首先获得jsp修改页面传递过来的id值,我们模拟通过id从数据库中查询出对应的user_A,我们把该对象保存到map集合中,并且保存到了request作用域中
第二步:然后访问testModelAttribute对象的时候,通过requestMapping封装java对象可以知道,testModelAttribute(User user)中的参数User user可以获得从jsp页面传递过的参数值,这个时候会干啥事情了,会将修改对象提交的用户名和密码
去修改保存在作用域中user_A对象中的用户名和邮箱的值,密码没有被修改还是原来得密码,提交只是修改了user_A对象中的用户名和密码, 其他参数属性值没有被修改
我们来看下打印
user is :User [id=1, userName=天才, password=123456, email=789@qq.com, role=null]
这里有一点必须要注意的上面这种方式中 map.put("user", user);中key的值必须和 testModelAttribute(User user)形参一样,并且都必须是类名的第一个字母小写

如果上面不一样,我们在map中存放的值是map.put("abc", user);在入参形参中可以使用下面的参数进行解决

下面的方法默认等价于
     public String  testModelAttribute(User user){
         System.out.println("user is :"+ user.toString());
         return "sucess";

     }
public String  testModelAttribute(@ModelAttribute("user") User user){
         System.out.println("user is :"+ user.toString());
         return "sucess";

     }
默认是类名的第一个小写字母
@Controller
@RequestMapping("/springmvc")
public class SpringMvcTest {

    @ModelAttribute
    public void  getUsrById(@RequestParam(value="id",required = false) String id,Map<String, Object> map){
        int user_id = Integer.parseInt(id);
        //模拟依据id从数据库中得到该用户的所有信息
        User user = new User();
        user.setId(Integer.parseInt(id));
        user.setUserName("Tom");
        user.setPassword("123456");
        user.setEmail("555@qq.com");
        //将user对象存储在map域中
        map.put("abc", user);
        }

    @RequestMapping(value="/testModelAttribute",method=RequestMethod.POST)
     public String  testModelAttribute(@ModelAttribute("abc") User user){
         System.out.println("user is :"+ user.toString());
         return "sucess";

     }
23. 尚硅谷_佟刚_SpringMVC_SessionAttributes注解引发的异常.avi
使用@ModelAttribute和@SessionAttributes配合使用的时候可能会产生下面的异常
先说明下业务的操作流程:使用@ModelAttribute("abc")首先会从map中查询key为abc的对象是否存在,如果存在直接使用,如果map对象中不存在,只看类是否使用了@SessionAttributes(value="abc")修饰
如果修饰了,但是session中不存在key=abc对象的对象,会抛出异常
Spring MVC封装一个pojo的原理如下所示:

SpringMVC确定目标方法POJO类型的入参过程
1、确认一个key:
(1)、若目标方法的POJO类型的参数没有使用@ModelAttribute作为修饰,则key为POJO类名第一个字母的小写
(2)、若使用@ModelAttribute来修饰,则key为@ModelAttibute注解的value属性值。
1 @RequestMapping("/updateUser")
2 public String update(User user){
这里没有使用@ModelAttribute修饰,所有对应的key为POJO类名首字母小写,即为:user
1 public String update(@ModelAttribute("abc") User user)
这里使用了@ModelAttribute来修饰POJO,那么对应的可以为@ModelAttribute的value而值,即为:abc
2、在implicitModel中查找key对应的对象。若存在,则作为参数传入
(1)、若在@ModelAttibute标记的方法中在Map中保存过POJO,且key和1中确认的key一致,则会获取。例如:

 1 package com.proc;
 2
 3 import java.util.Map;
 4
 5 import org.springframework.stereotype.Controller;
 6 import org.springframework.web.bind.annotation.ModelAttribute;
 7 import org.springframework.web.bind.annotation.RequestMapping;
 8 import org.springframework.web.bind.annotation.RequestParam;
 9
10 @Controller
11 public class UserController {
12
13
14     @ModelAttribute
15     public void getUser(@RequestParam(required=false) Integer id,Map map){
16         if(id!=null){
17             User user=new User();
18             user.setId(1);
19             user.setUsername("caoyc");
20             user.setAge(18);
21             user.setPassword("123456");
22             map.put("user", user);
23         }
24     }
25
26     @RequestMapping("/updateUser")
27     public String update(@ModelAttribute("abc") User user){
28         System.out.println("更新User对象为:"+user);
29         return "success";
30     }
31 }
JSP页面
 1 <%@ page language="java" import="java.util.*" pageEncoding="utf-8" contentType="text/html; charset=utf-8"%>
 2
 3 <!DOCTYPE HTML PUBLIC "-//W3C//DTD HTML 4.01 Transitional//EN">
 4 <html>
 5   <head>
 6
 7   </head>
 8
 9   <body>
10     <form action="updateUser" method="post">
11         <input type="hidden" name="id" value="1">
12         <table>
13             <tr>
14                 <td>用户名:</td><td><input type="text" name="username" value="caoyc"/></td>
15             </tr>
16             <tr>
17                 <td>年龄:</td><td><input type="text" name="age" value="12"/></td>
18             </tr>
19             <tr>
20                 <td></td><td><input type="submit" value="提交"></td>
21             </tr>
22            </table>
23     </form>
24   </body>
25 </html>
结果在控制台中输出:User [id=1, username=caoyc, password=123456, age=12]
其中原因是:在方法/updateUser时对应的方法update( User user)时,先要执行@ModelAttribute标记的方法,而在@ModelAttribute中向implicitModel中保存了一个key为user的POJO对象。而此时update对象中参数的key为POJO类名首字母小写,也是user,也就是在implicitModel中存在该key和对应的POJO对象。那么就会以该对象作为原始值。而JSP页面中传入过来的POJO对象属性不为空且有变化的属性来修改原始值。
原始对象:User [id=1, username=caoyc, password=123456, age=18]
JSP中 :User[id=1, username=caoyc, password=null, age=12]
这里需要修改的属性为age。在原始值得基础上修改了将age修改为12
所以最总在implicitModel中key值为user的POJO对象为:User [id=1, username=caoyc, password=123456, age=12]
3、座implicitModel中不存在key对应的对象,则检查当前的Handler是否使用了@SessionAttributes注解修饰,若使用了该注解,且@SessionAttribute注解的value属性值中包含了key,则会从HttpSession中获取key所对应的value值,若存在则直接传入到目标方法的入参中,若不存在则将抛出异常。
Java代码
 1 @SessionAttributes(value={"user"})
 2 @Controller
 3 public class UserController {
 4
 5     @RequestMapping("/updateUser")
 6     public String update(User user){
 7         //System.out.println("更新User对象为:"+user);
 8         return "success";
 9     }
10 }
此时,如果session中没有key为user的值,那么只需/updateUser时会抛出异常。因为在只需目标方法时,发现类有@SessionAttributes注解,且目标方法需要一个key为user的POJO对象,该key还存在@SessionAttributes注解的value中,所以会抛出异常。如果此时session中存在key为user的值,则将该值传入目标方法参数。
怎么解决异常?
方法一:添加一个使用@ModelAttribute的注解的方法,该方法向implicitModel保存一个为key为user的POJO
方法二:去掉@SessionAttributes注解
方法三:修改目标参数的key值。例如 @ModelAttribute(value="user2") User user
4、若Handler没有标识@SessionAttributes注解或@SessionAttributes注解的value值中不包含key,则会通过反射来创建POJO类型的参数,并作为参数传入到目标方法
5、SpringMVC会把key和POJO类型的对象保存到imlicitModel中,进而会保存到request中。
我们来看下代码
package com.wst.springmvc.handlers;

import java.io.IOException;
import java.io.Writer;
import java.util.Map;

import javax.servlet.http.HttpServletRequest;
import javax.servlet.http.HttpServletResponse;

import org.springframework.stereotype.Controller;
import org.springframework.web.bind.annotation.CookieValue;
import org.springframework.web.bind.annotation.ModelAttribute;
import org.springframework.web.bind.annotation.PathVariable;
import org.springframework.web.bind.annotation.RequestHeader;
import org.springframework.web.bind.annotation.RequestMapping;
import org.springframework.web.bind.annotation.RequestMethod;
import org.springframework.web.bind.annotation.RequestParam;
import org.springframework.web.bind.annotation.SessionAttributes;

@Controller
@RequestMapping("/springmvc")
@SessionAttributes(value="abc")
public class SpringMvcTest {

    /*@ModelAttribute
    public void  getUsrById(@RequestParam(value="id",required = false) String id,Map<String, Object> map){
        int user_id = Integer.parseInt(id);
        //模拟依据id从数据库中得到该用户的所有信息
        User user = new User();
        user.setId(Integer.parseInt(id));
        user.setUserName("Tom");
        user.setPassword("123456");
        user.setEmail("555@qq.com");
        //将user对象存储在map域中
        map.put("abc", user);
        }*/

    @RequestMapping(value="/testModelAttribute",method=RequestMethod.POST)
     public String  testModelAttribute(@ModelAttribute("abc") User user){
         System.out.println("user is :"+ user.toString());
         return "sucess";

     }


    @RequestMapping(value="/testServletApi")
    public void testServletApi(HttpServletRequest request,
            HttpServletResponse response ,Writer write) throws IOException{
        //返回一个字符串给客户端
        write.write("iioioio");

    }
    @RequestMapping(value = "/testPojo", method = RequestMethod.POST)
    public String testPojo(User user) {
        System.out.println("testPojo: " + user);
        return "sucess";
    }

    //http://localhost:9000/SpringMVC/testRP/testRequestParam?username=test&age=1
    @RequestMapping(value = "testRP/testRequestParam")
    public String testRequestParam(@CookieValue(value="username" ) String username,
              @RequestParam(value="age",required=false) Integer age){
        System.out.println("username:"+username);
        System.out.println("age:"+age);
        return "sucess";
    }

    @RequestMapping(value = "/rest/{id}",method = RequestMethod.DELETE)
    public String testrestDELETE(@PathVariable int id){
        return "sucess";
    }
    @RequestMapping(value = "/rest/{id}",method = RequestMethod.PUT)
    public String testrestPUT(@PathVariable int id){
        return "sucess";
    }
    @RequestMapping(value = "/rest/{id}",method = RequestMethod.POST)
    public String testrestPOST(@PathVariable int id){
        return "sucess";

    }


    //指定客户端访问该testMethod函数的方式必须是post方式
        @RequestMapping(value="/testPathVariable/{id}")
        public String testPathVariable(@PathVariable Integer id){
            System.out.println("id = "+id);
            return "sucess";
        }

    //指定客户端访问该testMethod函数的方式必须是post方式
    @RequestMapping(value="/testMethod",method=RequestMethod.POST)
    public String testMethod(){
        return "sucess";
    }

    //指定客户端访问该testMethod函数的方式必须是post方式
    @RequestMapping(value="/testparams",params={"username","age!=10"})
    public String testparams(){
        return "sucess";
    }

    @RequestMapping("/testRequestMapping")
    public String testRequestMapping(){
        return "sucess";
    }
}
上面代码屏蔽了getUsrById方法,运行的时候就会抛出下面的异常
org.springframework.web.HttpSessionRequiredException: Session attribute 'abc' required - not found in session
    org.springframework.web.servlet.mvc.annotation.AnnotationMethodHandlerAdapter$ServletHandlerMethodInvoker.raiseSessionRequiredException(AnnotationMethodHandlerAdapter.java:789)
    org.springframework.web.bind.annotation.support.HandlerMethodInvoker.resolveModelAttribute(HandlerMethodInvoker.java:772)
    org.springframework.web.bind.annotation.support.HandlerMethodInvoker.resolveHandlerArguments(HandlerMethodInvoker.java:369)
    org.springframework.web.bind.annotation.support.HandlerMethodInvoker.invokeHandlerMethod(HandlerMethodInvoker.java:173)
    org.springframework.web.servlet.mvc.annotation.AnnotationMethodHandlerAdapter.invokeHandlerMethod(AnnotationMethodHandlerAdapter.java:444)
    org.springframework.web.servlet.mvc.annotation.AnnotationMethodHandlerAdapter.handle(AnnotationMethodHandlerAdapter.java:432)
    org.springframework.web.servlet.DispatcherServlet.doDispatch(DispatcherServlet.java:959)
    org.springframework.web.servlet.DispatcherServlet.doService(DispatcherServlet.java:893)
    org.springframework.web.servlet.FrameworkServlet.processRequest(FrameworkServlet.java:969)
    org.springframework.web.servlet.FrameworkServlet.doPost(FrameworkServlet.java:871)
    javax.servlet.http.HttpServlet.service(HttpServlet.java:641)
    org.springframework.web.servlet.FrameworkServlet.service(FrameworkServlet.java:845)
    javax.servlet.http.HttpServlet.service(HttpServlet.java:722)
    org.springframework.web.filter.HiddenHttpMethodFilter.doFilterInternal(HiddenHttpMethodFilter.java:77)
    org.springframework.web.filter.OncePerRequestFilter.doFilter(OncePerRequestFilter.java:107)
    org.springframework.web.filter.CharacterEncodingFilter.doFilterInternal(CharacterEncodingFilter.java:121)
    org.springframework.web.filter.OncePerRequestFilter.doFilter(OncePerRequestFilter.java:107)
第二种异常:
package com.wst.springmvc.handlers;

import java.io.IOException;
import java.io.Writer;
import java.util.Map;

import javax.servlet.http.HttpServletRequest;
import javax.servlet.http.HttpServletResponse;

import org.springframework.stereotype.Controller;
import org.springframework.web.bind.annotation.CookieValue;
import org.springframework.web.bind.annotation.ModelAttribute;
import org.springframework.web.bind.annotation.PathVariable;
import org.springframework.web.bind.annotation.RequestHeader;
import org.springframework.web.bind.annotation.RequestMapping;
import org.springframework.web.bind.annotation.RequestMethod;
import org.springframework.web.bind.annotation.RequestParam;
import org.springframework.web.bind.annotation.SessionAttributes;

@Controller
@RequestMapping("/springmvc")
@SessionAttributes(value="user")
public class SpringMvcTest {

    /*@ModelAttribute
    public void  getUsrById(@RequestParam(value="id",required = false) String id,Map<String, Object> map){
        int user_id = Integer.parseInt(id);
        //模拟依据id从数据库中得到该用户的所有信息
        User user = new User();
        user.setId(Integer.parseInt(id));
        user.setUserName("Tom");
        user.setPassword("123456");
        user.setEmail("555@qq.com");
        //将user对象存储在map域中
        map.put("abc", user);
        }*/

    @RequestMapping(value="/testModelAttribute",method=RequestMethod.POST)
     public String  testModelAttribute( User user){
         System.out.println("user is :"+ user.toString());
         return "sucess";

     }


    @RequestMapping(value="/testServletApi")
    public void testServletApi(HttpServletRequest request,
            HttpServletResponse response ,Writer write) throws IOException{
        //返回一个字符串给客户端
        write.write("iioioio");

    }
    @RequestMapping(value = "/testPojo", method = RequestMethod.POST)
    public String testPojo(User user) {
        System.out.println("testPojo: " + user);
        return "sucess";
    }

    //http://localhost:9000/SpringMVC/testRP/testRequestParam?username=test&age=1
    @RequestMapping(value = "testRP/testRequestParam")
    public String testRequestParam(@CookieValue(value="username" ) String username,
              @RequestParam(value="age",required=false) Integer age){
        System.out.println("username:"+username);
        System.out.println("age:"+age);
        return "sucess";
    }

    @RequestMapping(value = "/rest/{id}",method = RequestMethod.DELETE)
    public String testrestDELETE(@PathVariable int id){
        return "sucess";
    }
    @RequestMapping(value = "/rest/{id}",method = RequestMethod.PUT)
    public String testrestPUT(@PathVariable int id){
        return "sucess";
    }
    @RequestMapping(value = "/rest/{id}",method = RequestMethod.POST)
    public String testrestPOST(@PathVariable int id){
        return "sucess";

    }


    //指定客户端访问该testMethod函数的方式必须是post方式
        @RequestMapping(value="/testPathVariable/{id}")
        public String testPathVariable(@PathVariable Integer id){
            System.out.println("id = "+id);
            return "sucess";
        }

    //指定客户端访问该testMethod函数的方式必须是post方式
    @RequestMapping(value="/testMethod",method=RequestMethod.POST)
    public String testMethod(){
        return "sucess";
    }

    //指定客户端访问该testMethod函数的方式必须是post方式
    @RequestMapping(value="/testparams",params={"username","age!=10"})
    public String testparams(){
        return "sucess";
    }

    @RequestMapping("/testRequestMapping")
    public String testRequestMapping(){
        return "sucess";
    }
}
 也会抛出同上面一样的异常,因为 public String  testModelAttribute( User user)默认等价于 public String  testModelAttribute(@ModelAttribute("user") User user),其中key为对象的第一个字母的小写
这里千万一定要注意
24. 尚硅谷_佟刚_SpringMVC_视图解析流程分析.avi
本篇主要讲述SpringMVC如何解析、渲染视图并转发返回结果对象。
请求处理方法执行完成后,最终返回一个ModelAndView对象。对于那些返回String,view或者ModelMap等类型的处理方法,SpringMVC也会在内部将他们装配成一个ModelAndView对象。
它包含了逻辑名和模型对象,其中的model可能为 { }空。
首先说明springmvc.xml中视图解析器配置注意事项:
<bean class="org.springframework.web.servlet.view.InternalResourceViewResolver">
<property name="prefix" value="/WEB-INF/views/"></property>
<property name="suffix" value=".jsp"></property>
</bean>
说明一下,如果前缀为 /WEB-INF/views/,那么后台return视图名”/success” or “success”均映射到 /WEB-INF/views/success.jsp ;
如果前缀 为 /WEB-INF/views,那么后台return视图名”/success”,将会映射到/WEB-INF/views/success.jsp;如果后台return视图名”success”,将会报错!
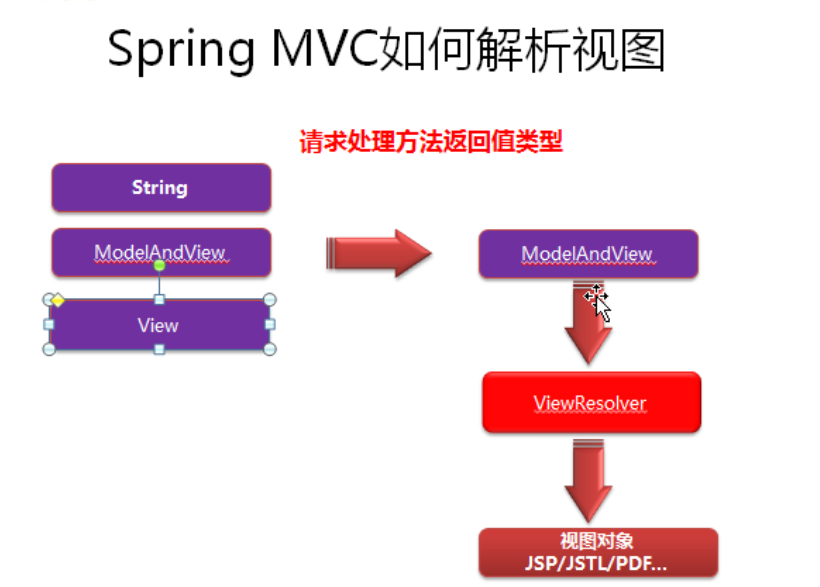
对于控制器的目标方法,无论其返回值是String、View、ModelMap或是ModelAndView,SpringMVC都会在内部将它们封装为一个ModelAndView对象进行返回。
Spring MVC 借助视图解析器(ViewResolver)得到最终的视图对象(View),最终的视图可以是JSP也可是Excell、
JFreeChart等各种表现形式的视图。
SpringMVC的视图解析流程
SpringMVC的视图解析流程为:
1、调用目标方法,SpringMVC将目标方法返回的String、View、ModelMap或是ModelAndView都转换为一个ModelAndView对象;
2、然后通过视图解析器(ViewResolver)对ModelAndView对象中的View对象进行解析,将该逻辑视图View对象解析为一个物理视图View对象;
3、最后调用物理视图View对象的render()方法进行视图渲染,得到响应结果。
25. 尚硅谷_佟刚_SpringMVC_JstlView.avi
若项目中使用了jstl标签,视图解析器会将视图解析成JstlView视图

接下来我们是jstl实现一个国际化功能
为什么要配置国际化资源文件
当我们所做的网站,有可能被外国人访问,或者被浏览器语言为英语的用户访问时,我们就需要配置国际化资源文件。配置之后,可以根据浏览器的语言(中文或英文),自动显示对应的语言。
先来看看配置后的效果:
这里我们使用IE浏览器,一般情况下的显示界面如下
这里写图片描述
然后点击工具->Internet选项->语言
这里写图片描述
点击添加,加入英语(美国)[en-US],点击上移,将其移动到第一行(截图中还未上移),点击确定
刷新页面,发现中文变成了英文
这里写图片描述
如何配置国际化资源文件
1.在src目录下创建三个properties文件
1.在src目录下创建三个properties文件 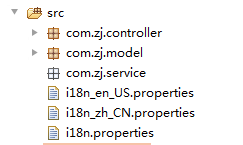
截图中第一个文件和第三个文件内容一致 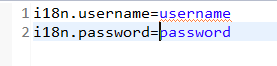
第二个文件中,则使用中文 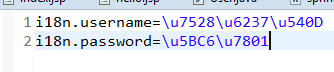
(当你输入中文时,会被自动编码成如图所示的内容)
接下来在spring-mvc中配置下面的内容
<!-- 配置国际化资源文件 -->
<bean id="messageSource"
class="org.springframework.context.support.ResourceBundleMessageSource">
<property name="basename" value="i18n"></property>
</bean>
spring-mvc.xml内容如下
<?xml version="1.0" encoding="UTF-8"?>
<beans xmlns="http://www.springframework.org/schema/beans"
    xmlns:xsi="http://www.w3.org/2001/XMLSchema-instance"
    xmlns:context="http://www.springframework.org/schema/context"
    xmlns:mvc="http://www.springframework.org/schema/mvc"
    xsi:schemaLocation="http://www.springframework.org/schema/mvc http://www.springframework.org/schema/mvc/spring-mvc-4.1.xsd
        http://www.springframework.org/schema/beans http://www.springframework.org/schema/beans/spring-beans.xsd
        http://www.springframework.org/schema/context http://www.springframework.org/schema/context/spring-context-4.1.xsd">
    <!-- 配置自动扫描包  扫描com.ibigsea.springmvc 包下的类,后期会使用spring进行管理 -->
    <context:component-scan base-package="com.wst.springmvc.handlers"/>
<!-- 配置视图解析器 如返回helloworld
                         为 [/WEB-INF/pages/helloworld.jsp] -->
    <bean class="org.springframework.web.servlet.view.InternalResourceViewResolver">
     <!-- 前缀 -->
        <property name="prefix" value="/WEB-INF/pages/"/>
         <!-- 后缀 -->
        <property name="suffix" value=".jsp"/>
    </bean>

        <!-- 配置国际化资源文件 -->
    <bean id="messageSource"
    class="org.springframework.context.support.ResourceBundleMessageSource">
            <property name="basename" value="i18n"></property>
    </bean>
</beans>
接下来在需要使用显示用户名和密码的jsp页面添加fmt国际化解析的标签,同时需要添加对应的jstl jar包我们是在sucess.jsp页面中
<%@ taglib prefix="fmt" uri="http://java.sun.com/jsp/jstl/fmt" %>
3.你想要国际化的内容处使用fmt标签
<fmt:message key="i18n.username"></fmt:message>
    <br><br>

    <fmt:message key="i18n.password"></fmt:message>
    <br><br>
sucess.jsp页面的内容如下所示
<%@ page language="java" import="java.util.*" pageEncoding="utf-8"%>
<%@ taglib prefix="fmt" uri="http://java.sun.com/jsp/jstl/fmt" %>
<%
String path = request.getContextPath();
String basePath = request.getScheme()+"://"+request.getServerName()+":"+request.getServerPort()+path+"/";
%>

<!DOCTYPE HTML PUBLIC "-//W3C//DTD HTML 4.01 Transitional//EN">
<html>
  <head>
    <base href="<%=basePath%>">

    <title>My JSP 'index.jsp' starting page</title>
    <meta http-equiv="pragma" content="no-cache">
    <meta http-equiv="cache-control" content="no-cache">
    <meta http-equiv="expires" content="0">
    <meta http-equiv="keywords" content="keyword1,keyword2,keyword3">
    <meta http-equiv="description" content="This is my page">
    <!--
    <link rel="stylesheet" type="text/css" href="styles.css">
    -->
  </head>

  <body>
     页面跳转成功
     <fmt:message key="i18n.username"></fmt:message>
    <br><br>

    <fmt:message key="i18n.password"></fmt:message>
    <br><br>
  </body>
</html>
26. 尚硅谷_佟刚_SpringMVC_mvc_view-controller标签.avi
对应WEB-INF目录下面的JSP页面,我们知道是不能直接使用URL访问到。需要通过转发的方式,而我们一般都是在控制器中做转发映射,对应一些我们不需要其他操作的JSP页面,我们可以使用<mvc:view-controller path=""/>来配置,这样就可以不用再控制器中再去做转发映射
看在spring-mvc配置文件中配置
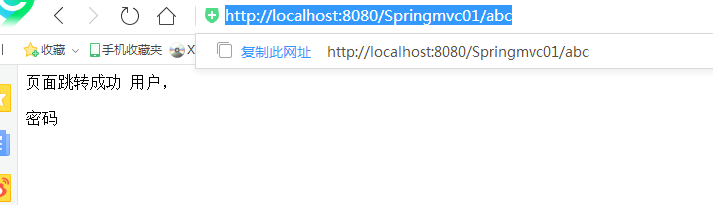
<mvc:view-controller path="/abc" view-name="sucess"/>
    <mvc:annotation-driven></mvc:annotation-driven>
其中path对应的是url的访问路径,
view-name对应的是你要访问的jsp页面的名字

我们来看看整个配置文件
<?xml version="1.0" encoding="UTF-8"?>
<beans xmlns="http://www.springframework.org/schema/beans"
    xmlns:xsi="http://www.w3.org/2001/XMLSchema-instance"
    xmlns:context="http://www.springframework.org/schema/context"
    xmlns:mvc="http://www.springframework.org/schema/mvc"
    xsi:schemaLocation="http://www.springframework.org/schema/mvc http://www.springframework.org/schema/mvc/spring-mvc-4.1.xsd
        http://www.springframework.org/schema/beans http://www.springframework.org/schema/beans/spring-beans.xsd
        http://www.springframework.org/schema/context http://www.springframework.org/schema/context/spring-context-4.1.xsd">
    <!-- 配置自动扫描包  扫描com.ibigsea.springmvc 包下的类,后期会使用spring进行管理 -->
    <context:component-scan base-package="com.wst.springmvc.handlers"/>
<!-- 配置视图解析器 如返回helloworld
                         为 [/WEB-INF/pages/helloworld.jsp] -->
    <bean class="org.springframework.web.servlet.view.InternalResourceViewResolver">
     <!-- 前缀 -->
        <property name="prefix" value="/WEB-INF/pages/"/>
         <!-- 后缀 -->
        <property name="suffix" value=".jsp"/>
    </bean>

        <!-- 配置国际化资源文件 -->
    <bean id="messageSource"
    class="org.springframework.context.support.ResourceBundleMessageSource">
            <property name="basename" value="i18n"></property>
    </bean>

    <mvc:view-controller path="/abc" view-name="sucess"/>
    <mvc:annotation-driven></mvc:annotation-driven>
</beans>
在浏览器中输入http://localhost:8080/Springmvc01/abc,访问的就是/WEB-INF/pages/sucess.jsp页面,不经过handler进行处理
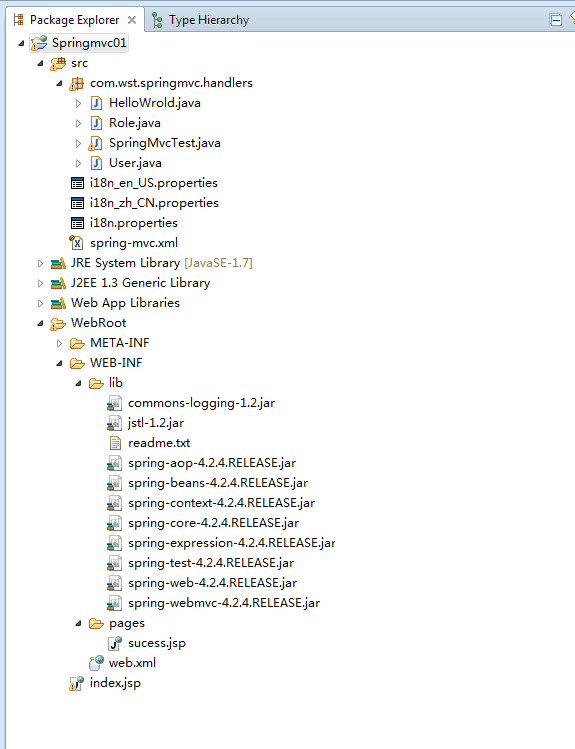
整个项目的工程代码如下所示
posted on 2018-04-14 15:33 luzhouxiaoshuai 阅读(768) 评论(0) 编辑 收藏 举报

