4、ASP.NET MVC入门到精通——NHibernate构建一个ASP.NET MVC应用程序
下周就去办理离职手续了,之前没有使用过NHibernate,只知道NHibernate是一种ORM框架,但是听说新公司是使用NHibernate在做项目,所以,我就网上找资料学习一下NHibernate,在此以笔记的形式,记录自己的学习过程,一来供自己以后备忘用,而来希望对同样准备学习NHibernate的同行门有所帮助或提供借鉴。
什么是Nhibernate?
NHibernate是一个面向.NET环境的对象/关系数据库映射工具。对象/关系数据库映射(object/relational mapping,ORM)这个术语表示一种技术,用来把对象模型表示的对象映射到基于SQL的关系模型数据结构中去。
NHibernate 是一个基于.Net 的针对关系型数据库的对象持久化类库。NHibernate 来源于非常优秀的基于Java的Hibernate 关系型持久化工具。
NHibernate的目标主要是用于与数据持久化相关的编程任务,能够使开发人员从原来枯燥的SQL语句的编写中解放出来,解放出来的精力可以让开发人员投入到业务逻辑的实现上。
我最不喜欢理论知识了,还是那句话,实践出真知,我将以最直观的形式来表达。下面开始动手来构建我们的NHibernate应用程序。
开发环境:Win7、VS2012、Sqlserver2008
搭建项目
我这里使用asp.net mvc项目
然后再依次分别新建3个类库项目,Shop.Domain,Shop.Data,Shop.Business
最终效果图如下:
项目架构说明
采用传统三层架构
Shop.Domain:数据实体和数据库映射文件。也有人叫做领域层。
Shop.Data:数据层,存放数据库的操作及Nhibernate辅助类。引用Iesi.Collections.dll,NHibernate.dll和类库Shop.Domain
Shop.Business:业务逻辑类。引用类库项目Shop.Domain, Shop.Data
Shop.WebSite:测试项目。需引用Iesi.Collections.dll,NHibernate.dll和类库项目Shop.Domain, Shop.Business
下载Nhibernate
安装完成之后,自动添加了如下引用:
数据库设计
为了省事,数据库,我就直接使用northwnd.mdf了,下载地址:https://files.cnblogs.com/files/jiekzou/northwnd.zip,数据库——附加
关于NorthWind表和字段的说明请查看:http://www.cnblogs.com/pnljs/archive/2012/04/26/2471046.html
Nhibernate数据库配置
打开本项目解决方案所在文件夹位置:E:\WorkSpace\Study\Webs\MVC\Shop,会发现有一个packages文件夹,打开此packages文件夹,
会看到一个NHibernate.4.0.3.4000文件夹,打开如下图:
这里使用的是SQL Server2008,所以我们使用MSSQL.cfg.xml文件,将此文件复制到Shop.WebSite应用程序根目录,然后重命名为hibernate.cfg.xml.,修改hibernate.cfg.xml
注意需根据自己数据库的实例名修改,并添加mapping节点,其他的设置,可根据需要进行添加。
修改后如下(我对配置文件都加上了注释):
<?xml version="1.0" encoding="utf-8"?>
<!--
This template was written to work with NHibernate.Test.
Copy the template to your NHibernate.Test project folder and rename it in hibernate.cfg.xml and change it
for your own use before compile tests in VisualStudio.
-->
<!-- This is the System.Data.dll provider for SQL Server -->
<hibernate-configuration  xmlns="urn:nhibernate-configuration-2.2" >
    <session-factory>
    <!--定制数据库IDriver的类型.-->
        <property name="connection.driver_class">NHibernate.Driver.SqlClientDriver</property>
    <!--连接字符串-->
        <property name="connection.connection_string">
      Server=.;database=Northwind;uid=sa;pwd=yujie1127
    </property>
    <!--NHibernate方言(Dialect)的类名 - 可以让NHibernate使用某些特定的数据库平台的特性-->
        <property name="dialect">NHibernate.Dialect.MsSql2008Dialect</property>
    <!--指定映射文档中所在程序集-->
    <mapping  assembly="Shop.Domain"/>
    </session-factory>
</hibernate-configuration>
最后,记得修改hibernate.cfg.xml文件的属性,
NHibernateHelper辅助类
这里编写一个简单的辅助类NHibernateHelper,用于创建ISessionFactory和配置ISessionFactory,并打开一个新的ISession的方法。在Shop.Data项目下新建一个类NHibernateHelper,代码如下:
using NHibernate;
using NHibernate.Cfg;
using System;
using System.Collections.Generic;
using System.Linq;
using System.Text;
using System.Threading.Tasks;

namespace Shop.Data
{
    public class NHibernateHelper
    {
        private ISessionFactory _sessionFactory;
        public NHibernateHelper()
        {
            //创建ISessionFactory
            _sessionFactory = GetSessionFactory();
        }

        /// <summary>
        /// 创建ISessionFactory
        /// </summary>
        /// <returns></returns>
        public ISessionFactory GetSessionFactory()
        {
            //配置ISessionFactory
            return (new Configuration()).Configure().BuildSessionFactory();
        }

        /// <summary>
        /// 打开ISession
        /// </summary>
        /// <returns></returns>
        public ISession GetSession()
        {
            return _sessionFactory.OpenSession();
        }
    }
}
持久化类
为客户实体创建持久化类Customers。在项目Shop.Domain中新建文件夹Entities,然后新建类Customers,这里为了偷懒,我就使用动软工具生成代码如下:
注意:NHibernate默认使用代理功能,要求持久化类不是sealed的,而且其公共方法、属性和事件声明为virtual。在这里,类中的字段要设置为virtual,否则出现“NHibernate.InvalidProxyTypeException”类型的异常在 Shop.Data.dll 中发生,但未在用户代码中进行处理
public  class Customers
    {
        #region Model

        private string _customerid;
        private string _companyname;
        private string _contactname;
        private string _contacttitle;
        private string _address;
        private string _city;
        private string _region;
        private string _postalcode;
        private string _country;
        private string _phone;
        private string _fax;

        /// <summary>
        /// 客户ID 主键
        /// </summary>
        public  virtual  string CustomerID
        {
            set { _customerid = value; }
            get { return _customerid; }
        }
        /// <summary>
        /// 公司
        /// </summary>
        public  virtual  string CompanyName
        {
            set { _companyname = value; }
            get { return _companyname; }
        }
        /// <summary>
        /// 客户姓名
        /// </summary>
        public  virtual  string ContactName
        {
            set { _contactname = value; }
            get { return _contactname; }
        }
        /// <summary>
        /// 客户头衔
        /// </summary>
        public  virtual string ContactTitle
        {
            set { _contacttitle = value; }
            get { return _contacttitle; }
        }
        /// <summary>
        /// 联系地址
        /// </summary>
        public  virtual string Address
        {
            set { _address = value; }
            get { return _address; }
        }
        /// <summary>
        /// 所在城市
        /// </summary>
        public  virtual string City
        {
            set { _city = value; }
            get { return _city; }
        }
        /// <summary>
        /// 所在地区
        /// </summary>
        public  virtual string Region
        {
            set { _region = value; }
            get { return _region; }
        }
        /// <summary>
        /// 邮编
        /// </summary>
        public  virtual string PostalCode
        {
            set { _postalcode = value; }
            get { return _postalcode; }
        }
        /// <summary>
        /// 国籍
        /// </summary>
        public  virtual string Country
        {
            set { _country = value; }
            get { return _country; }
        }
        /// <summary>
        /// 电话
        /// </summary>
        public  virtual string Phone
        {
            set { _phone = value; }
            get { return _phone; }
        }
        /// <summary>
        /// 传真
        /// </summary>
        public  virtual string Fax
        {
            set { _fax = value; }
            get { return _fax; }
        }
        #endregion Model
}
编写映射文件
编写NHibernate配置文件智能提示的功能。只要在下载的NHibernate里找到configuration.xsd和nhibernate-mapping.xsd两个文件并复制到vs安装目录下,如D:\Program Files (x86)\Microsoft Visual Studio 11.0\Xml\Schemas目录即可。
此时,你在nhibernate的配置文件中就有智能提示功能了。
nhibernate如何知道持久化类和数据库表的对应关系的呢?这就要通过映射文件来完 成这个任务了,映射文件包含了对象/关系映射所需的元数据。元数据包含持久化类的声明和属性到数据库的映射。映射文件告诉nhibernate它应该访问 数据库里面的哪个表及使用表里面的哪些字段。
那么我们编写Customers持久化类的映射文件,注意映射文件以.hbm.xml结尾。如Customers.hbm.xml
我同样使用动软代码生成工具生成映射文件,代码如下:
<?xml version="1.0"  encoding="utf-8" ?>
<hibernate-mapping xmlns="urn:nhibernate-mapping-2.2" assembly="Shop.Domain" namespace="Shop.Domain.Entities">
  <!--类的全称,程序集,数据库表名称-->
  <class name="Shop.Domain.Entities.Customers, Shop.Domain" table="Customers">
    <id name="CustomerID" column="CustomerID" type="string"  />
    <property name="CompanyName" column="CompanyName" type="string"  />
    <property name="ContactName" column="ContactName" type="string"  />
    <property name="ContactTitle" column="ContactTitle" type="string"  />
    <property name="Address" column="Address" type="string"  />
    <property name="City" column="City" type="string"/>
    <property name="Region" column="Region" type="string"/>
    <property name="PostalCode" column="PostalCode" type="string"/>
    <property name="Country" column="Country" type="string"  />
    <property name="Phone" column="Phone" type="string"  />
    <property name="Fax" column="Fax" type="string"  />
  </class>
</hibernate-mapping>
最后记得给此映射文件设置属性
添加数据访问层类CustomersData.cs:
using System;
using System.Collections.Generic;
using System.Linq;
using System.Text;
using System.Threading.Tasks;
using NHibernate;
using NHibernate.Linq;
using NHibernate.Cfg;
using System.Linq.Expressions;
using Shop.Domain.Entities;

namespace Shop.Data
{
   public class CustomersData
    {
        /// <summary>
        /// 根据条件得到客户信息集合
        /// </summary>
        /// <param name="where">条件</param>
        /// <returns>客户信息集合</returns>
        public IList<Customers> GetCustomerList(Expression<Func<Customers, bool>> where)
        {
            try
            {
                NHibernateHelper nhibernateHelper = new NHibernateHelper();
                ISession session = nhibernateHelper.GetSession();
                return session.Query<Customers>().Select(x=>new Customers { ContactName=x.ContactName,City=x.City,Address=x.Address,Phone=x.Phone,CompanyName=x.CompanyName,Country=x.Country}).Where(where).ToList();
            }
            catch (Exception ex)
            {
                throw ex;
            }
        }
    }
}
添加业务逻辑层类CustomersBusiness.cs:
using System;
using System.Collections.Generic;
using System.Linq;
using System.Linq.Expressions;
using System.Text;
using System.Threading.Tasks;
using Shop.Data;
using Shop.Domain.Entities;

namespace Shop.Business
{
    public class CustomersBusiness
    {
         private CustomersData _customersData;
        public CustomersBusiness()
        {
            _customersData = new CustomersData();
        }
        /// <summary>
        /// 根据条件得到客户信息集合
        /// </summary>
        /// <param name="where">条件</param>
        /// <returns>客户信息集合</returns>
        public IList<Customers> GetCustomerList(Expression<Func<Customers, bool>> where)
        {
            return _customersData.GetCustomerList(where);
        }
    }
}
添加控制器:
using System;
using System.Collections.Generic;
using System.Linq;
using System.Web;
using System.Web.Mvc;
using Shop.Business;
using Shop.Domain.Entities;

namespace Shop.Controllers
{
    public class CustomersController : Controller
    {
        CustomersBusiness customersBusiness = new CustomersBusiness();
        //
        // GET: /Customer/

        public ActionResult Index()
        {
            var result = customersBusiness.GetCustomerList(c => 1 == 1);
            return View(result);
        }
    }
}
添加视图Index:
@model IEnumerable<Shop.Domain.Entities.Customers>
@{
    ViewBag.Title = "Index";
}
<h2>Index</h2>
<p>
    @Html.ActionLink("Create New", "Create")
</p>
<table>
    <tr>
        <th>
            @Html.DisplayNameFor(model => model.CompanyName)
        </th>
        <th>
            @Html.DisplayNameFor(model => model.ContactName)
        </th>
        <th>
            @Html.DisplayNameFor(model => model.Address)
        </th>
        <th>
            @Html.DisplayNameFor(model => model.City)
        </th>
        <th>
            @Html.DisplayNameFor(model => model.Country)
        </th>
        <th>
            @Html.DisplayNameFor(model => model.Phone)
        </th>
        <th style="width:180px;"></th>
    </tr>
@foreach (var item in Model) {
    <tr>
        <td>
            @Html.DisplayFor(modelItem => item.CompanyName)
        </td>
        <td>
            @Html.DisplayFor(modelItem => item.ContactName)
        </td>

        <td>
            @Html.DisplayFor(modelItem => item.Address)
        </td>
        <td>
            @Html.DisplayFor(modelItem => item.City)
        </td>
         <td>
            @Html.DisplayFor(modelItem => item.Country)
        </td>
        <td>
            @Html.DisplayFor(modelItem => item.Phone)
        </td>
        <td>
            @Html.ActionLink("Edit", "Edit", new { /* id=item.PrimaryKey */ }) |
            @Html.ActionLink("Details", "Details", new { /* id=item.PrimaryKey */ }) |
            @Html.ActionLink("Delete", "Delete", new { /* id=item.PrimaryKey */ })
        </td>
    </tr>
}
</table>
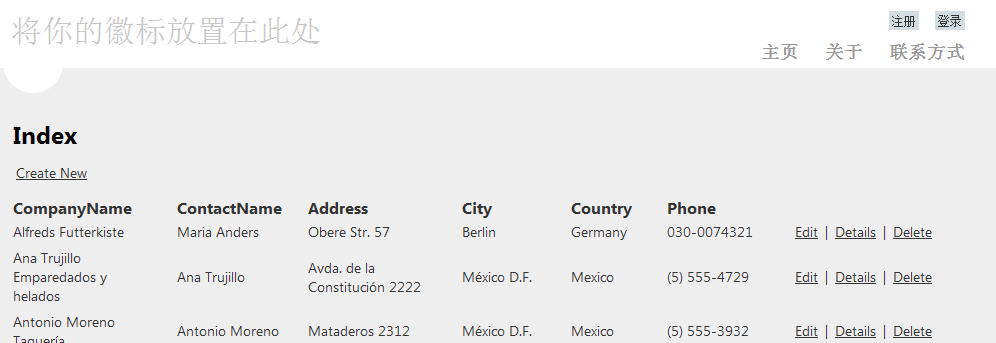
运行程序,效果图:

感冒一周了还没好,人好难受,可怜我还在电脑旁边工作着,今天就暂时先写到这里了,写博客确实是很耗时的工作。
| 博客地址: | http://www.cnblogs.com/jiekzou/ | |
| 博客版权: | 本文以学习、研究和分享为主,欢迎转载,但必须在文章页面明显位置给出原文连接。 如果文中有不妥或者错误的地方还望高手的你指出,以免误人子弟。如果觉得本文对你有所帮助不如【推荐】一下!如果你有更好的建议,不如留言一起讨论,共同进步! 再次感谢您耐心的读完本篇文章。 |
|
| 其它: |
.net-QQ群4:612347965
java-QQ群:805741535
H5-QQ群:773766020 |


 浙公网安备 33010602011771号