SharePoint 开发TimerJob 介绍
项目需要写TimerJob,以前也大概知道原理,不过,开发过程中,还是遇到一些问题,网上看了好多博客,也有写的灰常好的,不过,自己还是想再写一下,也算是给自己一个总结,也算给大家多一个参考吧。
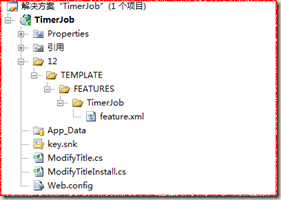
TimerJob项目结构,主要有两个Class,一个是用来定义TimerJob功能的,一个是用来部署开发好的TimerJob的,分别继承两个不同的类。如下图,先建一个如下结构的项目:
文件描述:
TimerJob定义类:ModifyTitle.cs(继承自SPJobDefinition)
TimerJob安装类:ModifyTitleInstall.cs(继承自SPFeatureReceiver)
激活TimerJob的Feature.xml
添加强命名,因为将来生成的dll是要放到GAC里面去的
添加引用:
引用Microsoft.SharePoint.dll文件,两个Class都需要添加下面命名空间
using Microsoft.SharePoint;
using Microsoft.SharePoint.Administration;
ModifyTitleInstall类
|
public class ModifyTitleInstall : SPFeatureReceiver { const string TimerJobName = "ModifyTitleTimerJob";//TimerJob的标题 //激活TimerJob的方法 public override void FeatureActivated(SPFeatureReceiverProperties properties) { SPSite site = properties.Feature.Parent as SPSite; foreach (SPJobDefinition job in site.WebApplication.JobDefinitions) { //如果有相同的TimerJob,先删除 if (job.Title == TimerJobName) { job.Delete(); } } ModifyTitle modifyTitle = new ModifyTitle(TimerJobName, site.WebApplication); SPMinuteSchedule minuteSchedule = new SPMinuteSchedule();//计时器对象 minuteSchedule.BeginSecond = 0; minuteSchedule.EndSecond = 59; minuteSchedule.Interval = 1; modifyTitle.Schedule = minuteSchedule; modifyTitle.Update(); //throw new NotImplementedException(); } public override void FeatureDeactivating(SPFeatureReceiverProperties properties) { SPSite site = properties.Feature.Parent as SPSite; foreach (SPJobDefinition job in site.WebApplication.JobDefinitions) { if (job.Title == TimerJobName) { job.Delete(); } } //throw new NotImplementedException(); } public override void FeatureInstalled(SPFeatureReceiverProperties properties) { //throw new NotImplementedException(); } public override void FeatureUninstalling(SPFeatureReceiverProperties properties) { //throw new NotImplementedException(); } |
ModifyTitle类
|
public class ModifyTitle : SPJobDefinition { public ModifyTitle():base(){} public ModifyTitle(string TimerName, SPWebApplication webapp) : base(TimerName, webapp, null, SPJobLockType.ContentDatabase) { //TimerJob的标题 this.Title = "定期修改Title的TimerJob"; } public override void Execute(Guid targetInstanceId) { SPWebApplication webapp = this.Parent as SPWebApplication; SPContentDatabase contentDB=webapp.ContentDatabases[targetInstanceId]; foreach (SPItem item in contentDB.Sites[0].RootWeb.Lists["TimerJob"].Items) { DateTime dt = Convert.ToDateTime(item["创建时间"].ToString()); item["标题"] = "今天是这个月的第" + dt.Day.ToString() + "天"; item.Update(); } //base.Execute(targetInstanceId); } } |
Feature.xml(Id是需要重新生成的Guid)
|
<?xml version="1.0" encoding="utf-8" ?> <Feature xmlns="http://schemas.microsoft.com/sharepoint/" Id="f0c813e8-68e0-4ad2-82cd-292b1b7222cd" Title="Modify Title Timer Job" Description="Modify Title Timer Job" Scope="Site" Hidden="TRUE" Version="1.0.0.0" ReceiverAssembly="TimerJob, Version=1.0.0.0, Culture=neutral, PublicKeyToken=f7436af6afb9480b" ReceiverClass="TimerJob.ModifyTitleInstall"> </Feature> |
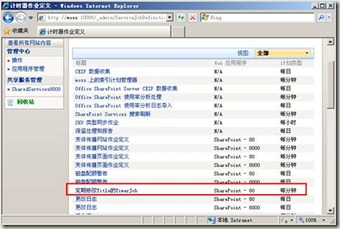
添加结果:
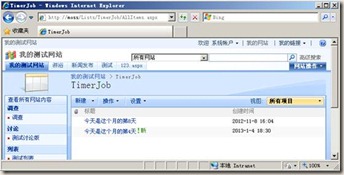
运行结果:无论标题是什么,都改成今天是这个月的第N天。
添加配置文件:
|
<?xml version="1.0" encoding="utf-8" ?> <configuration> <appSettings> <add key="AAString" value="http://localhost"/> </appSettings> </configuration> |
获取配置文件:
string AAString = ConfigurationManager.AppSettings.Get("AAString");
注:配置文件格式不对的话,可能造成Timer服务启动错误,所以,可以拷一个控制台程序debug下面的Consoleapp.exe.config文件,然后改成OWSTIMER.exe.config,然后放到12/bin(C:\Program Files\Common Files\Microsoft Shared\Web Server Extensions\12\BIN)下就可以了
部署TimerJob脚本:
|
@echo off SET TEMPLATE="c:\program files\common files\microsoft shared\web server extensions\12\Template" Echo Copying files to TEMPLATES directory xcopy /e /y 12\TEMPLATE\* %TEMPLATE% Echo Copying TimerJob.dll to GAC "C:\Program Files\Microsoft SDKs\Windows\v6.0A\Bin\gacutil.exe" -if bin\TimerJob.dll iisreset "C:\Program Files\Common Files\Microsoft Shared\Web Server Extensions\12\bin\stsadm" -o installfeature -filename TimerJob\feature.xml -force "C:\Program Files\Common Files\Microsoft Shared\Web Server Extensions\12\bin\stsadm" -o deactivatefeature -filename TimerJob\feature.xml -url http://localhost -force "C:\Program Files\Common Files\Microsoft Shared\Web Server Extensions\12\bin\stsadm" -o activatefeature -filename TimerJob\feature.xml -url http://localhost -force net stop SPTimerV3 net start SPTimerV3 PAUSE |
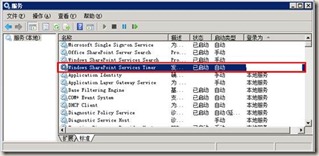
注:新的TimerJob运行一定要重启SPTimerV3服务,在windows服务里面,如下图:
调试:TimerJob程序和WebPart等SharePoint程序,运行的进程不一样,如果需要调试,需要重新安装TimerJob,然后附加到SharePoint计时器进程(下图),进行调试!
体会:
开发完TimerJob感觉,和SharePoint的东西有一样的特点,就是代码开发比较简单,但是杂七杂八的事情很多,部署、调试起来比较麻烦,而且非常需要细心,如果其间遇到各种bug,可以建议重启下机器(我就是头天晚上,各种报错,转天就好了)。
还有就是,我的代码是SharePoint2007环境开发的,如果在2010或者更高版本,代码基本是类似的,注意目录即可,部署方式可能需要PowerShell,可以网上查一下。
| 博文推荐: |
| SharePoint 2013 WebPart 管理工具分享[开源] |
| 基于SharePoint 2013的论坛解决方案[开源] |
| SharePoint 2013 学习基础系列入门教程 |
| SharePoint 2013 图文开发系列之门教程 |
| SharePoint Designer 学习系列入门教程 |
| 特:如果有SharePoint项目,欢迎邮件联系我,Email:linyu_s@163.com |


