[Tensorflow] Object Detection API - prepare your training data
From: TensorFlow Object Detection API
This chapter help you to train your own model to identify objects required.
1. Data
1.1 Get your own data
- 标准的范例,从ImageNet上获取数据集
Get your own data from ImageNet
Download tiny-imagenet-200.zip, which is smaller than original monster. (150G)

- 图片格式转化
We need .png but not .jpg here, so
cd ./images
ls -1 *.jpg | xargs -n 1 bash -c 'convert "$0" "${0%.jpg}.png"'
1.2 Create your Annotation.
- 获取标记记录
Sol 01:
# 找数据集上现成的对应的标记框记录
Find its xml version from: http://image-net.org/download-bboxes


Sol 02:
# 自己写标记记录
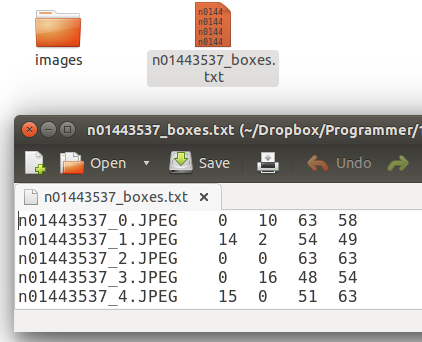
Write script to create your xml for Annotation from *_box.txt. This is not a complex structure as following.
<annotation>
    <folder>n02119789</folder>
    <filename>n02119789_122</filename>
    <source>
        <database>ImageNet database</database>
    </source>
    <size>
        <width>200</width>
        <height>191</height>
        <depth>3</depth>
    </size>
    <segmented>0</segmented>
    <object>
        <name>n02119789</name>
        <pose>Unspecified</pose>
        <truncated>0</truncated>
        <difficult>0</difficult>
        <bndbox>
            <xmin>17</xmin>
            <ymin>16</ymin>
            <xmax>181</xmax>
            <ymax>181</ymax>
        </bndbox>
    </object>
</annotation>
Sol 03:
# 通过工具辅助生成标记框记录
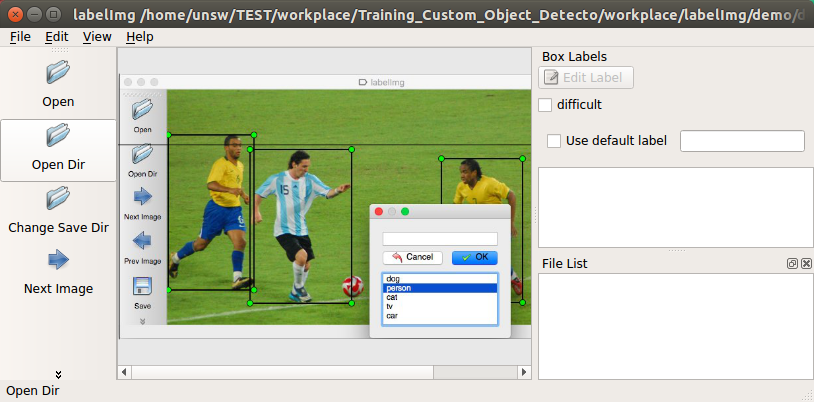
Label them manually. This is a crazy way to create your train data (100-500 images) if you have enough time.
sudo apt-get install pyqt5-dev-tools
sudo pip3 install lxml
git clone https://github.com/tzutalin/labelImg
unsw@unsw-UX303UB$ make qt5py3
unsw@unsw-UX303UB$ python3 labelImg.py

- 完整的数据集
Finally, this is what we need.

- .csv 格式的数据集
Similarly, we need .csv but not .xml here, so
Download: https://raw.githubusercontent.com/datitran/raccoon_dataset/master/xml_to_csv.py

import os
import glob
import pandas as pd
import xml.etree.ElementTree as ET


def xml_to_csv(path):
    xml_list = []
    for xml_file in glob.glob(path + '/*.xml'):
        tree = ET.parse(xml_file)
        root = tree.getroot()
        for member in root.findall('object'):
            value = (root.find('filename').text,
                     int(root.find('size')[0].text),
                     int(root.find('size')[1].text),
                     member[0].text,
                     int(member[4][0].text),
                     int(member[4][1].text),
                     int(member[4][2].text),
                     int(member[4][3].text)
                     )
            xml_list.append(value)
    column_name = ['filename', 'width', 'height', 'class', 'xmin', 'ymin', 'xmax', 'ymax']
    xml_df = pd.DataFrame(xml_list, columns=column_name)
    return xml_df


def main():
    image_path = os.path.join(os.getcwd(), 'annotations')
    xml_df = xml_to_csv(image_path)
    xml_df.to_csv('raccoon_labels.csv', index=None)
    print('Successfully converted xml to csv.')


main()
unsw@unsw-UX303UB$ python xml_to_csv.py
Successfully converted xml to csv.

unsw@unsw-UX303UB$ ls
annotations  images  Others  raccoon_labels.csv  xml_to_csv.py
This is final bounding box info.

2. Cascade Classifier Training
一、相关方案
Ref: https://docs.opencv.org/2.4/doc/user_guide/ug_traincascade.html
- 接口
THE OPENCV TUTORIAL FOR TRAINING CASCADE CLASSIFIERS is a pretty good place to start. It explains the 2 binary utilities used in the process (opencv_createsamples and opencv_traincascade),
and all of their command line arguments and options, but it doesn’t really give an example of a flow to follow, nor does it explain all the possible uses for the opencv_createsamplesutility.
- 方案一
On the other hand, NAOTOSHI SEO’S TUTORIAL is actually quite thorough and explains the 4 different uses for the opencv_createsamples utility.
THORSTEN BALL WROTE A TUTORIAL using Naotoshi Seo’s scripts to train a classifier to detect bananas, but it requires running some perl scripts and compiling some C++… too much work…
- 方案二
Jeff also has some NICE NOTES about how he prepared his data, and a SCRIPT for automatically iterating over a couple of options for the 2 utilities.
The way we did it was inspired by all of these tutorials, with some minor modifications and optimizations.
二、Process
- 是什么
Ref: https://processing.org/download/
一种语言,处理图像,提供了更为亲和的方式。
/* implement */


